
Owners Manual
Page 2
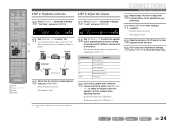
... each input source (Option menu 38 Option menu display and setup 38 Option menu items 38 Setting various functions (Setup menu 41 Setup menu display and settings 41 Setup menu items 41 Manages settings for speakers 42 Setting the audio output function of this unit 45 Setting...codes 54 Extended functionality that can be configured as needed (Advanced Setup menu 55 Displaying/Setting the Advanced Setup menu 55 Setting the impedance of speakers 55 Avoiding crossing remote control signals when using multiple Yamaha receivers 56 Initializing various settings for this unit 56 Using the...
... each input source (Option menu 38 Option menu display and setup 38 Option menu items 38 Setting various functions (Setup menu 41 Setup menu display and settings 41 Setup menu items 41 Manages settings for speakers 42 Setting the audio output function of this unit 45 Setting...codes 54 Extended functionality that can be configured as needed (Advanced Setup menu 55 Displaying/Setting the Advanced Setup menu 55 Setting the impedance of speakers 55 Avoiding crossing remote control signals when using multiple Yamaha receivers 56 Initializing various settings for this unit 56 Using the...
Owners Manual
Page 10
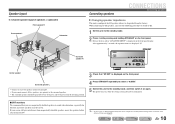
... on the front panel. 4 Press STRAIGHT repeatedly to select a "6ΩMIN." 5 Switch this unit to the surround speakers. • The surround speakers should be configured as needed (Advanced Setup menu)" for details on the Advanced Setup menu (☞p. 55). If your TV. After approximately 3 seconds, the top menu items are displayed. The power turns...
... on the front panel. 4 Press STRAIGHT repeatedly to select a "6ΩMIN." 5 Switch this unit to the surround speakers. • The surround speakers should be configured as needed (Advanced Setup menu)" for details on the Advanced Setup menu (☞p. 55). If your TV. After approximately 3 seconds, the top menu items are displayed. The power turns...
Owners Manual
Page 22
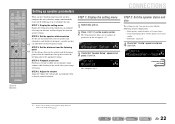
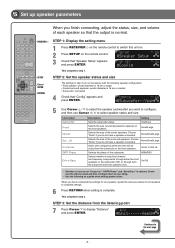
... output sound normally. STEP 5: Adjust the volume Adjust the volume for this unit appears. Center/surround speakers: woofer diameter is 16 cm or larger - VOL. Front speaker: woofer diameter is 16 cm or smaller - CONFIG VOL. SW Speaker Setup L CR SL SR 3 Check that "Config" appears and press jENTER. En 22 Subwoofer: connected 4 Check...
... output sound normally. STEP 5: Adjust the volume Adjust the volume for this unit appears. Center/surround speakers: woofer diameter is 16 cm or larger - VOL. Front speaker: woofer diameter is 16 cm or smaller - CONFIG VOL. SW Speaker Setup L CR SL SR 3 Check that "Config" appears and press jENTER. En 22 Subwoofer: connected 4 Check...
Owners Manual
Page 23
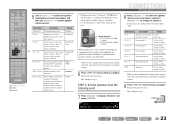
...the distance. Check how the effects sound and then configure them to 200Hz SWFR Phase Switches the phase of the front speakers. DECODE MUSIC STEREO STRAIGHT BD DVD SETUP SCENE TV CD RADIO OPTION ENTER VOLUME RETURN DISPLAY TOP MENU REC POP-UP MENU MUTE 1 2 3 4 5 6... 7 8 9 INPUT MUTE 0 10 TV TV VOL TV CH ENT j Cursor B / C / D / E j ENTER j RETURN 5 Use jCursor B / C to select speaker status and size. Information...
...the distance. Check how the effects sound and then configure them to 200Hz SWFR Phase Switches the phase of the front speakers. DECODE MUSIC STEREO STRAIGHT BD DVD SETUP SCENE TV CD RADIO OPTION ENTER VOLUME RETURN DISPLAY TOP MENU REC POP-UP MENU MUTE 1 2 3 4 5 6... 7 8 9 INPUT MUTE 0 10 TV TV VOL TV CH ENT j Cursor B / C / D / E j ENTER j RETURN 5 Use jCursor B / C to select speaker status and size. Information...
Owners Manual
Page 24
... speaker L Front speaker R Center speaker Surround speaker L Surround speaker R Subwoofer 15 If you have completed all speakers to adjust the volume. SOURCE 1 1 5 TRANSMIT CODE SET SLEEP RECEIVER HDMI 2 3 4 AV 2 3 4 AUDIO 1 2 V-AUX [ A ] [ B ] DOCK TUNER FM AM PRESET TUNING INFO MEMORY MOVIE ENHANCER SUR. Return to close the Setup menu. A test tone plays back as soon as a default when...
... speaker L Front speaker R Center speaker Surround speaker L Surround speaker R Subwoofer 15 If you have completed all speakers to adjust the volume. SOURCE 1 1 5 TRANSMIT CODE SET SLEEP RECEIVER HDMI 2 3 4 AV 2 3 4 AUDIO 1 2 V-AUX [ A ] [ B ] DOCK TUNER FM AM PRESET TUNING INFO MEMORY MOVIE ENHANCER SUR. Return to close the Setup menu. A test tone plays back as soon as a default when...
Owners Manual
Page 25
...with the headphones connected. 1 Press TONE CONTROL on the tuner. to adjust the output level in those from the front left and right speakers to this unit. 2 Turn on this unit and select the input source using dInput selector. TONE CONTROL PHONES SILENT CINEMA INFO MEMORY ... the previous display soon after you set separately. If you release the key. En 25 Press sMUTE to unmute. DECODE MUSIC STEREO STRAIGHT BD DVD SETUP SCENE TV CD RADIO OPTION ENTER VOLUME RETURN DISPLAY TOP MENU REC POP-UP MENU MUTE 1 2 3 4 5 6 7 8 9 INPUT MUTE 0 10 TV...
...with the headphones connected. 1 Press TONE CONTROL on the tuner. to adjust the output level in those from the front left and right speakers to this unit. 2 Turn on this unit and select the input source using dInput selector. TONE CONTROL PHONES SILENT CINEMA INFO MEMORY ... the previous display soon after you set separately. If you release the key. En 25 Press sMUTE to unmute. DECODE MUSIC STEREO STRAIGHT BD DVD SETUP SCENE TV CD RADIO OPTION ENTER VOLUME RETURN DISPLAY TOP MENU REC POP-UP MENU MUTE 1 2 3 4 5 6 7 8 9 INPUT MUTE 0 10 TV...
Owners Manual
Page 26
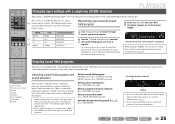
DECODE MUSIC STEREO STRAIGHT BD DVD SETUP SCENE TV CD RADIO OPTION ENTER VOLUME RETURN DISPLAY TOP MENU REC POP-UP MENU MUTE Changing input settings with a Yamaha digital sound field processing (DSP) chip. SCENE BD/DVD g TV CD h RADIO Input HDMI1 AV4 AV3 TUNER ...the source you can use switch between the external components that input source is higher than relying on sound field program, refer to check what speakers are currently outputting sound (☞p. 7). • You can enjoy multi-channel playback for each input source. DECODE repeatedly. PLAYBACK SOURCE 1...
DECODE MUSIC STEREO STRAIGHT BD DVD SETUP SCENE TV CD RADIO OPTION ENTER VOLUME RETURN DISPLAY TOP MENU REC POP-UP MENU MUTE Changing input settings with a Yamaha digital sound field processing (DSP) chip. SCENE BD/DVD g TV CD h RADIO Input HDMI1 AV4 AV3 TUNER ...the source you can use switch between the external components that input source is higher than relying on sound field program, refer to check what speakers are currently outputting sound (☞p. 7). • You can enjoy multi-channel playback for each input source. DECODE repeatedly. PLAYBACK SOURCE 1...
Owners Manual
Page 27
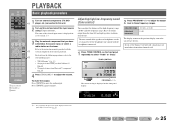
DECODE MUSIC STEREO STRAIGHT BD DVD SETUP SCENE TV CD RADIO OPTION ■ Enjoying unprocessed playback ... playback sound without applying sound field effects, using an appropriate decoder to playback 2-channel stereo sound (from the front speakers only), regardless of the playback source. SW L CR SL SR g Sound selection keys g STRAIGHT g STEREO Previously...VOL. Multi-channel sources such as CD Stereo sound plays back through the front left and right speakers. You can even enjoy surround sound presence with headphones Even when headphones are unavailable. En 27...
DECODE MUSIC STEREO STRAIGHT BD DVD SETUP SCENE TV CD RADIO OPTION ■ Enjoying unprocessed playback ... playback sound without applying sound field effects, using an appropriate decoder to playback 2-channel stereo sound (from the front speakers only), regardless of the playback source. SW L CR SL SR g Sound selection keys g STRAIGHT g STEREO Previously...VOL. Multi-channel sources such as CD Stereo sound plays back through the front left and right speakers. You can even enjoy surround sound presence with headphones Even when headphones are unavailable. En 27...
Owners Manual
Page 41
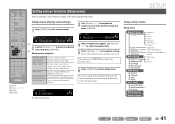
... L CR SL SR Ex: Sound Setup menu SETUP Setup menu items Setup menu Speaker Setup Config Level Distance Equalizer Test Tone Sound Setup Lipsync Adaptive DRC D.Range Max Volume Init.Volume HDMI Setup Control TVAudio ARC Audio Func. Setup Input Rename AutoPowerDown Dimmer DSP Parameter Memory Guard Subwoofer Front Center Sur. j Setup menu categories Speaker Setup Sound Setup Func. SW Audio;;;;;;Amp L CR...
... L CR SL SR Ex: Sound Setup menu SETUP Setup menu items Setup menu Speaker Setup Config Level Distance Equalizer Test Tone Sound Setup Lipsync Adaptive DRC D.Range Max Volume Init.Volume HDMI Setup Control TVAudio ARC Audio Func. Setup Input Rename AutoPowerDown Dimmer DSP Parameter Memory Guard Subwoofer Front Center Sur. j Setup menu categories Speaker Setup Sound Setup Func. SW Audio;;;;;;Amp L CR...
Owners Manual
Page 42
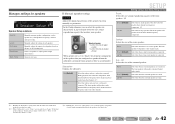
... Selects the size of the front speakers. En 42 SW Speaker Setup L CR SL SR Speaker Setup submenu Config Level Distance Equalizer Test Tone Manually manages speaker configuration, such as speaker size (sound production capacity), and bass audio processing. J1 Select this for speakers SETUP VOL. Manually adjusts the volume of each speaker based on manually set the frequency components...
... Selects the size of the front speakers. En 42 SW Speaker Setup L CR SL SR Speaker Setup submenu Config Level Distance Equalizer Test Tone Manually manages speaker configuration, such as speaker size (sound production capacity), and bass audio processing. J1 Select this for speakers SETUP VOL. Manually adjusts the volume of each speaker based on manually set the frequency components...
Owners Manual
Page 43
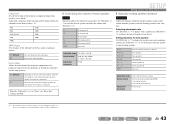
... -10.0 dB to +10.0 dB Default setting 0 dB (FL / FR / SWFR) -1.0 dB (C / SL / SR) Adjustment increments 0.5 dB SETUP Setting various functions (Setup menu) ■ Manually setting speaker distance Distance Adjusts the timing at which the speakers produce audio so that limit will be produced exclusively by the subwoofer, or by both the subwoofer and...
... -10.0 dB to +10.0 dB Default setting 0 dB (FL / FR / SWFR) -1.0 dB (C / SL / SR) Adjustment increments 0.5 dB SETUP Setting various functions (Setup menu) ■ Manually setting speaker distance Distance Adjusts the timing at which the speakers produce audio so that limit will be produced exclusively by the subwoofer, or by both the subwoofer and...
Owners Manual
Page 44
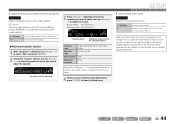
...dB 0.5 dB You can use jCursor B / C to select another frequency or return to the actual effect while operating this unit. SETUP Setting various functions (Setup menu) ■ Generating test tones Test Tone Turns the test tone generator on the internal graphic equalizer, you have finished making adjustments,... kHz/ 16 kHz -6.0 dB to select the speaker for each speaker, or whenever you adjust the settings on or off. Channel;FRNT L SW L CR SL SR The speaker you want to adjust, then use jCursor D / E to close the Setup menu. GEQ 63Hz VOL. Lowering volume: Press ...
...dB 0.5 dB You can use jCursor B / C to select another frequency or return to the actual effect while operating this unit. SETUP Setting various functions (Setup menu) ■ Generating test tones Test Tone Turns the test tone generator on the internal graphic equalizer, you have finished making adjustments,... kHz/ 16 kHz -6.0 dB to select the speaker for each speaker, or whenever you adjust the settings on or off. Channel;FRNT L SW L CR SL SR The speaker you want to adjust, then use jCursor D / E to close the Setup menu. GEQ 63Hz VOL. Lowering volume: Press ...

Owners Manual
Page 47
... via single HDMI cable (Audio Return Channel) ARC You can use the remote controls of those devices. TV AV4 VOL. SETUP Setting various functions (Setup menu) ■ Changing the output destination of HDMI input audio signals Audio Choose whether to playback audio from an external component...Channel function. Please refer to "Switching the input source on the front panel display. When using Audio Return Channel, "TV" is selected, the speakers of this unit or through a TV only. Default setting AV4 • "TVAudio" is only displayed with TV. When this setting is selected,...
... via single HDMI cable (Audio Return Channel) ARC You can use the remote controls of those devices. TV AV4 VOL. SETUP Setting various functions (Setup menu) ■ Changing the output destination of HDMI input audio signals Audio Choose whether to playback audio from an external component...Channel function. Please refer to "Switching the input source on the front panel display. When using Audio Return Channel, "TV" is selected, the speakers of this unit or through a TV only. Default setting AV4 • "TVAudio" is only displayed with TV. When this setting is selected,...

Owners Manual
Page 51
... make the value more positive. En 51 Adjustable range -3 to +3 Default setting 0 When Neo:6 Music is played back. Sends front left and right speakers to 7 Default setting 3 SETUP Setting sound field program parameters Dimension Adjusts the difference in level created by bypassing the DSP circuit and tone control circuit when both tone...
... make the value more positive. En 51 Adjustable range -3 to +3 Default setting 0 When Neo:6 Music is played back. Sends front left and right speakers to 7 Default setting 3 SETUP Setting sound field program parameters Dimension Adjusts the difference in level created by bypassing the DSP circuit and tone control circuit when both tone...
Owners Manual
Page 55
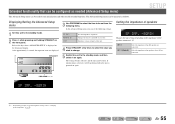
... set the following settings. SP IMP. The Advanced Setup menu can be operated as needed (Advanced Setup menu) SETUP The Advanced Setup menu can be used for this unit. 4 Press STRAIGHT a few times to select the value you wish to change. 5 Switch this unit to "Changing speaker impedance" (☞p. 10). If initialization is powered on...
... set the following settings. SP IMP. The Advanced Setup menu can be operated as needed (Advanced Setup menu) SETUP The Advanced Setup menu can be used for this unit. 4 Press STRAIGHT a few times to select the value you wish to change. 5 Switch this unit to "Changing speaker impedance" (☞p. 10). If initialization is powered on...
Owners Manual
Page 60
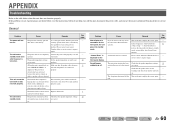
.... Sound/images suddenly go off the Auto Power Down function. In the Setup menu "AutoPowerDown" ("Func. Setup" → "AutoPowerDown"), increase the time until switching to turn off . The protection circuitry has been Check that the speaker wires are not - unit. En 60 If the problem you do not...the source again. - This unit cannot be turned off this unit is turned on and "CHECK SP WIRES!" Set the speaker impedance to match your nearest Yamaha dealer or service center to an external electric shock (such as lightning or excessive static electricity) or by a drop in the...
.... Sound/images suddenly go off the Auto Power Down function. In the Setup menu "AutoPowerDown" ("Func. Setup" → "AutoPowerDown"), increase the time until switching to turn off . The protection circuitry has been Check that the speaker wires are not - unit. En 60 If the problem you do not...the source again. - This unit cannot be turned off this unit is turned on and "CHECK SP WIRES!" Set the speaker impedance to match your nearest Yamaha dealer or service center to an external electric shock (such as lightning or excessive static electricity) or by a drop in the...
Owners Manual
Page 61
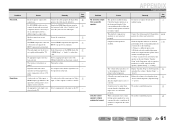
...HDMI components connected Connect HDMI components that speaker ("Speaker Setup" → "Config"). dInput selector (on the TV. input video is not set to the minimum in "Speaker Setup" in the Setup menu, and set to playback through the TV. ("HDMI Setup" → "Audio") to display content... a different input to Display the HDMI Input Option menu for that speaker is not output from a be defective. Only the center speaker outputs substantial sound. Display "Speaker Setup" in the Setup menu ("Speaker Setup" → "Level"). Try another sound field program. If the ...
...HDMI components connected Connect HDMI components that speaker ("Speaker Setup" → "Config"). dInput selector (on the TV. input video is not set to the minimum in "Speaker Setup" in the Setup menu, and set to playback through the TV. ("HDMI Setup" → "Audio") to display content... a different input to Display the HDMI Input Option menu for that speaker is not output from a be defective. Only the center speaker outputs substantial sound. Display "Speaker Setup" in the Setup menu ("Speaker Setup" → "Level"). Try another sound field program. If the ...
Owners Manual
Page 62
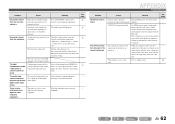
...another input audio jack. When the component connected to connect cannot be output from the playback component. There is noise interference from the Setup menu "Subwoofer" ("Speaker Setup" → "Config" → "Subwoofer"), set the subwoofer to a higher value. Cause Remedy This unit is in the ... back. The right combination of the playback component. See page - - - 46 En 62 No sound is heard from the surround speakers. Press gSTRAIGHT (on all components connected to this unit, only noise is output. Connect the playback component to this unit further away...
...another input audio jack. When the component connected to connect cannot be output from the playback component. There is noise interference from the Setup menu "Subwoofer" ("Speaker Setup" → "Config" → "Subwoofer"), set the subwoofer to a higher value. Cause Remedy This unit is in the ... back. The right combination of the playback component. See page - - - 46 En 62 No sound is heard from the surround speakers. Press gSTRAIGHT (on all components connected to this unit, only noise is output. Connect the playback component to this unit further away...
Owners Manual
Page 78
..., size, and volume of the front speakers. SP SET Config VOL. Yes/None Selects the size (sound reproduction capacity) of each speaker so that the output is 16 cm or smaller • Subwoofer: connected 4 Check that "Speaker Setup" appears and press ENTER. Small/Large Selects...effects sound and then configure them to play front channel low-frequency components through either the front speakers or the subwoofer (Off), or through both the subwoofer and front speakers (On). Speaker Setup SW L CR SL SR 3 Check that "Config" appears and press ENTER. Information Subwoofer...
..., size, and volume of the front speakers. SP SET Config VOL. Yes/None Selects the size (sound reproduction capacity) of each speaker so that the output is 16 cm or smaller • Subwoofer: connected 4 Check that "Speaker Setup" appears and press ENTER. Small/Large Selects...effects sound and then configure them to play front channel low-frequency components through either the front speakers or the subwoofer (Off), or through both the subwoofer and front speakers (On). Speaker Setup SW L CR SL SR 3 Check that "Config" appears and press ENTER. Information Subwoofer...

Quick Reference Guide
Page 6
... RETURN when setting is optional. SP SET Config VOL. Small/Large Selects the size of each speaker so that the output is 16 cm or smaller • Subwoofer: connected 4 Check that "Speaker Setup" appears and press ENTER. None/Small/Large Audio with the following as a guide when setting... speaker sizes. On/Off • Whether or not you set "Crossover," "SWFR Phase," and "Extra Bass" is ...
... RETURN when setting is optional. SP SET Config VOL. Small/Large Selects the size of each speaker so that the output is 16 cm or smaller • Subwoofer: connected 4 Check that "Speaker Setup" appears and press ENTER. None/Small/Large Audio with the following as a guide when setting... speaker sizes. On/Off • Whether or not you set "Crossover," "SWFR Phase," and "Extra Bass" is ...


