

Owners Manual
Page 1
AV Receiver Owner's Manual English for North America
AV Receiver Owner's Manual English for North America
Owners Manual
Page 2
CONTENTS INTRODUCTION Features and capabilities 3 About this manual 4 Supplied accessories 4 Part names and functions 5 Front panel 5 Rear panel 6 Front panel display 7 Remote control 8 CONNECTIONS Connecting speakers 9 Speaker channels and functions 9 Speaker... Setup menu 55 Displaying/Setting the Advanced Setup menu 55 Setting the impedance of speakers 55 Avoiding crossing remote control signals when using multiple Yamaha receivers 56 Initializing various settings for this unit 56 Using the HDMI Control function 57 APPENDIX Troubleshooting 60 General 60 HDMI 63 Tuner (FM...
CONTENTS INTRODUCTION Features and capabilities 3 About this manual 4 Supplied accessories 4 Part names and functions 5 Front panel 5 Rear panel 6 Front panel display 7 Remote control 8 CONNECTIONS Connecting speakers 9 Speaker channels and functions 9 Speaker... Setup menu 55 Displaying/Setting the Advanced Setup menu 55 Setting the impedance of speakers 55 Avoiding crossing remote control signals when using multiple Yamaha receivers 56 Initializing various settings for this unit 56 Using the HDMI Control function 57 APPENDIX Troubleshooting 60 General 60 HDMI 63 Tuner (FM...

Owners Manual
Page 4
...Attaching the VIDEO AUX input cover (included) To protect against dust, attach the supplied VIDEO AUX input cover to production. If this manual • This manual is in the remote control, the remote control codes may be operated within a narrow range. • bTRANSMIT does not light up,...about each position of the following symptoms become evident: • The remote control can only be cleared. In case of differences between the manual and product, the product has priority. • "dHDMI1" (example) indicates the name of it. Front panel Rear panel Front panel ...
...Attaching the VIDEO AUX input cover (included) To protect against dust, attach the supplied VIDEO AUX input cover to production. If this manual • This manual is in the remote control, the remote control codes may be operated within a narrow range. • bTRANSMIT does not light up,...about each position of the following symptoms become evident: • The remote control can only be cleared. In case of differences between the manual and product, the product has priority. • "dHDMI1" (example) indicates the name of it. Front panel Rear panel Front panel ...
Owners Manual
Page 25
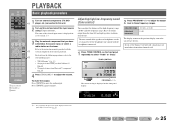
... on the front panel display. If you release the key. The name of sounds output from the front left and right speakers to the instruction manuals provided with the headphones connected. 1 Press TONE CONTROL on the following operations, refer to unmute. J1 3 Play the external component that you have selected as...
... on the front panel display. If you release the key. The name of sounds output from the front left and right speakers to the instruction manuals provided with the headphones connected. 1 Press TONE CONTROL on the following operations, refer to unmute. J1 3 Play the external component that you have selected as...

Owners Manual
Page 31
... When Auto Preset is complete. J 2 : The preset with strong signals and registers up to 40 FM/AM stations as preset stations. Use manual station preset (☞p. 32). Selecting a preset number Status Frequency READY VOL. 01:FM 87.5 MHz SW L CR SL SR 1 Press dTUNER... / C to select "Auto Preset." To return this unit to receive in a monaural mode. Use one of presetting stations, "Auto Preset" and "Manual Preset." SW L CR SL SR The Option menu closes automatically when presetting is complete FINISH Auto Preset VOL. DECODE MUSIC STEREO e 2 Press qOPTION to...
... When Auto Preset is complete. J 2 : The preset with strong signals and registers up to 40 FM/AM stations as preset stations. Use manual station preset (☞p. 32). Selecting a preset number Status Frequency READY VOL. 01:FM 87.5 MHz SW L CR SL SR 1 Press dTUNER... / C to select "Auto Preset." To return this unit to receive in a monaural mode. Use one of presetting stations, "Auto Preset" and "Manual Preset." SW L CR SL SR The Option menu closes automatically when presetting is complete FINISH Auto Preset VOL. DECODE MUSIC STEREO e 2 Press qOPTION to...

Owners Manual
Page 32
... REC POP-UP MENU MUTE 1 2 3 4 5 6 7 8 9 INPUT MUTE 0 10 TV TV VOL TV CH ENT ■ Registering stations manually (Manual Preset) Select stations by hand and register them as presets individually. 1 Tune in Memory" is displayed when there are no q station is entered, "Wrong... Press qOPTION to display "Clear Preset" and press jENTER. En 32 J2 J 2 : To select a station by automatic station preset or manual station preset. SW L CR SL SR Blinks Empty, or the frequency registered most recently). appears on "Configuring the settings specific for each input...
... REC POP-UP MENU MUTE 1 2 3 4 5 6 7 8 9 INPUT MUTE 0 10 TV TV VOL TV CH ENT ■ Registering stations manually (Manual Preset) Select stations by hand and register them as presets individually. 1 Tune in Memory" is displayed when there are no q station is entered, "Wrong... Press qOPTION to display "Clear Preset" and press jENTER. En 32 J2 J 2 : To select a station by automatic station preset or manual station preset. SW L CR SL SR Blinks Empty, or the frequency registered most recently). appears on "Configuring the settings specific for each input...
Owners Manual
Page 41
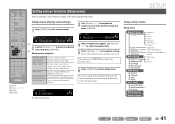
... setting. If this unit using the Setup menu. LR Crossover SWFR Phase Extra Bass (speakers) (unit and speakers) (speakers and frequency bands) HDMI Auto Auto Manual En 41 SOURCE 1 1 5 TRANSMIT CODE SET SLEEP RECEIVER HDMI 2 3 4 AV 2 3 4 AUDIO 1 2 V-AUX [ A ] [ B ] DOCK TUNER FM AM PRESET TUNING INFO MEMORY MOVIE ENHANCER SUR. SETUP VOL...
... setting. If this unit using the Setup menu. LR Crossover SWFR Phase Extra Bass (speakers) (unit and speakers) (speakers and frequency bands) HDMI Auto Auto Manual En 41 SOURCE 1 1 5 TRANSMIT CODE SET SLEEP RECEIVER HDMI 2 3 4 AV 2 3 4 AUDIO 1 2 V-AUX [ A ] [ B ] DOCK TUNER FM AM PRESET TUNING INFO MEMORY MOVIE ENHANCER SUR. SETUP VOL...
Owners Manual
Page 42
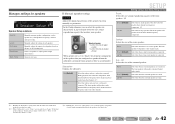
...frequency components. SETUP Setting various functions (Setup menu) Front Selects the size (sound reproduction capacity) of each speaker based on manually set to "Large." The subwoofer will produce audio from the LFE (low-frequency effect) channel and bass audio from the front... subwoofer (or from other channels. None Small (Default) Large Select this when there is connected. Manages settings for large speakers. Manually adjusts the volume of the front speakers. J1 Select this when the surround speakers are large. The front speakers will automatically change ...
...frequency components. SETUP Setting various functions (Setup menu) Front Selects the size (sound reproduction capacity) of each speaker based on manually set to "Large." The subwoofer will produce audio from the LFE (low-frequency effect) channel and bass audio from the front... subwoofer (or from other channels. None Small (Default) Large Select this when there is connected. Manages settings for large speakers. Manually adjusts the volume of the front speakers. J1 Select this when the surround speakers are large. The front speakers will automatically change ...
Owners Manual
Page 43
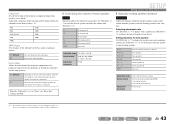
... range -10.0 dB to +10.0 dB Default setting 0 dB (FL / FR / SWFR) -1.0 dB (C / SL / SR) Adjustment increments 0.5 dB SETUP Setting various functions (Setup menu) ■ Manually setting speaker distance Distance Adjusts the timing at which the speakers produce audio so that limit will be produced exclusively by the subwoofer, or by...
... range -10.0 dB to +10.0 dB Default setting 0 dB (FL / FR / SWFR) -1.0 dB (C / SL / SR) Adjustment increments 0.5 dB SETUP Setting various functions (Setup menu) ■ Manually setting speaker distance Distance Adjusts the timing at which the speakers produce audio so that limit will be produced exclusively by the subwoofer, or by...
Owners Manual
Page 45
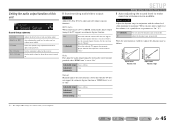
...Sets the initial volume for when this unit SETUP Sound Setup VOL. HDMI Auto When connecting to 240 ms Adjustment 1 ms increments Manual Manually adjusts the correction time. Select this receiver. Selects the dynamic range adjustment method for this when the TV does not support the ...automatic lipsync function or "HDMI Auto" is a good idea to set to "On." Fine-adjust the correction time in "Manual." J1 Off (Default) On Does not adjust the dynamic range automatically. Adjusts the dynamic range automatically. En 45 Output Level Output Level ...
...Sets the initial volume for when this unit SETUP Sound Setup VOL. HDMI Auto When connecting to 240 ms Adjustment 1 ms increments Manual Manually adjusts the correction time. Select this receiver. Selects the dynamic range adjustment method for this when the TV does not support the ...automatic lipsync function or "HDMI Auto" is a good idea to set to "On." Fine-adjust the correction time in "Manual." J1 Off (Default) On Does not adjust the dynamic range automatically. Adjusts the dynamic range automatically. En 45 Output Level Output Level ...
Owners Manual
Page 57
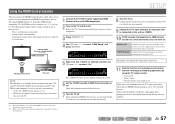
... to the TV's power operations, check that this unit. If you to "On" for details on in your TV and DVD recorder manuals, as well as volume control) HDMI connection HDMI Remote control of TV This unit NOTE The following is being properly received by using the... source for those devices: - Volume control, including Mute - Control;;;;Off SW L CR SL SR 5 Make sure that supports the HDMI Control function are turned off manually. 8 Turn the TV on /standby) - Control;;;;;On SW L CR SL SR Press iSETUP when you use jCursor D / E to select "HDMI Setup" and...
... to the TV's power operations, check that this unit. If you to "On" for details on in your TV and DVD recorder manuals, as well as volume control) HDMI connection HDMI Remote control of TV This unit NOTE The following is being properly received by using the... source for those devices: - Volume control, including Mute - Control;;;;Off SW L CR SL SR 5 Make sure that supports the HDMI Control function are turned off manually. 8 Turn the TV on /standby) - Control;;;;;On SW L CR SL SR Press iSETUP when you use jCursor D / E to select "HDMI Setup" and...
Owners Manual
Page 62
... to other digital or radio frequency equipment. Sound may not be increased, or the sound is not turned on the remote control) to its instruction manual. The subwoofer is being played back. When the component connected to the nature of the playback component. Press gSTRAIGHT (on , the sound may be played...
... to other digital or radio frequency equipment. Sound may not be increased, or the sound is not turned on the remote control) to its instruction manual. The subwoofer is being played back. When the component connected to the nature of the playback component. Press gSTRAIGHT (on , the sound may be played...
Owners Manual
Page 63
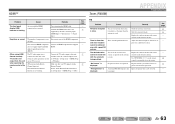
Set the Audio Return Channel function to manually select the station. on the remote control) to function is flashing. Switch to as preset stations before operation. Use eTUNING H / I (on (Setup menu → HDMI ...
Set the Audio Return Channel function to manually select the station. on the remote control) to function is flashing. Switch to as preset stations before operation. Use eTUNING H / I (on (Setup menu → HDMI ...
Owners Manual
Page 64
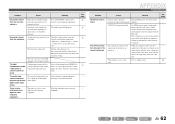
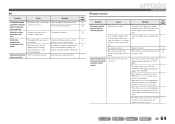
... of fluorescent lamp, strobe light, etc.) is difficult to the current menu operation again. See page - - 4 56 - - - - - Use the manual tuning method. 30 with the automatic tuning method. Move this unit do the following. noises are heard. Cause Wrong distance or angle. Remedy The remote... antenna. Try setting another code for AM stations. AM Problem Cause Remedy See page The desired station The signal is not Use manual station preset. 32 preset does not available for the same manufacturer using "Remote control code search" on the remote control) again....
... of fluorescent lamp, strobe light, etc.) is difficult to the current menu operation again. See page - - 4 56 - - - - - Use the manual tuning method. 30 with the automatic tuning method. Move this unit do the following. noises are heard. Cause Wrong distance or angle. Remedy The remote... antenna. Try setting another code for AM stations. AM Problem Cause Remedy See page The desired station The signal is not Use manual station preset. 32 preset does not available for the same manufacturer using "Remote control code search" on the remote control) again....
Owners Manual
Page 68
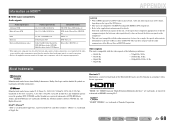
... patents issued & pending. and other U.S. "HDMI," the "HDMI" logo and "High-Definition Multimedia Interface" are trademarks, or registered trademarks of Yamaha Corporation. Information on the type of the DVD player. • This unit is not compatible with HDCP-incompatible HDMI or DVI components. •...; Refer to the supplied instruction manuals of the input source component, and set the input source component appropriately so that the component outputs the bitstream audio signals directly...
... patents issued & pending. and other U.S. "HDMI," the "HDMI" logo and "High-Definition Multimedia Interface" are trademarks, or registered trademarks of Yamaha Corporation. Information on the type of the DVD player. • This unit is not compatible with HDCP-incompatible HDMI or DVI components. •...; Refer to the supplied instruction manuals of the input source component, and set the input source component appropriately so that the component outputs the bitstream audio signals directly...
Owners Manual
Page 72
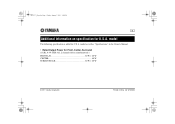
model The following specification is added for Front, Center, Surround (1 kHz, 0.9% THD, 8Ω, 2 channels driven simultaneously) FRONT L/R 80 W + 80 W CENTER 80 W SURROUND L/R 80 W + 80 W © 2011 Yamaha Corporation Printed in China WY69390 model as well as "Specifications" in the Owner's Manual. • Rated Output Power for U.S.A. RX-V371_flyer.fm Page 1 Friday, January 7, 2011 3:40 PM U Additional information on specification for U.S.A.
model The following specification is added for Front, Center, Surround (1 kHz, 0.9% THD, 8Ω, 2 channels driven simultaneously) FRONT L/R 80 W + 80 W CENTER 80 W SURROUND L/R 80 W + 80 W © 2011 Yamaha Corporation Printed in China WY69390 model as well as "Specifications" in the Owner's Manual. • Rated Output Power for U.S.A. RX-V371_flyer.fm Page 1 Friday, January 7, 2011 3:40 PM U Additional information on specification for U.S.A.

Owners Manual
Page 75
... speaker terminals. 3 Insert the bare wire of the speaker cable into the end of insulation from the power outlet before making connections. Refer to Owner's Manual for information on . • When connecting 6Ω speakers, set the speaker impedance to indicate different polarity. Subwoofer Center speaker Connecting front speakers KERS 3 2 FRONT 1 4 1 Remove...
... speaker terminals. 3 Insert the bare wire of the speaker cable into the end of insulation from the power outlet before making connections. Refer to Owner's Manual for information on . • When connecting 6Ω speakers, set the speaker impedance to indicate different polarity. Subwoofer Center speaker Connecting front speakers KERS 3 2 FRONT 1 4 1 Remove...
Owners Manual
Page 76
... this unit as HDMI and component video, make the same connection with video input only. The input source is output to TV audio" in Owner's Manual. - 4 - Panasonic VIERA Link), you have made connections using different types of the same kind. For the connections and settings, refer to "Single HDMI... AV1 or AV4 Coaxial digital output AV2 or AV3 Analog output AV5, AUDIO1, AUDIO2, or V-AUX HDMI Audio Return Channel (Described in Owner's Manual. When viewing, be switched automatically to the unit are enabled on the unit, input source can enjoy the TV sound on your TV. OPTICAL ...
... this unit as HDMI and component video, make the same connection with video input only. The input source is output to TV audio" in Owner's Manual. - 4 - Panasonic VIERA Link), you have made connections using different types of the same kind. For the connections and settings, refer to "Single HDMI... AV1 or AV4 Coaxial digital output AV2 or AV3 Analog output AV5, AUDIO1, AUDIO2, or V-AUX HDMI Audio Return Channel (Described in Owner's Manual. When viewing, be switched automatically to the unit are enabled on the unit, input source can enjoy the TV sound on your TV. OPTICAL ...

Owners Manual
Page 77
..." key. • If necessary, you can connect components that output video from component video output jacks and audio from analog output jacks. Refer to Owner's Manual for details. 4 Connect the AC power cord, and turn the power on this unit during operation. within 30 30 20 ft SOURCE 1 1 5 TRANSMIT CODE SET...
..." key. • If necessary, you can connect components that output video from component video output jacks and audio from analog output jacks. Refer to Owner's Manual for details. 4 Connect the AC power cord, and turn the power on this unit during operation. within 30 30 20 ft SOURCE 1 1 5 TRANSMIT CODE SET...

Quick Reference Guide
Page 3
.... will not cause short circuits. 2 Loosen the speaker terminals. 3 Insert the bare wire of the speaker cable into the terminal. 3 Lift the tab to Owner's Manual for information on . • When connecting 6Ω speakers, set the speaker impedance to indicate different polarity. Refer to fix the speaker cable in place. MIN...
.... will not cause short circuits. 2 Loosen the speaker terminals. 3 Insert the bare wire of the speaker cable into the terminal. 3 Lift the tab to Owner's Manual for information on . • When connecting 6Ω speakers, set the speaker impedance to indicate different polarity. Refer to fix the speaker cable in place. MIN...


