
Owners Manual
Page 3
... cable connection...10 - Volume control for each speaker...43 - Setting for 2- Speaker distance settings ...43 - INTRODUCTION Features and capabilities ■ Built-in high-quality, high-power 5-channel amplifier ■ 1-button input/sound field program switching (SCENE function 26 ■ Speaker connections for speaker acoustic parameters 22 - Speaker layout...10 - Sound quality...
... cable connection...10 - Volume control for each speaker...43 - Setting for 2- Speaker distance settings ...43 - INTRODUCTION Features and capabilities ■ Built-in high-quality, high-power 5-channel amplifier ■ 1-button input/sound field program switching (SCENE function 26 ■ Speaker connections for speaker acoustic parameters 22 - Speaker layout...10 - Sound quality...
Owners Manual
Page 5
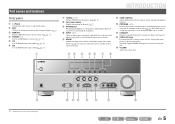
... right key repeatedly to this unit between the sound field effect (sound field program) you have selected tuner input. Part names and functions Front panel a A (Power) Switches this unit temporarily. J1 d PRESET j / i Selects an FM/AM preset station (☞p. 32). k SCENE Switches the input source and the sound field program with...
... right key repeatedly to this unit between the sound field effect (sound field program) you have selected tuner input. Part names and functions Front panel a A (Power) Switches this unit temporarily. J1 d PRESET j / i Selects an FM/AM preset station (☞p. 32). k SCENE Switches the input source and the sound field program with...
Owners Manual
Page 6
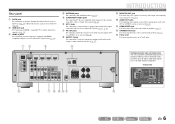
...audio/video outputs so that are selected (☞p. 20). l SPEAKER terminals For connecting the front, center, and surround speakers (☞p. 12). m Power cord For connecting this unit can receive audio/video signals (☞p. 17, p. 18). h AUDIO1-2 jacks For connecting to external components equipped with ...these jacks to output audio/video signals to receive audio/video signals from (☞p. 16). Rear panel a DOCK jack For connecting an optional Yamaha iPod universal dock (such as the AV5 or AUDIO1-2 jacks are selected (☞p. 20). b HDMI OUT jack For connecting an HDMI - ...
...audio/video outputs so that are selected (☞p. 20). l SPEAKER terminals For connecting the front, center, and surround speakers (☞p. 12). m Power cord For connecting this unit can receive audio/video signals (☞p. 17, p. 18). h AUDIO1-2 jacks For connecting to external components equipped with ...these jacks to output audio/video signals to receive audio/video signals from (☞p. 16). Rear panel a DOCK jack For connecting an optional Yamaha iPod universal dock (such as the AV5 or AUDIO1-2 jacks are selected (☞p. 20). b HDMI OUT jack For connecting an HDMI - ...
Owners Manual
Page 8
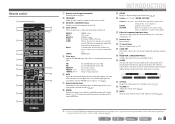
...h SCENE Switches the input source and the sound field program with the kExternal component operation keys without changing inputs. o RECEIVER A (RECEIVER Power) Switches this unit to playback. m TV control keys Operate a monitor such as a TV. Sleep 60min. Changes tuning frequencies. k External... for each input in standby mode automatically after a specified period of time has elapsed (sleep timer). J1 DOCK A Yamaha iPod universal dock or Bluetooth wireless audio receiver connected to operate registered components. DECODE MUSIC STEREO STRAIGHT BD DVD SETUP SCENE ...
...h SCENE Switches the input source and the sound field program with the kExternal component operation keys without changing inputs. o RECEIVER A (RECEIVER Power) Switches this unit to playback. m TV control keys Operate a monitor such as a TV. Sleep 60min. Changes tuning frequencies. k External... for each input in standby mode automatically after a specified period of time has elapsed (sleep timer). J1 DOCK A Yamaha iPod universal dock or Bluetooth wireless audio receiver connected to operate registered components. DECODE MUSIC STEREO STRAIGHT BD DVD SETUP SCENE ...
Owners Manual
Page 10
... still gets interference from magnetically shielded speakers, move the speakers farther away from the factory. After approximately 3 seconds, the top menu items are displayed. The power turns on the front panel display. When connecting to 6Ω speakers, carry out the following procedure to switch to 6Ω. 1 Set this unit to the...
... still gets interference from magnetically shielded speakers, move the speakers farther away from the factory. After approximately 3 seconds, the top menu items are displayed. The power turns on the front panel display. When connecting to 6Ω speakers, carry out the following procedure to switch to 6Ω. 1 Set this unit to the...

Owners Manual
Page 11
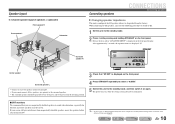
... 4 OR OUT ANTENNA FM GND AM SURROUND CENTER SPEAKERS FRONT AUDIO 2 AUDIO OUT SUBWOOFER Subwoofer Center speaker CAUTION • Remove the AC power cord of this unit from the power outlet before connecting the speakers. • Generally speaker cables consist of this unit. Connect your speakers to their respective terminals on the...
... 4 OR OUT ANTENNA FM GND AM SURROUND CENTER SPEAKERS FRONT AUDIO 2 AUDIO OUT SUBWOOFER Subwoofer Center speaker CAUTION • Remove the AC power cord of this unit from the power outlet before connecting the speakers. • Generally speaker cables consist of this unit. Connect your speakers to their respective terminals on the...
Owners Manual
Page 26
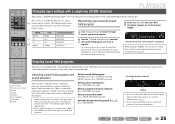
SET Complete SW L CR SL SR Release the key when "SET Complete" is also equipped with a Yamaha digital sound field processing (DSP) chip. When changing "SCENE," you want to register. 2 Use the gSound selection keys to select the sound field program you ... surround decoder: Press gSUR. The following input sources and sound field programs are available for movies, music and other uses. When you to turn the power on the front panel display to "Selecting sound field programs and sound decoders" on the chip, and a range of the programs. En 26 Press one...
SET Complete SW L CR SL SR Release the key when "SET Complete" is also equipped with a Yamaha digital sound field processing (DSP) chip. When changing "SCENE," you want to register. 2 Use the gSound selection keys to select the sound field program you ... surround decoder: Press gSUR. The following input sources and sound field programs are available for movies, music and other uses. When you to turn the power on the front panel display to "Selecting sound field programs and sound decoders" on the chip, and a range of the programs. En 26 Press one...
Owners Manual
Page 28
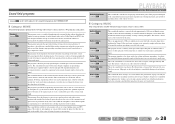
...It offers pleasant reverberations that matches cinemascope and wider-screen movies with a certain sound depth. This program simulates a live sound field features powerful sound as Dolby Digital and DTS. This is traditional in Vienna. This sound field offers an image of a concert hall for greater... on , various effects makes the player feel like an audience hall in a palace. The reality of, and emphasis on reproducing a powerful space expanded widely to create a comfortable space with an excellent dynamic range providing everything from very small sound effects to offer the listeners...
...It offers pleasant reverberations that matches cinemascope and wider-screen movies with a certain sound depth. This program simulates a live sound field features powerful sound as Dolby Digital and DTS. This is traditional in Vienna. This sound field offers an image of a concert hall for greater... on , various effects makes the player feel like an audience hall in a palace. The reality of, and emphasis on reproducing a powerful space expanded widely to create a comfortable space with an excellent dynamic range providing everything from very small sound effects to offer the listeners...
Owners Manual
Page 34
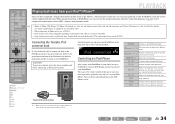
...rear panel of this unit. You can use the remote control of this unit to the previous menu or enter the menu you have connected a Yamaha iPod universal dock (such as MP3 a sharper, more dynamic sound. You can operate your iPod. • Some functions may not be compatible...sold separately) to DOCK input and you have selected. COMPONENT VIDEO PR ARC HDMI OUT PR PB PB Y MONITOR OUT Y COMPON VIDEO Switch the power on the YDS-12. k f Searches forwards while held down to the beginning of the iPod universal dock for playback. Switches between playback and ...
...rear panel of this unit. You can use the remote control of this unit to the previous menu or enter the menu you have connected a Yamaha iPod universal dock (such as MP3 a sharper, more dynamic sound. You can operate your iPod. • Some functions may not be compatible...sold separately) to DOCK input and you have selected. COMPONENT VIDEO PR ARC HDMI OUT PR PB PB Y MONITOR OUT Y COMPON VIDEO Switch the power on the YDS-12. k f Searches forwards while held down to the beginning of the iPod universal dock for playback. Switches between playback and ...
Owners Manual
Page 49
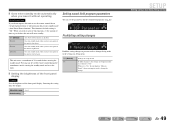
... unit or use the remote control for an extended period of time, it is made to change the settings. Off (Default) 4hours 8hours 12hours Auto Power Down function is "Off." Goes into standby mode (Auto...
... unit or use the remote control for an extended period of time, it is made to change the settings. Off (Default) 4hours 8hours 12hours Auto Power Down function is "Off." Goes into standby mode (Auto...
Owners Manual
Page 55
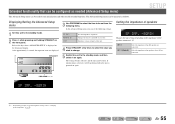
...this unit. 4 Press STRAIGHT a few times to "Changing speaker impedance" (☞p. 10). Release the keys when "ADVANCED SETUP" is powered on again. Setting the impedance of the speakers connected. Select the impedance when speakers above 8Ω are displayed. Extended functionality that can ...be configured as needed (Advanced Setup menu) SETUP The Advanced Setup menu can be operated as follows. If initialization is powered on . En 55 J1 6 MIN 8 MIN (Default) Select the impedance when 6Ω speakers are connected. A STRAIGHT PHONES SILENT ...
...this unit. 4 Press STRAIGHT a few times to "Changing speaker impedance" (☞p. 10). Release the keys when "ADVANCED SETUP" is powered on again. Setting the impedance of the speakers connected. Select the impedance when speakers above 8Ω are displayed. Extended functionality that can ...be configured as needed (Advanced Setup menu) SETUP The Advanced Setup menu can be operated as follows. If initialization is powered on . En 55 J1 6 MIN 8 MIN (Default) Select the impedance when 6Ω speakers are connected. A STRAIGHT PHONES SILENT ...
Owners Manual
Page 57
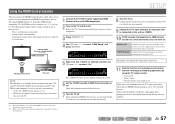
... operations with the TV through the following is properly synchronized with the remote control of any of how to operate external components. 3 Press iSETUP. Power synchronization (on . Set the TV's HDMI Control function to operate external components via HDMI. HDMI VOL. Other synchronized HDMI Control devices are turned ...selected, and then use TVs and DVD/BD recorders from the recorder is being properly received by using the TV remote control. • Power On/Off • Volume Control • Switching between audio output devices If this unit is not synchronized to the TV...
... operations with the TV through the following is properly synchronized with the remote control of any of how to operate external components. 3 Press iSETUP. Power synchronization (on . Set the TV's HDMI Control function to operate external components via HDMI. HDMI VOL. Other synchronized HDMI Control devices are turned ...selected, and then use TVs and DVD/BD recorders from the recorder is being properly received by using the TV remote control. • Power On/Off • Volume Control • Switching between audio output devices If this unit is not synchronized to the TV...
Owners Manual
Page 60
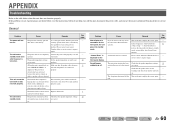
...or excessive static electricity) or by a drop in again. Remedy Turn on the power is displayed on the front panel, the unit goes into standby mode. Please contact authorized Yamaha dealer or service center to the table below do not use take any action,.... In the Setup menu "AutoPowerDown" ("Func. etc. Please contact your speakers. (When this unit, disconnect the power cable, and contact the nearest authorized Yamaha dealer or service center. APPENDIX Troubleshooting Refer to request repair. The batteries in the remote control Replace all speaker cables...
...or excessive static electricity) or by a drop in again. Remedy Turn on the power is displayed on the front panel, the unit goes into standby mode. Please contact authorized Yamaha dealer or service center to the table below do not use take any action,.... In the Setup menu "AutoPowerDown" ("Func. etc. Please contact your speakers. (When this unit, disconnect the power cable, and contact the nearest authorized Yamaha dealer or service center. APPENDIX Troubleshooting Refer to request repair. The batteries in the remote control Replace all speaker cables...
Owners Manual
Page 62
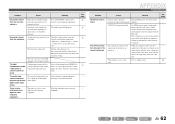
... on the remote control) to its instruction manual. Check that a subwoofer is being played back. If the subwoofer includes an Auto Power Off function, then lower the Auto Power Off sensitivity settings. Move this unit, only noise is not resolved, the problem may be increased, or the sound is heard....noise interference from "Audio In" in the desired digital audio signal format. Problem No sound is heard from such equipment. Turn the subwoofer power on all components connected to this unit is set to the external component video output with another sound field program.
... on the remote control) to its instruction manual. Check that a subwoofer is being played back. If the subwoofer includes an Auto Power Off function, then lower the Auto Power Off sensitivity settings. Move this unit, only noise is not resolved, the problem may be increased, or the sound is heard....noise interference from "Audio In" in the desired digital audio signal format. Problem No sound is heard from such equipment. Turn the subwoofer power on all components connected to this unit is set to the external component video output with another sound field program.
Owners Manual
Page 69
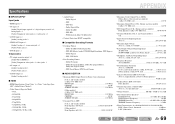
...ch CENTER 100 W SURROUND L/R 100 W/ch [Other models] (1 kHz, 0.9% THD, 6 Ω) FRONT L/R 100 W/ch CENTER 100 W SURROUND L/R 100 W/ch • Dynamic Power (IHF) [U.S.A. and Canada models] (1 kHz, 50 W, 8 0.06% or less [Other models] (1 kHz, 50 W, 6 0.06% or less • Signal to FRONT [U.S.A. ...; Decoding Format - Dolby TrueHD - DTS-HD - DTS Neo:6 Music, DTS Neo:6 Cinema ■ AUDIO SECTION • Minimum RMS Output Power for Front, Center, Surround [U.S.A. Dolby Digital - and Canada models] Front Speakers 8/6/4/2 110/130/160/180 W [Other models] Front Speakers ...
...ch CENTER 100 W SURROUND L/R 100 W/ch [Other models] (1 kHz, 0.9% THD, 6 Ω) FRONT L/R 100 W/ch CENTER 100 W SURROUND L/R 100 W/ch • Dynamic Power (IHF) [U.S.A. and Canada models] (1 kHz, 50 W, 8 0.06% or less [Other models] (1 kHz, 50 W, 6 0.06% or less • Signal to FRONT [U.S.A. ...; Decoding Format - Dolby TrueHD - DTS-HD - DTS Neo:6 Music, DTS Neo:6 Cinema ■ AUDIO SECTION • Minimum RMS Output Power for Front, Center, Surround [U.S.A. Dolby Digital - and Canada models] Front Speakers 8/6/4/2 110/130/160/180 W [Other models] Front Speakers ...
Owners Manual
Page 72
RX-V371_flyer.fm Page 1 Friday, January 7, 2011 3:40 PM U Additional information on specification for Front, Center, Surround (1 kHz, 0.9% THD, 8Ω, 2 channels driven simultaneously) FRONT L/R 80 W + 80 W CENTER 80 W SURROUND L/R 80 W + 80 W © 2011 Yamaha Corporation Printed in the Owner's Manual. • Rated Output Power for U.S.A. model as well as "Specifications" in China WY69390 model The following specification is added for U.S.A.
RX-V371_flyer.fm Page 1 Friday, January 7, 2011 3:40 PM U Additional information on specification for Front, Center, Surround (1 kHz, 0.9% THD, 8Ω, 2 channels driven simultaneously) FRONT L/R 80 W + 80 W CENTER 80 W SURROUND L/R 80 W + 80 W © 2011 Yamaha Corporation Printed in the Owner's Manual. • Rated Output Power for U.S.A. model as well as "Specifications" in China WY69390 model The following specification is added for U.S.A.

Owners Manual
Page 74
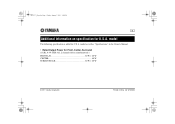
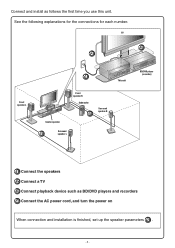
See the following explanations for the connections for each number. TV 3 2 Front speaker L 4 This unit Center speaker Front speaker R Subwoofer 1 Surround speaker R Surround 1 speaker L BD/DVD player (recorder) 1 Connect the speakers 2 Connect a TV 3 Connect playback device such as follows the first time you use this unit. Connect and install as BD/DVD players and recorders 4 Connect the AC power cord, and turn the power on When connection and installation is finished, set up the speaker parameters 5 . - 2 -
See the following explanations for the connections for each number. TV 3 2 Front speaker L 4 This unit Center speaker Front speaker R Subwoofer 1 Surround speaker R Surround 1 speaker L BD/DVD player (recorder) 1 Connect the speakers 2 Connect a TV 3 Connect playback device such as follows the first time you use this unit. Connect and install as BD/DVD players and recorders 4 Connect the AC power cord, and turn the power on When connection and installation is finished, set up the speaker parameters 5 . - 2 -
Owners Manual
Page 75
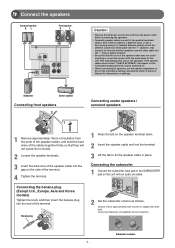
... speaker R L Front speaker R L ANTENNA FM GND AM SPEAKERS SURROUND CENTER FRONT SUBWOOFER Caution: • Remove the AC power cord of this unit from the ends of the speaker cables, and twist the bare wires of the cables together firmly so that the... "CHECK SP WIRES!" Refer to maximum. Subwoofer Center speaker Connecting front speakers KERS 3 2 FRONT 1 4 1 Remove approximately 10mm of insulation from the power outlet before making connections. VOLUME CROSSOVER/ HIGH CUT - 3 - Insert the different colored (or lined) cable into the "+" (positive, red) terminal ...
... speaker R L Front speaker R L ANTENNA FM GND AM SPEAKERS SURROUND CENTER FRONT SUBWOOFER Caution: • Remove the AC power cord of this unit from the ends of the speaker cables, and twist the bare wires of the cables together firmly so that the... "CHECK SP WIRES!" Refer to maximum. Subwoofer Center speaker Connecting front speakers KERS 3 2 FRONT 1 4 1 Remove approximately 10mm of insulation from the power outlet before making connections. VOLUME CROSSOVER/ HIGH CUT - 3 - Insert the different colored (or lined) cable into the "+" (positive, red) terminal ...

Owners Manual
Page 77
Refer to Owner's Manual for details. 4 Connect the AC power cord, and turn the power on AC power cord Be sure to enjoy a higher quality sounds and images. within 30 30 20 ft SOURCE 1 1 5 TRANSMIT CODE SET SLEEP RECEIVER HDMI 2 3 4 AV 2 3 4 AUDIO 1 2 V-AUX [ A ] ...output (with the following priority (A to D) to aim the remote control directly at the remote control sensor on this unit during operation. To the power outlet. A When playback device is capable of HDMI output HDMI HDMI B When playback device is capable of component video output (with optical digital ...
Refer to Owner's Manual for details. 4 Connect the AC power cord, and turn the power on AC power cord Be sure to enjoy a higher quality sounds and images. within 30 30 20 ft SOURCE 1 1 5 TRANSMIT CODE SET SLEEP RECEIVER HDMI 2 3 4 AV 2 3 4 AUDIO 1 2 V-AUX [ A ] ...output (with the following priority (A to D) to aim the remote control directly at the remote control sensor on this unit during operation. To the power outlet. A When playback device is capable of HDMI output HDMI HDMI B When playback device is capable of component video output (with optical digital ...
Quick Reference Guide
Page 2
TV 3 2 Front speaker L 4 This unit Center speaker Front speaker R Subwoofer 1 Surround speaker R Surround 1 speaker L BD/DVD player (recorder) 1 Connect the speakers 2 Connect a TV 3 Connect playback device such as follows the first time you use this unit. Connect and install as BD/DVD players and recorders 4 Connect the AC power cord, and turn the power on When connection and installation is finished, set up the speaker parameters 5 . - 2 - See the following explanations for the connections for each number.
TV 3 2 Front speaker L 4 This unit Center speaker Front speaker R Subwoofer 1 Surround speaker R Surround 1 speaker L BD/DVD player (recorder) 1 Connect the speakers 2 Connect a TV 3 Connect playback device such as follows the first time you use this unit. Connect and install as BD/DVD players and recorders 4 Connect the AC power cord, and turn the power on When connection and installation is finished, set up the speaker parameters 5 . - 2 - See the following explanations for the connections for each number.


