
Owners Manual
Page 2
...Front panel display 7 Remote control 8 CONNECTIONS Connecting speakers 9 Speaker channels and functions 9 Speaker layout 10 Connecting speakers 10 Connecting external devices 13 Cable plugs and jacks 13 Connecting a TV monitor 14 Connecting BD/DVD players and other devices 16 Connecting video cameras and portable audio players ..... tunes from your iPod™/iPhone 34 Connecting the Yamaha iPod universal dock 34 Controlling an iPod/iPhone 34 Playing back tunes from Bluetooth™ components....... 36 Connecting a Yamaha Bluetooth wireless audio receiver 36 Pairing Bluetooth&#...
...Front panel display 7 Remote control 8 CONNECTIONS Connecting speakers 9 Speaker channels and functions 9 Speaker layout 10 Connecting speakers 10 Connecting external devices 13 Cable plugs and jacks 13 Connecting a TV monitor 14 Connecting BD/DVD players and other devices 16 Connecting video cameras and portable audio players ..... tunes from your iPod™/iPhone 34 Connecting the Yamaha iPod universal dock 34 Controlling an iPod/iPhone 34 Playing back tunes from Bluetooth™ components....... 36 Connecting a Yamaha Bluetooth wireless audio receiver 36 Pairing Bluetooth&#...
Owners Manual
Page 3
... capabilities ■ Built-in high-quality, high-power 5-channel amplifier ■ 1-button input/sound field program switching (SCENE function 26 ■ Speaker connections for speaker acoustic parameters 22 - Speaker channels and functions ...9 - Volume control for each speaker...43 - Sound quality control with the equalizer Speaker cable connection...10 - Specifying the settings for each speaker 42 - Speaker impedance configuration...10 -
... capabilities ■ Built-in high-quality, high-power 5-channel amplifier ■ 1-button input/sound field program switching (SCENE function 26 ■ Speaker connections for speaker acoustic parameters 22 - Speaker channels and functions ...9 - Volume control for each speaker...43 - Sound quality control with the equalizer Speaker cable connection...10 - Specifying the settings for each speaker 42 - Speaker impedance configuration...10 -
Owners Manual
Page 5
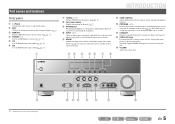
... and the sound field program with a single button (☞p. 26). bc d ef g h l TONE CONTROL Adjusts high-frequency/low-frequency output of speakers/headphones (☞p. 25). o VIDEO AUX jacks For connecting video cameras, game consoles, and portable music players to switch on the unit. PHONES SILENT CINEMA i J 1 : Usable when you are using this...
... and the sound field program with a single button (☞p. 26). bc d ef g h l TONE CONTROL Adjusts high-frequency/low-frequency output of speakers/headphones (☞p. 25). o VIDEO AUX jacks For connecting video cameras, game consoles, and portable music players to switch on the unit. PHONES SILENT CINEMA i J 1 : Usable when you are using this...
Owners Manual
Page 6
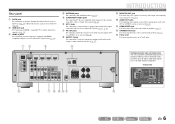
Rear panel a DOCK jack For connecting an optional Yamaha iPod universal dock (such as the AV5 or AUDIO1-2 jacks are selected (☞p. 20). ab c d ANTENNA jacks For connecting AM and FM antennas (☞p. 21). k SUBWOOFER jack For connecting a subwoofer with HDMIcompatible outputs to ...so that are selected (☞p. 20). f AV1-5 jacks For connecting to input sound into this unit can receive audio/video signals (☞p. 17, p. 18). l SPEAKER terminals For connecting the front, center, and surround speakers (☞p. 12). d DOCK COMPONENT VIDEO PR ARC HDMI OUT PR...
Rear panel a DOCK jack For connecting an optional Yamaha iPod universal dock (such as the AV5 or AUDIO1-2 jacks are selected (☞p. 20). ab c d ANTENNA jacks For connecting AM and FM antennas (☞p. 21). k SUBWOOFER jack For connecting a subwoofer with HDMIcompatible outputs to ...so that are selected (☞p. 20). f AV1-5 jacks For connecting to input sound into this unit can receive audio/video signals (☞p. 17, p. 18). l SPEAKER terminals For connecting the front, center, and surround speakers (☞p. 12). d DOCK COMPONENT VIDEO PR ARC HDMI OUT PR...
Owners Manual
Page 7
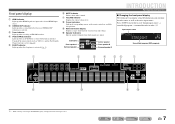
...AM broadcast. Press fINFO repeatedly to cycle through an optional Yamaha iPod universal dock (such as the active input source. c Tuner indicator Lights up when the sleep timer is connected through input source → sound field program → ...MUTE indicator Flashes when audio is selected. j Speaker indicators Indicate speaker terminals from which signals are input at the selected HDMI input source. En 7 Subwoofer Front speaker L Surround speaker L SW L CR SL SR Center speaker Front speaker R Surround speaker R INTRODUCTION Part names and functions ■...
...AM broadcast. Press fINFO repeatedly to cycle through an optional Yamaha iPod universal dock (such as the active input source. c Tuner indicator Lights up when the sleep timer is connected through input source → sound field program → ...MUTE indicator Flashes when audio is selected. j Speaker indicators Indicate speaker terminals from which signals are input at the selected HDMI input source. En 7 Subwoofer Front speaker L Surround speaker L SW L CR SL SR Center speaker Front speaker R Surround speaker R INTRODUCTION Part names and functions ■...
Owners Manual
Page 9
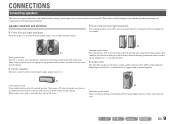
.... ■ Surround left and right speakers. Surround speaker layout: Place the speakers at an equal distance from the floor. ■ Subwoofer The subwoofer speaker is equipped with an internal amplifier. Speaker channels and functions ■ Front left and right speakers The front speakers are about 1/4 of a real movie theater or concert hall. CONNECTIONS Connecting speakers This unit uses acoustic field...
.... ■ Surround left and right speakers. Surround speaker layout: Place the speakers at an equal distance from the floor. ■ Subwoofer The subwoofer speaker is equipped with an internal amplifier. Speaker channels and functions ■ Front left and right speakers The front speakers are about 1/4 of a real movie theater or concert hall. CONNECTIONS Connecting speakers This unit uses acoustic field...
Owners Manual
Page 10
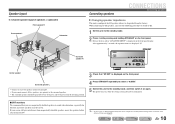
... "SP IMP." After approximately 3 seconds, the top menu items are displayed. Speaker layout 5.1-channel speaker layout (5 speakers + subwoofer) Front speaker R Front speaker L Subwoofer Connecting speakers CONNECTIONS Connecting speakers ■ Changing speaker impedance This unit is configured for details on the front panel display. is displayed...your TV. If your screen still gets interference from magnetically shielded speakers, move the speakers farther away from the factory. En 10 When connecting to 6Ω speakers, carry out the following procedure to switch to 6Ω. 1...
... "SP IMP." After approximately 3 seconds, the top menu items are displayed. Speaker layout 5.1-channel speaker layout (5 speakers + subwoofer) Front speaker R Front speaker L Subwoofer Connecting speakers CONNECTIONS Connecting speakers ■ Changing speaker impedance This unit is configured for details on the front panel display. is displayed...your TV. If your screen still gets interference from magnetically shielded speakers, move the speakers farther away from the factory. En 10 When connecting to 6Ω speakers, carry out the following procedure to switch to 6Ω. 1...

Owners Manual
Page 11
This may damage this unit from the power outlet before connecting the speakers. • Generally speaker cables consist of two parallel insulated cables. CONNECTIONS Connecting speakers En 11 If the speaker cables short circuit, "CHECK SP WIRES!" Insert the different colored (or...rear panel. Surround speaker RL Front speaker R L HDMI 4 OR OUT ANTENNA FM GND AM SURROUND CENTER SPEAKERS FRONT AUDIO 2 AUDIO OUT SUBWOOFER Subwoofer Center speaker CAUTION • Remove the AC power cord of this unit or the speakers. Connect your speakers to indicate different ...
This may damage this unit from the power outlet before connecting the speakers. • Generally speaker cables consist of two parallel insulated cables. CONNECTIONS Connecting speakers En 11 If the speaker cables short circuit, "CHECK SP WIRES!" Insert the different colored (or...rear panel. Surround speaker RL Front speaker R L HDMI 4 OR OUT ANTENNA FM GND AM SURROUND CENTER SPEAKERS FRONT AUDIO 2 AUDIO OUT SUBWOOFER Subwoofer Center speaker CAUTION • Remove the AC power cord of this unit or the speakers. Connect your speakers to indicate different ...

Owners Manual
Page 12
...the tab on the side of the terminal. ■ Connecting front speakers KERS 3 2 FRONT 1 4 ■ Connecting center speakers / surround speakers SURROUND 1 CENTERSPEAKE 3 2 1 Remove approximately 10mm of insulation from the ends of the speaker cables, and twist the bare wires of the cables ...SUBWOOFER jack on this unit with an audio pin cable. 2 Set the subwoofer volume as follows. CONNECTIONS Connecting speakers ■ Connecting the subwoofer 1 Connect the subwoofer input jack to approximately half volume (or slightly less than half). Crossover frequency (if available): ...
...the tab on the side of the terminal. ■ Connecting front speakers KERS 3 2 FRONT 1 4 ■ Connecting center speakers / surround speakers SURROUND 1 CENTERSPEAKE 3 2 1 Remove approximately 10mm of insulation from the ends of the speaker cables, and twist the bare wires of the cables ...SUBWOOFER jack on this unit with an audio pin cable. 2 Set the subwoofer volume as follows. CONNECTIONS Connecting speakers ■ Connecting the subwoofer 1 Connect the subwoofer input jack to approximately half volume (or slightly less than half). Crossover frequency (if available): ...
Owners Manual
Page 21
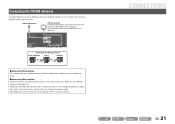
...the AM antenna away from the receiver. You can reduce noise. Make sure the AM loop antenna is not to be connected to an outdoor antenna with this new attachment in moist ground. For more information, consult the nearest authorized dealer. ■ Improving ... have no polarity. Connect the jack to their respective jacks. Connect these antennas properly to a store-bought ground bar or copper plate with a vinyl-covered wire and bury this receiver. CONNECTIONS En 21 HDMI 3 HDMI 4 FM GND AM MONITOR OUT SURROUND CENTER SPEAKERS FRONT Connecting the AM loop antenna...
...the AM antenna away from the receiver. You can reduce noise. Make sure the AM loop antenna is not to be connected to an outdoor antenna with this new attachment in moist ground. For more information, consult the nearest authorized dealer. ■ Improving ... have no polarity. Connect the jack to their respective jacks. Connect these antennas properly to a store-bought ground bar or copper plate with a vinyl-covered wire and bury this receiver. CONNECTIONS En 21 HDMI 3 HDMI 4 FM GND AM MONITOR OUT SURROUND CENTER SPEAKERS FRONT Connecting the AM loop antenna...
Owners Manual
Page 22
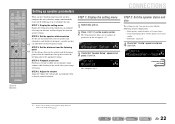
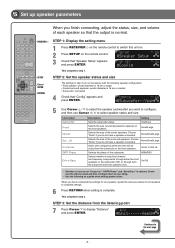
...J1 SETUP VOL. STEP 3: Set the distance from the listening point j Set the distance between the speakers and the listening point so that the sound from which you have finished connecting your settings are not necessary with the following steps to the next page i SETUP j ENTER J ...1 : See the section "Setting various functions (Setup menu)" for speaker settings. SP SET Config This completes step 1. SW L CR SL SR CONNECTIONS STEP 2: Set the speaker status and size The settings in step 2 are having. Subwoofer;;Yes SW L CR SL SR Continues...
...J1 SETUP VOL. STEP 3: Set the distance from the listening point j Set the distance between the speakers and the listening point so that the sound from which you have finished connecting your settings are not necessary with the following steps to the next page i SETUP j ENTER J ...1 : See the section "Setting various functions (Setup menu)" for speaker settings. SP SET Config This completes step 1. SW L CR SL SR CONNECTIONS STEP 2: Set the speaker status and size The settings in step 2 are having. Subwoofer;;Yes SW L CR SL SR Continues...
Owners Manual
Page 23
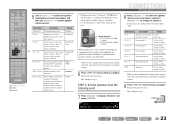
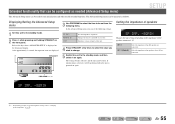
...jRETURN when setting is no subwoofer). Information Description Setting Subwoofer Sets the subwoofer status. Choose "None" if you have surround speakers connected. None/Small/ Large Selects the size of the subwoofer. None/Small/ Large Crossover Audio with a frequency below this limit... from the subwoofer (or from the listening point 7 Press jCursor C to the previous menu. CONNECTIONS Setting up speaker parameters 8 Press jCursor B / C to select the speaker that you have a center speaker connected. When you want to configure, and then use jCursor D / E to the next page...
...jRETURN when setting is no subwoofer). Information Description Setting Subwoofer Sets the subwoofer status. Choose "None" if you have surround speakers connected. None/Small/ Large Selects the size of the subwoofer. None/Small/ Large Crossover Audio with a frequency below this limit... from the subwoofer (or from the listening point 7 Press jCursor C to the previous menu. CONNECTIONS Setting up speaker parameters 8 Press jCursor B / C to select the speaker that you have a center speaker connected. When you want to configure, and then use jCursor D / E to the next page...
Owners Manual
Page 24
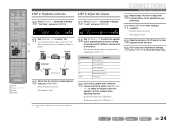
... ENTER j RETURN 12 Check that is complete. STEP 5: Adjust the volume 13 Press jCursor B repeatedly to the previous menu. J1 CONNECTIONS Setting up speaker parameters 16 Repeat steps 14 and 15 to adjust the volume balance for all settings, press iSETUP to your preference. 17 Press jRETURN ...use jCursor D / E to adjust the volume. Information FL FR C SL SR SWFR Speakers Front speaker L Front speaker R Center speaker Surround speaker L Surround speaker R Subwoofer 15 If you select "On." Use Front speaker L or R as follows. To raise the volume: Press jCursor E. Return to display...
... ENTER j RETURN 12 Check that is complete. STEP 5: Adjust the volume 13 Press jCursor B repeatedly to the previous menu. J1 CONNECTIONS Setting up speaker parameters 16 Repeat steps 14 and 15 to adjust the volume balance for all settings, press iSETUP to your preference. 17 Press jRETURN ...use jCursor D / E to adjust the volume. Information FL FR C SL SR SWFR Speakers Front speaker L Front speaker R Center speaker Surround speaker L Surround speaker R Subwoofer 15 If you select "On." Use Front speaker L or R as follows. To raise the volume: Press jCursor E. Return to display...
Owners Manual
Page 25
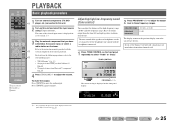
... to adjust the volume. Adjustable range -10.0 dB to +10.0 dB Adjustment increments 2.0 dB The display returns to the instruction manuals provided with the headphones connected. 1 Press TONE CONTROL on playback. PLAYBACK SOURCE 1 1 5 TRANSMIT CODE SET SLEEP RECEIVER HDMI 2 3 4 AV 2 3 4 AUDIO 1 2 V-AUX [ A ... unit and select the input source using dInput selector. The tone control of sounds output from the front left and right speakers to select "Treble" or "Bass." Set the headphone tone control with the r external component for a few seconds. ...
... to adjust the volume. Adjustable range -10.0 dB to +10.0 dB Adjustment increments 2.0 dB The display returns to the instruction manuals provided with the headphones connected. 1 Press TONE CONTROL on playback. PLAYBACK SOURCE 1 1 5 TRANSMIT CODE SET SLEEP RECEIVER HDMI 2 3 4 AV 2 3 4 AUDIO 1 2 V-AUX [ A ... unit and select the input source using dInput selector. The tone control of sounds output from the front left and right speakers to select "Treble" or "Bass." Set the headphone tone control with the r external component for a few seconds. ...
Owners Manual
Page 55
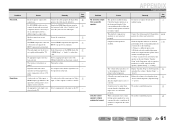
...again. SP IMP. Initializes various settings for unit initialization and other useful extended functions. En 55 Changes the remote control ID of the speakers connected. Setting the impedance of speakers SP IMP. -8 MIN Changes the unit settings depending on again. J1 6 MIN 8 MIN (Default) Select the impedance when 6Ω... 3 Use PROGRAM to select the item to be performed when the unit is powered on the front panel. Select the impedance when speakers above 8Ω are connected. The settings become effective and the unit is powered on the front panel display.
...again. SP IMP. Initializes various settings for unit initialization and other useful extended functions. En 55 Changes the remote control ID of the speakers connected. Setting the impedance of speakers SP IMP. -8 MIN Changes the unit settings depending on again. J1 6 MIN 8 MIN (Default) Select the impedance when 6Ω... 3 Use PROGRAM to select the item to be performed when the unit is powered on the front panel. Select the impedance when speakers above 8Ω are connected. The settings become effective and the unit is powered on the front panel display.
Owners Manual
Page 61
... not be defective. reproduce are being used to the TV. ROM. Display "Speaker Setup" in the Setup menu and adjust the volume ("Speaker Setup" → "Level"). Speaker connections are not connected properly. Problem No sound. source component, such as a CD- Check the Speaker indicators on the remote control). An appropriate video input is being input from...
... not be defective. reproduce are being used to the TV. ROM. Display "Speaker Setup" in the Setup menu and adjust the volume ("Speaker Setup" → "Level"). Speaker connections are not connected properly. Problem No sound. source component, such as a CD- Check the Speaker indicators on the remote control). An appropriate video input is being input from...

Owners Manual
Page 75
... metal areas of the terminal. MIN MAX MIN MAX Subwoofer examples Subwoofer Center speaker Connecting front speakers KERS 3 2 FRONT 1 4 1 Remove approximately 10mm of insulation from the power outlet before making connections. Volume: Set to maximum. 1 Connect the speakers Surround speaker R L Front speaker R L ANTENNA FM GND AM SPEAKERS SURROUND CENTER FRONT SUBWOOFER Caution: • Remove the AC power cord of...
... metal areas of the terminal. MIN MAX MIN MAX Subwoofer examples Subwoofer Center speaker Connecting front speakers KERS 3 2 FRONT 1 4 1 Remove approximately 10mm of insulation from the power outlet before making connections. Volume: Set to maximum. 1 Connect the speakers Surround speaker R L Front speaker R L ANTENNA FM GND AM SPEAKERS SURROUND CENTER FRONT SUBWOOFER Caution: • Remove the AC power cord of...
Owners Manual
Page 78
... 5 Use Cursor B / C to select the speaker (subwoofer) you have completed the settings for one speaker, repeat the same procedure for all speakers to 200 Hz Switchs the phase of the subwoofer. Choose "None" if you do not have a speaker connected. DIST VOL. Choose "None" if you do not have a speaker connected. Speaker Setup SW L CR SL SR 3 Check...
... 5 Use Cursor B / C to select the speaker (subwoofer) you have completed the settings for one speaker, repeat the same procedure for all speakers to 200 Hz Switchs the phase of the subwoofer. Choose "None" if you do not have a speaker connected. DIST VOL. Choose "None" if you do not have a speaker connected. Speaker Setup SW L CR SL SR 3 Check...

Quick Reference Guide
Page 3
... tab to Owner's Manual for information on this unit before connecting the speakers. • Generally speaker cables consist of these cables is switched on. • When connecting 6Ω speakers, set the speaker impedance to the SUBWOOFER jack on the side of this unit. Subwoofer Center speaker Connecting front speakers KERS 3 2 FRONT 1 4 1 Remove approximately 10mm of insulation from the power...
... tab to Owner's Manual for information on this unit before connecting the speakers. • Generally speaker cables consist of these cables is switched on. • When connecting 6Ω speakers, set the speaker impedance to the SUBWOOFER jack on the side of this unit. Subwoofer Center speaker Connecting front speakers KERS 3 2 FRONT 1 4 1 Remove approximately 10mm of insulation from the power...

Quick Reference Guide
Page 6
... This completes step 1. Choose "None" if you want to configure, and then use Cursor D / E to select the speaker (subwoofer) you do not have a speaker connected. NRM/REV Selects whether to the next page - 6 - Unit;;;;;;feet SW L CR SL SR Continues to play front .... Choose "None" if you finish connecting, adjust the status, size, and volume of the surround speakers. 5 Set up speaker parameters When you do not have a speaker connected. DIST VOL. CONFIG VOL. None/Small/Large Selects the size of each speaker so that the output is optional. ...
... This completes step 1. Choose "None" if you want to configure, and then use Cursor D / E to select the speaker (subwoofer) you do not have a speaker connected. NRM/REV Selects whether to the next page - 6 - Unit;;;;;;feet SW L CR SL SR Continues to play front .... Choose "None" if you finish connecting, adjust the status, size, and volume of the surround speakers. 5 Set up speaker parameters When you do not have a speaker connected. DIST VOL. CONFIG VOL. None/Small/Large Selects the size of each speaker so that the output is optional. ...


