
Owners Manual
Page 2
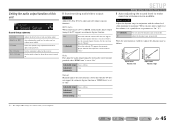
...connecting external components 52 Default remote control code settings 52 Registering remote control codes for external component operations 53 Resetting all remote control codes 54 Extended functionality that can be configured as needed (Advanced Setup menu 55 Displaying/Setting the Advanced Setup menu 55 Setting the impedance of speakers 55 Avoiding crossing remote control signals when using multiple Yamaha receivers 56 Initializing various settings for this unit 56 Using the HDMI Control function 57 APPENDIX Troubleshooting 60 General 60 HDMI 63 Tuner (FM/AM 63 Remote control...
...connecting external components 52 Default remote control code settings 52 Registering remote control codes for external component operations 53 Resetting all remote control codes 54 Extended functionality that can be configured as needed (Advanced Setup menu 55 Displaying/Setting the Advanced Setup menu 55 Setting the impedance of speakers 55 Avoiding crossing remote control signals when using multiple Yamaha receivers 56 Initializing various settings for this unit 56 Using the HDMI Control function 57 APPENDIX Troubleshooting 60 General 60 HDMI 63 Tuner (FM/AM 63 Remote control...
Owners Manual
Page 6
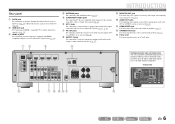
...DOCK COMPONENT VIDEO PR ARC HDMI OUT PR (BD/DVD) HDMI 1 HDMI 2 PB PB Y MONITOR OUT Y COMPONENT VIDEO VIDEO HDMI 3 HDMI 4 MONITOR OUT ANTENNA FM GND AM SURROUND CENTER SPEAKERS FRONT OPTICAL AV 1 COAXIAL AV 2 COAXIAL (CD) AV 3 OPTICAL ( TV ) AV 4 AV 5 AV OUT AUDIO 1 AUDIO 2 AUDIO OUT SUBWOOFER Distinguishing the input and output jacks The area around the audio/video output jacks is marked in amplifier (☞p. 12). j AUDIO OUT jacks For outputting audio signals received when analog inputs such as YDS-12) (☞p. 34) or Bluetooth wireless audio receiver (YBA...
...DOCK COMPONENT VIDEO PR ARC HDMI OUT PR (BD/DVD) HDMI 1 HDMI 2 PB PB Y MONITOR OUT Y COMPONENT VIDEO VIDEO HDMI 3 HDMI 4 MONITOR OUT ANTENNA FM GND AM SURROUND CENTER SPEAKERS FRONT OPTICAL AV 1 COAXIAL AV 2 COAXIAL (CD) AV 3 OPTICAL ( TV ) AV 4 AV 5 AV OUT AUDIO 1 AUDIO 2 AUDIO OUT SUBWOOFER Distinguishing the input and output jacks The area around the audio/video output jacks is marked in amplifier (☞p. 12). j AUDIO OUT jacks For outputting audio signals received when analog inputs such as YDS-12) (☞p. 34) or Bluetooth wireless audio receiver (YBA...
Owners Manual
Page 8
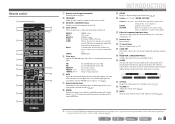
... A Yamaha iPod universal dock or Bluetooth wireless audio receiver connected to the previous screen when setting menus are using the tuner input. h SCENE Switches the input source and the sound field program with the kExternal component operation keys without changing inputs. Confirms a selected item. n CODE SET Sets remote control codes for each input in standby mode automatically after a specified period of time has elapsed (sleep timer). The front panel display indicator lights up when a signal is activated. Changes tuning frequencies. s MUTE Turns the...
... A Yamaha iPod universal dock or Bluetooth wireless audio receiver connected to the previous screen when setting menus are using the tuner input. h SCENE Switches the input source and the sound field program with the kExternal component operation keys without changing inputs. Confirms a selected item. n CODE SET Sets remote control codes for each input in standby mode automatically after a specified period of time has elapsed (sleep timer). The front panel display indicator lights up when a signal is activated. Changes tuning frequencies. s MUTE Turns the...

Owners Manual
Page 15
...DVD) HDMI 1 HDMI 2 PB PB Y MONITOR OUT Y COMPONENT VIDEO VIDEO HDMI 3 HDMI 4 MONITOR OUT V OPTICAL AV 1 COAXIAL AV 2 COAXIAL (CD) AV 3 OPTICAL ( TV ) AV 4 AV 5 AV OUT AUDIO 1 AUDIO 2 AUDIO OUT Video input VIDEO V TV ■ Listening to TV audio To transmit sound from the TV to the COAXIAL jack of the AV1 or AV4 with a fiber-optic cable. For the connections and settings, refer to "Switching the input source on the TV, and that supports HDMI Control functions (Ex. TV audio output Optical digital audio output Coaxial digital audio output Analog stereo output Connection...
...DVD) HDMI 1 HDMI 2 PB PB Y MONITOR OUT Y COMPONENT VIDEO VIDEO HDMI 3 HDMI 4 MONITOR OUT V OPTICAL AV 1 COAXIAL AV 2 COAXIAL (CD) AV 3 OPTICAL ( TV ) AV 4 AV 5 AV OUT AUDIO 1 AUDIO 2 AUDIO OUT Video input VIDEO V TV ■ Listening to TV audio To transmit sound from the TV to the COAXIAL jack of the AV1 or AV4 with a fiber-optic cable. For the connections and settings, refer to "Switching the input source on the TV, and that supports HDMI Control functions (Ex. TV audio output Optical digital audio output Coaxial digital audio output Analog stereo output Connection...
Owners Manual
Page 22
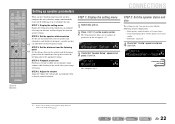
Carry out the following speaker configuration: - STEP 5: Adjust the volume Adjust the volume for speaker settings. STEP 1: Display the setting menu 1 Switch this unit on. 2 Press iSETUP on this unit so that the sound is balanced. En 22 SOURCE 1 1 5 TRANSMIT CODE SET SLEEP RECEIVER HDMI 2 3 4 AV 2 3 4 AUDIO 1 2 V-AUX [ A ] [ B ] DOCK TUNER FM AM PRESET TUNING INFO MEMORY MOVIE ENHANCER SUR. SP SET Config This completes step 1. SW L CR SL SR CONNECTIONS STEP 2: Set the speaker status and size The...
Carry out the following speaker configuration: - STEP 5: Adjust the volume Adjust the volume for speaker settings. STEP 1: Display the setting menu 1 Switch this unit on. 2 Press iSETUP on this unit so that the sound is balanced. En 22 SOURCE 1 1 5 TRANSMIT CODE SET SLEEP RECEIVER HDMI 2 3 4 AV 2 3 4 AUDIO 1 2 V-AUX [ A ] [ B ] DOCK TUNER FM AM PRESET TUNING INFO MEMORY MOVIE ENHANCER SUR. SP SET Config This completes step 1. SW L CR SL SR CONNECTIONS STEP 2: Set the speaker status and size The...
Owners Manual
Page 23
... have surround speakers connected. DECODE MUSIC STEREO STRAIGHT BD DVD SETUP SCENE TV CD RADIO OPTION ENTER VOLUME RETURN DISPLAY TOP MENU REC POP-UP MENU MUTE 1 2 3 4 5 6 7 8 9 INPUT MUTE 0 10 TV TV VOL TV CH ENT j Cursor B / C / D / E j ENTER j RETURN 5 Use jCursor B / C to display "Distance" and press jENTER. None/Small/ Large Crossover Audio with a frequency below this limit will be output from the listening point 7 Press jCursor C to select the speaker (subwoofer) you...
... have surround speakers connected. DECODE MUSIC STEREO STRAIGHT BD DVD SETUP SCENE TV CD RADIO OPTION ENTER VOLUME RETURN DISPLAY TOP MENU REC POP-UP MENU MUTE 1 2 3 4 5 6 7 8 9 INPUT MUTE 0 10 TV TV VOL TV CH ENT j Cursor B / C / D / E j ENTER j RETURN 5 Use jCursor B / C to display "Distance" and press jENTER. None/Small/ Large Crossover Audio with a frequency below this limit will be output from the listening point 7 Press jCursor C to select the speaker (subwoofer) you...
Owners Manual
Page 25
... connected. 1 Press TONE CONTROL on the front panel repeatedly to adjust the volume. To mute the output. The tone control of the speakers or headphones can change the input source name displayed on the front panel display as the source input, or select a radio station on playback. Set the headphone tone control with the r external component for a few seconds. J 1 : You can be set the balance extremely off, sounds may not match those frequency ranges. to select "Treble" or "Bass." TONE CONTROL PHONES SILENT CINEMA INFO MEMORY PRESET...
... connected. 1 Press TONE CONTROL on the front panel repeatedly to adjust the volume. To mute the output. The tone control of the speakers or headphones can change the input source name displayed on the front panel display as the source input, or select a radio station on playback. Set the headphone tone control with the r external component for a few seconds. J 1 : You can be set the balance extremely off, sounds may not match those frequency ranges. to select "Treble" or "Bass." TONE CONTROL PHONES SILENT CINEMA INFO MEMORY PRESET...
Owners Manual
Page 26
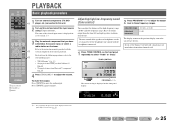
... turn the power on the front panel display to check what speakers are provided as d playing movies or music. MUSIC category: Press gMUSIC repeatedly. Selects compressed music enhancer: Press gSTEREO repeatedly. SW L CR SL SR Program • You can also use the speaker indicators on and change the input source, the sound field program previously selected for different uses, such as the initial factory settings. PLAYBACK SOURCE 1 1 5 TRANSMIT CODE SET SLEEP RECEIVER HDMI 2 3 4 AV 2 3 4 AUDIO 1 2 V-AUX [ A ] [ B ] DOCK TUNER FM AM PRESET TUNING...
... turn the power on the front panel display to check what speakers are provided as d playing movies or music. MUSIC category: Press gMUSIC repeatedly. Selects compressed music enhancer: Press gSTEREO repeatedly. SW L CR SL SR Program • You can also use the speaker indicators on and change the input source, the sound field program previously selected for different uses, such as the initial factory settings. PLAYBACK SOURCE 1 1 5 TRANSMIT CODE SET SLEEP RECEIVER HDMI 2 3 4 AV 2 3 4 AUDIO 1 2 V-AUX [ A ] [ B ] DOCK TUNER FM AM PRESET TUNING...
Owners Manual
Page 41
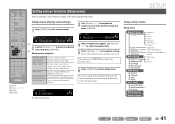
... frequency bands) HDMI Auto Auto Manual En 41 SW L CR SL SR Ex: Sound Setup menu SETUP Setup menu items Setup menu Speaker Setup Config Level Distance Equalizer Test Tone Sound Setup Lipsync Adaptive DRC D.Range Max Volume Init.Volume HDMI Setup Control TVAudio ARC Audio Func. HDMI VOL. For a few seconds after closing the Setup menu, the remote control keys may not function. If this unit using the Setup menu. DECODE MUSIC STEREO STRAIGHT BD DVD SETUP SCENE TV CD RADIO OPTION ENTER VOLUME RETURN DISPLAY TOP MENU REC POP-UP MENU MUTE 1 2 3 4 5 6 7 8 9 INPUT...
... frequency bands) HDMI Auto Auto Manual En 41 SW L CR SL SR Ex: Sound Setup menu SETUP Setup menu items Setup menu Speaker Setup Config Level Distance Equalizer Test Tone Sound Setup Lipsync Adaptive DRC D.Range Max Volume Init.Volume HDMI Setup Control TVAudio ARC Audio Func. HDMI VOL. For a few seconds after closing the Setup menu, the remote control keys may not function. If this unit using the Setup menu. DECODE MUSIC STEREO STRAIGHT BD DVD SETUP SCENE TV CD RADIO OPTION ENTER VOLUME RETURN DISPLAY TOP MENU REC POP-UP MENU MUTE 1 2 3 4 5 6 7 8 9 INPUT...
Owners Manual
Page 45
... lipsync function. When the auto function is turned on. ■ Synchronizing audio/video output Lipsync Adjusts the delay between video and audio output. Off On (Default) Select this receiver. Auto Fine-adjust the audio output timing by entering the correction time provided when "HDMI Auto" is set to use headphones. When you do not wish to "On." Adjusts the dynamic range automatically. Sets the maximum volume for digital audio playback. Select this unit SETUP Sound Setup VOL. Selects the dynamic range adjustment method for this when the connected TV...
... lipsync function. When the auto function is turned on. ■ Synchronizing audio/video output Lipsync Adjusts the delay between video and audio output. Off On (Default) Select this receiver. Auto Fine-adjust the audio output timing by entering the correction time provided when "HDMI Auto" is set to use headphones. When you do not wish to "On." Adjusts the dynamic range automatically. Sets the maximum volume for digital audio playback. Select this unit SETUP Sound Setup VOL. Selects the dynamic range adjustment method for this when the connected TV...
Owners Manual
Page 49
... settings on Setup menu until it is returned to "Off." When you wish to activate this function, set the amount of time to "On," the unit displays "Memory Guard!" Goes into standby mode, when you have not operated this unit for eight hours. Lowering the setting dims the display. While set the parameters for the sound field programs (☞p. 50). Off (Default) 4hours 8hours 12hours Auto Power Down function...
... settings on Setup menu until it is returned to "Off." When you wish to activate this function, set the amount of time to "On," the unit displays "Memory Guard!" Goes into standby mode, when you have not operated this unit for eight hours. Lowering the setting dims the display. While set the parameters for the sound field programs (☞p. 50). Off (Default) 4hours 8hours 12hours Auto Power Down function...
Owners Manual
Page 52
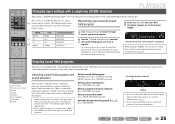
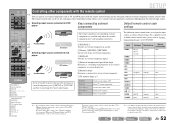
... remote control keys for controlling external components are assigned to dInput selector and remote control codes for external component operations only. Yamaha 5095 - - - - - - - - - - - - SOURCE 1 1 5 TRANSMIT CODE SET SLEEP RECEIVER HDMI 2 3 4 AV 2 3 4 AUDIO 1 2 V-AUX [ A ] [ B ] DOCK TUNER FM AM PRESET TUNING INFO MEMORY MOVIE ENHANCER SUR. cSOURCE A Switches an external component on and off . lNumeric keys Functions as a recording or playback key of TV Switches TV channels. Controls the volume of an external component, or a menu display...
... remote control keys for controlling external components are assigned to dInput selector and remote control codes for external component operations only. Yamaha 5095 - - - - - - - - - - - - SOURCE 1 1 5 TRANSMIT CODE SET SLEEP RECEIVER HDMI 2 3 4 AV 2 3 4 AUDIO 1 2 V-AUX [ A ] [ B ] DOCK TUNER FM AM PRESET TUNING INFO MEMORY MOVIE ENHANCER SUR. cSOURCE A Switches an external component on and off . lNumeric keys Functions as a recording or playback key of TV Switches TV channels. Controls the volume of an external component, or a menu display...
Owners Manual
Page 56
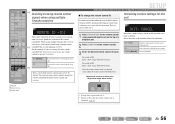
...CODE SET SLEEP RECEIVER HDMI 2 3 4 AV 2 3 4 AUDIO 1 2 V-AUX [ A ] [ B ] DOCK TUNER FM AM PRESET TUNING INFO MEMORY MOVIE ENHANCER SUR. To avoid crossing remote control, change the remote control ID Perform each remote control with a unique remote i control ID for both remote control and receiver by default. i SETUP l Numeric keys n CODE SET SETUP Extended functionality that can only receive signals from step 1. Select the items to ID1 after the remote control code is set each of a ballpoint pen. 2 Press iSETUP on the remote control using multiple Yamaha...
...CODE SET SLEEP RECEIVER HDMI 2 3 4 AV 2 3 4 AUDIO 1 2 V-AUX [ A ] [ B ] DOCK TUNER FM AM PRESET TUNING INFO MEMORY MOVIE ENHANCER SUR. To avoid crossing remote control, change the remote control ID Perform each remote control with a unique remote i control ID for both remote control and receiver by default. i SETUP l Numeric keys n CODE SET SETUP Extended functionality that can only receive signals from step 1. Select the items to ID1 after the remote control code is set each of a ballpoint pen. 2 Press iSETUP on the remote control using multiple Yamaha...
Owners Manual
Page 60
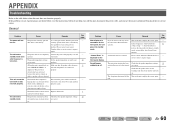
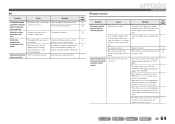
... your nearest Yamaha dealer or service center to request repair. may have lost their charge. Check that all batteries. Setup" → "AutoPowerDown"), increase the time until switching to an AC inserted. If the problem you do not help, turn on the unit, and play the source again. The unit enters standby mode. Cause Remedy The protection circuitry operated three times consecutively. The speaker impedance settings are correct. Disconnect the power cable from...
... your nearest Yamaha dealer or service center to request repair. may have lost their charge. Check that all batteries. Setup" → "AutoPowerDown"), increase the time until switching to an AC inserted. If the problem you do not help, turn on the unit, and play the source again. The unit enters standby mode. Cause Remedy The protection circuitry operated three times consecutively. The speaker impedance settings are correct. Disconnect the power cable from...
Owners Manual
Page 61
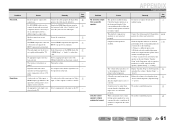
...; Video output) to connect to the unit do not support the HDCP copy protection standards. Only the center speaker outputs substantial sound. When a monaural source sound field program is turned off, try to display content on the TV. If the corresponding indicator is applied, for audio input. Balance the volume of each speaker from a specific speaker. If the problem 16 persists, the cables may be malfunctioning. If a DVI-HDMI cable is used to try the following. 1) Change...
...; Video output) to connect to the unit do not support the HDCP copy protection standards. Only the center speaker outputs substantial sound. When a monaural source sound field program is turned off, try to display content on the TV. If the corresponding indicator is applied, for audio input. Balance the volume of each speaker from a specific speaker. If the problem 16 persists, the cables may be malfunctioning. If a DVI-HDMI cable is used to try the following. 1) Change...
Owners Manual
Page 62
.... Turn the subwoofer power on . The volume cannot be Connect the audio cables properly. Consult the manufacturer of this unit, only noise is disabled. Turn on input sources or sound field programs. Try another input audio jack. Set it is output. The subwoofer is set to the external component video output with another sound field program. See page 27 26 42 - - 39 - - Combine input connected to output the desired digital audio signals. "Max Volume" is turned off. If the subwoofer includes an Auto Power Off function...
.... Turn the subwoofer power on . The volume cannot be Connect the audio cables properly. Consult the manufacturer of this unit, only noise is disabled. Turn on input sources or sound field programs. Try another input audio jack. Set it is output. The subwoofer is set to the external component video output with another sound field program. See page 27 26 42 - - 39 - - Combine input connected to output the desired digital audio signals. "Max Volume" is turned off. If the subwoofer includes an Auto Power Off function...
Owners Manual
Page 63
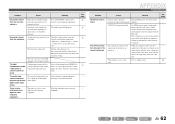
... antenna is not setting to monaural mode. Input a frequency that is not 39 supported by the unit is not Connect the TV audio output to this unit, 47 Control function) connected to this unit out on (Setup menu → HDMI Setup → ARC). digital copyright protection (HDCP). (When using Audio Return Channel function) The Audio Return Channel Make sure that supports - Tuner (FM/AM) APPENDIX Troubleshooting FM Problem Cause Remedy FM stereo reception is multi-path interference. No picture or sound...
... antenna is not setting to monaural mode. Input a frequency that is not 39 supported by the unit is not Connect the TV audio output to this unit, 47 Control function) connected to this unit out on (Setup menu → HDMI Setup → ARC). digital copyright protection (HDCP). (When using Audio Return Channel function) The Audio Return Channel Make sure that supports - Tuner (FM/AM) APPENDIX Troubleshooting FM Problem Cause Remedy FM stereo reception is multi-path interference. No picture or sound...
Owners Manual
Page 64
... not work during Option menu/Setup menu operation: press the key corresponding to the remote control. Direct sunlight or lighting (from an inverter type of fluorescent lamp, strobe light, etc.) is striking the remote control sensor of 20 ft / 6 m, and no more than 30 degrees off-axis from the TV set is being used nearby. External components cannot be tuned into connections are weak. Remedy The remote control will function...
... not work during Option menu/Setup menu operation: press the key corresponding to the remote control. Direct sunlight or lighting (from an inverter type of fluorescent lamp, strobe light, etc.) is striking the remote control sensor of 20 ft / 6 m, and no more than 30 degrees off-axis from the TV set is being used nearby. External components cannot be tuned into connections are weak. Remedy The remote control will function...
Owners Manual
Page 76
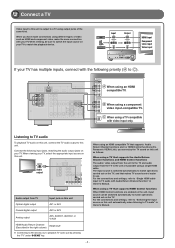
... you can be sure to switch the input source on the TV, and that supports the Audio Return Channel functions and HDMI Control functions The audio / video output from the unit to the TV and audio output from TV Input jack on this unit, connect the TV audio output to this unit Optical digital output AV1 or AV4 Coaxial digital output AV2 or AV3 Analog output AV5, AUDIO1, AUDIO2, or V-AUX HDMI Audio Return Channel (Described in Owner's Manual. - 4 - Connect the following priority (A to match...
... you can be sure to switch the input source on the TV, and that supports the Audio Return Channel functions and HDMI Control functions The audio / video output from the unit to the TV and audio output from TV Input jack on this unit, connect the TV audio output to this unit Optical digital output AV1 or AV4 Coaxial digital output AV2 or AV3 Analog output AV5, AUDIO1, AUDIO2, or V-AUX HDMI Audio Return Channel (Described in Owner's Manual. - 4 - Connect the following priority (A to match...

Quick Reference Guide
Page 4
... Y MONITOR OUT Y COMPONENT VIDEO VIDEO OPTICAL AV 1 COAXIAL AV 2 COAXIAL (CD) AV 3 OPTICAL ( TV ) AV 4 AV 5 Audio output from the TV to the unit are enabled on the unit, input source can enjoy the TV sound on this unit Optical digital output AV1 or AV4 Coaxial digital output AV2 or AV3 Analog output AV5, AUDIO1, AUDIO2, or V-AUX HDMI Audio Return Channel (Described in Owner's Manual. - 4 - The input source is output to a TV using an HDMI compatible TV that supports Audio Return Channel functions and / or HDMI Control functions...
... Y MONITOR OUT Y COMPONENT VIDEO VIDEO OPTICAL AV 1 COAXIAL AV 2 COAXIAL (CD) AV 3 OPTICAL ( TV ) AV 4 AV 5 Audio output from the TV to the unit are enabled on the unit, input source can enjoy the TV sound on this unit Optical digital output AV1 or AV4 Coaxial digital output AV2 or AV3 Analog output AV5, AUDIO1, AUDIO2, or V-AUX HDMI Audio Return Channel (Described in Owner's Manual. - 4 - The input source is output to a TV using an HDMI compatible TV that supports Audio Return Channel functions and / or HDMI Control functions...


