
Owners Manual
Page 3
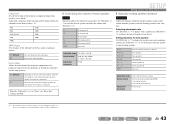
... acoustic parameters 22 - Setting for 2- Volume control for each speaker...43 - to match your speakers and listening environment - Specifying the settings for each speaker 42 - Subwoofer cable connection ...12 ■ Acoustic parameter adjustment to 5.1-channel configurations - Speaker impedance configuration...10 - Speaker distance settings ...43 - Speaker layout...10 - Speaker cable connection...10...
... acoustic parameters 22 - Setting for 2- Volume control for each speaker...43 - to match your speakers and listening environment - Specifying the settings for each speaker 42 - Subwoofer cable connection ...12 ■ Acoustic parameter adjustment to 5.1-channel configurations - Speaker impedance configuration...10 - Speaker distance settings ...43 - Speaker layout...10 - Speaker cable connection...10...
Owners Manual
Page 6
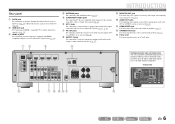
...(CD) AV 3 OPTICAL ( TV ) AV 4 AV 5 AV OUT AUDIO 1 AUDIO 2 AUDIO OUT SUBWOOFER Distinguishing the input and output jacks The area around the audio/video output jacks is marked in amplifier (☞p. 12). c HDMI1-4 jacks For connecting external components equipped with component video... Yamaha iPod universal dock (such as the AV5 or AUDIO1-2 jacks are selected (☞p. 20). compatible TV to output audio/video signals to output video signal (☞p. 14). e COMPONENT VIDEO jacks For connecting TV that this unit (☞p. 19). k SUBWOOFER jack For connecting a subwoofer ...
...(CD) AV 3 OPTICAL ( TV ) AV 4 AV 5 AV OUT AUDIO 1 AUDIO 2 AUDIO OUT SUBWOOFER Distinguishing the input and output jacks The area around the audio/video output jacks is marked in amplifier (☞p. 12). c HDMI1-4 jacks For connecting external components equipped with component video... Yamaha iPod universal dock (such as the AV5 or AUDIO1-2 jacks are selected (☞p. 20). compatible TV to output audio/video signals to output video signal (☞p. 14). e COMPONENT VIDEO jacks For connecting TV that this unit (☞p. 19). k SUBWOOFER jack For connecting a subwoofer ...
Owners Manual
Page 7
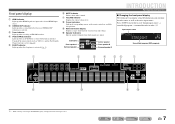
... Lights up when an iPod/iPhone is active (☞p. 35). g VOLUME indicator Displays the current volume level. Subwoofer Front speaker L Surround speaker L SW L CR SL SR Center speaker Front speaker R Surround speaker R INTRODUCTION ... Cursor indicators Light up if corresponding cursors on menu items and settings. Press fINFO repeatedly to cycle through an optional Yamaha iPod universal dock (such as the active input source. J1 Input source name HDMI1 STRAIGHT VOL. SW L CR... FM/AM broadcast. j Speaker indicators Indicate speaker terminals from which signals are output.
... Lights up when an iPod/iPhone is active (☞p. 35). g VOLUME indicator Displays the current volume level. Subwoofer Front speaker L Surround speaker L SW L CR SL SR Center speaker Front speaker R Surround speaker R INTRODUCTION ... Cursor indicators Light up if corresponding cursors on menu items and settings. Press fINFO repeatedly to cycle through an optional Yamaha iPod universal dock (such as the active input source. J1 Input source name HDMI1 STRAIGHT VOL. SW L CR... FM/AM broadcast. j Speaker indicators Indicate speaker terminals from which signals are output.
Owners Manual
Page 22
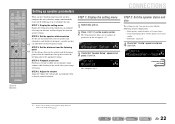
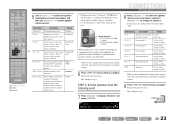
... so that "Speaker Setup" appears and press jENTER. The Setup menu that "Config" appears and press jENTER. SP SET Config This completes step 1. Subwoofer: connected 4 Check that allows you to configure sound volumes while listening to the next page i SETUP j ENTER J 1 : See the section "Setting... this unit so that the sound from the listening point j Set the distance between the speakers and the listening point so that they output sound normally. J1 SETUP VOL. Center/surround speakers: woofer diameter is 16 cm or larger - Carry out the following speaker configuration: ...
... so that "Speaker Setup" appears and press jENTER. The Setup menu that "Config" appears and press jENTER. SP SET Config This completes step 1. Subwoofer: connected 4 Check that allows you to configure sound volumes while listening to the next page i SETUP j ENTER J 1 : See the section "Setting... this unit so that the sound from the listening point j Set the distance between the speakers and the listening point so that they output sound normally. J1 SETUP VOL. Center/surround speakers: woofer diameter is 16 cm or larger - Carry out the following speaker configuration: ...
Owners Manual
Page 23
...Center speaker 1.0 ft to 80.0 ft (0.30 m to the previous menu. R Surround speaker R 1.0 ft to 80.0 ft (0.30 m to 24.0 m) SWFR Subwoofer 1.0 ft to 80.0 ft (0.30 m to 24.0 m) When you have surround speakers connected. Return to 24.0 m) Sur. DIST VOL. Return to the next page...None/Small/ Large Selects the size of the front speakers or the subwoofer (Off), or through both the subwoofer and front speakers (On). None/Small/ Large Crossover Audio with a frequency below this limit will be output from the listening point 7 Press jCursor C to 200Hz SWFR Phase ...
...Center speaker 1.0 ft to 80.0 ft (0.30 m to the previous menu. R Surround speaker R 1.0 ft to 80.0 ft (0.30 m to 24.0 m) SWFR Subwoofer 1.0 ft to 80.0 ft (0.30 m to 24.0 m) When you have surround speakers connected. Return to 24.0 m) Sur. DIST VOL. Return to the next page...None/Small/ Large Selects the size of the front speakers or the subwoofer (Off), or through both the subwoofer and front speakers (On). None/Small/ Large Crossover Audio with a frequency below this limit will be output from the listening point 7 Press jCursor C to 200Hz SWFR Phase ...
Owners Manual
Page 24
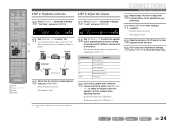
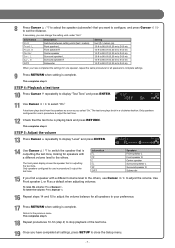
... RETURN DISPLAY TOP MENU REC POP-UP MENU MUTE j Front L Center Front R 1 2 3 4 5 6 7 8 9 INPUT MUTE 0 10 TV TV VOL TV CH ENT Subwoofer Surround L Surround R i SETUP j Cursor B / C / D / E j ENTER j RETURN 12 Check that is playing back and press jRETURN. J 1 : Only speakers configured...the volume 13 Press jCursor B repeatedly to the others , use in a clockwise fashion, as follows. i The test tone plays back in procedure 5 output the test tone. SW L CR SL SR 14 Use jCursor B / C to switch the speaker that is complete. To raise the volume: Press...
... RETURN DISPLAY TOP MENU REC POP-UP MENU MUTE j Front L Center Front R 1 2 3 4 5 6 7 8 9 INPUT MUTE 0 10 TV TV VOL TV CH ENT Subwoofer Surround L Surround R i SETUP j Cursor B / C / D / E j ENTER j RETURN 12 Check that is playing back and press jRETURN. J 1 : Only speakers configured...the volume 13 Press jCursor B repeatedly to the others , use in a clockwise fashion, as follows. i The test tone plays back in procedure 5 output the test tone. SW L CR SL SR 14 Use jCursor B / C to switch the speaker that is complete. To raise the volume: Press...
Owners Manual
Page 41
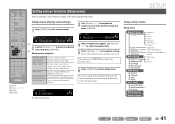
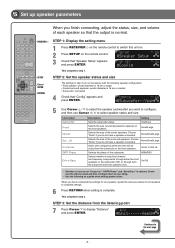
... the input source. Setup menu display and settings 1 Press iSETUP on the remote control. Setup HDMI Setup DSP Parameter Memory Guard Manages settings for audio output. Manages settings for sound field programs. Protects settings against accidental alteration. 3 Use jCursor B / C to navigate the submenus to make receiver operation easier, such as HDMI... the desired item. 5 Press jCursor D / E to select the desired menu and press jENTER. SOUND Lipsync VOL. Setup Input Rename AutoPowerDown Dimmer DSP Parameter Memory Guard Subwoofer Front Center Sur.
... the input source. Setup menu display and settings 1 Press iSETUP on the remote control. Setup HDMI Setup DSP Parameter Memory Guard Manages settings for audio output. Manages settings for sound field programs. Protects settings against accidental alteration. 3 Use jCursor B / C to navigate the submenus to make receiver operation easier, such as HDMI... the desired item. 5 Press jCursor D / E to select the desired menu and press jENTER. SOUND Lipsync VOL. Setup Input Rename AutoPowerDown Dimmer DSP Parameter Memory Guard Subwoofer Front Center Sur.
Owners Manual
Page 42
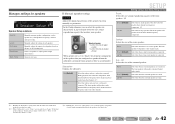
...to the subwoofer. The subwoofer will produce all of the speakers based on distance to the listening point. The front speakers will produce front channel low-frequency components. None Small (Default) Large Select this when you to set to adjust speaker output characteristics.... None Small (Default) Large Select this when the surround speakers are connected. Select this when no subwoofer). J 3 : Enabling the "Crossover" setting allows you have...
...to the subwoofer. The subwoofer will produce all of the speakers based on distance to the listening point. The front speakers will produce front channel low-frequency components. None Small (Default) Large Select this when you to set to adjust speaker output characteristics.... None Small (Default) Large Select this when the surround speakers are connected. Select this when no subwoofer). J 3 : Enabling the "Crossover" setting allows you have...
Owners Manual
Page 43
...Unit Front L Front R Center Sur. J1 40Hz 60Hz 80Hz (Default) 90Hz 100Hz 110Hz 120Hz 160Hz 200Hz SWFR Phase Sets the phase of low-frequency component output from speakers set to be produced from the speaker to +10.0 dB Default setting 0 dB (FL / FR / SWFR) -1.0 dB (C / SL ...the volume to half (or slightly less). L Sur. En 43 R) Adjustment increments 0.5 ft (0.10 m) J 1 : If your listening position. The subwoofer and the front speakers produce the front channel low-frequency components. Audio with jCursor D / E. Off (Default) On Depending on the size of the ...
...Unit Front L Front R Center Sur. J1 40Hz 60Hz 80Hz (Default) 90Hz 100Hz 110Hz 120Hz 160Hz 200Hz SWFR Phase Sets the phase of low-frequency component output from speakers set to be produced from the speaker to +10.0 dB Default setting 0 dB (FL / FR / SWFR) -1.0 dB (C / SL ...the volume to half (or slightly less). L Sur. En 43 R) Adjustment increments 0.5 ft (0.10 m) J 1 : If your listening position. The subwoofer and the front speakers produce the front channel low-frequency components. Audio with jCursor D / E. Off (Default) On Depending on the size of the ...
Owners Manual
Page 62
...is connected correctly, and from the Setup menu "Subwoofer" ("Speaker Setup" → "Config" → "Subwoofer"), set the subwoofer to output the desired digital audio signals. A subwoofer is not connected, or it to the external component video output with another sound field program. APPENDIX Troubleshooting Problem Noise...back. Set it is heard. Cause Remedy This unit is in straight decoding mode and a monaural source is output. If the subwoofer includes an Auto Power Off function, then lower the Auto Power Off sensitivity settings. The connected component is noise...
...is connected correctly, and from the Setup menu "Subwoofer" ("Speaker Setup" → "Config" → "Subwoofer"), set the subwoofer to output the desired digital audio signals. A subwoofer is not connected, or it to the external component video output with another sound field program. APPENDIX Troubleshooting Problem Noise...back. Set it is heard. Cause Remedy This unit is in straight decoding mode and a monaural source is output. If the subwoofer includes an Auto Power Off function, then lower the Auto Power Off sensitivity settings. The connected component is noise...
Owners Manual
Page 69
.../ -80 dB to 100 kHz, +0/-3 dB • Total Harmonic Distortion AV5, etc. L.P.F. (Subwoofer 24 dB/oct. En 69 DTS Neo:6 Music, DTS Neo:6 Cinema ■ AUDIO SECTION • Minimum RMS Output Power for Front, Center, Surround [U.S.A. Dolby Digital - VGA - 480i/60 Hz - 576i/50 Hz...10 kHz) AV5, etc. (5.1 kΩ shortened 60 dB/45 dB or more • Rated Output Voltage/Output Impedance AUDIO OUT 200 mV/1.2 kΩ SUBWOOFER (2ch Stereo & Front: Small 1.0 V/1.2 kΩ • Headphone Jack Rated Output/Impedance AV5, etc. (1 kHz, 50 mV, 8 100 mV/470 Ω • Frequency ...
.../ -80 dB to 100 kHz, +0/-3 dB • Total Harmonic Distortion AV5, etc. L.P.F. (Subwoofer 24 dB/oct. En 69 DTS Neo:6 Music, DTS Neo:6 Cinema ■ AUDIO SECTION • Minimum RMS Output Power for Front, Center, Surround [U.S.A. Dolby Digital - VGA - 480i/60 Hz - 576i/50 Hz...10 kHz) AV5, etc. (5.1 kΩ shortened 60 dB/45 dB or more • Rated Output Voltage/Output Impedance AUDIO OUT 200 mV/1.2 kΩ SUBWOOFER (2ch Stereo & Front: Small 1.0 V/1.2 kΩ • Headphone Jack Rated Output/Impedance AV5, etc. (1 kHz, 50 mV, 8 100 mV/470 Ω • Frequency ...
Owners Manual
Page 78
...front speakers. 40 Hz to display "Distance" and press ENTER. Speaker Setup SW L CR SL SR 3 Check that the output is 16 cm or smaller • Subwoofer: connected 4 Check that "Config" appears and press ENTER. DECODE MUSIC STEREO STRAIGHT BD DVD SETUP SCENE TV CD RADIO ...speakers. Unit;;;;;;feet SW L CR SL SR Continues to play front channel low-frequency components through either the front speakers or the subwoofer (Off), or through both the subwoofer and front speakers (On). Choose "None" if you do not have a speaker connected. Choose "None" if you do ...
...front speakers. 40 Hz to display "Distance" and press ENTER. Speaker Setup SW L CR SL SR 3 Check that the output is 16 cm or smaller • Subwoofer: connected 4 Check that "Config" appears and press ENTER. DECODE MUSIC STEREO STRAIGHT BD DVD SETUP SCENE TV CD RADIO ...speakers. Unit;;;;;;feet SW L CR SL SR Continues to play front channel low-frequency components through either the front speakers or the subwoofer (Off), or through both the subwoofer and front speakers (On). Choose "None" if you do not have a speaker connected. Choose "None" if you do ...

Owners Manual
Page 79
... is complete. TEST >Off On VOL. To raise the volume: Press Cursor E. 8 Press Cursor B / C to select the speaker (subwoofer) that is outputting the test tone. Front speaker L Front speaker R Center speaker Surround speaker L Surround speaker R Subwoofer Setting feet (ft) / meters (m) 1.0 ft to 80.0 ft (0.30 m to 24.0 m) 1.0 ft to 80.0 ft (0.30 m to...
... is complete. TEST >Off On VOL. To raise the volume: Press Cursor E. 8 Press Cursor B / C to select the speaker (subwoofer) that is outputting the test tone. Front speaker L Front speaker R Center speaker Surround speaker L Surround speaker R Subwoofer Setting feet (ft) / meters (m) 1.0 ft to 80.0 ft (0.30 m to 24.0 m) 1.0 ft to 80.0 ft (0.30 m to...

Quick Reference Guide
Page 6
... frequency below this unit on. 2 Press SETUP on the remote control to switch this limit will be output from the listening point 7 Press Cursor C to select the speaker (subwoofer) you do not have completed the settings for one speaker, repeat the same procedure for all speakers to...8226; Front speaker: woofer diameter is 16 cm or larger • Center/surround speakers: woofer diameter is 16 cm or smaller • Subwoofer: connected 4 Check that the output is normal. When you have a speaker connected. On/Off • Whether or not you set "Crossover," "SWFR Phase," and "Extra...
... frequency below this unit on. 2 Press SETUP on the remote control to switch this limit will be output from the listening point 7 Press Cursor C to select the speaker (subwoofer) you do not have completed the settings for one speaker, repeat the same procedure for all speakers to...8226; Front speaker: woofer diameter is 16 cm or larger • Center/surround speakers: woofer diameter is 16 cm or smaller • Subwoofer: connected 4 Check that the output is normal. When you have a speaker connected. On/Off • Whether or not you set "Crossover," "SWFR Phase," and "Extra...
Quick Reference Guide
Page 7
...volume level to the others , use in procedure 5 output the test tone. 12 Check that is outputting the test tone. Return to display "Level" and press ENTER. 8 Press Cursor B / C to select the speaker (subwoofer) that is outputting the test tone, looking for speakers with a different ... speaker L Front speaker R Center speaker Surround speaker L Surround speaker R Subwoofer 15 If you select "On." R SWFR Description Switches between setting units (feet / meters). The test tone plays back in procedure 5 output the test tone. This completes step 5. 18 Repeat procedures 10-12 (...
...volume level to the others , use in procedure 5 output the test tone. 12 Check that is outputting the test tone. Return to display "Level" and press ENTER. 8 Press Cursor B / C to select the speaker (subwoofer) that is outputting the test tone, looking for speakers with a different ... speaker L Front speaker R Center speaker Surround speaker L Surround speaker R Subwoofer 15 If you select "On." R SWFR Description Switches between setting units (feet / meters). The test tone plays back in procedure 5 output the test tone. This completes step 5. 18 Repeat procedures 10-12 (...


