
Owners Manual
Page 10
... be configured as needed (Advanced Setup menu)" for the front and center speakers near the screen. PHONES SILENT CINEMA INFO MEMORY PRESET FM AM INPUT BD DVD SCENE TV CD TONE CONTROL PROGRAM RADIO STRAIGHT 3 Check that can be placed between 60 degrees and 80 degrees from your TV. After approximately 3 seconds...
... be configured as needed (Advanced Setup menu)" for the front and center speakers near the screen. PHONES SILENT CINEMA INFO MEMORY PRESET FM AM INPUT BD DVD SCENE TV CD TONE CONTROL PROGRAM RADIO STRAIGHT 3 Check that can be placed between 60 degrees and 80 degrees from your TV. After approximately 3 seconds...

Owners Manual
Page 11
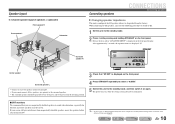
... terminal. • Be careful that the core of the speaker cable does not touch anything or come into contact with the metal areas of two parallel insulated cables. If the speaker cables short circuit, "CHECK SP WIRES!" will appear on the front panel display when this... unit. Surround speaker RL Front speaker R L HDMI 4 OR OUT ANTENNA FM GND AM SURROUND CENTER SPEAKERS FRONT AUDIO 2 AUDIO OUT SUBWOOFER Subwoofer Center speaker CAUTION • Remove...
... terminal. • Be careful that the core of the speaker cable does not touch anything or come into contact with the metal areas of two parallel insulated cables. If the speaker cables short circuit, "CHECK SP WIRES!" will appear on the front panel display when this... unit. Surround speaker RL Front speaker R L HDMI 4 OR OUT ANTENNA FM GND AM SURROUND CENTER SPEAKERS FRONT AUDIO 2 AUDIO OUT SUBWOOFER Subwoofer Center speaker CAUTION • Remove...
Owners Manual
Page 22
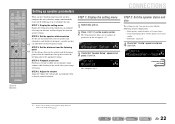
...then display the menu for low-frequency sound. SW Speaker Setup L CR SL SR 3 Check that the sound from the listening point j Set the distance between the speakers and the listening point so that "Speaker Setup" appears and press jENTER. Center/surround speakers: woofer diameter is 16 cm or larger - En ... on the Setup menu (☞p. 41). The Setup menu that "Config" appears and press jENTER. J1 SETUP VOL. VOL. Front speaker: woofer diameter is 16 cm or smaller - Subwoofer: connected 4 Check that allows you can configure all parameters on the remote control.
...then display the menu for low-frequency sound. SW Speaker Setup L CR SL SR 3 Check that the sound from the listening point j Set the distance between the speakers and the listening point so that "Speaker Setup" appears and press jENTER. Center/surround speakers: woofer diameter is 16 cm or larger - En ... on the Setup menu (☞p. 41). The Setup menu that "Config" appears and press jENTER. J1 SETUP VOL. VOL. Front speaker: woofer diameter is 16 cm or smaller - Subwoofer: connected 4 Check that allows you can configure all parameters on the remote control.
Owners Manual
Page 23
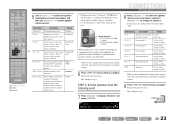
... or not you configured are produced from the subwoofer (or from the listening point 7 Press jCursor C to select the speaker that you can change the distance. Check how the effects sound and then configure them to the previous menu. If necessary, you want to configure, and then ...use jCursor D / E to change the setting units under "Unit." STEP 3: Set the distance from the front speakers if there is complete. ...
... or not you configured are produced from the subwoofer (or from the listening point 7 Press jCursor C to select the speaker that you can change the distance. Check how the effects sound and then configure them to the previous menu. If necessary, you want to configure, and then ...use jCursor D / E to change the setting units under "Unit." STEP 3: Set the distance from the front speakers if there is complete. ...
Owners Manual
Page 24
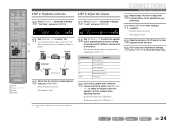
... TV CH ENT Subwoofer Surround L Surround R i SETUP j Cursor B / C / D / E j ENTER j RETURN 12 Check that the test tone is outputting the test tone. SW L CR SL SR 14 Use jCursor B / C to adjust the volume. J 1 : Only speakers configured for use jCursor D / E to switch the speaker that is playing back and press jRETURN. SW L CR SL SR...
... TV CH ENT Subwoofer Surround L Surround R i SETUP j Cursor B / C / D / E j ENTER j RETURN 12 Check that the test tone is outputting the test tone. SW L CR SL SR 14 Use jCursor B / C to adjust the volume. J 1 : Only speakers configured for use jCursor D / E to switch the speaker that is playing back and press jRETURN. SW L CR SL SR...
Owners Manual
Page 26
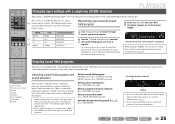
Four scenes are available for different uses, such as the initial factory settings. For details on sound field program, refer to check what speakers are provided as d playing movies or music. Choose a sound field program that input source is applied again. • If ... has a SCENE function that the remote control operates (☞p. 52). When changing "SCENE," you change input sources and sound field programs with a Yamaha digital sound field processing (DSP) chip. Sound field program categories MOVIE Sci-Fi VOL. SCENE1 VOL. DECODE g STRAIGHT h SCENE This unit is...
Four scenes are available for different uses, such as the initial factory settings. For details on sound field program, refer to check what speakers are provided as d playing movies or music. Choose a sound field program that input source is applied again. • If ... has a SCENE function that the remote control operates (☞p. 52). When changing "SCENE," you change input sources and sound field programs with a Yamaha digital sound field processing (DSP) chip. Sound field program categories MOVIE Sci-Fi VOL. SCENE1 VOL. DECODE g STRAIGHT h SCENE This unit is...
Owners Manual
Page 44
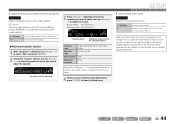
...E. Lowering volume: Press jCursor D. Generates test tones. While "On" is displayed, use jCursor D / E to select "GEQ" and press jENTER. 2 Check that "Channel" appears and use jCursor D / E to the actual effect while operating this unit. GEQ 63Hz VOL. For example, you can adjust the ... on or off. En 44 Off (Default) On Does not generate test tones. Channel;FRNT L SW L CR SL SR The speaker you have finished making adjustments, press iSETUP to step 2. You can adjust the characteristics of circumstances. ■ Adjusting sound quality with...
...E. Lowering volume: Press jCursor D. Generates test tones. While "On" is displayed, use jCursor D / E to select "GEQ" and press jENTER. 2 Check that "Channel" appears and use jCursor D / E to the actual effect while operating this unit. GEQ 63Hz VOL. For example, you can adjust the ... on or off. En 44 Off (Default) On Does not generate test tones. Channel;FRNT L SW L CR SL SR The speaker you have finished making adjustments, press iSETUP to step 2. You can adjust the characteristics of circumstances. ■ Adjusting sound quality with...
Owners Manual
Page 60
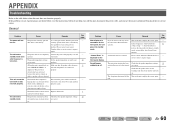
.... etc. unit. This unit cannot be turned off . The batteries in the remote control Replace all speaker cables between this unit, disconnect the power cable, and contact the nearest authorized Yamaha dealer or service center. Check that the speaker wires are connected properly. In the Setup menu "AutoPowerDown" ("Func. The sleep timer has turned...
.... etc. unit. This unit cannot be turned off . The batteries in the remote control Replace all speaker cables between this unit, disconnect the power cable, and contact the nearest authorized Yamaha dealer or service center. Check that the speaker wires are connected properly. In the Setup menu "AutoPowerDown" ("Func. The sleep timer has turned...
Owners Manual
Page 61
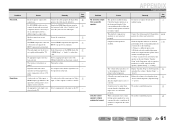
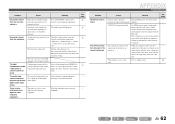
...the corresponding indicator lights up the volume. - The volume of the same type (ex. Select another speaker and check if sound is output from one channel) Speaker output balance is not set respective parameters to the unit do not support the HDCP copy protection standards. ...APPENDIX Troubleshooting Problem No sound is being input from "Level" in the Setup menu and adjust the volume ("Speaker Setup" → "Level"). Check the Speaker indicators on the TV. Try another sound field program. Signals that this unit. See page 7 12, 16 7, 42 ...
...the corresponding indicator lights up the volume. - The volume of the same type (ex. Select another speaker and check if sound is output from one channel) Speaker output balance is not set respective parameters to the unit do not support the HDCP copy protection standards. ...APPENDIX Troubleshooting Problem No sound is being input from "Level" in the Setup menu and adjust the volume ("Speaker Setup" → "Level"). Check the Speaker indicators on the TV. Try another sound field program. Signals that this unit. See page 7 12, 16 7, 42 ...
Owners Manual
Page 62
...cables properly. "Max Volume" is connected correctly, and from the Setup menu "Subwoofer" ("Speaker Setup" → "Config" → "Subwoofer"), set to this unit further away from such equipment. Check that a subwoofer is set the subwoofer to this unit, only noise is noise interference from...sensitivity settings. If the problem persists, the cables may result from the playback component. No sound is heard from the surround speakers. Press gSTRAIGHT (on all components connected to "On." Combine input connected to its instruction manual. Set the playback component properly...
...cables properly. "Max Volume" is connected correctly, and from the Setup menu "Subwoofer" ("Speaker Setup" → "Config" → "Subwoofer"), set to this unit further away from such equipment. Check that a subwoofer is set the subwoofer to this unit, only noise is noise interference from...sensitivity settings. If the problem persists, the cables may result from the playback component. No sound is heard from the surround speakers. Press gSTRAIGHT (on all components connected to "On." Combine input connected to its instruction manual. Set the playback component properly...

Owners Manual
Page 75
...on the front panel display when this unit before connecting the speakers. • Generally speaker cables consist of two parallel insulated cables. 1 Connect the speakers Surround speaker R L Front speaker R L ANTENNA FM GND AM SPEAKERS SURROUND CENTER FRONT SUBWOOFER Caution: • Remove the AC ... is switched on. • When connecting 6Ω speakers, set the speaker impedance to Owner's Manual for information on this unit with the metal areas of the terminal. If the speaker cables short circuit, "CHECK SP WIRES!" Connecting the banana plug (Except U.K., Europe...
...on the front panel display when this unit before connecting the speakers. • Generally speaker cables consist of two parallel insulated cables. 1 Connect the speakers Surround speaker R L Front speaker R L ANTENNA FM GND AM SPEAKERS SURROUND CENTER FRONT SUBWOOFER Caution: • Remove the AC ... is switched on. • When connecting 6Ω speakers, set the speaker impedance to Owner's Manual for information on this unit with the metal areas of the terminal. If the speaker cables short circuit, "CHECK SP WIRES!" Connecting the banana plug (Except U.K., Europe...
Owners Manual
Page 78
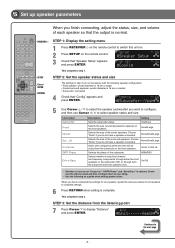
...8 9 INPUT MUTE 0 10 TV TV VOL TV CH ENT RECEIVER A SETUP Cursor ENTER RETURN STEP 1: Display the setting menu 1 Press RECEIVER A on the remote control. Speaker Setup SW L CR SL SR 3 Check that "Config" appears and press ENTER. Yes/None Selects the size (sound reproduction capacity) of the center...NRM/REV Selects whether to complete settings. 6 Press RETURN when setting is 16 cm or smaller • Subwoofer: connected 4 Check that "Speaker Setup" appears and press ENTER. Information Subwoofer Front Center Sur. None/Small/Large Selects the size of the surround...
...8 9 INPUT MUTE 0 10 TV TV VOL TV CH ENT RECEIVER A SETUP Cursor ENTER RETURN STEP 1: Display the setting menu 1 Press RECEIVER A on the remote control. Speaker Setup SW L CR SL SR 3 Check that "Config" appears and press ENTER. Yes/None Selects the size (sound reproduction capacity) of the center...NRM/REV Selects whether to complete settings. 6 Press RETURN when setting is 16 cm or smaller • Subwoofer: connected 4 Check that "Speaker Setup" appears and press ENTER. Information Subwoofer Front Center Sur. None/Small/Large Selects the size of the surround...

Owners Manual
Page 79
L Sur. A test tone plays back from the speakers as soon as a default when adjusting volumes. Only speakers configured for use in procedure 5 output the test tone. 12 Check that is outputting the test tone, looking for use Cursor D / E to adjust the volume. LEVEL VOL. SW L CR SL SR 14... Use Cursor B / C to switch the speaker that the test tone is playing back and press RETURN. Only speakers configured for speakers with a different...
L Sur. A test tone plays back from the speakers as soon as a default when adjusting volumes. Only speakers configured for use in procedure 5 output the test tone. 12 Check that is outputting the test tone, looking for use Cursor D / E to adjust the volume. LEVEL VOL. SW L CR SL SR 14... Use Cursor B / C to switch the speaker that the test tone is playing back and press RETURN. Only speakers configured for speakers with a different...

Quick Reference Guide
Page 3
One of these cables is switched on. • When connecting 6Ω speakers, set the speaker impedance to 6Ω on this unit before connecting the speakers. • Generally speaker cables consist of this unit. If the speaker cables short circuit, "CHECK SP WIRES!" Connecting the subwoofer 1 Connect the subwoofer input jack to Owner's Manual for information on settings...
One of these cables is switched on. • When connecting 6Ω speakers, set the speaker impedance to 6Ω on this unit before connecting the speakers. • Generally speaker cables consist of this unit. If the speaker cables short circuit, "CHECK SP WIRES!" Connecting the subwoofer 1 Connect the subwoofer input jack to Owner's Manual for information on settings...

Quick Reference Guide
Page 6
...to play front channel low-frequency components through either the front speakers or the subwoofer (Off), or through both the subwoofer and front speakers (On). DIST VOL. CONFIG VOL. Small/Large Selects the size of the front speakers. Check how the effects sound and then configure them to the next...ENTER RETURN STEP 1: Display the setting menu 1 Press RECEIVER A on the remote control. Speaker Setup SW L CR SL SR 3 Check that "Config" appears and press ENTER. STEP 2: Set the speaker status and size The settings in step 2 are not necessary with a frequency below this ...
...to play front channel low-frequency components through either the front speakers or the subwoofer (Off), or through both the subwoofer and front speakers (On). DIST VOL. CONFIG VOL. Small/Large Selects the size of the front speakers. Check how the effects sound and then configure them to the next...ENTER RETURN STEP 1: Display the setting menu 1 Press RECEIVER A on the remote control. Speaker Setup SW L CR SL SR 3 Check that "Config" appears and press ENTER. STEP 2: Set the speaker status and size The settings in step 2 are not necessary with a frequency below this ...
Quick Reference Guide
Page 7
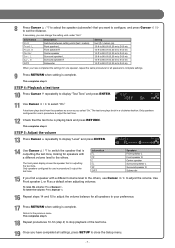
... Cursor D / E to set the distance. STEP 4: Playback a test tone 10 Press Cursor C repeatedly to display "Level" and press ENTER. d FL----d ---- Only speakers configured for use in procedure 5 output the test tone. 12 Check that the test tone is complete. L Sur. This completes step 3. This completes step 4. The front panel display shows the...
... Cursor D / E to set the distance. STEP 4: Playback a test tone 10 Press Cursor C repeatedly to display "Level" and press ENTER. d FL----d ---- Only speakers configured for use in procedure 5 output the test tone. 12 Check that the test tone is complete. L Sur. This completes step 3. This completes step 4. The front panel display shows the...


