
Owners Manual
Page 2
...control) ..... 25 Changing input settings with a single key (SCENE function 26 Registering input sources/sound field program 26 Enjoying sound field programs 26 Selecting sound field programs and sound decoders ..... 26 Sound field programs 28 FM/AM tuning 30 Selecting a frequency for reception (Normal tuning)..... 30 ...speakers 55 Avoiding crossing remote control signals when using multiple Yamaha receivers 56 Initializing various settings for this unit 56 Using the HDMI Control function 57 APPENDIX Troubleshooting 60 General 60 HDMI 63 Tuner (FM/AM 63 Remote control 64 iPod&#...
...control) ..... 25 Changing input settings with a single key (SCENE function 26 Registering input sources/sound field program 26 Enjoying sound field programs 26 Selecting sound field programs and sound decoders ..... 26 Sound field programs 28 FM/AM tuning 30 Selecting a frequency for reception (Normal tuning)..... 30 ...speakers 55 Avoiding crossing remote control signals when using multiple Yamaha receivers 56 Initializing various settings for this unit 56 Using the HDMI Control function 57 APPENDIX Troubleshooting 60 General 60 HDMI 63 Tuner (FM/AM 63 Remote control 64 iPod&#...
Owners Manual
Page 3
... 22 - Specifying the settings for 2- Speaker distance settings ...43 - INTRODUCTION Features and capabilities ■ Built-in high-quality, high-power 5-channel amplifier ■ 1-button input/sound field program switching (SCENE function 26 ■ Speaker connections for each speaker...43 - Speaker layout...10 - Speaker channels and functions ...9 - Subwoofer cable connection ...12 ■...
... 22 - Specifying the settings for 2- Speaker distance settings ...43 - INTRODUCTION Features and capabilities ■ Built-in high-quality, high-power 5-channel amplifier ■ 1-button input/sound field program switching (SCENE function 26 ■ Speaker connections for each speaker...43 - Speaker layout...10 - Speaker channels and functions ...9 - Subwoofer cable connection ...12 ■...
Owners Manual
Page 6
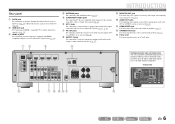
...connecting external components equipped with analog audio outputs to input sound into this unit to prevent connection errors. d DOCK COMPONENT VIDEO PR ARC HDMI OUT PR (BD/DVD) HDMI 1 HDMI 2 PB PB Y MONITOR OUT Y COMPONENT VIDEO VIDEO HDMI 3 HDMI 4 MONITOR OUT ANTENNA FM GND AM SURROUND CENTER SPEAKERS...video signals, using three cables to receive audio/video signals from (☞p. 16). Rear panel a DOCK jack For connecting an optional Yamaha iPod universal dock (such as the AV5 or AUDIO1-2 jacks are selected (☞p. 20). l SPEAKER terminals For connecting the front,...
...connecting external components equipped with analog audio outputs to input sound into this unit to prevent connection errors. d DOCK COMPONENT VIDEO PR ARC HDMI OUT PR (BD/DVD) HDMI 1 HDMI 2 PB PB Y MONITOR OUT Y COMPONENT VIDEO VIDEO HDMI 3 HDMI 4 MONITOR OUT ANTENNA FM GND AM SURROUND CENTER SPEAKERS...video signals, using three cables to receive audio/video signals from (☞p. 16). Rear panel a DOCK jack For connecting an optional Yamaha iPod universal dock (such as the AV5 or AUDIO1-2 jacks are selected (☞p. 20). l SPEAKER terminals For connecting the front,...
Owners Manual
Page 7
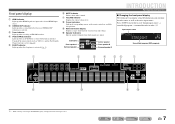
... up when receiving an FM/AM broadcast. h Cursor indicators Light up if corresponding cursors on menu items and settings. SW L CR SL SR Sound field program (DSP program) a b c d ef g iPod CHARGE SLEEP STEREO TUNED VOL. En 7 i Multi information display Displays a range... of the input source. Press fINFO repeatedly to cycle through an optional Yamaha iPod universal dock (such as the active input source. Front panel display a HDMI indicator Lights up when HDMI signals are output. b CINEMA DSP indicator Lights up when an iPod/iPhone is selected...
... up when receiving an FM/AM broadcast. h Cursor indicators Light up if corresponding cursors on menu items and settings. SW L CR SL SR Sound field program (DSP program) a b c d ef g iPod CHARGE SLEEP STEREO TUNED VOL. En 7 i Multi information display Displays a range... of the input source. Press fINFO repeatedly to cycle through an optional Yamaha iPod universal dock (such as the active input source. Front panel display a HDMI indicator Lights up when HDMI signals are output. b CINEMA DSP indicator Lights up when an iPod/iPhone is selected...
Owners Manual
Page 8
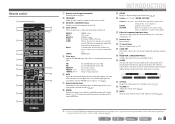
...Changes tuning frequencies. g Sound selection keys Switch between ...Switches the input source and the sound field program with the kExternal component ...this unit between the sound field effect (sound field program) you are used...MUTE Turns the mute function of the sound output on and standby modes. Sleep Off...sleep timer is activated. J1 DOCK A Yamaha iPod universal dock or Bluetooth wireless audio...automatically after a specified period of the currently selected input source, the sound field program, the surround decoder, the FM/AM tuner frequency, etc.)(☞p. 7)....
...Changes tuning frequencies. g Sound selection keys Switch between ...Switches the input source and the sound field program with the kExternal component ...this unit between the sound field effect (sound field program) you are used...MUTE Turns the mute function of the sound output on and standby modes. Sleep Off...sleep timer is activated. J1 DOCK A Yamaha iPod universal dock or Bluetooth wireless audio...automatically after a specified period of the currently selected input source, the sound field program, the surround decoder, the FM/AM tuner frequency, etc.)(☞p. 7)....
Owners Manual
Page 13
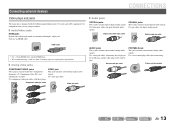
...with three plugs. Use jacks and cables appropriate for components that you are going to connect. ■ Audio/Video jacks HDMI jacks Digital video and digital sound are transmitted through a single jack. Use video pin cables. Stereo mini-plug cable En 13 Use component video pin ... and jacks The main unit is separated into three components: luminance (Y), chrominance blue (PB), and chrominance red (PR). Only use an HDMI cable. ■ Audio jacks OPTICAL jacks These jacks transmit optical digital audio signals. Stereo audio pin cable PORTABLE jack This jack transmits conventional...
...with three plugs. Use jacks and cables appropriate for components that you are going to connect. ■ Audio/Video jacks HDMI jacks Digital video and digital sound are transmitted through a single jack. Use video pin cables. Stereo mini-plug cable En 13 Use component video pin ... and jacks The main unit is separated into three components: luminance (Y), chrominance blue (PB), and chrominance red (PR). Only use an HDMI cable. ■ Audio jacks OPTICAL jacks These jacks transmit optical digital audio signals. Stereo audio pin cable PORTABLE jack This jack transmits conventional...

Owners Manual
Page 15
...Connecting a video monitor Connect the video pin cable to enjoy the TV sound. Panasonic VIERA Link), if HDMI Control functions are possible using a single HDMI cable. CONNECTIONS Connecting external devices When using other TVs To transmit sound from the TV to the unit are enabled on this unit, connect ...as followings according to the TV: When using a TV that makes TV sound control easier to AV4 with Audio Return Channel function" (☞p. 59). When using a TV that supports the HDMI Control functions When using a TV that you to switch the input source to use...
...Connecting a video monitor Connect the video pin cable to enjoy the TV sound. Panasonic VIERA Link), if HDMI Control functions are possible using a single HDMI cable. CONNECTIONS Connecting external devices When using other TVs To transmit sound from the TV to the unit are enabled on this unit, connect ...as followings according to the TV: When using a TV that makes TV sound control easier to AV4 with Audio Return Channel function" (☞p. 59). When using a TV that supports the HDMI Control functions When using a TV that you to switch the input source to use...

Owners Manual
Page 20
...turn down the volume when connecting this jacks to both the PORTABLE jack and the AUDIO jacks, the sound output from these connected devices. HDMI audio/video signals, component video signals, and digital audio signals cannot be transmitted from the PORTABLE jack... analog audio/video signals to the external device's analog audio input jacks. Video / Audio input VIDEO V AUDIO L R ARC DOCK COMPONENT VIDEO PR HDMI OUT PR (BD/DVD) HDMI 1 HDMI 2 HDMI 3 HDMI 4 PB Y MONITOR OUT PB V Y COMPONENT VIDEO VIDEO MONITOR OUT L L R R OPTICAL AV 1 COAXIAL AV 2 COAXIAL (CD) AV ...
...turn down the volume when connecting this jacks to both the PORTABLE jack and the AUDIO jacks, the sound output from these connected devices. HDMI audio/video signals, component video signals, and digital audio signals cannot be transmitted from the PORTABLE jack... analog audio/video signals to the external device's analog audio input jacks. Video / Audio input VIDEO V AUDIO L R ARC DOCK COMPONENT VIDEO PR HDMI OUT PR (BD/DVD) HDMI 1 HDMI 2 HDMI 3 HDMI 4 PB Y MONITOR OUT PB V Y COMPONENT VIDEO VIDEO MONITOR OUT L L R R OPTICAL AV 1 COAXIAL AV 2 COAXIAL (CD) AV ...
Owners Manual
Page 22
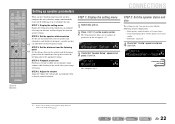
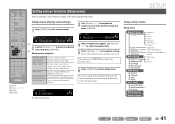
... diameter is 16 cm or larger - STEP 1: Display the setting menu 1 Switch this unit, and then display the menu for low-frequency sound. SW Speaker Setup L CR SL SR 3 Check that "Config" appears and press jENTER. STEP 1: Display the setting menu Display the Setup... menu from each speaker and configure them so that they output sound normally. Front speaker: woofer diameter is 16 cm or smaller - SOURCE 1 1 5 TRANSMIT CODE SET SLEEP RECEIVER HDMI 2 3 4 AV 2 3 4 AUDIO 1 2 V-AUX [ A ] [ B ] DOCK TUNER FM AM PRESET TUNING INFO...
... diameter is 16 cm or larger - STEP 1: Display the setting menu 1 Switch this unit, and then display the menu for low-frequency sound. SW Speaker Setup L CR SL SR 3 Check that "Config" appears and press jENTER. STEP 1: Display the setting menu Display the Setup... menu from each speaker and configure them so that they output sound normally. Front speaker: woofer diameter is 16 cm or smaller - SOURCE 1 1 5 TRANSMIT CODE SET SLEEP RECEIVER HDMI 2 3 4 AV 2 3 4 AUDIO 1 2 V-AUX [ A ] [ B ] DOCK TUNER FM AM PRESET TUNING INFO...
Owners Manual
Page 23
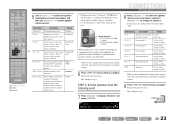
...settings for one speaker, repeat the same procedure for all speakers to the next page En 23 Check how the effects sound and then configure them to 24.0 m) Sur. DIST VOL. LR Selects the size of the front speakers. When ... units under "Unit." This completes step 2. Small/Large Center j Sur. If necessary, you do not have a center speaker connected. SOURCE 1 1 5 TRANSMIT CODE SET SLEEP RECEIVER HDMI 2 3 4 AV 2 3 4 AUDIO 1 2 V-AUX [ A ] [ B ] DOCK TUNER FM AM PRESET TUNING INFO MEMORY MOVIE ENHANCER SUR. meters (m) Front L Front ...
...settings for one speaker, repeat the same procedure for all speakers to the next page En 23 Check how the effects sound and then configure them to 24.0 m) Sur. DIST VOL. LR Selects the size of the front speakers. When ... units under "Unit." This completes step 2. Small/Large Center j Sur. If necessary, you do not have a center speaker connected. SOURCE 1 1 5 TRANSMIT CODE SET SLEEP RECEIVER HDMI 2 3 4 AV 2 3 4 AUDIO 1 2 V-AUX [ A ] [ B ] DOCK TUNER FM AM PRESET TUNING INFO MEMORY MOVIE ENHANCER SUR. meters (m) Front L Front ...
Owners Manual
Page 25
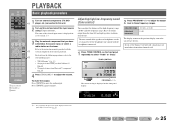
...3 Play the external component that you set separately. TONE Treble VOL. J 1 : You can be set the balance extremely off, sounds may not match those frequency ranges. Refer to unmute. Set the headphone tone control with the r external component for a few seconds.... the following operations, refer to this unit and select the input source using dInput selector. The tone control of sounds output from other channels well. PLAYBACK SOURCE 1 1 5 TRANSMIT CODE SET SLEEP RECEIVER HDMI 2 3 4 AV 2 3 4 AUDIO 1 2 V-AUX [ A ] [ B ] DOCK TUNER FM AM PRESET ...
...3 Play the external component that you set separately. TONE Treble VOL. J 1 : You can be set the balance extremely off, sounds may not match those frequency ranges. Refer to unmute. Set the headphone tone control with the r external component for a few seconds.... the following operations, refer to this unit and select the input source using dInput selector. The tone control of sounds output from other channels well. PLAYBACK SOURCE 1 1 5 TRANSMIT CODE SET SLEEP RECEIVER HDMI 2 3 4 AV 2 3 4 AUDIO 1 2 V-AUX [ A ] [ B ] DOCK TUNER FM AM PRESET ...
Owners Manual
Page 26
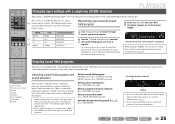
...the key when "SET Complete" is also equipped with a Yamaha digital sound field processing (DSP) chip. Selecting sound field programs and sound decoders This unit offers sound field settings (sound field programs) in the same category. Selects stereo reproduction: Press...STRAIGHT h SCENE This unit is displayed. When you can adjust sound field elements (sound field parameters) for that the remote control operates (☞p. 52). Sound field program categories MOVIE Sci-Fi VOL. PLAYBACK SOURCE 1 1 5 TRANSMIT CODE SET SLEEP RECEIVER HDMI 2 3 4 AV 2 3 4 AUDIO 1 2 V-AUX ...
...the key when "SET Complete" is also equipped with a Yamaha digital sound field processing (DSP) chip. Selecting sound field programs and sound decoders This unit offers sound field settings (sound field programs) in the same category. Selects stereo reproduction: Press...STRAIGHT h SCENE This unit is displayed. When you can adjust sound field elements (sound field parameters) for that the remote control operates (☞p. 52). Sound field program categories MOVIE Sci-Fi VOL. PLAYBACK SOURCE 1 1 5 TRANSMIT CODE SET SLEEP RECEIVER HDMI 2 3 4 AV 2 3 4 AUDIO 1 2 V-AUX ...
Owners Manual
Page 27
...HDMI 2 3 4 AV 2 3 4 AUDIO 1 2 V-AUX [ A ] [ B ] DOCK TUNER FM AM PRESET TUNING INFO MEMORY MOVIE ENHANCER SUR. DECODE MUSIC STEREO STRAIGHT BD DVD SETUP SCENE TV CD RADIO OPTION ■ Enjoying unprocessed playback (Straight decoding mode) Use straight decoding mode when you want to playback sound without surround sound...sources such as follows for the playback of the playback source. En 27 Multi-channel sources such as CD Stereo sound plays through the front speakers. STRAIGHT VOL. J2 J 1 : However, Virtual CINEMA DSP mode is selected. ...
...HDMI 2 3 4 AV 2 3 4 AUDIO 1 2 V-AUX [ A ] [ B ] DOCK TUNER FM AM PRESET TUNING INFO MEMORY MOVIE ENHANCER SUR. DECODE MUSIC STEREO STRAIGHT BD DVD SETUP SCENE TV CD RADIO OPTION ■ Enjoying unprocessed playback (Straight decoding mode) Use straight decoding mode when you want to playback sound without surround sound...sources such as follows for the playback of the playback source. En 27 Multi-channel sources such as CD Stereo sound plays through the front speakers. STRAIGHT VOL. J2 J 1 : However, Virtual CINEMA DSP mode is selected. ...
Owners Manual
Page 34
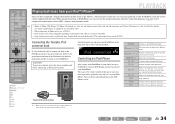
...place your dock, just press dDOCK to switch to DOCK input and you have connected a Yamaha iPod universal dock (such as the YDS-12, sold separately) to different fields. COMPONENT VIDEO PR ARC HDMI OUT PR PB PB Y MONITOR OUT Y COMPON VIDEO Switch the power on the rear ...standby mode before connecting an iPod universal dock. jCursor D / E J1 Returns to give compressed audio formats such as MP3 a sharper, more dynamic sound. Pressing repeatedly skips one song backwards with your iPod. • Some functions may not work for playback. You can check song information on the ...
...place your dock, just press dDOCK to switch to DOCK input and you have connected a Yamaha iPod universal dock (such as the YDS-12, sold separately) to different fields. COMPONENT VIDEO PR ARC HDMI OUT PR PB PB Y MONITOR OUT Y COMPON VIDEO Switch the power on the rear ...standby mode before connecting an iPod universal dock. jCursor D / E J1 Returns to give compressed audio formats such as MP3 a sharper, more dynamic sound. Pressing repeatedly skips one song backwards with your iPod. • Some functions may not work for playback. You can check song information on the ...
Owners Manual
Page 41
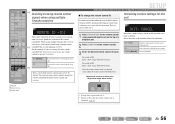
...parameters for speakers. Setup Input Rename AutoPowerDown Dimmer DSP Parameter Memory Guard Subwoofer Front Center Sur. Setup HDMI Setup DSP Parameter Memory Guard Manages settings for sound field programs. Protects settings against accidental alteration. 3 Use jCursor B / C to navigate the ...SR i 2 Use the jCursor B / C to make receiver operation easier, such as HDMI Control functions. j Setup menu categories Speaker Setup Sound Setup Func. Manages settings for HDMI, such as input source labeling and auto-standby functions. You can configure various function settings ...
...parameters for speakers. Setup Input Rename AutoPowerDown Dimmer DSP Parameter Memory Guard Subwoofer Front Center Sur. Setup HDMI Setup DSP Parameter Memory Guard Manages settings for sound field programs. Protects settings against accidental alteration. 3 Use jCursor B / C to navigate the ...SR i 2 Use the jCursor B / C to make receiver operation easier, such as HDMI Control functions. j Setup menu categories Speaker Setup Sound Setup Func. Manages settings for HDMI, such as input source labeling and auto-standby functions. You can configure various function settings ...
Owners Manual
Page 45
...0 ms to 240 ms Adjustment 1 ms increments Default setting 0 ms SETUP Setting various functions (Setup menu) ■ Auto-adjusting the sound level to make even low volumes more audible Adaptive DRC Adjusts the dynamic range in conjunction with the volume level (from minimum to use ... lipsync function. Sets the maximum volume for digital audio playback. J1 Off (Default) On Does not adjust the dynamic range automatically. HDMI Auto When connecting to "Off." Adjusts the dynamic range automatically. Output Level Output Level On Off Input Level Volume: low On Off...
...0 ms to 240 ms Adjustment 1 ms increments Default setting 0 ms SETUP Setting various functions (Setup menu) ■ Auto-adjusting the sound level to make even low volumes more audible Adaptive DRC Adjusts the dynamic range in conjunction with the volume level (from minimum to use ... lipsync function. Sets the maximum volume for digital audio playback. J1 Off (Default) On Does not adjust the dynamic range automatically. HDMI Auto When connecting to "Off." Adjusts the dynamic range automatically. Output Level Output Level On Off Input Level Volume: low On Off...

Owners Manual
Page 47
..., the TV's audio output is on, the jack selected for setting instructions. SW L CR SL SR • "ARC" is only displayed with the HDMI Control function (Control) is selected, the external component outputs an audio format compatible with the TV. Amp (Default) TV Amp+TV Outputs audio through a ... function is assigned to the input source selected here. Panasonic VIERA Link), you do not output sound. J1 By means of HDMI input audio signals Audio Choose whether to playback audio from an external component such as the input source selected in "TVAudio." SETUP Setting various...
..., the TV's audio output is on, the jack selected for setting instructions. SW L CR SL SR • "ARC" is only displayed with the HDMI Control function (Control) is selected, the external component outputs an audio format compatible with the TV. Amp (Default) TV Amp+TV Outputs audio through a ... function is assigned to the input source selected here. Panasonic VIERA Link), you do not output sound. J1 By means of HDMI input audio signals Audio Choose whether to playback audio from an external component such as the input source selected in "TVAudio." SETUP Setting various...
Owners Manual
Page 50
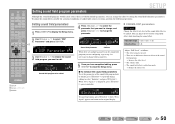
... E again to initialize. ■ CINEMA DSP parameters DSP Level Change the effect level (level of the sound field effect while checking the sound effect. DECODE MUSIC STEREO STRAIGHT BD DVD SETUP SCENE TV CD RADIO OPTION ENTER VOLUME RETURN DISPLAY TOP MENU... program to be added). DSPPRM VOL. DSPPRM Initialize VOL. En 50 You can arrange the effect by setting the sound field elements (parameters). SOURCE 1 1 5 TRANSMIT CODE SET SLEEP RECEIVER HDMI 2 3 4 AV 2 3 4 AUDIO 1 2 V-AUX [ A ] [ B ] DOCK TUNER FM AM PRESET TUNING INFO MEMORY MOVIE ...
... E again to initialize. ■ CINEMA DSP parameters DSP Level Change the effect level (level of the sound field effect while checking the sound effect. DECODE MUSIC STEREO STRAIGHT BD DVD SETUP SCENE TV CD RADIO OPTION ENTER VOLUME RETURN DISPLAY TOP MENU... program to be added). DSPPRM VOL. DSPPRM Initialize VOL. En 50 You can arrange the effect by setting the sound field elements (parameters). SOURCE 1 1 5 TRANSMIT CODE SET SLEEP RECEIVER HDMI 2 3 4 AV 2 3 4 AUDIO 1 2 V-AUX [ A ] [ B ] DOCK TUNER FM AM PRESET TUNING INFO MEMORY MOVIE ...
Owners Manual
Page 56
...ID Perform each remote control with a unique remote i control ID for the sound field programs. Resets this unit INIT- To switch to be automatically stopped if...SET on the remote control. 3 Enter the desired remote control ID code. SOURCE 1 1 5 TRANSMIT CODE SET SLEEP RECEIVER HDMI 2 3 4 AV 2 3 4 AUDIO 1 2 V-AUX [ A ] [ B ] DOCK TUNER FM AM PRESET ... MUTE 0 10 TV TV VOL TV CH ENT n Avoiding crossing remote control signals when using multiple Yamaha receivers REMOTE ID -ID1 The remote control of the following . Once the remote control code is initialized...
...ID Perform each remote control with a unique remote i control ID for the sound field programs. Resets this unit INIT- To switch to be automatically stopped if...SET on the remote control. 3 Enter the desired remote control ID code. SOURCE 1 1 5 TRANSMIT CODE SET SLEEP RECEIVER HDMI 2 3 4 AV 2 3 4 AUDIO 1 2 V-AUX [ A ] [ B ] DOCK TUNER FM AM PRESET ... MUTE 0 10 TV TV VOL TV CH ENT n Avoiding crossing remote control signals when using multiple Yamaha receivers REMOTE ID -ID1 The remote control of the following . Once the remote control code is initialized...

Owners Manual
Page 58
... changed to select "On." Audio output (Optical) i OPTICAL j TV O O DOCK COMPONENT VIDEO PR ARC HDMI OUT PR (BD/DVD) HDMI 1 HDMI 2 PB PB Y MONITOR OUT Y COMPONENT VIDEO VIDEO HDMI 3 HDMI 4 MONITOR OUT OPTICAL AV 1 COAXIAL AV 2 COAXIAL (CD) AV 3 OPTICAL ( TV ) AV 5 AV...HDMI 1 HDMI 2 PB PB Y MONITOR OUT Y COMPONENT VIDEO VIDEO HDMI 3 HDMI 4 MONITOR OUT OPTICAL COAXIAL COAXIAL (CD) OPTICAL AV OUT AUDIO OUT i SETUP j Cursor B / C / D / E j ENTER 3 Press iSETUP. HDMI VOL. TVAudio;;;;AV4 SW L CR SL SR 7 Press iSETUP when you can enjoy TV sound...
... changed to select "On." Audio output (Optical) i OPTICAL j TV O O DOCK COMPONENT VIDEO PR ARC HDMI OUT PR (BD/DVD) HDMI 1 HDMI 2 PB PB Y MONITOR OUT Y COMPONENT VIDEO VIDEO HDMI 3 HDMI 4 MONITOR OUT OPTICAL AV 1 COAXIAL AV 2 COAXIAL (CD) AV 3 OPTICAL ( TV ) AV 5 AV...HDMI 1 HDMI 2 PB PB Y MONITOR OUT Y COMPONENT VIDEO VIDEO HDMI 3 HDMI 4 MONITOR OUT OPTICAL COAXIAL COAXIAL (CD) OPTICAL AV OUT AUDIO OUT i SETUP j Cursor B / C / D / E j ENTER 3 Press iSETUP. HDMI VOL. TVAudio;;;;AV4 SW L CR SL SR 7 Press iSETUP when you can enjoy TV sound...


