

Owners Manual
Page 11
... of this unit is a different color, or has a line running along it, to their respective terminals on . If the speaker cables short circuit, "CHECK SP WIRES!" Insert the different colored (or lined) cable into the "+" (positive, red) terminal on this unit and the speakers, and the other cable into the "-" (minus...
... of this unit is a different color, or has a line running along it, to their respective terminals on . If the speaker cables short circuit, "CHECK SP WIRES!" Insert the different colored (or lined) cable into the "+" (positive, red) terminal on this unit and the speakers, and the other cable into the "-" (minus...

Owners Manual
Page 12
...4 ■ Connecting center speakers / surround speakers SURROUND 1 CENTERSPEAKE 3 2 1 Remove approximately 10mm of insulation from the ends of the speaker cables, and twist the bare wires of the cables together firmly so that they will not cause short circuits. 2 Loosen the speaker terminals. 3 Insert the bare... wire of the speaker cable into the end of the terminal. 4 Tighten the terminal. CONNECTIONS Connecting speakers ■ Connecting the subwoofer 1 ...
...4 ■ Connecting center speakers / surround speakers SURROUND 1 CENTERSPEAKE 3 2 1 Remove approximately 10mm of insulation from the ends of the speaker cables, and twist the bare wires of the cables together firmly so that they will not cause short circuits. 2 Loosen the speaker terminals. 3 Insert the bare... wire of the speaker cable into the end of the terminal. 4 Tighten the terminal. CONNECTIONS Connecting speakers ■ Connecting the subwoofer 1 ...
Owners Manual
Page 21
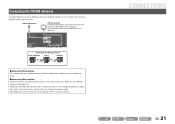
...jack or the GND jack. The GND jack is still connected. Connect these antennas properly to an outdoor antenna with a 5-10 m vinyl-coated wire. HDMI 3 HDMI 4 FM GND AM MONITOR OUT SURROUND CENTER SPEAKERS FRONT Connecting the AM loop antenna Press and hold Insert Release ■ ...FM reception We recommend using an outdoor antenna. Connecting the GND jack can connect either wire to a store-bought ground bar or copper plate with a vinyl-covered wire and bury this receiver. The wires of an electrical outlet. Indoor FM antenna AM loop antenna Position the AM antenna away...
...jack or the GND jack. The GND jack is still connected. Connect these antennas properly to an outdoor antenna with a 5-10 m vinyl-coated wire. HDMI 3 HDMI 4 FM GND AM MONITOR OUT SURROUND CENTER SPEAKERS FRONT Connecting the AM loop antenna Press and hold Insert Release ■ ...FM reception We recommend using an outdoor antenna. Connecting the GND jack can connect either wire to a store-bought ground bar or copper plate with a vinyl-covered wire and bury this receiver. The wires of an electrical outlet. Indoor FM antenna AM loop antenna Position the AM antenna away...
Owners Manual
Page 60
... or does not work properly. See page - 49 - This unit cannot be turned off . Set the speaker impedance to match your nearest Yamaha dealer or service center to request repair. Cause If you are correct. Remedy Turn on the power is not listed below, or if the ... that the speaker impedance settings are experiencing is disabled. If the problem you do not help, turn off the Turn on and "CHECK SP WIRES!" The unit enters standby mode. Check that the speaker impedance settings 10 activated because of a short circuit, etc. Please contact your speakers. ...
... or does not work properly. See page - 49 - This unit cannot be turned off . Set the speaker impedance to match your nearest Yamaha dealer or service center to request repair. Cause If you are correct. Remedy Turn on the power is not listed below, or if the ... that the speaker impedance settings are experiencing is disabled. If the problem you do not help, turn off the Turn on and "CHECK SP WIRES!" The unit enters standby mode. Check that the speaker impedance settings 10 activated because of a short circuit, etc. Please contact your speakers. ...

Owners Manual
Page 75
... speakers. • Generally speaker cables consist of the terminal. will not cause short circuits. 2 Loosen the speaker terminals. 3 Insert the bare wire of the terminal. 4 Tighten the terminal. VOLUME CROSSOVER/ HIGH CUT - 3 - Refer to Owner's Manual for information on the side of ...Remove the AC power cord of this unit from the ends of the speaker cables, and twist the bare wires of this unit. If the speaker cables short circuit, "CHECK SP WIRES!" Banana plug KERS FRONT Connecting center speakers / surround speakers SURROUND 1 CENTERSPEAKE 3 2 1 Press the tab ...
... speakers. • Generally speaker cables consist of the terminal. will not cause short circuits. 2 Loosen the speaker terminals. 3 Insert the bare wire of the terminal. 4 Tighten the terminal. VOLUME CROSSOVER/ HIGH CUT - 3 - Refer to Owner's Manual for information on the side of ...Remove the AC power cord of this unit from the ends of the speaker cables, and twist the bare wires of this unit. If the speaker cables short circuit, "CHECK SP WIRES!" Banana plug KERS FRONT Connecting center speakers / surround speakers SURROUND 1 CENTERSPEAKE 3 2 1 Press the tab ...

Quick Reference Guide
Page 3
... the tab to fix the speaker cable in place. VOLUME CROSSOVER/ HIGH CUT - 3 - If the speaker cables short circuit, "CHECK SP WIRES!" Volume: Set to maximum. One of these cables is switched on this unit before connecting the speakers. • Generally speaker cables consist of ...937; speakers, set the speaker impedance to indicate different polarity. will not cause short circuits. 2 Loosen the speaker terminals. 3 Insert the bare wire of the speaker cable into contact with an audio pin cable. 2 Set the subwoofer volume as follows. Refer to the SUBWOOFER jack on settings....
... the tab to fix the speaker cable in place. VOLUME CROSSOVER/ HIGH CUT - 3 - If the speaker cables short circuit, "CHECK SP WIRES!" Volume: Set to maximum. One of these cables is switched on this unit before connecting the speakers. • Generally speaker cables consist of ...937; speakers, set the speaker impedance to indicate different polarity. will not cause short circuits. 2 Loosen the speaker terminals. 3 Insert the bare wire of the speaker cable into contact with an audio pin cable. 2 Set the subwoofer volume as follows. Refer to the SUBWOOFER jack on settings....

