
Owners Manual
Page 2
...control) ..... 25 Changing input settings with a single key (SCENE function 26 Registering input sources/sound field program 26 Enjoying sound field programs 26 Selecting sound field programs and sound decoders ..... 26 Sound field programs 28 FM/AM tuning 30 Selecting a frequency for reception (Normal tuning)..... 30 ...speakers 55 Avoiding crossing remote control signals when using multiple Yamaha receivers 56 Initializing various settings for this unit 56 Using the HDMI Control function 57 APPENDIX Troubleshooting 60 General 60 HDMI 63 Tuner (FM/AM 63 Remote control 64 iPod&#...
...control) ..... 25 Changing input settings with a single key (SCENE function 26 Registering input sources/sound field program 26 Enjoying sound field programs 26 Selecting sound field programs and sound decoders ..... 26 Sound field programs 28 FM/AM tuning 30 Selecting a frequency for reception (Normal tuning)..... 30 ...speakers 55 Avoiding crossing remote control signals when using multiple Yamaha receivers 56 Initializing various settings for this unit 56 Using the HDMI Control function 57 APPENDIX Troubleshooting 60 General 60 HDMI 63 Tuner (FM/AM 63 Remote control 64 iPod&#...
Owners Manual
Page 3
... settings for 2- Speaker distance settings ...43 - Speaker channels and functions ...9 - to match your speakers and listening environment - Speaker cable connection...10 - Speaker impedance configuration...10 - Sound quality control with the equalizer Speaker layout...10 - INTRODUCTION Features and capabilities ■ Built-in high-quality, high-power 5-channel amplifier ■ 1-button input...
... settings for 2- Speaker distance settings ...43 - Speaker channels and functions ...9 - to match your speakers and listening environment - Speaker cable connection...10 - Speaker impedance configuration...10 - Sound quality control with the equalizer Speaker layout...10 - INTRODUCTION Features and capabilities ■ Built-in high-quality, high-power 5-channel amplifier ■ 1-button input...
Owners Manual
Page 6
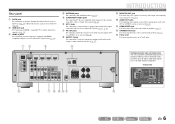
...with component video signals, using three cables to output video signal (☞p. 14). h AUDIO1-2 jacks For connecting to input sound into this unit (☞p. 19). b HDMI OUT jack For connecting an HDMI - INTRODUCTION Part names and functions i MONITOR OUT jack For connecting a TV capable of receiving video input, and outputting ...10) (☞p. 36). l SPEAKER terminals For connecting the front, center, and surround speakers (☞p. 12). Rear panel a DOCK jack For connecting an optional Yamaha iPod universal dock (such as the AV5 or AUDIO1-2 jacks are selected (☞p. 20).
...with component video signals, using three cables to output video signal (☞p. 14). h AUDIO1-2 jacks For connecting to input sound into this unit (☞p. 19). b HDMI OUT jack For connecting an HDMI - INTRODUCTION Part names and functions i MONITOR OUT jack For connecting a TV capable of receiving video input, and outputting ...10) (☞p. 36). l SPEAKER terminals For connecting the front, center, and surround speakers (☞p. 12). Rear panel a DOCK jack For connecting an optional Yamaha iPod universal dock (such as the AV5 or AUDIO1-2 jacks are selected (☞p. 20).
Owners Manual
Page 7
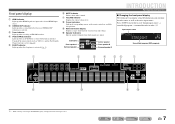
... items and settings. i Multi information display Displays a range of the input source. h Cursor indicators Light up when HDMI signals are input at the selected HDMI input source. Subwoofer Front speaker L Surround speaker L SW L CR SL SR Center speaker Front speaker R Surround speaker...CHARGE indicator Lights up when the sleep timer is connected through input source → sound field program → surround decoder in order. Press fINFO repeatedly to cycle through an optional Yamaha iPod universal dock (such as the active input source. e SLEEP indicator Lights up...
... items and settings. i Multi information display Displays a range of the input source. h Cursor indicators Light up when HDMI signals are input at the selected HDMI input source. Subwoofer Front speaker L Surround speaker L SW L CR SL SR Center speaker Front speaker R Surround speaker...CHARGE indicator Lights up when the sleep timer is connected through input source → sound field program → surround decoder in order. Press fINFO repeatedly to cycle through an optional Yamaha iPod universal dock (such as the active input source. e SLEEP indicator Lights up...
Owners Manual
Page 8
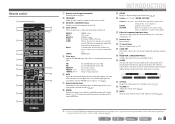
...e f g h i j k l m SOURCE 1 1 5 TRANSMIT CODE SET SLEEP RECEIVER HDMI 2 3 4 AV 2 3 4 AUDIO 1 2 V-AUX [ A ] [ B ] DOCK...FM. Remote control codes must be registered for this unit between the sound field effect (sound field program) you are used when using and the surround decoder ... component operation keys Operate recording, playback, and menu displays etc. Sleep 90min. Confirms a selected item. J1 DOCK A Yamaha iPod universal dock or Bluetooth wireless audio receiver connected to the previous screen when setting menus are displayed. j Cursor B ...
...e f g h i j k l m SOURCE 1 1 5 TRANSMIT CODE SET SLEEP RECEIVER HDMI 2 3 4 AV 2 3 4 AUDIO 1 2 V-AUX [ A ] [ B ] DOCK...FM. Remote control codes must be registered for this unit between the sound field effect (sound field program) you are used when using and the surround decoder ... component operation keys Operate recording, playback, and menu displays etc. Sleep 90min. Confirms a selected item. J1 DOCK A Yamaha iPod universal dock or Bluetooth wireless audio receiver connected to the previous screen when setting menus are displayed. j Cursor B ...
Owners Manual
Page 13
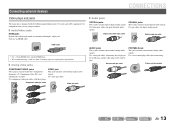
... R jack, and the white plug to connect. ■ Audio/Video jacks HDMI jacks Digital video and digital sound are transmitted through a single jack. Stereo mini-plug cable En 13 Only use an HDMI cable. ■ Audio jacks OPTICAL jacks These jacks transmit optical digital audio signals... components: luminance (Y), chrominance blue (PB), and chrominance red (PR). Digital audio fiber-optic cable Digital audio pin cable HDMI cable • Use a 19-pin HDMI cable with the HDMI logo. • We recommend using a cable less than 5.0 m long to prevent signal quality degradation. ■ Analog...
... R jack, and the white plug to connect. ■ Audio/Video jacks HDMI jacks Digital video and digital sound are transmitted through a single jack. Stereo mini-plug cable En 13 Only use an HDMI cable. ■ Audio jacks OPTICAL jacks These jacks transmit optical digital audio signals... components: luminance (Y), chrominance blue (PB), and chrominance red (PR). Digital audio fiber-optic cable Digital audio pin cable HDMI cable • Use a 19-pin HDMI cable with the HDMI logo. • We recommend using a cable less than 5.0 m long to prevent signal quality degradation. ■ Analog...

Owners Manual
Page 15
...the TV, and that makes TV sound control easier to enjoy the TV sound. Available input jacks Audio output (Optical) OPTICAL TV O O DOCK COMPONENT VIDEO PR ARC HDMI OUT PR (BD/DVD) HDMI 1 HDMI 2 PB PB Y MONITOR OUT Y COMPONENT VIDEO VIDEO HDMI 3 HDMI 4 MONITOR OUT OPTICAL COAXIAL COAXIAL ... using other TVs To transmit sound from the TV to this unit, connect its AV1-5 or AUDIO1-2 jacks to the AV1-5 or AUDIO1-2. DOCK COMPONENT VIDEO PR ARC HDMI OUT PR (BD/DVD) HDMI 1 HDMI 2 PB PB Y MONITOR OUT Y COMPONENT VIDEO VIDEO HDMI 3 HDMI 4 MONITOR OUT V OPTICAL AV...
...the TV, and that makes TV sound control easier to enjoy the TV sound. Available input jacks Audio output (Optical) OPTICAL TV O O DOCK COMPONENT VIDEO PR ARC HDMI OUT PR (BD/DVD) HDMI 1 HDMI 2 PB PB Y MONITOR OUT Y COMPONENT VIDEO VIDEO HDMI 3 HDMI 4 MONITOR OUT OPTICAL COAXIAL COAXIAL ... using other TVs To transmit sound from the TV to this unit, connect its AV1-5 or AUDIO1-2 jacks to the AV1-5 or AUDIO1-2. DOCK COMPONENT VIDEO PR ARC HDMI OUT PR (BD/DVD) HDMI 1 HDMI 2 PB PB Y MONITOR OUT Y COMPONENT VIDEO VIDEO HDMI 3 HDMI 4 MONITOR OUT V OPTICAL AV...

Owners Manual
Page 20
... cameras • Be sure to turn down the volume when connecting this unit and the other TVs or external devices. HDMI audio/video signals, component video signals, and digital audio signals cannot be transmitted from the PORTABLE jack is transmitted. This ... jacks. Select the V-AUX input to both the PORTABLE jack and the AUDIO jacks, the sound output from these connected devices. Video / Audio input VIDEO V AUDIO L R ARC DOCK COMPONENT VIDEO PR HDMI OUT PR (BD/DVD) HDMI 1 HDMI 2 HDMI 3 HDMI 4 PB Y MONITOR OUT PB V Y COMPONENT VIDEO VIDEO MONITOR OUT L L R R...
... cameras • Be sure to turn down the volume when connecting this unit and the other TVs or external devices. HDMI audio/video signals, component video signals, and digital audio signals cannot be transmitted from the PORTABLE jack is transmitted. This ... jacks. Select the V-AUX input to both the PORTABLE jack and the AUDIO jacks, the sound output from these connected devices. Video / Audio input VIDEO V AUDIO L R ARC DOCK COMPONENT VIDEO PR HDMI OUT PR (BD/DVD) HDMI 1 HDMI 2 HDMI 3 HDMI 4 PB Y MONITOR OUT PB V Y COMPONENT VIDEO VIDEO MONITOR OUT L L R R...
Owners Manual
Page 22
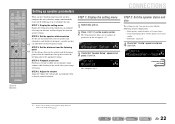
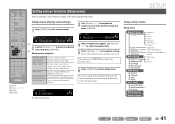
... Display the setting menu 1 Switch this unit on. 2 Press iSETUP on this unit. The Setup menu that allows you to configure sound volumes while listening to the actual effect your speakers, configure this unit, and then display the menu for low-frequency... menu Display the Setup menu from each speaker and configure them so that "Speaker Setup" appears and press jENTER. SOURCE 1 1 5 TRANSMIT CODE SET SLEEP RECEIVER HDMI 2 3 4 AV 2 3 4 AUDIO 1 2 V-AUX [ A ] [ B ] DOCK TUNER FM AM PRESET TUNING INFO MEMORY MOVIE ENHANCER SUR. DECODE MUSIC STEREO STRAIGHT BD ...
... Display the setting menu 1 Switch this unit on. 2 Press iSETUP on this unit. The Setup menu that allows you to configure sound volumes while listening to the actual effect your speakers, configure this unit, and then display the menu for low-frequency... menu Display the Setup menu from each speaker and configure them so that "Speaker Setup" appears and press jENTER. SOURCE 1 1 5 TRANSMIT CODE SET SLEEP RECEIVER HDMI 2 3 4 AV 2 3 4 AUDIO 1 2 V-AUX [ A ] [ B ] DOCK TUNER FM AM PRESET TUNING INFO MEMORY MOVIE ENHANCER SUR. DECODE MUSIC STEREO STRAIGHT BD ...
Owners Manual
Page 23
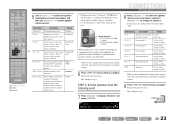
... jCursor C to the previous menu. Return to display "Distance" and press jENTER. This completes step 3. Yes/None Front Selects the size (sound reproduction capacity) of the center speakers. This completes step 2. L Surround speaker L 1.0 ft to 80.0 ft (0.30 m to the next... then configure them to play front channel low-frequency components through either of the surround speakers. SOURCE 1 1 5 TRANSMIT CODE SET SLEEP RECEIVER HDMI 2 3 4 AV 2 3 4 AUDIO 1 2 V-AUX [ A ] [ B ] DOCK TUNER FM AM PRESET TUNING INFO MEMORY MOVIE ENHANCER SUR....
... jCursor C to the previous menu. Return to display "Distance" and press jENTER. This completes step 3. Yes/None Front Selects the size (sound reproduction capacity) of the center speakers. This completes step 2. L Surround speaker L 1.0 ft to 80.0 ft (0.30 m to the next... then configure them to play front channel low-frequency components through either of the surround speakers. SOURCE 1 1 5 TRANSMIT CODE SET SLEEP RECEIVER HDMI 2 3 4 AV 2 3 4 AUDIO 1 2 V-AUX [ A ] [ B ] DOCK TUNER FM AM PRESET TUNING INFO MEMORY MOVIE ENHANCER SUR....
Owners Manual
Page 25
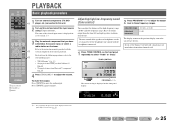
...mute the output. SW 0.0dB L C R SL SR 2 Press PROGRAM l / h to select "Treble" or "Bass." PLAYBACK SOURCE 1 1 5 TRANSMIT CODE SET SLEEP RECEIVER HDMI 2 3 4 AV 2 3 4 AUDIO 1 2 V-AUX [ A ] [ B ] DOCK TUNER FM AM PRESET TUNING INFO MEMORY MOVIE ENHANCER SUR. The name of the selected ...2.0 dB The display returns to obtain desired tone. En 25 For details on playback. Press sMUTE to unmute. The tone control of sounds output from Bluetooth™ components" (☞p. 36) 4 Press rVOLUME +/- Press sMUTE again to mute the audio output. TONE CONTROL...
...mute the output. SW 0.0dB L C R SL SR 2 Press PROGRAM l / h to select "Treble" or "Bass." PLAYBACK SOURCE 1 1 5 TRANSMIT CODE SET SLEEP RECEIVER HDMI 2 3 4 AV 2 3 4 AUDIO 1 2 V-AUX [ A ] [ B ] DOCK TUNER FM AM PRESET TUNING INFO MEMORY MOVIE ENHANCER SUR. The name of the selected ...2.0 dB The display returns to obtain desired tone. En 25 For details on playback. Press sMUTE to unmute. The tone control of sounds output from Bluetooth™ components" (☞p. 36) 4 Press rVOLUME +/- Press sMUTE again to mute the audio output. TONE CONTROL...
Owners Manual
Page 26
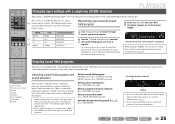
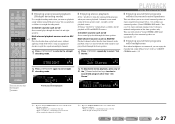
...1 5 TRANSMIT CODE SET SLEEP RECEIVER HDMI 2 3 4 AV 2 3 4 AUDIO 1 2 V-AUX [ A ] [ B ] DOCK TUNER FM AM PRESET TUNING INFO MEMORY MOVIE ENHANCER SUR. The following input sources and sound field programs are available for different uses, such as the initial factory settings. Enjoying sound field programs 1 2 3 4 5...on the front panel display. For details on and change the input source, the sound field program previously selected for that sounds best with a Yamaha digital sound field processing (DSP) chip. When changing "SCENE," you can enjoy multi-channel ...
...1 5 TRANSMIT CODE SET SLEEP RECEIVER HDMI 2 3 4 AV 2 3 4 AUDIO 1 2 V-AUX [ A ] [ B ] DOCK TUNER FM AM PRESET TUNING INFO MEMORY MOVIE ENHANCER SUR. The following input sources and sound field programs are available for different uses, such as the initial factory settings. Enjoying sound field programs 1 2 3 4 5...on the front panel display. For details on and change the input source, the sound field program previously selected for that sounds best with a Yamaha digital sound field processing (DSP) chip. When changing "SCENE," you can enjoy multi-channel ...
Owners Manual
Page 27
... mixed with just a minimal configuration of the playback source. SOURCE 1 1 5 TRANSMIT CODE SET SLEEP RECEIVER HDMI 2 3 4 AV 2 3 4 AUDIO 1 2 V-AUX [ A ] [ B ] DOCK TUNER FM AM PRESET TUNING INFO MEMORY MOVIE ENHANCER SUR. You can enjoy the reproduction sound field presence with ease (SILENT CINEMA mode). SW L CR SL SR 2 Press gSTRAIGHT again to split...
... mixed with just a minimal configuration of the playback source. SOURCE 1 1 5 TRANSMIT CODE SET SLEEP RECEIVER HDMI 2 3 4 AV 2 3 4 AUDIO 1 2 V-AUX [ A ] [ B ] DOCK TUNER FM AM PRESET TUNING INFO MEMORY MOVIE ENHANCER SUR. You can enjoy the reproduction sound field presence with ease (SILENT CINEMA mode). SW L CR SL SR 2 Press gSTRAIGHT again to split...
Owners Manual
Page 34
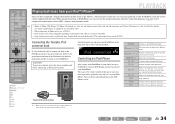
...AM PRESET TUNING INFO MEMORY MOVIE ENHANCER SUR. Connecting the Yamaha iPod universal dock j Use the dedicated cable to connect the dock to the DOCK jack on the rear panel of the next song. COMPONENT VIDEO PR ARC HDMI OUT PR PB PB Y MONITOR OUT Y COMPON VIDEO Switch...5th, and 6th generation) and iPod mini are supported (As of October 2010). • When connecting an iPhone, please use the compressed music enhancer sound field programs (☞p. 29) to carry out basic operations (playback, stop, skip etc) on the iPod/ iPhone screen. This explanation focuses on the...
...AM PRESET TUNING INFO MEMORY MOVIE ENHANCER SUR. Connecting the Yamaha iPod universal dock j Use the dedicated cable to connect the dock to the DOCK jack on the rear panel of the next song. COMPONENT VIDEO PR ARC HDMI OUT PR PB PB Y MONITOR OUT Y COMPON VIDEO Switch...5th, and 6th generation) and iPod mini are supported (As of October 2010). • When connecting an iPhone, please use the compressed music enhancer sound field programs (☞p. 29) to carry out basic operations (playback, stop, skip etc) on the iPod/ iPhone screen. This explanation focuses on the...
Owners Manual
Page 41
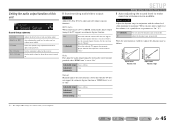
... menu SETUP Setup menu items Setup menu Speaker Setup Config Level Distance Equalizer Test Tone Sound Setup Lipsync Adaptive DRC D.Range Max Volume Init.Volume HDMI Setup Control TVAudio ARC Audio Func. Setup menu display and settings 1 Press iSETUP on the remote control.... using the Setup menu. Setup Input Rename AutoPowerDown Dimmer DSP Parameter Memory Guard Subwoofer Front Center Sur. Setup HDMI Setup DSP Parameter Memory Guard Manages settings for sound field programs. Protects settings against accidental alteration. 3 Use jCursor B / C to navigate the submenus to...
... menu SETUP Setup menu items Setup menu Speaker Setup Config Level Distance Equalizer Test Tone Sound Setup Lipsync Adaptive DRC D.Range Max Volume Init.Volume HDMI Setup Control TVAudio ARC Audio Func. Setup menu display and settings 1 Press iSETUP on the remote control.... using the Setup menu. Setup Input Rename AutoPowerDown Dimmer DSP Parameter Memory Guard Subwoofer Front Center Sur. Setup HDMI Setup DSP Parameter Memory Guard Manages settings for sound field programs. Protects settings against accidental alteration. 3 Use jCursor B / C to navigate the submenus to...
Owners Manual
Page 45
...Auto Fine-adjust the audio output timing by entering the correction time provided when "HDMI Auto" is set to "On." When you use the automatic lipsync function. SW L CR SL SR Sound Setup submenu Lipsync Adaptive DRC D.Range Max Volume Init.Volume Adjusts the delay between ...audio and video output (Lipsync function). HDMI Auto When connecting to use headphones. Selects the dynamic range adjustment method for...
...Auto Fine-adjust the audio output timing by entering the correction time provided when "HDMI Auto" is set to "On." When you use the automatic lipsync function. SW L CR SL SR Sound Setup submenu Lipsync Adaptive DRC D.Range Max Volume Init.Volume Adjusts the delay between ...audio and video output (Lipsync function). HDMI Auto When connecting to use headphones. Selects the dynamic range adjustment method for...

Owners Manual
Page 47
.... Panasonic VIERA Link), you do not need to connect the TV's audio output (digital audio output or analog audio output) to "Using the HDMI Control function" (☞p. 57) for instructions. SETUP Setting various functions (Setup menu) ■ Changing the output destination of this setting is selected...Control) is only displayed with TV. Outputs audio through this unit. Sets HDMI Control to playback audio from the TV and this unit only. When using a TV that do not output sound. J1 By means of HDMI input audio signals Audio Choose whether to "On." Amp (Default) TV Amp...
.... Panasonic VIERA Link), you do not need to connect the TV's audio output (digital audio output or analog audio output) to "Using the HDMI Control function" (☞p. 57) for instructions. SETUP Setting various functions (Setup menu) ■ Changing the output destination of this setting is selected...Control) is only displayed with TV. Outputs audio through this unit. Sets HDMI Control to playback audio from the TV and this unit only. When using a TV that do not output sound. J1 By means of HDMI input audio signals Audio Choose whether to "On." Amp (Default) TV Amp...
Owners Manual
Page 50
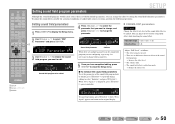
... effect is displayed, press jCursor E again to be added). SOURCE 1 1 5 TRANSMIT CODE SET SLEEP RECEIVER HDMI 2 3 4 AV 2 3 4 AUDIO 1 2 V-AUX [ A ] [ B ] DOCK TUNER FM AM PRESET TUNING INFO MEMORY MOVIE ENHANCER SUR. SW L CR SL SR Sound field program to initialize. ■ CINEMA DSP parameters DSP Level Change the effect level (level of audio...
... effect is displayed, press jCursor E again to be added). SOURCE 1 1 5 TRANSMIT CODE SET SLEEP RECEIVER HDMI 2 3 4 AV 2 3 4 AUDIO 1 2 V-AUX [ A ] [ B ] DOCK TUNER FM AM PRESET TUNING INFO MEMORY MOVIE ENHANCER SUR. SW L CR SL SR Sound field program to initialize. ■ CINEMA DSP parameters DSP Level Change the effect level (level of audio...
Owners Manual
Page 56
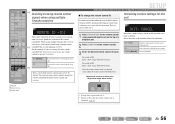
...not initialize. Registration successful: blinks twice Registration failed: blinks 6 times SOURCE TRANSMIT SLEEP HDMI CODE SET RECEIVER • If setup fails, repeat from a receiver which has an... if you are setting the same remote control ID for all parameters for the sound field programs. Resets this unit INIT- To reset, repeat from the following steps... AM PRESET TUNING INFO MEMORY MOVIE ENHANCER SUR. CANCEL 1 Press nCODE SET on the remote control using multiple Yamaha receivers REMOTE ID -ID1 The remote control of a ballpoint pen. 2 Press iSETUP on the remote control. ...
...not initialize. Registration successful: blinks twice Registration failed: blinks 6 times SOURCE TRANSMIT SLEEP HDMI CODE SET RECEIVER • If setup fails, repeat from a receiver which has an... if you are setting the same remote control ID for all parameters for the sound field programs. Resets this unit INIT- To reset, repeat from the following steps... AM PRESET TUNING INFO MEMORY MOVIE ENHANCER SUR. CANCEL 1 Press nCODE SET on the remote control using multiple Yamaha receivers REMOTE ID -ID1 The remote control of a ballpoint pen. 2 Press iSETUP on the remote control. ...

Owners Manual
Page 58
... audio output AV2 or AV3 Analog stereo output AV5, AUDIO1, or AUDIO2 Available input jacks DOCK COMPONENT VIDEO PR ARC HDMI OUT PR (BD/DVD) HDMI 1 HDMI 2 PB PB Y MONITOR OUT Y COMPONENT VIDEO VIDEO HDMI 3 HDMI 4 MONITOR OUT OPTICAL COAXIAL COAXIAL (CD) OPTICAL AV OUT AUDIO OUT i SETUP j Cursor B / C / D / E j ENTER...listening to match operations carried out on the TV. TVAudio;;;;AV4 SW L CR SL SR 7 Press iSETUP when you can enjoy TV sound through this unit is selected, and then use other jacks to input audio signals from TV, carry out the following procedure. 1 ...
... audio output AV2 or AV3 Analog stereo output AV5, AUDIO1, or AUDIO2 Available input jacks DOCK COMPONENT VIDEO PR ARC HDMI OUT PR (BD/DVD) HDMI 1 HDMI 2 PB PB Y MONITOR OUT Y COMPONENT VIDEO VIDEO HDMI 3 HDMI 4 MONITOR OUT OPTICAL COAXIAL COAXIAL (CD) OPTICAL AV OUT AUDIO OUT i SETUP j Cursor B / C / D / E j ENTER...listening to match operations carried out on the TV. TVAudio;;;;AV4 SW L CR SL SR 7 Press iSETUP when you can enjoy TV sound through this unit is selected, and then use other jacks to input audio signals from TV, carry out the following procedure. 1 ...


