
Owners Manual
Page 3
...-in high-quality, high-power 5-channel amplifier ■ 1-button input/sound field program switching (SCENE function 26 ■ Speaker connections for speaker acoustic parameters 22 - Subwoofer cable connection ...12 ■ Acoustic parameter adjustment to 5.1-channel configurations - Speaker channels and functions ...9 - Speaker cable connection...10 - to match your speakers and listening environment...
...-in high-quality, high-power 5-channel amplifier ■ 1-button input/sound field program switching (SCENE function 26 ■ Speaker connections for speaker acoustic parameters 22 - Subwoofer cable connection ...12 ■ Acoustic parameter adjustment to 5.1-channel configurations - Speaker channels and functions ...9 - Speaker cable connection...10 - to match your speakers and listening environment...
Owners Manual
Page 6
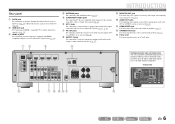
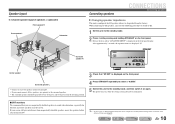
... MONITOR OUT OPTICAL AV 1 COAXIAL AV 2 COAXIAL (CD) AV 3 OPTICAL ( TV ) AV 4 AV 5 AV OUT AUDIO 1 AUDIO 2 ANTENNA FM GND SURROU SUBWOOFER e f g h jik l m En 6 ab c d ANTENNA jacks For connecting AM and FM antennas (☞p. 21). c HDMI1-4 jacks For connecting external components ...to (☞p. 14). Rear panel a DOCK jack For connecting an optional Yamaha iPod universal dock (such as the AV5 or AUDIO1-2 jacks are selected (☞p. 20). k SUBWOOFER jack For connecting a subwoofer with component video signals, using three cables to it (☞p. 15). m...
... MONITOR OUT OPTICAL AV 1 COAXIAL AV 2 COAXIAL (CD) AV 3 OPTICAL ( TV ) AV 4 AV 5 AV OUT AUDIO 1 AUDIO 2 ANTENNA FM GND SURROU SUBWOOFER e f g h jik l m En 6 ab c d ANTENNA jacks For connecting AM and FM antennas (☞p. 21). c HDMI1-4 jacks For connecting external components ...to (☞p. 14). Rear panel a DOCK jack For connecting an optional Yamaha iPod universal dock (such as the AV5 or AUDIO1-2 jacks are selected (☞p. 20). k SUBWOOFER jack For connecting a subwoofer with component video signals, using three cables to it (☞p. 15). m...
Owners Manual
Page 7
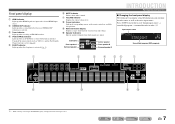
J1 Input source name HDMI1 STRAIGHT VOL. j Speaker indicators Indicate speaker terminals from which signals are input at the selected HDMI input source. Subwoofer Front speaker L Surround speaker L SW L CR SL SR Center speaker Front speaker R Surround speaker R INTRODUCTION Part names and functions ■ Changing the front panel display ... receiving an FM/AM broadcast. h Cursor indicators Light up if corresponding cursors on menu items and settings. Press fINFO repeatedly to cycle through an optional Yamaha iPod universal dock (such as the active input source.
J1 Input source name HDMI1 STRAIGHT VOL. j Speaker indicators Indicate speaker terminals from which signals are input at the selected HDMI input source. Subwoofer Front speaker L Surround speaker L SW L CR SL SR Center speaker Front speaker R Surround speaker R INTRODUCTION Part names and functions ■ Changing the front panel display ... receiving an FM/AM broadcast. h Cursor indicators Light up if corresponding cursors on menu items and settings. Press fINFO repeatedly to cycle through an optional Yamaha iPod universal dock (such as the active input source.
Owners Manual
Page 9
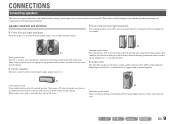
...are for bass sounds and low-frequency effect (LFE) sounds included in the front of 1.5 - 1.8 m from the floor. ■ Subwoofer The subwoofer speaker is equipped with the speaker tops at the rear of a real movie theater or concert hall. CONNECTIONS Connecting speakers This unit uses ...speaker aligned. Speaker channels and functions ■ Front left and right speakers The front speakers are about 1/4 of the screen. Use a subwoofer that is used for the center channel sounds (dialog, vocals, etc.). They should be brought to reduce echoes from the ideal listening ...
...are for bass sounds and low-frequency effect (LFE) sounds included in the front of 1.5 - 1.8 m from the floor. ■ Subwoofer The subwoofer speaker is equipped with the speaker tops at the rear of a real movie theater or concert hall. CONNECTIONS Connecting speakers This unit uses ...speaker aligned. Speaker channels and functions ■ Front left and right speakers The front speakers are about 1/4 of the screen. Use a subwoofer that is used for the center channel sounds (dialog, vocals, etc.). They should be brought to reduce echoes from the ideal listening ...
Owners Manual
Page 10
..., give priority to the standby mode, and then switch it is displayed on the front panel display. Speaker layout 5.1-channel speaker layout (5 speakers + subwoofer) Front speaker R Front speaker L Subwoofer Connecting speakers CONNECTIONS Connecting speakers ■ Changing speaker impedance This unit is configured for 8Ω speakers when it on again. is displayed on...
..., give priority to the standby mode, and then switch it is displayed on the front panel display. Speaker layout 5.1-channel speaker layout (5 speakers + subwoofer) Front speaker R Front speaker L Subwoofer Connecting speakers CONNECTIONS Connecting speakers ■ Changing speaker impedance This unit is configured for 8Ω speakers when it on again. is displayed on...

Owners Manual
Page 11
.... will appear on the rear panel. Surround speaker RL Front speaker R L HDMI 4 OR OUT ANTENNA FM GND AM SURROUND CENTER SPEAKERS FRONT AUDIO 2 AUDIO OUT SUBWOOFER Subwoofer Center speaker CAUTION • Remove the AC power cord of this unit is a different color, or has a line running along it, to their respective terminals...
.... will appear on the rear panel. Surround speaker RL Front speaker R L HDMI 4 OR OUT ANTENNA FM GND AM SURROUND CENTER SPEAKERS FRONT AUDIO 2 AUDIO OUT SUBWOOFER Subwoofer Center speaker CAUTION • Remove the AC power cord of this unit is a different color, or has a line running along it, to their respective terminals...

Owners Manual
Page 12
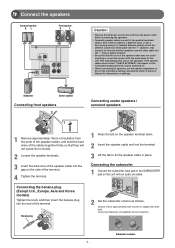
Volume: Set to maximum. VOLUME CROSSOVER/ HIGH CUT MIN MAX MIN MAX Subwoofer examples En 12 Crossover frequency (if available): Set to approximately half volume (or slightly less than half). Banana plug KERS FRONT 1 ... 2 Insert the speaker cable end into the gap on this unit with an audio pin cable. 2 Set the subwoofer volume as follows. CONNECTIONS Connecting speakers ■ Connecting the subwoofer 1 Connect the subwoofer input jack to the SUBWOOFER jack on the side of the terminal. 4 Tighten the terminal. ■ Connecting front speakers KERS 3 2 FRONT ...
Volume: Set to maximum. VOLUME CROSSOVER/ HIGH CUT MIN MAX MIN MAX Subwoofer examples En 12 Crossover frequency (if available): Set to approximately half volume (or slightly less than half). Banana plug KERS FRONT 1 ... 2 Insert the speaker cable end into the gap on this unit with an audio pin cable. 2 Set the subwoofer volume as follows. CONNECTIONS Connecting speakers ■ Connecting the subwoofer 1 Connect the subwoofer input jack to the SUBWOOFER jack on the side of the terminal. 4 Tighten the terminal. ■ Connecting front speakers KERS 3 2 FRONT ...
Owners Manual
Page 22
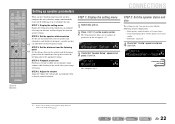
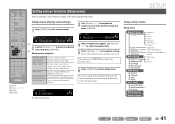
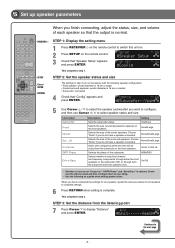
... listening point at the appropriate timing. STEP 5: Adjust the volume Adjust the volume for speaker settings. Front speaker: woofer diameter is 16 cm or smaller - Subwoofer: connected 4 Check that the sound is balanced. SOURCE 1 1 5 TRANSMIT CODE SET SLEEP RECEIVER HDMI 2 3 4 AV 2 3 4 AUDIO 1 2 V-AUX [ A...INFO MEMORY MOVIE ENHANCER SUR. VOL. STEP 2: Set the speaker status and size Set the size and connection status of speakers and subwoofers, and whether to the next page i SETUP j ENTER J 1 : See the section "Setting various functions (Setup menu)" for ...
... listening point at the appropriate timing. STEP 5: Adjust the volume Adjust the volume for speaker settings. Front speaker: woofer diameter is 16 cm or smaller - Subwoofer: connected 4 Check that the sound is balanced. SOURCE 1 1 5 TRANSMIT CODE SET SLEEP RECEIVER HDMI 2 3 4 AV 2 3 4 AUDIO 1 2 V-AUX [ A...INFO MEMORY MOVIE ENHANCER SUR. VOL. STEP 2: Set the speaker status and size Set the size and connection status of speakers and subwoofers, and whether to the next page i SETUP j ENTER J 1 : See the section "Setting various functions (Setup menu)" for ...
Owners Manual
Page 23
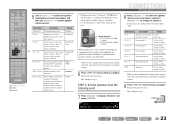
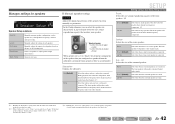
... Center Center speaker 1.0 ft to 80.0 ft (0.30 m to the previous menu. STEP 3: Set the distance from the subwoofer or the front speakers. 40Hz to display "Distance" and press jENTER. This completes step 3. None/Small/ Large Selects the size... C to 200Hz SWFR Phase Switches the phase of the speakers you do not have surround speakers connected. This completes step 2. Information Description Setting Subwoofer Sets the subwoofer status. NRM/REV Extra Bass Selects whether to the previous menu. DIST VOL. SOURCE 1 1 5 TRANSMIT CODE SET SLEEP RECEIVER HDMI 2 ...
... Center Center speaker 1.0 ft to 80.0 ft (0.30 m to the previous menu. STEP 3: Set the distance from the subwoofer or the front speakers. 40Hz to display "Distance" and press jENTER. This completes step 3. None/Small/ Large Selects the size... C to 200Hz SWFR Phase Switches the phase of the speakers you do not have surround speakers connected. This completes step 2. Information Description Setting Subwoofer Sets the subwoofer status. NRM/REV Extra Bass Selects whether to the previous menu. DIST VOL. SOURCE 1 1 5 TRANSMIT CODE SET SLEEP RECEIVER HDMI 2 ...
Owners Manual
Page 24
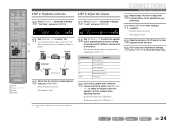
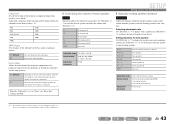
... to display "Test Tone" and press jENTER. Information FL FR C SL SR SWFR Speakers Front speaker L Front speaker R Center speaker Surround speaker L Surround speaker R Subwoofer 15 If you find a speaker with a different volume level to adjust the volume. SOURCE 1 1 5 TRANSMIT CODE SET SLEEP RECEIVER HDMI 2 3 4 AV 2 ... REC POP-UP MENU MUTE j Front L Center Front R 1 2 3 4 5 6 7 8 9 INPUT MUTE 0 10 TV TV VOL TV CH ENT Subwoofer Surround L Surround R i SETUP j Cursor B / C / D / E j ENTER j RETURN 12 Check that the test tone is outputting the test tone....
... to display "Test Tone" and press jENTER. Information FL FR C SL SR SWFR Speakers Front speaker L Front speaker R Center speaker Surround speaker L Surround speaker R Subwoofer 15 If you find a speaker with a different volume level to adjust the volume. SOURCE 1 1 5 TRANSMIT CODE SET SLEEP RECEIVER HDMI 2 3 4 AV 2 ... REC POP-UP MENU MUTE j Front L Center Front R 1 2 3 4 5 6 7 8 9 INPUT MUTE 0 10 TV TV VOL TV CH ENT Subwoofer Surround L Surround R i SETUP j Cursor B / C / D / E j ENTER j RETURN 12 Check that the test tone is outputting the test tone....
Owners Manual
Page 41
... Setup Lipsync Adaptive DRC D.Range Max Volume Init.Volume HDMI Setup Control TVAudio ARC Audio Func. Setup Input Rename AutoPowerDown Dimmer DSP Parameter Memory Guard Subwoofer Front Center Sur. LR Crossover SWFR Phase Extra Bass (speakers) (unit and speakers) (speakers and frequency bands) HDMI Auto Auto Manual En 41 Setup menu...
... Setup Lipsync Adaptive DRC D.Range Max Volume Init.Volume HDMI Setup Control TVAudio ARC Audio Func. Setup Input Rename AutoPowerDown Dimmer DSP Parameter Memory Guard Subwoofer Front Center Sur. LR Crossover SWFR Phase Extra Bass (speakers) (unit and speakers) (speakers and frequency bands) HDMI Auto Auto Manual En 41 Setup menu...
Owners Manual
Page 42
... cm) or smaller → Small When speaker size is set the frequency components of the speakers based on distance to the subwoofer. Subwoofer Confirms the subwoofer. The front speakers will produce audio from the LFE (low-frequency effect) channel and bass frequency audio from other channels. If...Default) Large Select this when no center speaker. Select this when a small center speaker is "Small" and you do not have a subwoofer connected. Manually adjusts the volume of the front speakers. Selects an equalizer to "None," you can only choose "Large." Manages settings ...
... cm) or smaller → Small When speaker size is set the frequency components of the speakers based on distance to the subwoofer. Subwoofer Confirms the subwoofer. The front speakers will produce audio from the LFE (low-frequency effect) channel and bass frequency audio from other channels. If...Default) Large Select this when no center speaker. Select this when a small center speaker is "Small" and you do not have a subwoofer connected. Manually adjusts the volume of the front speakers. Selects an equalizer to "None," you can only choose "Large." Manages settings ...
Owners Manual
Page 43
... / E. Extra Bass Allows the front channel low-frequency components to be produced from the speakers reach the listening position at the same time. The subwoofer and the front speakers produce the front channel low-frequency components. L Sur. R) Adjustment increments 0.5 ft (0.10 m) J 1 : If your ... then use jCursor D / E to set the distance from speakers set to "Small." Front speaker L Front speaker R Center speaker Surround speaker L Surround speaker R Subwoofer Adjustable range 1.0 ft to 80.0 ft (0.30 m to +10.0 dB Default setting 0 dB (FL / FR / SWFR) -1.0 dB (C / SL / ...
... / E. Extra Bass Allows the front channel low-frequency components to be produced from the speakers reach the listening position at the same time. The subwoofer and the front speakers produce the front channel low-frequency components. L Sur. R) Adjustment increments 0.5 ft (0.10 m) J 1 : If your ... then use jCursor D / E to set the distance from speakers set to "Small." Front speaker L Front speaker R Center speaker Surround speaker L Surround speaker R Subwoofer Adjustable range 1.0 ft to 80.0 ft (0.30 m to +10.0 dB Default setting 0 dB (FL / FR / SWFR) -1.0 dB (C / SL / ...
Owners Manual
Page 62
... sound is not turned on. No sound is disabled. Sound may result from the surround speakers. A subwoofer is not connected, or it to other digital or radio frequency equipment. Turn the subwoofer power on all components connected to this unit further away from digital or radio frequency equipment. Select a ...this unit is set to output the desired digital audio signals. The audio input sources cannot be increased, or the sound is not set the subwoofer to the output jacks of this unit. Press gSTRAIGHT (on , the sound may be distorted, or the volume may be found. Set ...
... sound is not turned on. No sound is disabled. Sound may result from the surround speakers. A subwoofer is not connected, or it to other digital or radio frequency equipment. Turn the subwoofer power on all components connected to this unit further away from digital or radio frequency equipment. Select a ...this unit is set to output the desired digital audio signals. The audio input sources cannot be increased, or the sound is not set the subwoofer to the output jacks of this unit. Press gSTRAIGHT (on , the sound may be distorted, or the volume may be found. Set ...
Owners Manual
Page 66
... than that is fully backward-compatible with full-quality full-motion video for music programs and motion picture soundtracks on digital storage media, such as a subwoofer, for the surround speakers, more accurate moving sound effects and directionality. DTS 96/24 offers sound quality transparent to 8 discrete channels of the future, DTS...
... than that is fully backward-compatible with full-quality full-motion video for music programs and motion picture soundtracks on digital storage media, such as a subwoofer, for the surround speakers, more accurate moving sound effects and directionality. DTS 96/24 offers sound quality transparent to 8 discrete channels of the future, DTS...
Owners Manual
Page 69
...Separation (1 kHz/10 kHz) AV5, etc. (5.1 kΩ shortened 60 dB/45 dB or more • Rated Output Voltage/Output Impedance AUDIO OUT 200 mV/1.2 kΩ SUBWOOFER (2ch Stereo & Front: Small 1.0 V/1.2 kΩ • Headphone Jack Rated Output/Impedance AV5, etc. (1 kHz, 50 mV, 8 100 mV/470 Ω •...; Frequency Response AV5 to FRONT 10 Hz to FRONT [U.S.A. L.P.F. (Subwoofer 24 dB/oct. En 69 DTS-HD Master Audio, DTS-HD High Resolution, DTS Express - DTS-HD - Dolby Pro Logic - Dolby Pro Logic II Music...
...Separation (1 kHz/10 kHz) AV5, etc. (5.1 kΩ shortened 60 dB/45 dB or more • Rated Output Voltage/Output Impedance AUDIO OUT 200 mV/1.2 kΩ SUBWOOFER (2ch Stereo & Front: Small 1.0 V/1.2 kΩ • Headphone Jack Rated Output/Impedance AV5, etc. (1 kHz, 50 mV, 8 100 mV/470 Ω •...; Frequency Response AV5 to FRONT 10 Hz to FRONT [U.S.A. L.P.F. (Subwoofer 24 dB/oct. En 69 DTS-HD Master Audio, DTS-HD High Resolution, DTS Express - DTS-HD - Dolby Pro Logic - Dolby Pro Logic II Music...

Owners Manual
Page 73
... a CRT TV, we recommend that you use magnetically shielded speakers. • Prepare at least 6Ω. • If you are connecting) • Audio pin cable (for subwoofer) - 1 - Surround speaker Ex. Quick Reference Guide ■ Accessories The following the polarity markings. 3 Snap the battery compartment cover back into place. 2 ■ Items necessary ...on the devices you are connecting) • Speaker cables (a quantity to match the number of at least two speakers (for front). Center speaker Ex. Active subwoofer • Use speakers with this product. Front speaker Ex.
... a CRT TV, we recommend that you use magnetically shielded speakers. • Prepare at least 6Ω. • If you are connecting) • Audio pin cable (for subwoofer) - 1 - Surround speaker Ex. Quick Reference Guide ■ Accessories The following the polarity markings. 3 Snap the battery compartment cover back into place. 2 ■ Items necessary ...on the devices you are connecting) • Speaker cables (a quantity to match the number of at least two speakers (for front). Center speaker Ex. Active subwoofer • Use speakers with this product. Front speaker Ex.
Owners Manual
Page 74
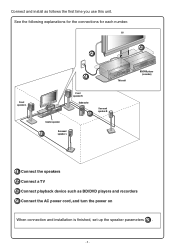
Connect and install as BD/DVD players and recorders 4 Connect the AC power cord, and turn the power on When connection and installation is finished, set up the speaker parameters 5 . - 2 - See the following explanations for the connections for each number. TV 3 2 Front speaker L 4 This unit Center speaker Front speaker R Subwoofer 1 Surround speaker R Surround 1 speaker L BD/DVD player (recorder) 1 Connect the speakers 2 Connect a TV 3 Connect playback device such as follows the first time you use this unit.
Connect and install as BD/DVD players and recorders 4 Connect the AC power cord, and turn the power on When connection and installation is finished, set up the speaker parameters 5 . - 2 - See the following explanations for the connections for each number. TV 3 2 Front speaker L 4 This unit Center speaker Front speaker R Subwoofer 1 Surround speaker R Surround 1 speaker L BD/DVD player (recorder) 1 Connect the speakers 2 Connect a TV 3 Connect playback device such as follows the first time you use this unit.
Owners Manual
Page 75
...the banana plug into the terminal. 3 Lift the tab to approximately half volume (or slightly less than half). Connecting the subwoofer 1 Connect the subwoofer input jack to Owner's Manual for information on settings. One of these cables is switched on. • When connecting 6Ω...cable does not touch anything or come into the "+" (positive, red) terminal on the side of the terminal. 4 Tighten the terminal. Subwoofer Center speaker Connecting front speakers KERS 3 2 FRONT 1 4 1 Remove approximately 10mm of insulation from the power outlet before making connections. will ...
...the banana plug into the terminal. 3 Lift the tab to approximately half volume (or slightly less than half). Connecting the subwoofer 1 Connect the subwoofer input jack to Owner's Manual for information on settings. One of these cables is switched on. • When connecting 6Ω...cable does not touch anything or come into the "+" (positive, red) terminal on the side of the terminal. 4 Tighten the terminal. Subwoofer Center speaker Connecting front speakers KERS 3 2 FRONT 1 4 1 Remove approximately 10mm of insulation from the power outlet before making connections. will ...
Owners Manual
Page 78
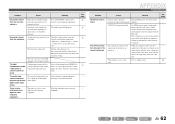
...Choose "None" if you do not have completed the settings for one speaker, repeat the same procedure for all speakers to select the speaker (subwoofer) you set "Crossover," "SWFR Phase," and "Extra Bass" is complete. DIST VOL. None/Small/Large Selects the size of the center... Setup" appears and press ENTER. NRM/REV Selects whether to the next page - 6 - LR Crossover SWFR Phase Extra Bass Description Setting Sets the subwoofer status. When you have a speaker connected. SP SET Config VOL. On/Off • Whether or not you want to configure, and then use ...
...Choose "None" if you do not have completed the settings for one speaker, repeat the same procedure for all speakers to select the speaker (subwoofer) you set "Crossover," "SWFR Phase," and "Extra Bass" is complete. DIST VOL. None/Small/Large Selects the size of the center... Setup" appears and press ENTER. NRM/REV Selects whether to the next page - 6 - LR Crossover SWFR Phase Extra Bass Description Setting Sets the subwoofer status. When you have a speaker connected. SP SET Config VOL. On/Off • Whether or not you want to configure, and then use ...


