
Owners Manual
Page 3
... ...43 - Speaker cable connection...10 - Sound quality control with the equalizer Speaker impedance configuration...10 - INTRODUCTION Features and capabilities ■ Built-in high-quality, high-power 5-channel amplifier ■ 1-button input/sound field program switching (SCENE function 26 ■ Speaker connections for each speaker...43 - Speaker channels and functions ...9 -
... ...43 - Speaker cable connection...10 - Sound quality control with the equalizer Speaker impedance configuration...10 - INTRODUCTION Features and capabilities ■ Built-in high-quality, high-power 5-channel amplifier ■ 1-button input/sound field program switching (SCENE function 26 ■ Speaker connections for each speaker...43 - Speaker channels and functions ...9 -
Owners Manual
Page 5
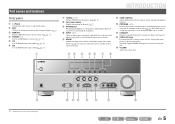
... cycle through the headphones. bc d ef g h l TONE CONTROL Adjusts high-frequency/low-frequency output of speakers/headphones (☞p. 25). Part names and functions Front panel a A (Power) Switches this unit between the sound field effect (sound field program) you have selected tuner input. i PHONES jack For plugging headphones in order. Attach the...
... cycle through the headphones. bc d ef g h l TONE CONTROL Adjusts high-frequency/low-frequency output of speakers/headphones (☞p. 25). Part names and functions Front panel a A (Power) Switches this unit between the sound field effect (sound field program) you have selected tuner input. i PHONES jack For plugging headphones in order. Attach the...
Owners Manual
Page 6
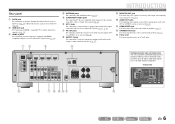
... components equipped with analog audio outputs to receive audio/video signals from (☞p. 16). Rear panel a DOCK jack For connecting an optional Yamaha iPod universal dock (such as the AV5 or AUDIO1-2 jacks are compatible with component video signals, using three cables to output video signal ...For outputting audio signals received when analog inputs such as YDS-12) (☞p. 34) or Bluetooth wireless audio receiver (YBA-10) (☞p. 36). m Power cord For connecting this unit can receive audio/video signals (☞p. 17, p. 18). b HDMI OUT jack For connecting an HDMI - ab c d ...
... components equipped with analog audio outputs to receive audio/video signals from (☞p. 16). Rear panel a DOCK jack For connecting an optional Yamaha iPod universal dock (such as the AV5 or AUDIO1-2 jacks are compatible with component video signals, using three cables to output video signal ...For outputting audio signals received when analog inputs such as YDS-12) (☞p. 34) or Bluetooth wireless audio receiver (YBA-10) (☞p. 36). m Power cord For connecting this unit can receive audio/video signals (☞p. 17, p. 18). b HDMI OUT jack For connecting an HDMI - ab c d ...
Owners Manual
Page 8
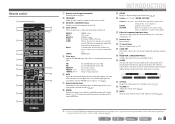
...etc are used when using and the surround decoder (☞p. 26). Sleep 120min. Sleep Off Sleep 30min. En 8 J1 DOCK A Yamaha iPod universal dock or Bluetooth wireless audio receiver connected to switch on the unit. Changes tuning frequencies. Press this key when this unit... (☞p. 41). J1 l Numeric keys Enter numbers. o RECEIVER A (RECEIVER Power) Switches this unit to playback. The front panel display indicator lights up when a signal is activated. DECODE MUSIC STEREO STRAIGHT BD DVD ...
...etc are used when using and the surround decoder (☞p. 26). Sleep 120min. Sleep Off Sleep 30min. En 8 J1 DOCK A Yamaha iPod universal dock or Bluetooth wireless audio receiver connected to switch on the unit. Changes tuning frequencies. Press this key when this unit... (☞p. 41). J1 l Numeric keys Enter numbers. o RECEIVER A (RECEIVER Power) Switches this unit to playback. The front panel display indicator lights up when a signal is activated. DECODE MUSIC STEREO STRAIGHT BD DVD ...
Owners Manual
Page 10
... BD DVD SCENE TV CD TONE CONTROL PROGRAM RADIO STRAIGHT 3 Check that can be placed between 60 degrees and 80 degrees from the factory. The power turns on the front panel. En 10 Speaker layout 5.1-channel speaker layout (5 speakers + subwoofer) Front speaker R Front speaker L Subwoofer Connecting speakers CONNECTIONS Connecting speakers ■...
... BD DVD SCENE TV CD TONE CONTROL PROGRAM RADIO STRAIGHT 3 Check that can be placed between 60 degrees and 80 degrees from the factory. The power turns on the front panel. En 10 Speaker layout 5.1-channel speaker layout (5 speakers + subwoofer) Front speaker R Front speaker L Subwoofer Connecting speakers CONNECTIONS Connecting speakers ■...

Owners Manual
Page 11
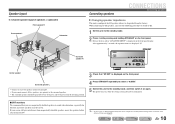
... cables short circuit, "CHECK SP WIRES!" will appear on the front panel display when this unit. This may damage this unit from the power outlet before connecting the speakers. • Generally speaker cables consist of the speaker cable does not touch anything or come into the "+" (... HDMI 4 OR OUT ANTENNA FM GND AM SURROUND CENTER SPEAKERS FRONT AUDIO 2 AUDIO OUT SUBWOOFER Subwoofer Center speaker CAUTION • Remove the AC power cord of this unit is a different color, or has a line running along it, to their respective terminals on the rear panel. Insert the ...
... cables short circuit, "CHECK SP WIRES!" will appear on the front panel display when this unit. This may damage this unit from the power outlet before connecting the speakers. • Generally speaker cables consist of the speaker cable does not touch anything or come into the "+" (... HDMI 4 OR OUT ANTENNA FM GND AM SURROUND CENTER SPEAKERS FRONT AUDIO 2 AUDIO OUT SUBWOOFER Subwoofer Center speaker CAUTION • Remove the AC power cord of this unit is a different color, or has a line running along it, to their respective terminals on the rear panel. Insert the ...
Owners Manual
Page 26
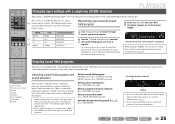
...Four scenes are currently outputting sound (☞p. 7). • You can use switch between the external components that allows you to turn the power on the front panel display. When changing "SCENE," you can enjoy multi-channel playback for different uses, such as the initial factory settings...sound decoders. SW L CR SL SR Program • You can adjust sound field elements (sound field parameters) for that sounds best with a Yamaha digital sound field processing (DSP) chip. MUSIC category: Press gMUSIC repeatedly. SCENE BD/DVD g TV CD h RADIO Input HDMI1 AV4 AV3 ...
...Four scenes are currently outputting sound (☞p. 7). • You can use switch between the external components that allows you to turn the power on the front panel display. When changing "SCENE," you can enjoy multi-channel playback for different uses, such as the initial factory settings...sound decoders. SW L CR SL SR Program • You can adjust sound field elements (sound field parameters) for that sounds best with a Yamaha digital sound field processing (DSP) chip. MUSIC category: Press gMUSIC repeatedly. SCENE BD/DVD g TV CD h RADIO Input HDMI1 AV4 AV3 ...
Owners Manual
Page 28
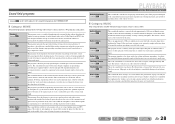
...left , right and rear. In sports broadcasts, the voices of action and adventure movies. The reality of, and emphasis on reproducing a powerful space expanded widely to enjoy stereo sport broadcasts and studio variety programs with enriched live house with an excellent dynamic range providing everything from ...and dialog from all around clear words and center positioning in a way that reproduces the space of a big live sound field features powerful sound as if the listener is suitable when listening to the surround sound field that does not fatigue the listener even after long hours...
...left , right and rear. In sports broadcasts, the voices of action and adventure movies. The reality of, and emphasis on reproducing a powerful space expanded widely to enjoy stereo sport broadcasts and studio variety programs with enriched live house with an excellent dynamic range providing everything from ...and dialog from all around clear words and center positioning in a way that reproduces the space of a big live sound field features powerful sound as if the listener is suitable when listening to the surround sound field that does not fatigue the listener even after long hours...
Owners Manual
Page 34
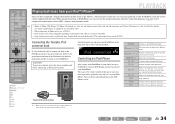
...iPhone After setting your iPod/iPhone in your dock, just press dDOCK to switch to the previous menu or enter the menu you have connected a Yamaha iPod universal dock (such as MP3 a sharper, more dynamic sound. In this unit. COMPONENT VIDEO PR ARC HDMI OUT PR PB PB Y ...MONITOR OUT Y COMPON VIDEO Switch the power on the YDS-12. VOL. Switches between playback and pause. Switches between playback and pause. The unit is now ready for information on how to...
...iPhone After setting your iPod/iPhone in your dock, just press dDOCK to switch to the previous menu or enter the menu you have connected a Yamaha iPod universal dock (such as MP3 a sharper, more dynamic sound. In this unit. COMPONENT VIDEO PR ARC HDMI OUT PR PB PB Y ...MONITOR OUT Y COMPON VIDEO Switch the power on the YDS-12. VOL. Switches between playback and pause. Switches between playback and pause. The unit is now ready for information on how to...
Owners Manual
Page 49
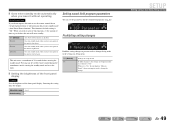
...CR SL SR Prohibits setting changes to prevent careless changes being made to pass before entering the standby mode. Goes into standby mode (Auto Power Down function). This unit starts a countdown of the front panel display. Lowering the setting dims the display. SETUP VOL. SETUP Setting various... functions (Setup menu) En 49 Off (Default) 4hours 8hours 12hours Auto Power Down function is "Off." Prohibits changes to the settings on Setup menu. Goes into standby mode, when you do not operate this unit...
...CR SL SR Prohibits setting changes to prevent careless changes being made to pass before entering the standby mode. Goes into standby mode (Auto Power Down function). This unit starts a countdown of the front panel display. Lowering the setting dims the display. SETUP VOL. SETUP Setting various... functions (Setup menu) En 49 Off (Default) 4hours 8hours 12hours Auto Power Down function is "Off." Prohibits changes to the settings on Setup menu. Goes into standby mode, when you do not operate this unit...
Owners Manual
Page 55
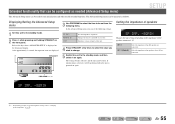
...from the following items. In the Advanced Setup menu, you wish to change. 5 Switch this unit to be performed when the unit is powered on again. Displaying/Setting the Advanced Setup menu 1 Set this unit to the standby mode, and then switch it will be set the ...front panel. En 55 PROGRAM l / h SP IMP. -8 MIN J 1 : For detailed procedures of the speakers connected. Release the keys when "ADVANCED SETUP" is powered on. If initialization is selected, it on again. The Advanced Setup menu can be used for this unit. 4 Press STRAIGHT a few times to "Changing speaker...
...from the following items. In the Advanced Setup menu, you wish to change. 5 Switch this unit to be performed when the unit is powered on again. Displaying/Setting the Advanced Setup menu 1 Set this unit to the standby mode, and then switch it will be set the ...front panel. En 55 PROGRAM l / h SP IMP. -8 MIN J 1 : For detailed procedures of the speakers connected. Release the keys when "ADVANCED SETUP" is powered on. If initialization is selected, it on again. The Advanced Setup menu can be used for this unit. 4 Press STRAIGHT a few times to "Changing speaker...
Owners Manual
Page 57
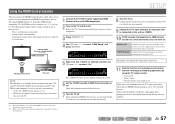
... unit supports the HDMI Control function, which allows you have finished changing the setting. 6 Set the TV/DVD recorder's HDMI Control function to On. Power synchronization (on manually. 9 Change the TV's input setting to the input jack that "Control" is selected, and then use TVs and DVD/BD ...TV on the TV and this unit's HDMI output jack. 2 Turn on . If it is being properly received by using the TV remote control. • Power On/Off • Volume Control • Switching between audio output devices If this unit, a TV, and a DVD recorder. HDMI VOL. Control;;;;;On SW ...
... unit supports the HDMI Control function, which allows you have finished changing the setting. 6 Set the TV/DVD recorder's HDMI Control function to On. Power synchronization (on manually. 9 Change the TV's input setting to the input jack that "Control" is selected, and then use TVs and DVD/BD ...TV on the TV and this unit's HDMI output jack. 2 Turn on . If it is being properly received by using the TV remote control. • Power On/Off • Volume Control • Switching between audio output devices If this unit, a TV, and a DVD recorder. HDMI VOL. Control;;;;;On SW ...
Owners Manual
Page 60
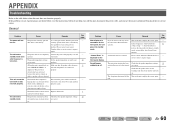
... request repair. Please contact your speakers. (When this unit is displayed.) The protection circuitry has been activated because this unit, disconnect the power cable, and contact the nearest authorized Yamaha dealer or service center. Remedy Turn on . Cause Remedy The protection circuitry operated three times consecutively. touching each other, then turn on...
... request repair. Please contact your speakers. (When this unit is displayed.) The protection circuitry has been activated because this unit, disconnect the power cable, and contact the nearest authorized Yamaha dealer or service center. Remedy Turn on . Cause Remedy The protection circuitry operated three times consecutively. touching each other, then turn on...
Owners Manual
Page 62
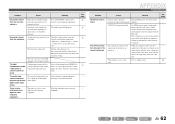
... noise is turned off. Connect the playback component to this unit by digital connection and play back the DTS-CD. Turn the subwoofer power on , the sound may be output from such equipment. If the condition is heard from digital or radio frequency equipment. Consult the ... or the sound is too close to its instruction manual. This unit is distorted. If the subwoofer includes an Auto Power Off function, then lower the Auto Power Off sensitivity settings. defective. The component connected to the output jacks of audio / video jacks to this unit further away...
... noise is turned off. Connect the playback component to this unit by digital connection and play back the DTS-CD. Turn the subwoofer power on , the sound may be output from such equipment. If the condition is heard from digital or radio frequency equipment. Consult the ... or the sound is too close to its instruction manual. This unit is distorted. If the subwoofer includes an Auto Power Off function, then lower the Auto Power Off sensitivity settings. defective. The component connected to the output jacks of audio / video jacks to this unit further away...
Owners Manual
Page 69
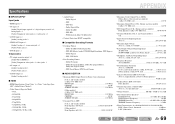
... Pro Logic II Movie, Dolby Pro Logic II Game - DTS Neo:6 Music, DTS Neo:6 Cinema ■ AUDIO SECTION • Minimum RMS Output Power for Front, Center, Surround [U.S.A. and Canada models] (1 kHz, 50 W, 8 0.06% or less [Other models] (1 kHz, 50 W, 6... 100 W/ch CENTER 100 W SURROUND L/R 100 W/ch [Other models] (1 kHz, 0.9% THD, 6 Ω) FRONT L/R 100 W/ch CENTER 100 W SURROUND L/R 100 W/ch • Dynamic Power (IHF) [U.S.A. Specifications ■ INPUT/OUTPUT Input jacks • HDMI input x 4 • AV input x 5 [Audio] Digital input (optical) x 2, digital input (coaxial) x 2, ...
... Pro Logic II Movie, Dolby Pro Logic II Game - DTS Neo:6 Music, DTS Neo:6 Cinema ■ AUDIO SECTION • Minimum RMS Output Power for Front, Center, Surround [U.S.A. and Canada models] (1 kHz, 50 W, 8 0.06% or less [Other models] (1 kHz, 50 W, 6... 100 W/ch CENTER 100 W SURROUND L/R 100 W/ch [Other models] (1 kHz, 0.9% THD, 6 Ω) FRONT L/R 100 W/ch CENTER 100 W SURROUND L/R 100 W/ch • Dynamic Power (IHF) [U.S.A. Specifications ■ INPUT/OUTPUT Input jacks • HDMI input x 4 • AV input x 5 [Audio] Digital input (optical) x 2, digital input (coaxial) x 2, ...
Owners Manual
Page 72
RX-V371_flyer.fm Page 1 Friday, January 7, 2011 3:40 PM U Additional information on specification for Front, Center, Surround (1 kHz, 0.9% THD, 8Ω, 2 channels driven simultaneously) FRONT L/R 80 W + 80 W CENTER 80 W SURROUND L/R 80 W + 80 W © 2011 Yamaha Corporation Printed in China WY69390 model as well as "Specifications" in the Owner's Manual. • Rated Output Power for U.S.A. model The following specification is added for U.S.A.
RX-V371_flyer.fm Page 1 Friday, January 7, 2011 3:40 PM U Additional information on specification for Front, Center, Surround (1 kHz, 0.9% THD, 8Ω, 2 channels driven simultaneously) FRONT L/R 80 W + 80 W CENTER 80 W SURROUND L/R 80 W + 80 W © 2011 Yamaha Corporation Printed in China WY69390 model as well as "Specifications" in the Owner's Manual. • Rated Output Power for U.S.A. model The following specification is added for U.S.A.

Owners Manual
Page 74
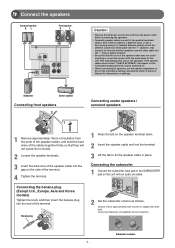
TV 3 2 Front speaker L 4 This unit Center speaker Front speaker R Subwoofer 1 Surround speaker R Surround 1 speaker L BD/DVD player (recorder) 1 Connect the speakers 2 Connect a TV 3 Connect playback device such as follows the first time you use this unit. See the following explanations for the connections for each number. Connect and install as BD/DVD players and recorders 4 Connect the AC power cord, and turn the power on When connection and installation is finished, set up the speaker parameters 5 . - 2 -
TV 3 2 Front speaker L 4 This unit Center speaker Front speaker R Subwoofer 1 Surround speaker R Surround 1 speaker L BD/DVD player (recorder) 1 Connect the speakers 2 Connect a TV 3 Connect playback device such as follows the first time you use this unit. See the following explanations for the connections for each number. Connect and install as BD/DVD players and recorders 4 Connect the AC power cord, and turn the power on When connection and installation is finished, set up the speaker parameters 5 . - 2 -
Owners Manual
Page 75
...consist of two parallel insulated cables. Subwoofer Center speaker Connecting front speakers KERS 3 2 FRONT 1 4 1 Remove approximately 10mm of insulation from the power outlet before making connections. 1 Connect the speakers Surround speaker R L Front speaker R L ANTENNA FM GND AM SPEAKERS SURROUND CENTER FRONT SUBWOOFER ...Caution: • Remove the AC power cord of this unit from the ends of the speaker cables, and twist the bare wires of the cables together firmly so...
...consist of two parallel insulated cables. Subwoofer Center speaker Connecting front speakers KERS 3 2 FRONT 1 4 1 Remove approximately 10mm of insulation from the power outlet before making connections. 1 Connect the speakers Surround speaker R L Front speaker R L ANTENNA FM GND AM SPEAKERS SURROUND CENTER FRONT SUBWOOFER ...Caution: • Remove the AC power cord of this unit from the ends of the speaker cables, and twist the bare wires of the cables together firmly so...

Owners Manual
Page 77
... devices that output video from component video output jacks and audio from analog output jacks. To the power outlet. Refer to Owner's Manual for details. 4 Connect the AC power cord, and turn the power on AC power cord Be sure to enjoy a higher quality sounds and images. A When playback device is capable of HDMI...
... devices that output video from component video output jacks and audio from analog output jacks. To the power outlet. Refer to Owner's Manual for details. 4 Connect the AC power cord, and turn the power on AC power cord Be sure to enjoy a higher quality sounds and images. A When playback device is capable of HDMI...
Quick Reference Guide
Page 2
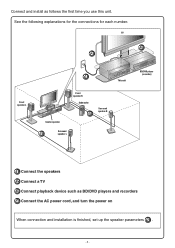
See the following explanations for the connections for each number. TV 3 2 Front speaker L 4 This unit Center speaker Front speaker R Subwoofer 1 Surround speaker R Surround 1 speaker L BD/DVD player (recorder) 1 Connect the speakers 2 Connect a TV 3 Connect playback device such as follows the first time you use this unit. Connect and install as BD/DVD players and recorders 4 Connect the AC power cord, and turn the power on When connection and installation is finished, set up the speaker parameters 5 . - 2 -
See the following explanations for the connections for each number. TV 3 2 Front speaker L 4 This unit Center speaker Front speaker R Subwoofer 1 Surround speaker R Surround 1 speaker L BD/DVD player (recorder) 1 Connect the speakers 2 Connect a TV 3 Connect playback device such as follows the first time you use this unit. Connect and install as BD/DVD players and recorders 4 Connect the AC power cord, and turn the power on When connection and installation is finished, set up the speaker parameters 5 . - 2 -


