
Owners Manual
Page 2
... Setup menu 55 Setting the impedance of speakers 55 Avoiding crossing remote control signals when using multiple Yamaha receivers 56 Initializing various settings for this unit 56 Using the HDMI Control function 57 APPENDIX Troubleshooting 60 General 60 HDMI 63 Tuner (FM/AM 63 Remote control 64 iPod™/iPhone 65 Bluetooth 65 Glossary 66 Audio...
... Setup menu 55 Setting the impedance of speakers 55 Avoiding crossing remote control signals when using multiple Yamaha receivers 56 Initializing various settings for this unit 56 Using the HDMI Control function 57 APPENDIX Troubleshooting 60 General 60 HDMI 63 Tuner (FM/AM 63 Remote control 64 iPod™/iPhone 65 Bluetooth 65 Glossary 66 Audio...
Owners Manual
Page 3
Speaker distance settings ...43 - Volume control for each speaker...43 - Sound quality control with the equalizer Subwoofer cable connection ...12 ■ Acoustic parameter adjustment to 5.1-channel configurations - Specifying the settings for each speaker 42 - INTRODUCTION Features and capabilities &#...
Speaker distance settings ...43 - Volume control for each speaker...43 - Sound quality control with the equalizer Subwoofer cable connection ...12 ■ Acoustic parameter adjustment to 5.1-channel configurations - Specifying the settings for each speaker 42 - INTRODUCTION Features and capabilities &#...

Owners Manual
Page 4
... the footnote. Attach the cover PUSH Remove the cover INTRODUCTION Features and capabilities ■ Installing batteries in the remote control When inserting batteries in the remote control, remove the battery compartment cover from the reverse side of the parts on the " " at the bottom ... (included) To protect against dust, attach the supplied VIDEO AUX input cover to the "Remote control" (☞p. 8) for more than two minutes, or leaving exhausted batteries in the remote control, the remote control codes may be operated within a narrow range. • bTRANSMIT does not light up, ...
... the footnote. Attach the cover PUSH Remove the cover INTRODUCTION Features and capabilities ■ Installing batteries in the remote control When inserting batteries in the remote control, remove the battery compartment cover from the reverse side of the parts on the " " at the bottom ... (included) To protect against dust, attach the supplied VIDEO AUX input cover to the "Remote control" (☞p. 8) for more than two minutes, or leaving exhausted batteries in the remote control, the remote control codes may be operated within a narrow range. • bTRANSMIT does not light up, ...
Owners Manual
Page 7
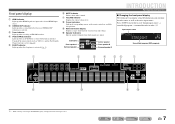
...settings. d iPod CHARGE indicator Lights up when a sound field effect that uses CINEMA DSP technology is displayed instead of information on the remote control are available for operations. h Cursor indicators Light up when receiving an FM/AM broadcast. i Multi information display Displays a range of ...the input source. Press fINFO repeatedly to cycle through an optional Yamaha iPod universal dock (such as the active input source. En 7 b CINEMA DSP indicator Lights up when an iPod/iPhone is muted....
...settings. d iPod CHARGE indicator Lights up when a sound field effect that uses CINEMA DSP technology is displayed instead of information on the remote control are available for operations. h Cursor indicators Light up when receiving an FM/AM broadcast. i Multi information display Displays a range of ...the input source. Press fINFO repeatedly to cycle through an optional Yamaha iPod universal dock (such as the active input source. En 7 b CINEMA DSP indicator Lights up when an iPod/iPhone is muted....
Owners Manual
Page 8
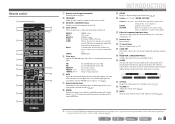
...component operations (☞p. 52, p. 56). Confirms a selected item. J1 l Numeric keys Enter numbers. n CODE SET Sets remote control codes for each input source to set the time for external components. h SCENE Switches the input source and the sound field... external component on this unit to playback. for the sleep timer function. J1 DOCK A Yamaha iPod universal dock or Bluetooth wireless audio receiver connected to AM. Selects a preset station. p SLEEP Sets this unit from the remote control. j Cursor B / C / D / E, ENTER, RETURN Cursor B / C ...
...component operations (☞p. 52, p. 56). Confirms a selected item. J1 l Numeric keys Enter numbers. n CODE SET Sets remote control codes for each input source to set the time for external components. h SCENE Switches the input source and the sound field... external component on this unit to playback. for the sleep timer function. J1 DOCK A Yamaha iPod universal dock or Bluetooth wireless audio receiver connected to AM. Selects a preset station. p SLEEP Sets this unit from the remote control. j Cursor B / C / D / E, ENTER, RETURN Cursor B / C ...

Owners Manual
Page 15
...You can be switched automatically to the TV's audio output jacks. If the TV supports optical digital audio output, we recommend that supports HDMI Control functions (Ex. En 15 Panasonic VIERA Link) and Audio Return Channel functions, audio/video output from the unit to the TV and audio ... Connect the video pin cable to one of the AV5, AUDIO1, AUDIO2, or V-AUX with a stereo pin cable. Panasonic VIERA Link), if HDMI Control functions are possible using the receiver's remote control by entering the TV's remote control code (☞p. 52). Connect to the VIDEO (MONITOR OUT) jack.
...You can be switched automatically to the TV's audio output jacks. If the TV supports optical digital audio output, we recommend that supports HDMI Control functions (Ex. En 15 Panasonic VIERA Link) and Audio Return Channel functions, audio/video output from the unit to the TV and audio ... Connect the video pin cable to one of the AV5, AUDIO1, AUDIO2, or V-AUX with a stereo pin cable. Panasonic VIERA Link), if HDMI Control functions are possible using the receiver's remote control by entering the TV's remote control code (☞p. 52). Connect to the VIDEO (MONITOR OUT) jack.
Owners Manual
Page 22
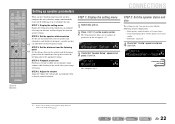
... functions (Setup menu)" for each speaker reaches the listening point at the appropriate timing. STEP 5: Adjust the volume Adjust the volume for details on the remote control.
... functions (Setup menu)" for each speaker reaches the listening point at the appropriate timing. STEP 5: Adjust the volume Adjust the volume for details on the remote control.
Owners Manual
Page 26
... field programs. Selects sound field program: MOVIE category: Press gMOVIE repeatedly. When you change input sources and sound field programs with a Yamaha digital sound field processing (DSP) chip. Switches Straight decoding mode (☞p. 27): Press gSTRAIGHT. For details on sound field program, refer...components that allows you are available for that sounds best with a single key (SCENE function) This unit has a SCENE function that the remote control operates (☞p. 52). Four scenes are playing back, rather than 96 kHz, this page. 3 Press the hSCENE key until "SET ...
... field programs. Selects sound field program: MOVIE category: Press gMOVIE repeatedly. When you change input sources and sound field programs with a Yamaha digital sound field processing (DSP) chip. Switches Straight decoding mode (☞p. 27): Press gSTRAIGHT. For details on sound field program, refer...components that allows you are available for that sounds best with a single key (SCENE function) This unit has a SCENE function that the remote control operates (☞p. 52). Four scenes are playing back, rather than 96 kHz, this page. 3 Press the hSCENE key until "SET ...
Owners Manual
Page 30
... SW L CR SL SR 3 Use eTUNING H / I Decreases the frequency. Make sure that is correct. J2 For example, enter as follows to select a station on the remote control to receive. Press and hold this unit to search automatically for a station on a higher frequency than the current one . d The FM/AM tuner of the...
... SW L CR SL SR 3 Use eTUNING H / I Decreases the frequency. Make sure that is correct. J2 For example, enter as follows to select a station on the remote control to receive. Press and hold this unit to search automatically for a station on a higher frequency than the current one . d The FM/AM tuner of the...

Owners Manual
Page 32
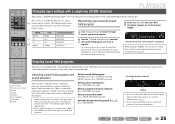
... preset to register the station to, and then press eMEMORY to display the Option menu. To cancel registration, press jRETURN or do not operate the remote control for reception (Normal tuning)" (☞p. 30). PLAYBACK FM/AM tuning Clearing preset stations 1 Press dTUNER to switch to the tuner input. 2 Press qOPTION to register...
... preset to register the station to, and then press eMEMORY to display the Option menu. To cancel registration, press jRETURN or do not operate the remote control for reception (Normal tuning)" (☞p. 30). PLAYBACK FM/AM tuning Clearing preset stations 1 Press dTUNER to switch to the tuner input. 2 Press qOPTION to register...
Owners Manual
Page 34
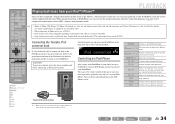
... COMPONENT VIDEO PR ARC HDMI OUT PR PB PB Y MONITOR OUT Y COMPON VIDEO Switch the power on and place your iPod/iPhone using the remote control supplied with this unit. You can check song information on the rear panel of this unit in the dock. jCursor B / C J1 Move the...5th, and 6th generation) and iPod mini are supported (As of October 2010). • When connecting an iPhone, please use the remote control of this unit. Connecting the Yamaha iPod universal dock j Use the dedicated cable to connect the dock to different fields. Refer to the operating instructions of the iPod ...
... COMPONENT VIDEO PR ARC HDMI OUT PR PB PB Y MONITOR OUT Y COMPON VIDEO Switch the power on and place your iPod/iPhone using the remote control supplied with this unit. You can check song information on the rear panel of this unit in the dock. jCursor B / C J1 Move the...5th, and 6th generation) and iPod mini are supported (As of October 2010). • When connecting an iPhone, please use the remote control of this unit. Connecting the Yamaha iPod universal dock j Use the dedicated cable to connect the dock to different fields. Refer to the operating instructions of the iPod ...

Owners Manual
Page 38
For a few seconds after closing the Option menu, the remote control keys may automatically close the Option menu when their functions are enabled. Parameters of input source, such as volume trim for compatible input sources, audio/... input source. 2 Press qOPTION. The parameters you wish to the previous screen or close the Option menu, press qOPTION. 1 Use the dInput selector on the remote control to select the Option menu you can set differ depending on the input source. For details, read the following items are displayed. q The Option menu...
For a few seconds after closing the Option menu, the remote control keys may automatically close the Option menu when their functions are enabled. Parameters of input source, such as volume trim for compatible input sources, audio/... input source. 2 Press qOPTION. The parameters you wish to the previous screen or close the Option menu, press qOPTION. 1 Use the dInput selector on the remote control to select the Option menu you can set differ depending on the input source. For details, read the following items are displayed. q The Option menu...
Owners Manual
Page 41
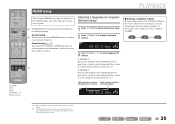
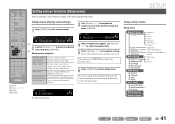
... Input Rename AutoPowerDown Dimmer DSP Parameter Memory Guard Subwoofer Front Center Sur. For a few seconds after closing the Setup menu, the remote control keys may not function. j Setup menu categories Speaker Setup Sound Setup Func. You can configure various function settings of this occurs,.../ E to exit the Setup menu. If this unit using the Setup menu. Setup menu display and settings 1 Press iSETUP on the remote control. Setup HDMI Setup DSP Parameter Memory Guard Manages settings for HDMI, such as input source labeling and auto-standby functions. Sets parameters for ...
... Input Rename AutoPowerDown Dimmer DSP Parameter Memory Guard Subwoofer Front Center Sur. For a few seconds after closing the Setup menu, the remote control keys may not function. j Setup menu categories Speaker Setup Sound Setup Func. You can configure various function settings of this occurs,.../ E to exit the Setup menu. If this unit using the Setup menu. Setup menu display and settings 1 Press iSETUP on the remote control. Setup HDMI Setup DSP Parameter Memory Guard Manages settings for HDMI, such as input source labeling and auto-standby functions. Sets parameters for ...

Owners Manual
Page 47
...AUDIO2 Assigns any of the AV1-5 input source for the input source cannot be used. J1 By means of this function, you can use the remote controls of those devices to operate some of this unit do not need to connect the TV's audio output (digital audio output or analog audio output... this unit. En 47 Please refer to "Switching the input source on the front panel display. ■ Receiver operation via TV (HDMI Control) Control Set the HDMI Control function to "On" to operate devices connected via HDMI through this unit or through this unit only. If this unit is connected to HDMI...
...AUDIO2 Assigns any of the AV1-5 input source for the input source cannot be used. J1 By means of this function, you can use the remote controls of those devices to operate some of this unit do not need to connect the TV's audio output (digital audio output or analog audio output... this unit. En 47 Please refer to "Switching the input source on the front panel display. ■ Receiver operation via TV (HDMI Control) Control Set the HDMI Control function to "On" to operate devices connected via HDMI through this unit or through this unit only. If this unit is connected to HDMI...
Owners Manual
Page 49
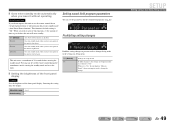
...before this unit will automatically go into standby mode, when you have not operated this unit for four hours. Pressing any key of the remote control during the countdown cancels entering the standby mode and reset the timer. ■ Setting the brightness of the front panel display Dimmer Sets...function). ■ Goes enter standby mode automatically when you leave it without operating AutoPowerDown If you do not operate this unit or use the remote control for an extended period of time, it is "Off." Off (Default) 4hours 8hours 12hours Auto Power Down function is made to the ...
...before this unit will automatically go into standby mode, when you have not operated this unit for four hours. Pressing any key of the remote control during the countdown cancels entering the standby mode and reset the timer. ■ Setting the brightness of the front panel display Dimmer Sets...function). ■ Goes enter standby mode automatically when you leave it without operating AutoPowerDown If you do not operate this unit or use the remote control for an extended period of time, it is "Off." Off (Default) 4hours 8hours 12hours Auto Power Down function is made to the ...
Owners Manual
Page 52
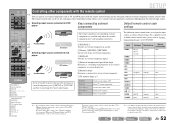
... settings DVD player i Playback/Stop q CD player j Selecting input source connected to input sources as TVs. CD player DOCK Tuner Manufacturer Remote control code Yamaha 2064 - - - - - - - - - - Yamaha 5095 - - - - - - - - - - - - To register a remote control code for devices such as factory default settings. cSOURCE A Switches an external component on the selected input source. lNumeric keys Functions as a recording or...
... settings DVD player i Playback/Stop q CD player j Selecting input source connected to input sources as TVs. CD player DOCK Tuner Manufacturer Remote control code Yamaha 2064 - - - - - - - - - - Yamaha 5095 - - - - - - - - - - - - To register a remote control code for devices such as factory default settings. cSOURCE A Switches an external component on the selected input source. lNumeric keys Functions as a recording or...
Owners Manual
Page 53
... the category or manufacturer of a unit. SETUP Controlling other remote control codes. J2 2 0 6 4 Once the remote control code is registered successfully the remote control will be used for external component operations The following section describes how to register remote control code using an example of the registration of the remote control codes of a Yamaha BD player connected to HDMI2 jack. • Perform...
... the category or manufacturer of a unit. SETUP Controlling other remote control codes. J2 2 0 6 4 Once the remote control code is registered successfully the remote control will be used for external component operations The following section describes how to register remote control code using an example of the registration of the remote control codes of a Yamaha BD player connected to HDMI2 jack. • Perform...
Owners Manual
Page 54
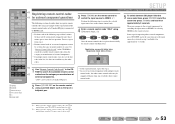
... TRANSMIT CODE SET SOURCE SLEEP HDMI RECEIVER If setup fails, repeat from step 2. 1 Press nCODE SET on the remote control. 3 Enter "9981" using a pointed object such as the tip of the following steps within 1 minute. i SETUP... TV TV VOL TV CH ENT n Resetting all remote control codes Resetting all remote control codes for external components to the initial factory settings. SETUP Controlling other components with the remote control 9 9 8 1 Once the remote control code is registered successfully the remote control will be automatically stopped if more than 1 minute...
... TRANSMIT CODE SET SOURCE SLEEP HDMI RECEIVER If setup fails, repeat from step 2. 1 Press nCODE SET on the remote control. 3 Enter "9981" using a pointed object such as the tip of the following steps within 1 minute. i SETUP... TV TV VOL TV CH ENT n Resetting all remote control codes Resetting all remote control codes for external components to the initial factory settings. SETUP Controlling other components with the remote control 9 9 8 1 Once the remote control code is registered successfully the remote control will be automatically stopped if more than 1 minute...
Owners Manual
Page 55
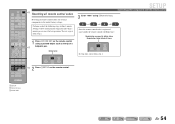
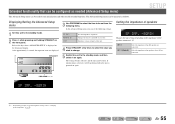
Changes the remote control ID of speakers. En 55 The Advanced Setup menu can be set from the following settings. A STRAIGHT PHONES SILENT CINEMA INFO MEMORY PRESET FM AM INPUT BD DVD SCENE TV CD TONE CONTROL PROGRAM RADIO STRAIGHT 3 Use PROGRAM to select the item to "Changing .... If initialization is selected, it on the front panel. Release the keys when "ADVANCED SETUP" is powered on the front panel display. REMOTE ID INIT Sets the impedance of a receiver. The settings become effective and the unit is displayed on . After approximately 3 seconds, the ...
Changes the remote control ID of speakers. En 55 The Advanced Setup menu can be set from the following settings. A STRAIGHT PHONES SILENT CINEMA INFO MEMORY PRESET FM AM INPUT BD DVD SCENE TV CD TONE CONTROL PROGRAM RADIO STRAIGHT 3 Use PROGRAM to select the item to "Changing .... If initialization is selected, it on the front panel. Release the keys when "ADVANCED SETUP" is powered on the front panel display. REMOTE ID INIT Sets the impedance of a receiver. The settings become effective and the unit is displayed on . After approximately 3 seconds, the ...
Owners Manual
Page 56
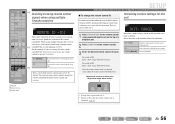
... receiver by default. Settings will blink twice. To reset, repeat from step 1. • Returns to default. CANCEL 1 Press nCODE SET on the remote control using multiple Yamaha receivers REMOTE ID -ID1 The remote control of the unit can be configured as the tip of the following . Initializes various settings stored in this unit and sets it...
... receiver by default. Settings will blink twice. To reset, repeat from step 1. • Returns to default. CANCEL 1 Press nCODE SET on the remote control using multiple Yamaha receivers REMOTE ID -ID1 The remote control of the unit can be configured as the tip of the following . Initializes various settings stored in this unit and sets it...


