
Owners Manual
Page 2
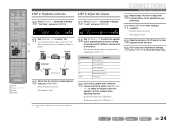
... each input source (Option menu 38 Option menu display and setup 38 Option menu items 38 Setting various functions (Setup menu 41 Setup menu display and settings 41 Setup menu items 41 Manages settings for speakers 42 Setting the audio output function of this unit 45 Setting...codes 54 Extended functionality that can be configured as needed (Advanced Setup menu 55 Displaying/Setting the Advanced Setup menu 55 Setting the impedance of speakers 55 Avoiding crossing remote control signals when using multiple Yamaha receivers 56 Initializing various settings for this unit 56 Using the...
... each input source (Option menu 38 Option menu display and setup 38 Option menu items 38 Setting various functions (Setup menu 41 Setup menu display and settings 41 Setup menu items 41 Manages settings for speakers 42 Setting the audio output function of this unit 45 Setting...codes 54 Extended functionality that can be configured as needed (Advanced Setup menu 55 Displaying/Setting the Advanced Setup menu 55 Setting the impedance of speakers 55 Avoiding crossing remote control signals when using multiple Yamaha receivers 56 Initializing various settings for this unit 56 Using the...
Owners Manual
Page 10
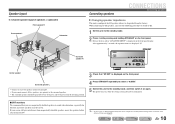
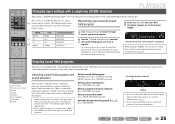
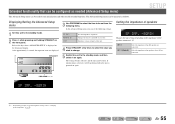
... when "ADVANCED SETUP" is dispatched from the factory. is displayed on the front panel. 4 Press STRAIGHT repeatedly to select a "6ΩMIN." 5 Switch this unit to avoid video distortion, especially for the front and center speakers near the screen. Speaker layout 5.1-channel speaker layout (5 speakers + subwoofer) Front speaker R Front speaker L Subwoofer Connecting speakers CONNECTIONS Connecting speakers ■ Changing speaker impedance This...
... when "ADVANCED SETUP" is dispatched from the factory. is displayed on the front panel. 4 Press STRAIGHT repeatedly to select a "6ΩMIN." 5 Switch this unit to avoid video distortion, especially for the front and center speakers near the screen. Speaker layout 5.1-channel speaker layout (5 speakers + subwoofer) Front speaker R Front speaker L Subwoofer Connecting speakers CONNECTIONS Connecting speakers ■ Changing speaker impedance This...
Owners Manual
Page 22
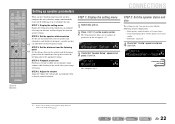
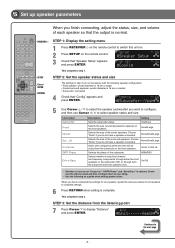
... is 16 cm or larger - STEP 1: Display the setting menu Display the Setup menu from each speaker and configure them so that they output sound normally. SW Speaker Setup L CR SL SR 3 Check that "Config" appears and press jENTER. Subwoofer: connected 4 Check that "Speaker Setup" appears and press jENTER. SOURCE 1 1 5 TRANSMIT CODE SET SLEEP RECEIVER HDMI...
... is 16 cm or larger - STEP 1: Display the setting menu Display the Setup menu from each speaker and configure them so that they output sound normally. SW Speaker Setup L CR SL SR 3 Check that "Config" appears and press jENTER. Subwoofer: connected 4 Check that "Speaker Setup" appears and press jENTER. SOURCE 1 1 5 TRANSMIT CODE SET SLEEP RECEIVER HDMI...
Owners Manual
Page 23
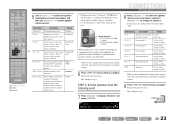
...DVD SETUP SCENE TV CD RADIO OPTION ENTER VOLUME RETURN DISPLAY TOP MENU REC POP-UP MENU MUTE 1 2 3 4 5 6 7 8 9 INPUT MUTE 0 10 TV TV VOL TV CH ENT j Cursor B / C / D / E j ENTER j RETURN 5 Use jCursor B / C to select the speaker (subwoofer) you do not have a center speaker .... Woofer diameter • 6-1/4 in (16 cm) or larger → Large • 6-1/4 in (16 cm) or smaller → Small When speaker size is set "Crossover," "SWFR Phase," and "Extra Bass" is complete. Information Description Setting Unit Switches between setting feet (ft) / units (feet...
...DVD SETUP SCENE TV CD RADIO OPTION ENTER VOLUME RETURN DISPLAY TOP MENU REC POP-UP MENU MUTE 1 2 3 4 5 6 7 8 9 INPUT MUTE 0 10 TV TV VOL TV CH ENT j Cursor B / C / D / E j ENTER j RETURN 5 Use jCursor B / C to select the speaker (subwoofer) you do not have a center speaker .... Woofer diameter • 6-1/4 in (16 cm) or larger → Large • 6-1/4 in (16 cm) or smaller → Small When speaker size is set "Crossover," "SWFR Phase," and "Extra Bass" is complete. Information Description Setting Unit Switches between setting feet (ft) / units (feet...
Owners Manual
Page 24
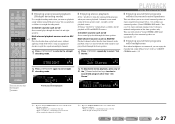
... setting is outputting the test tone, looking for all settings, press iSETUP to switch the speaker that is complete. To lower the volume: Press jCursor D. En 24 DECODE MUSIC STEREO STRAIGHT BD DVD SETUP SCENE TV CD RADIO OPTION STEP 4: Playback a test tone 10 Press jCursor C repeatedly to...and press jRETURN. LEVEL VOL. SW L CR SL SR 14 Use jCursor B / C to close the Setup menu. TEST >Off On VOL. This completes step 4. The front panel display shows the speaker that the test tone is outputting the test tone. To raise the volume: Press jCursor E. A test tone...
... setting is outputting the test tone, looking for all settings, press iSETUP to switch the speaker that is complete. To lower the volume: Press jCursor D. En 24 DECODE MUSIC STEREO STRAIGHT BD DVD SETUP SCENE TV CD RADIO OPTION STEP 4: Playback a test tone 10 Press jCursor C repeatedly to...and press jRETURN. LEVEL VOL. SW L CR SL SR 14 Use jCursor B / C to close the Setup menu. TEST >Off On VOL. This completes step 4. The front panel display shows the speaker that the test tone is outputting the test tone. To raise the volume: Press jCursor E. A test tone...
Owners Manual
Page 25
...Press TONE CONTROL on the tuner. to adjust the output level in those from the front left and right speakers to select "Treble" or "Bass." The tone control of the speakers or headphones can adjust the balance of the high-frequency range (Treble) and low-frequency range (Bass) ...-frequency sound (Tone control) You can be set the balance extremely off, sounds may not match those frequency ranges. DECODE MUSIC STEREO STRAIGHT BD DVD SETUP SCENE TV CD RADIO OPTION ENTER VOLUME RETURN DISPLAY TOP MENU REC POP-UP MENU MUTE 1 2 3 4 5 6 7 8 9 INPUT MUTE 0 10 ...
...Press TONE CONTROL on the tuner. to adjust the output level in those from the front left and right speakers to select "Treble" or "Bass." The tone control of the speakers or headphones can adjust the balance of the high-frequency range (Treble) and low-frequency range (Bass) ...-frequency sound (Tone control) You can be set the balance extremely off, sounds may not match those frequency ranges. DECODE MUSIC STEREO STRAIGHT BD DVD SETUP SCENE TV CD RADIO OPTION ENTER VOLUME RETURN DISPLAY TOP MENU REC POP-UP MENU MUTE 1 2 3 4 5 6 7 8 9 INPUT MUTE 0 10 ...
Owners Manual
Page 26
... are stored for each input source. Choose a sound field program that sounds best with a Yamaha digital sound field processing (DSP) chip. Sound field program categories MOVIE Sci-Fi VOL. Selecting...Press gSTEREO repeatedly. Press one key. DECODE repeatedly. When you can also use the speaker indicators on the front panel display to select the sound field program you are available ...for different uses, such as the initial factory settings. DECODE MUSIC STEREO STRAIGHT BD DVD SETUP SCENE TV CD RADIO OPTION ENTER VOLUME RETURN DISPLAY TOP MENU REC POP-UP MENU ...
... are stored for each input source. Choose a sound field program that sounds best with a Yamaha digital sound field processing (DSP) chip. Sound field program categories MOVIE Sci-Fi VOL. Selecting...Press gSTEREO repeatedly. Press one key. DECODE repeatedly. When you can also use the speaker indicators on the front panel display to select the sound field program you are available ...for different uses, such as the initial factory settings. DECODE MUSIC STEREO STRAIGHT BD DVD SETUP SCENE TV CD RADIO OPTION ENTER VOLUME RETURN DISPLAY TOP MENU REC POP-UP MENU ...
Owners Manual
Page 27
...and played back through the front speakers. 1 Press gSTEREO repeatedly to this unit. • When a "2ch Stereo" sound field program is selected. • When straight decoding mode is selected. En 27 DECODE MUSIC STEREO STRAIGHT BD DVD SETUP SCENE TV CD RADIO OPTION ■...; Enjoying unprocessed playback (Straight decoding mode) Use straight decoding mode when you to use virtual surround speakers to select a sound field program other than "2ch Stereo." J2 J...
...and played back through the front speakers. 1 Press gSTEREO repeatedly to this unit. • When a "2ch Stereo" sound field program is selected. • When straight decoding mode is selected. En 27 DECODE MUSIC STEREO STRAIGHT BD DVD SETUP SCENE TV CD RADIO OPTION ■...; Enjoying unprocessed playback (Straight decoding mode) Use straight decoding mode when you to use virtual surround speakers to select a sound field program other than "2ch Stereo." J2 J...
Owners Manual
Page 41
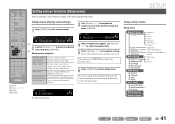
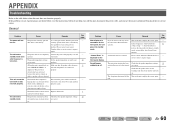
..., the remote control keys may not function. SW L CR SL SR Ex: Sound Setup menu SETUP Setup menu items Setup menu Speaker Setup Config Level Distance Equalizer Test Tone Sound Setup Lipsync Adaptive DRC D.Range Max Volume Init.Volume HDMI Setup Control TVAudio ARC Audio Func. SOURCE 1 1 5 TRANSMIT CODE SET SLEEP RECEIVER HDMI 2 3 4 AV 2 3 4 AUDIO 1 2 V-AUX [ A ] [ B ] DOCK TUNER...
..., the remote control keys may not function. SW L CR SL SR Ex: Sound Setup menu SETUP Setup menu items Setup menu Speaker Setup Config Level Distance Equalizer Test Tone Sound Setup Lipsync Adaptive DRC D.Range Max Volume Init.Volume HDMI Setup Control TVAudio ARC Audio Func. SOURCE 1 1 5 TRANSMIT CODE SET SLEEP RECEIVER HDMI 2 3 4 AV 2 3 4 AUDIO 1 2 V-AUX [ A ] [ B ] DOCK TUNER...
Owners Manual
Page 42
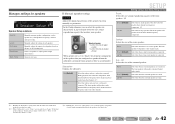
.... Manually adjusts the output of audio signals transmitted from other channels. J2 Small (Default) Large Select this when a large center speaker is set the frequency components of each speaker. Select this for speakers SETUP VOL. During playback, the subwoofer will produce audio from the LFE (low-frequency effect) channel and bass audio from the...
.... Manually adjusts the output of audio signals transmitted from other channels. J2 Small (Default) Large Select this when a large center speaker is set the frequency components of each speaker. Select this for speakers SETUP VOL. During playback, the subwoofer will produce audio from the LFE (low-frequency effect) channel and bass audio from the...
Owners Manual
Page 43
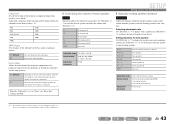
... -10.0 dB to +10.0 dB Default setting 0 dB (FL / FR / SWFR) -1.0 dB (C / SL / SR) Adjustment increments 0.5 dB SETUP Setting various functions (Setup menu) ■ Manually setting speaker distance Distance Adjusts the timing at which the speakers produce audio so that limit will be produced exclusively by the subwoofer, or by both the subwoofer and...
... -10.0 dB to +10.0 dB Default setting 0 dB (FL / FR / SWFR) -1.0 dB (C / SL / SR) Adjustment increments 0.5 dB SETUP Setting various functions (Setup menu) ■ Manually setting speaker distance Distance Adjusts the timing at which the speakers produce audio so that limit will be produced exclusively by the subwoofer, or by both the subwoofer and...
Owners Manual
Page 44
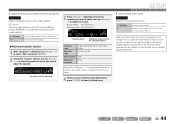
... finished making adjustments, press iSETUP to adjust the equalizer. Raising volume: Press jCursor E. SW L CR SL SR Frequency band Setting the volume level for each speaker, or whenever you adjust the settings on or off . Generates test tones. For example, you can adjust the characteristics of circumstances. Turn the test tone...; Adjusting the graphic equalizer 1 When "EQ Select" is selected, test tones are adjusting 3 Press jCursor C repeatedly to select the frequency you want to close the Setup menu. Off (Default) On Does not generate test tones.
... finished making adjustments, press iSETUP to adjust the equalizer. Raising volume: Press jCursor E. SW L CR SL SR Frequency band Setting the volume level for each speaker, or whenever you adjust the settings on or off . Generates test tones. For example, you can adjust the characteristics of circumstances. Turn the test tone...; Adjusting the graphic equalizer 1 When "EQ Select" is selected, test tones are adjusting 3 Press jCursor C repeatedly to select the frequency you want to close the Setup menu. Off (Default) On Does not generate test tones.

Owners Manual
Page 47
...functions will not operate. ■ Selecting an input source to assign audio input for the audio input from the TV. SETUP Setting various functions (Setup menu) ■ Changing the output destination of those devices. When this setting is selected, the external component outputs an ... While the Audio Return Channel function is transmit to the input source selected here. When using Audio Return Channel, "TV" is selected, the speakers of this unit automatically when listening to "On." Off (Default) On Sets the Audio Return Channel to "Off." Outputs audio through this unit...
...functions will not operate. ■ Selecting an input source to assign audio input for the audio input from the TV. SETUP Setting various functions (Setup menu) ■ Changing the output destination of those devices. When this setting is selected, the external component outputs an ... While the Audio Return Channel function is transmit to the input source selected here. When using Audio Return Channel, "TV" is selected, the speakers of this unit automatically when listening to "On." Off (Default) On Sets the Audio Return Channel to "Off." Outputs audio through this unit...

Owners Manual
Page 51
...balance. Auto (Default) Off Outputs sound by the software being played back to 100% Default setting 100% J 1 : Not displayed when speakers are emphasized excessively. ■ Parameters usable in surround decoder q PLII Music only Panorama Adjusts the soundscape of "Bass" and "Treble" ... sounds to 7 for a wraparound effect. High (Default) Low Standard effect. J1 Adjustable range 0 to 7 Default setting 3 SETUP Setting sound field program parameters Dimension Adjusts the difference in level created by bypassing the DSP circuit and tone control circuit when both ...
...balance. Auto (Default) Off Outputs sound by the software being played back to 100% Default setting 100% J 1 : Not displayed when speakers are emphasized excessively. ■ Parameters usable in surround decoder q PLII Music only Panorama Adjusts the soundscape of "Bass" and "Treble" ... sounds to 7 for a wraparound effect. High (Default) Low Standard effect. J1 Adjustable range 0 to 7 Default setting 3 SETUP Setting sound field program parameters Dimension Adjusts the difference in level created by bypassing the DSP circuit and tone control circuit when both ...
Owners Manual
Page 55
... REMOTE ID INIT Sets the impedance of a receiver. J1 6 MIN 8 MIN (Default) Select the impedance when 6Ω speakers are displayed. Displaying/Setting the Advanced Setup menu 1 Set this unit. 4 Press STRAIGHT a few times to the standby mode, and then switch it will be performed...and the unit is powered on again. The Advanced Setup menu can be used for this unit to "Changing speaker impedance" (☞p. 10). Release the keys when "ADVANCED SETUP" is selected, it on again. Setting the impedance of speaker impedance settings, refer to the standby mode. 2 ...
... REMOTE ID INIT Sets the impedance of a receiver. J1 6 MIN 8 MIN (Default) Select the impedance when 6Ω speakers are displayed. Displaying/Setting the Advanced Setup menu 1 Set this unit. 4 Press STRAIGHT a few times to the standby mode, and then switch it will be performed...and the unit is powered on again. The Advanced Setup menu can be used for this unit to "Changing speaker impedance" (☞p. 10). Release the keys when "ADVANCED SETUP" is selected, it on again. Setting the impedance of speaker impedance settings, refer to the standby mode. 2 ...
Owners Manual
Page 60
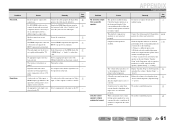
... countdown on and "CHECK SP WIRES!" An internal error has occurred. In the Setup menu "AutoPowerDown" ("Func. unit. General Problem The power will not turn on the front panel display. Please contact your speakers. (When this unit is turned back on the front panel, the unit goes ... capability to request repair. The power cable is hung-up due to request repair. wall outlet. The speaker impedance settings are connected properly. Set the speaker impedance to match your nearest Yamaha dealer or service center to turn off the Turn on the unit, and play the source again. ...
... countdown on and "CHECK SP WIRES!" An internal error has occurred. In the Setup menu "AutoPowerDown" ("Func. unit. General Problem The power will not turn on the front panel display. Please contact your speakers. (When this unit is turned back on the front panel, the unit goes ... capability to request repair. The power cable is hung-up due to request repair. wall outlet. The speaker impedance settings are connected properly. Set the speaker impedance to match your nearest Yamaha dealer or service center to turn off the Turn on the unit, and play the source again. ...
Owners Manual
Page 61
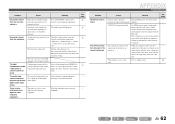
...; "Audio") to a different input source. 2) With the selected sound field program, sound is being input from that can - Select another speaker and check if sound is malfunctioning. Display "Speaker Setup" in the Setup menu ("Speaker Setup" → "Level"). Problem No sound. If the problem 16 persists, the cables may not be defective. dInput selector (on the...
...; "Audio") to a different input source. 2) With the selected sound field program, sound is being input from that can - Select another speaker and check if sound is malfunctioning. Display "Speaker Setup" in the Setup menu ("Speaker Setup" → "Level"). Problem No sound. If the problem 16 persists, the cables may not be defective. dInput selector (on the...
Owners Manual
Page 62
The audio input sources cannot be output from the Setup menu "Subwoofer" ("Speaker Setup" → "Config" → "Subwoofer"), set to a low value. There is heard. Press gSTRAIGHT (on . Check that a subwoofer is distorted. Turn the subwoofer power on the ... In" in the Option menu. The volume cannot be Connect the audio cables properly. If the problem persists, the cables may result from the surround speakers. If a DTS bitstream signal is set the subwoofer to "On." Consult the manufacturer of this unit. Turn on input sources or sound field programs. Try...
The audio input sources cannot be output from the Setup menu "Subwoofer" ("Speaker Setup" → "Config" → "Subwoofer"), set to a low value. There is heard. Press gSTRAIGHT (on . Check that a subwoofer is distorted. Turn the subwoofer power on the ... In" in the Option menu. The volume cannot be Connect the audio cables properly. If the problem persists, the cables may result from the surround speakers. If a DTS bitstream signal is set the subwoofer to "On." Consult the manufacturer of this unit. Turn on input sources or sound field programs. Try...
Owners Manual
Page 78
...: connected 4 Check that "Config" appears and press ENTER. On/Off • Whether or not you do not have a speaker connected. STEP 3: Set the distance from the subwoofer or the front speakers. 40 Hz to display "Distance" and press ENTER. Speaker Setup SW L CR SL SR 3 Check that the output is complete. STEP 2: Set the...
...: connected 4 Check that "Config" appears and press ENTER. On/Off • Whether or not you do not have a speaker connected. STEP 3: Set the distance from the subwoofer or the front speakers. 40 Hz to display "Distance" and press ENTER. Speaker Setup SW L CR SL SR 3 Check that the output is complete. STEP 2: Set the...

Quick Reference Guide
Page 6
.... This completes step 2. CONFIG VOL. NRM/REV Selects whether to your liking. • Use the following speaker configuration: • Front speaker: woofer diameter is 16 cm or larger • Center/surround speakers: woofer diameter is complete. DIST VOL. Speaker Setup SW L CR SL SR 3 Check that "Config" appears and press ENTER. None/Small/Large Selects...
.... This completes step 2. CONFIG VOL. NRM/REV Selects whether to your liking. • Use the following speaker configuration: • Front speaker: woofer diameter is 16 cm or larger • Center/surround speakers: woofer diameter is complete. DIST VOL. Speaker Setup SW L CR SL SR 3 Check that "Config" appears and press ENTER. None/Small/Large Selects...


