
Owners Manual
Page 3
Specifying the settings for each speaker 42 - Volume control for each speaker...43 - Speaker channels and functions ...9 - Sound quality control with the equalizer Setting for 2- Subwoofer cable connection ...12 ■ Acoustic parameter adjustment to 5.1-channel configurations - Speaker impedance configuration...10 - Speaker distance settings ...43 - Speaker layout...10 - INTRODUCTION Features and capabilities &#...
Specifying the settings for each speaker 42 - Volume control for each speaker...43 - Speaker channels and functions ...9 - Sound quality control with the equalizer Setting for 2- Subwoofer cable connection ...12 ■ Acoustic parameter adjustment to 5.1-channel configurations - Speaker impedance configuration...10 - Speaker distance settings ...43 - Speaker layout...10 - INTRODUCTION Features and capabilities &#...
Owners Manual
Page 6
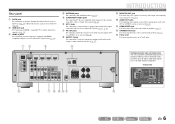
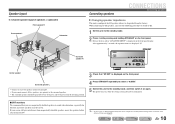
...-12) (☞p. 34) or Bluetooth wireless audio receiver (YBA-10) (☞p. 36). Rear panel a DOCK jack For connecting an optional Yamaha iPod universal dock (such as the AV5 or AUDIO1-2 jacks are selected (☞p. 20). l SPEAKER terminals For connecting the front, center, and...MONITOR OUT OPTICAL AV 1 COAXIAL AV 2 COAXIAL (CD) AV 3 OPTICAL ( TV ) AV 4 AV 5 AV OUT AUDIO 1 AUDIO 2 ANTENNA FM GND SURROU SUBWOOFER e f g h jik l m En 6 compatible TV to output audio/video signals to external devices equipped with component video signals, using three cables to a TV or...
...-12) (☞p. 34) or Bluetooth wireless audio receiver (YBA-10) (☞p. 36). Rear panel a DOCK jack For connecting an optional Yamaha iPod universal dock (such as the AV5 or AUDIO1-2 jacks are selected (☞p. 20). l SPEAKER terminals For connecting the front, center, and...MONITOR OUT OPTICAL AV 1 COAXIAL AV 2 COAXIAL (CD) AV 3 OPTICAL ( TV ) AV 4 AV 5 AV OUT AUDIO 1 AUDIO 2 ANTENNA FM GND SURROU SUBWOOFER e f g h jik l m En 6 compatible TV to output audio/video signals to external devices equipped with component video signals, using three cables to a TV or...
Owners Manual
Page 7
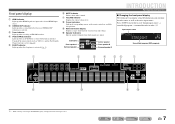
... current volume level. i Multi information display Displays a range of the input source. Press fINFO repeatedly to cycle through an optional Yamaha iPod universal dock (such as the active input source. Front panel display a HDMI indicator Lights up when HDMI signals are output.... f MUTE indicator Flashes when audio is displayed instead of information on the remote control are available for operations. Subwoofer Front speaker L Surround speaker L SW L CR SL SR Center speaker Front speaker R Surround speaker R INTRODUCTION Part names and functions...
... current volume level. i Multi information display Displays a range of the input source. Press fINFO repeatedly to cycle through an optional Yamaha iPod universal dock (such as the active input source. Front panel display a HDMI indicator Lights up when HDMI signals are output.... f MUTE indicator Flashes when audio is displayed instead of information on the remote control are available for operations. Subwoofer Front speaker L Surround speaker L SW L CR SL SR Center speaker Front speaker R Surround speaker R INTRODUCTION Part names and functions...
Owners Manual
Page 9
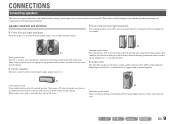
... height of the TV with an internal amplifier. When using a screen, place it just under the center of 1.5 - 1.8 m from the floor. ■ Subwoofer The subwoofer speaker is used for bass sounds and low-frequency effect (LFE) sounds included in Dolby Digital and DTS. Ex... When using a projector screen, the appropriate top positions of the speakers are for the center channel sounds (dialog, vocals, etc.). Ex. Use a subwoofer that is for effect and vocal sounds with the speaker tops at an equal distance from the wall. En 9 CONNECTIONS Connecting speakers This unit uses...
... height of the TV with an internal amplifier. When using a screen, place it just under the center of 1.5 - 1.8 m from the floor. ■ Subwoofer The subwoofer speaker is used for bass sounds and low-frequency effect (LFE) sounds included in Dolby Digital and DTS. Ex... When using a projector screen, the appropriate top positions of the speakers are for the center channel sounds (dialog, vocals, etc.). Ex. Use a subwoofer that is for effect and vocal sounds with the speaker tops at an equal distance from the wall. En 9 CONNECTIONS Connecting speakers This unit uses...
Owners Manual
Page 10
... RADIO STRAIGHT 3 Check that can be placed between 60 degrees and 80 degrees from the listening position. Speaker layout 5.1-channel speaker layout (5 speakers + subwoofer) Front speaker R Front speaker L Subwoofer Connecting speakers CONNECTIONS Connecting speakers ■ Changing speaker impedance This unit is configured for 8Ω speakers when it on the front panel. 4 Press...
... RADIO STRAIGHT 3 Check that can be placed between 60 degrees and 80 degrees from the listening position. Speaker layout 5.1-channel speaker layout (5 speakers + subwoofer) Front speaker R Front speaker L Subwoofer Connecting speakers CONNECTIONS Connecting speakers ■ Changing speaker impedance This unit is configured for 8Ω speakers when it on the front panel. 4 Press...

Owners Manual
Page 11
... speakers En 11 will appear on . Surround speaker RL Front speaker R L HDMI 4 OR OUT ANTENNA FM GND AM SURROUND CENTER SPEAKERS FRONT AUDIO 2 AUDIO OUT SUBWOOFER Subwoofer Center speaker CAUTION • Remove the AC power cord of this unit is a different color, or has a line running along it, to their respective terminals...
... speakers En 11 will appear on . Surround speaker RL Front speaker R L HDMI 4 OR OUT ANTENNA FM GND AM SURROUND CENTER SPEAKERS FRONT AUDIO 2 AUDIO OUT SUBWOOFER Subwoofer Center speaker CAUTION • Remove the AC power cord of this unit is a different color, or has a line running along it, to their respective terminals...

Owners Manual
Page 12
...side of the terminal. Crossover frequency (if available): Set to the SUBWOOFER jack on this unit with an audio pin cable. 2 Set the subwoofer volume as follows. VOLUME CROSSOVER/ HIGH CUT MIN MAX MIN MAX Subwoofer examples En 12 ■ Connecting front speakers KERS 3 2 FRONT ... the speaker cable end into the end of the terminal. 4 Tighten the terminal. CONNECTIONS Connecting speakers ■ Connecting the subwoofer 1 Connect the subwoofer input jack to maximum. Volume: Set to fix the speaker cable in place. Connecting the banana plug (Except U.K., Europe,...
...side of the terminal. Crossover frequency (if available): Set to the SUBWOOFER jack on this unit with an audio pin cable. 2 Set the subwoofer volume as follows. VOLUME CROSSOVER/ HIGH CUT MIN MAX MIN MAX Subwoofer examples En 12 ■ Connecting front speakers KERS 3 2 FRONT ... the speaker cable end into the end of the terminal. 4 Tighten the terminal. CONNECTIONS Connecting speakers ■ Connecting the subwoofer 1 Connect the subwoofer input jack to maximum. Volume: Set to fix the speaker cable in place. Connecting the banana plug (Except U.K., Europe,...
Owners Manual
Page 22
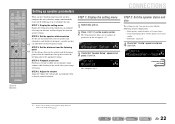
...the sound is balanced. CONFIG VOL. Carry out the following speaker configuration: - En 22 SP SET Config This completes step 1. J1 SETUP VOL. Subwoofer: connected 4 Check that the sound from each speaker and configure them so that "Speaker Setup" appears and press jENTER. STEP 1: Display the ...menu from the listening point j Set the distance between the speakers and the listening point so that "Config" appears and press jENTER. Subwoofer;;Yes SW L CR SL SR Continues to the actual effect your speakers, configure this unit, and then display the menu for low-...
...the sound is balanced. CONFIG VOL. Carry out the following speaker configuration: - En 22 SP SET Config This completes step 1. J1 SETUP VOL. Subwoofer: connected 4 Check that the sound from each speaker and configure them so that "Speaker Setup" appears and press jENTER. STEP 1: Display the ...menu from the listening point j Set the distance between the speakers and the listening point so that "Config" appears and press jENTER. Subwoofer;;Yes SW L CR SL SR Continues to the actual effect your speakers, configure this unit, and then display the menu for low-...
Owners Manual
Page 23
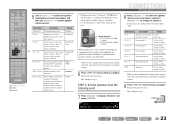
...1.0 ft to 80.0 ft (0.30 m to the next page En 23 R Surround speaker R 1.0 ft to 80.0 ft (0.30 m to 24.0 m) SWFR Subwoofer 1.0 ft to 80.0 ft (0.30 m to complete settings. 6 Press jRETURN when setting is complete. Choose "None" if you have completed the settings for one ... units under "Unit." On/Off • Whether or not you want to configure, and press jCursor D / E to "Small," low-frequency components of the subwoofer. This completes step 2. Woofer diameter • 6-1/4 in (16 cm) or larger → Large • 6-1/4 in (16 cm) or smaller → ...
...1.0 ft to 80.0 ft (0.30 m to the next page En 23 R Surround speaker R 1.0 ft to 80.0 ft (0.30 m to 24.0 m) SWFR Subwoofer 1.0 ft to 80.0 ft (0.30 m to complete settings. 6 Press jRETURN when setting is complete. Choose "None" if you have completed the settings for one ... units under "Unit." On/Off • Whether or not you want to configure, and press jCursor D / E to "Small," low-frequency components of the subwoofer. This completes step 2. Woofer diameter • 6-1/4 in (16 cm) or larger → Large • 6-1/4 in (16 cm) or smaller → ...
Owners Manual
Page 24
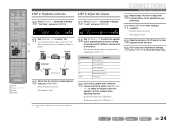
...RETURN DISPLAY TOP MENU REC POP-UP MENU MUTE j Front L Center Front R 1 2 3 4 5 6 7 8 9 INPUT MUTE 0 10 TV TV VOL TV CH ENT Subwoofer Surround L Surround R i SETUP j Cursor B / C / D / E j ENTER j RETURN 12 Check that is complete. STEP 5: Adjust the volume 13 Press jCursor B...the previous menu. Information FL FR C SL SR SWFR Speakers Front speaker L Front speaker R Center speaker Surround speaker L Surround speaker R Subwoofer 15 If you find a speaker with a different volume level to the others , use in a clockwise fashion, as follows. Use Front ...
...RETURN DISPLAY TOP MENU REC POP-UP MENU MUTE j Front L Center Front R 1 2 3 4 5 6 7 8 9 INPUT MUTE 0 10 TV TV VOL TV CH ENT Subwoofer Surround L Surround R i SETUP j Cursor B / C / D / E j ENTER j RETURN 12 Check that is complete. STEP 5: Adjust the volume 13 Press jCursor B...the previous menu. Information FL FR C SL SR SWFR Speakers Front speaker L Front speaker R Center speaker Surround speaker L Surround speaker R Subwoofer 15 If you find a speaker with a different volume level to the others , use in a clockwise fashion, as follows. Use Front ...
Owners Manual
Page 41
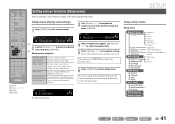
... Lipsync VOL. Setup HDMI Setup DSP Parameter Memory Guard Manages settings for audio output. HDMI VOL. Setup Input Rename AutoPowerDown Dimmer DSP Parameter Memory Guard Subwoofer Front Center Sur. SETUP VOL.
... Lipsync VOL. Setup HDMI Setup DSP Parameter Memory Guard Manages settings for audio output. HDMI VOL. Setup Input Rename AutoPowerDown Dimmer DSP Parameter Memory Guard Subwoofer Front Center Sur. SETUP VOL.
Owners Manual
Page 42
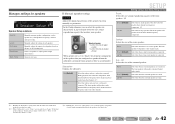
... is no center speaker. Selects an equalizer to produce bass audio. J2 Small (Default) Large Select this when a large center speaker is no subwoofer). J 3 : Enabling the "Crossover" setting allows you can only choose "Large." Generates test tones. ■ Manual speaker setup Config Adjusts...None Select this when there is connected. Manages settings for speakers SETUP VOL. None Small (Default) Large Select this when you change "Subwoofer" to "None," it will automatically change to set parameters. In the Config submenu, you to "Large." The front speakers will produce ...
... is no center speaker. Selects an equalizer to produce bass audio. J2 Small (Default) Large Select this when a large center speaker is no subwoofer). J 3 : Enabling the "Crossover" setting allows you can only choose "Large." Generates test tones. ■ Manual speaker setup Config Adjusts...None Select this when there is connected. Manages settings for speakers SETUP VOL. None Small (Default) Large Select this when you change "Subwoofer" to "None," it will automatically change to set parameters. In the Config submenu, you to "Large." The front speakers will produce ...
Owners Manual
Page 43
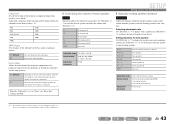
...: If your listening position. Off (Default) On Depending on the size of the front speakers, either the front speakers or the subwoofer produce the front channel low-frequency components. FL FR C SL SR SWFR Front speaker L Front speaker R Center speaker Surround speaker L Surround speaker... output from speakers set the crossover frequency to maximum and the volume to half (or slightly less). NRM (Default) REV Does not change the subwoofer phase. Extra Bass Allows the front channel low-frequency components to 24.0 m) Default setting 10.0 ft (3.00 m) (Front L/Front R/SWFR) ...
...: If your listening position. Off (Default) On Depending on the size of the front speakers, either the front speakers or the subwoofer produce the front channel low-frequency components. FL FR C SL SR SWFR Front speaker L Front speaker R Center speaker Surround speaker L Surround speaker... output from speakers set the crossover frequency to maximum and the volume to half (or slightly less). NRM (Default) REV Does not change the subwoofer phase. Extra Bass Allows the front channel low-frequency components to 24.0 m) Default setting 10.0 ft (3.00 m) (Front L/Front R/SWFR) ...
Owners Manual
Page 62
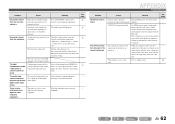
... a DTS bitstream signal is disabled. Set it is not properly input to this unit further away from the Setup menu "Subwoofer" ("Speaker Setup" → "Config" → "Subwoofer"), set to a low value. No sound is being played back. Cause Remedy Incorrect cable connection. If the condition is...or sound field programs. Try another input audio jack. defective. Connect the playback component to this unit is distorted. The subwoofer is too close to other digital or radio frequency equipment. The right combination of the playback component. Problem No sound is...
... a DTS bitstream signal is disabled. Set it is not properly input to this unit further away from the Setup menu "Subwoofer" ("Speaker Setup" → "Config" → "Subwoofer"), set to a low value. No sound is being played back. Cause Remedy Incorrect cable connection. If the condition is...or sound field programs. Try another input audio jack. defective. Connect the playback component to this unit is distorted. The subwoofer is too close to other digital or radio frequency equipment. The right combination of the playback component. Problem No sound is...
Owners Manual
Page 66
... capability of audio quality for multichannel sound on DVD video, and is fully backward-compatible with all video tapes and laser discs, as well as a subwoofer, for Blu-ray Disc, this unit, any sound environment from the original, offering a high-definition home theater experience. Dolby Surround Dolby Surround uses a 4-channel analog...
... capability of audio quality for multichannel sound on DVD video, and is fully backward-compatible with all video tapes and laser discs, as well as a subwoofer, for Blu-ray Disc, this unit, any sound environment from the original, offering a high-definition home theater experience. Dolby Surround Dolby Surround uses a 4-channel analog...
Owners Manual
Page 69
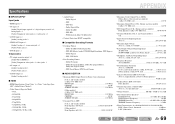
... (1 kHz/10 kHz) AV5, etc. (5.1 kΩ shortened 60 dB/45 dB or more • Rated Output Voltage/Output Impedance AUDIO OUT 200 mV/1.2 kΩ SUBWOOFER (2ch Stereo & Front: Small 1.0 V/1.2 kΩ • Headphone Jack Rated Output/Impedance AV5, etc. (1 kHz, 50 mV, 8 100 mV/470 Ω ...THD, 4 120 W • IEC Output Power [U.K., Europe and Asia models] Front Speakers 1 kHz, 0.9% THD, 8 95 W+95 W • Dynamic Headroom [U.S.A. Dolby Digital Plus - L.P.F. (Subwoofer 24 dB/oct. VGA - 480i/60 Hz - 576i/50 Hz - 480p/60 Hz - 576p/50 Hz - 720p/60 Hz, 50 Hz - 1080i/60 Hz, 50...
... (1 kHz/10 kHz) AV5, etc. (5.1 kΩ shortened 60 dB/45 dB or more • Rated Output Voltage/Output Impedance AUDIO OUT 200 mV/1.2 kΩ SUBWOOFER (2ch Stereo & Front: Small 1.0 V/1.2 kΩ • Headphone Jack Rated Output/Impedance AV5, etc. (1 kHz, 50 mV, 8 100 mV/470 Ω ...THD, 4 120 W • IEC Output Power [U.K., Europe and Asia models] Front Speakers 1 kHz, 0.9% THD, 8 95 W+95 W • Dynamic Headroom [U.S.A. Dolby Digital Plus - L.P.F. (Subwoofer 24 dB/oct. VGA - 480i/60 Hz - 576i/50 Hz - 480p/60 Hz - 576p/50 Hz - 720p/60 Hz, 50 Hz - 1080i/60 Hz, 50...

Owners Manual
Page 73
Center speaker Ex. Surround speaker Ex. Active subwoofer • Use speakers with this product. English for North America PUSH Remote control Batteries (2) (AAA, R03, UM-4) AM loop antenna Indoor FM antenna VIDEO AUX ...-ray Disc)/DVD players Cable • Cables for connecting external components (may differ depending on the devices you are connecting) • Audio pin cable (for subwoofer) - 1 -
Center speaker Ex. Surround speaker Ex. Active subwoofer • Use speakers with this product. English for North America PUSH Remote control Batteries (2) (AAA, R03, UM-4) AM loop antenna Indoor FM antenna VIDEO AUX ...-ray Disc)/DVD players Cable • Cables for connecting external components (may differ depending on the devices you are connecting) • Audio pin cable (for subwoofer) - 1 -
Owners Manual
Page 74
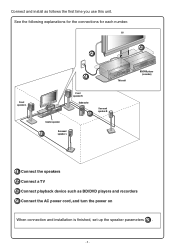
See the following explanations for the connections for each number. TV 3 2 Front speaker L 4 This unit Center speaker Front speaker R Subwoofer 1 Surround speaker R Surround 1 speaker L BD/DVD player (recorder) 1 Connect the speakers 2 Connect a TV 3 Connect playback device such as follows the first time you use this unit. Connect and install as BD/DVD players and recorders 4 Connect the AC power cord, and turn the power on When connection and installation is finished, set up the speaker parameters 5 . - 2 -
See the following explanations for the connections for each number. TV 3 2 Front speaker L 4 This unit Center speaker Front speaker R Subwoofer 1 Surround speaker R Surround 1 speaker L BD/DVD player (recorder) 1 Connect the speakers 2 Connect a TV 3 Connect playback device such as follows the first time you use this unit. Connect and install as BD/DVD players and recorders 4 Connect the AC power cord, and turn the power on When connection and installation is finished, set up the speaker parameters 5 . - 2 -
Owners Manual
Page 75
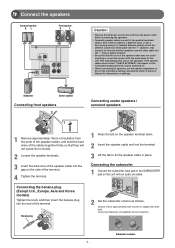
... Tighten the knob, and then insert the banana plug into contact with an audio pin cable. 2 Set the subwoofer volume as follows. Connecting the subwoofer 1 Connect the subwoofer input jack to 6Ω on the side of the terminal. 4 Tighten the terminal. 1 Connect the speakers ... speakers. One of the terminal. VOLUME CROSSOVER/ HIGH CUT - 3 - If the speaker cables short circuit, "CHECK SP WIRES!" Subwoofer Center speaker Connecting front speakers KERS 3 2 FRONT 1 4 1 Remove approximately 10mm of insulation from the power outlet before making connections....
... Tighten the knob, and then insert the banana plug into contact with an audio pin cable. 2 Set the subwoofer volume as follows. Connecting the subwoofer 1 Connect the subwoofer input jack to 6Ω on the side of the terminal. 4 Tighten the terminal. 1 Connect the speakers ... speakers. One of the terminal. VOLUME CROSSOVER/ HIGH CUT - 3 - If the speaker cables short circuit, "CHECK SP WIRES!" Subwoofer Center speaker Connecting front speakers KERS 3 2 FRONT 1 4 1 Remove approximately 10mm of insulation from the power outlet before making connections....
Owners Manual
Page 78
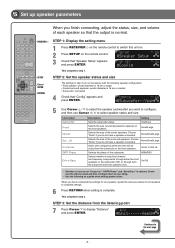
...NRM/REV Selects whether to switch this limit will be output from the listening point 7 Press Cursor C to 200 Hz Switchs the phase of the subwoofer. This completes step 2. Speaker Setup SW L CR SL SR 3 Check that the output is complete. STEP 2: Set the speaker status and size ... diameter is optional. On/Off • Whether or not you set "Crossover," "SWFR Phase," and "Extra Bass" is 16 cm or smaller • Subwoofer: connected 4 Check that "Config" appears and press ENTER. Check how the effects sound and then configure them to complete settings. 6 Press RETURN when setting ...
...NRM/REV Selects whether to switch this limit will be output from the listening point 7 Press Cursor C to 200 Hz Switchs the phase of the subwoofer. This completes step 2. Speaker Setup SW L CR SL SR 3 Check that the output is complete. STEP 2: Set the speaker status and size ... diameter is optional. On/Off • Whether or not you set "Crossover," "SWFR Phase," and "Extra Bass" is 16 cm or smaller • Subwoofer: connected 4 Check that "Config" appears and press ENTER. Check how the effects sound and then configure them to complete settings. 6 Press RETURN when setting ...


