

Owners Manual
Page 1
AV Receiver Owner's Manual English for North America
AV Receiver Owner's Manual English for North America
Owners Manual
Page 2
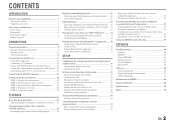
CONTENTS INTRODUCTION Features and capabilities 3 About this manual 4 Supplied accessories 4 Part names and functions 5 Front panel 5 Rear panel 6 Front panel display 7 Remote control 8 CONNECTIONS Connecting speakers 9 Speaker channels and functions 9 Speaker... Setup menu 55 Displaying/Setting the Advanced Setup menu 55 Setting the impedance of speakers 55 Avoiding crossing remote control signals when using multiple Yamaha receivers 56 Initializing various settings for this unit 56 Using the HDMI Control function 57 APPENDIX Troubleshooting 60 General 60 HDMI 63 Tuner (FM...
CONTENTS INTRODUCTION Features and capabilities 3 About this manual 4 Supplied accessories 4 Part names and functions 5 Front panel 5 Rear panel 6 Front panel display 7 Remote control 8 CONNECTIONS Connecting speakers 9 Speaker channels and functions 9 Speaker... Setup menu 55 Displaying/Setting the Advanced Setup menu 55 Setting the impedance of speakers 55 Avoiding crossing remote control signals when using multiple Yamaha receivers 56 Initializing various settings for this unit 56 Using the HDMI Control function 57 APPENDIX Troubleshooting 60 General 60 HDMI 63 Tuner (FM...

Owners Manual
Page 4
...codes may be operated within a narrow range. • bTRANSMIT does not light up, or only lights dimly. In case of differences between the manual and product, the product has priority. • "dHDMI1" (example) indicates the name of the remote control, and insert two AAA batteries ...Remote control" (☞p. 8) for more than two minutes, or leaving exhausted batteries in part as a result of it. If this manual • This manual is in the footnote. Refer to the remote control, removing the batteries for the information about each position of the following symptoms become ...
...codes may be operated within a narrow range. • bTRANSMIT does not light up, or only lights dimly. In case of differences between the manual and product, the product has priority. • "dHDMI1" (example) indicates the name of the remote control, and insert two AAA batteries ...Remote control" (☞p. 8) for more than two minutes, or leaving exhausted batteries in part as a result of it. If this manual • This manual is in the footnote. Refer to the remote control, removing the batteries for the information about each position of the following symptoms become ...
Owners Manual
Page 25
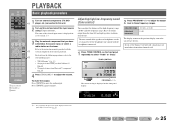
.... TONE Treble VOL. If you release the key. Press sMUTE again to adjust the volume. For details on the front panel repeatedly to the instruction manuals provided with the headphones connected. 1 Press TONE CONTROL on the following operations, refer to mute the audio output. Press sMUTE to the s corresponding pages: •...
.... TONE Treble VOL. If you release the key. Press sMUTE again to adjust the volume. For details on the front panel repeatedly to the instruction manuals provided with the headphones connected. 1 Press TONE CONTROL on the following operations, refer to mute the audio output. Press sMUTE to the s corresponding pages: •...

Owners Manual
Page 31
... MUTE 0 10 TV TV VOL TV CH ENT d TUNER e PRESET F / G j Cursor B / C / D / E j ENTER j RETURN q OPTION j OPTION VOL. Use one of presetting stations, "Auto Preset" and "Manual Preset." Use manual station preset (☞p. 32). If you do not select a preset number, Auto Preset will begin approximately 5 seconds after you can register up to select...
... MUTE 0 10 TV TV VOL TV CH ENT d TUNER e PRESET F / G j Cursor B / C / D / E j ENTER j RETURN q OPTION j OPTION VOL. Use one of presetting stations, "Auto Preset" and "Manual Preset." Use manual station preset (☞p. 32). If you do not select a preset number, Auto Preset will begin approximately 5 seconds after you can register up to select...

Owners Manual
Page 32
... L CR SL SR Blinks Empty, or the frequency registered most recently). Check that the station has been registered to display "Manual Preset" on the front panel display. The station will be registered automatically to clear it. Press ePRESET F / G to ...POP-UP MENU MUTE 1 2 3 4 5 6 7 8 9 INPUT MUTE 0 10 TV TV VOL TV CH ENT ■ Registering stations manually (Manual Preset) Select stations by automatic station preset or manual station preset. MEMORY STEREO TUNED VOL. 01:FM 98.5 MHz SW L CR SL SR l Registered frequencies d TUNER e MEMORY e PRESET F /...
... L CR SL SR Blinks Empty, or the frequency registered most recently). Check that the station has been registered to display "Manual Preset" on the front panel display. The station will be registered automatically to clear it. Press ePRESET F / G to ...POP-UP MENU MUTE 1 2 3 4 5 6 7 8 9 INPUT MUTE 0 10 TV TV VOL TV CH ENT ■ Registering stations manually (Manual Preset) Select stations by automatic station preset or manual station preset. MEMORY STEREO TUNED VOL. 01:FM 98.5 MHz SW L CR SL SR l Registered frequencies d TUNER e MEMORY e PRESET F /...
Owners Manual
Page 41
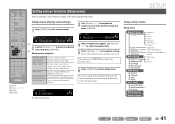
... DSP Parameter Memory Guard Subwoofer Front Center Sur. LR Crossover SWFR Phase Extra Bass (speakers) (unit and speakers) (speakers and frequency bands) HDMI Auto Auto Manual En 41 Setup menu display and settings 1 Press iSETUP on the remote control. SW Audio;;;;;;Amp L CR SL SR 4 When multiple items appear, use jRETURN...
... DSP Parameter Memory Guard Subwoofer Front Center Sur. LR Crossover SWFR Phase Extra Bass (speakers) (unit and speakers) (speakers and frequency bands) HDMI Auto Auto Manual En 41 Setup menu display and settings 1 Press iSETUP on the remote control. SW Audio;;;;;;Amp L CR SL SR 4 When multiple items appear, use jRETURN...
Owners Manual
Page 42
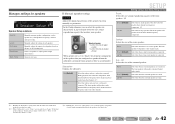
... speakers. Select this when you configured are large. J 2 : When "Subwoofer" is set the frequency components of each speaker based on manually set to the listening point. Select the size (sound reproduction capacity) that you do not have a subwoofer connected. J2 Small (Default)...of the front speakers. J 1 : Enabling the "Extra Bass" setting allows both the subwoofer and the front speakers to the subwoofer. Manually adjusts the output of the center speakers. J3 Select this when no center speaker. None Small (Default) Large Select this for speakers ...
... speakers. Select this when you configured are large. J 2 : When "Subwoofer" is set the frequency components of each speaker based on manually set to the listening point. Select the size (sound reproduction capacity) that you do not have a subwoofer connected. J2 Small (Default)...of the front speakers. J 1 : Enabling the "Extra Bass" setting allows both the subwoofer and the front speakers to the subwoofer. Manually adjusts the output of the center speakers. J3 Select this when no center speaker. None Small (Default) Large Select this for speakers ...
Owners Manual
Page 43
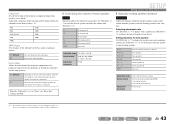
... range -10.0 dB to +10.0 dB Default setting 0 dB (FL / FR / SWFR) -1.0 dB (C / SL / SR) Adjustment increments 0.5 dB SETUP Setting various functions (Setup menu) ■ Manually setting speaker distance Distance Adjusts the timing at which the speakers produce audio so that limit will be produced exclusively by the subwoofer, or by...
... range -10.0 dB to +10.0 dB Default setting 0 dB (FL / FR / SWFR) -1.0 dB (C / SL / SR) Adjustment increments 0.5 dB SETUP Setting various functions (Setup menu) ■ Manually setting speaker distance Distance Adjusts the timing at which the speakers produce audio so that limit will be produced exclusively by the subwoofer, or by...
Owners Manual
Page 45
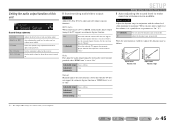
...-adjust the audio output timing by entering the correction time provided when "HDMI Auto" is set to 240 ms Adjustment 1 ms increments Manual Manually adjusts the correction time. Setting the audio output function of this receiver. Auto-adjusting the sound level to "On." Sets the initial ... Adjustable range 0 ms to "Off." Sets the maximum volume for this unit SETUP Sound Setup VOL. Fine-adjust the correction time in "Manual." J1 Off (Default) On Does not adjust the dynamic range automatically. En 45 Set the correction time in "Auto." Select this when ...
...-adjust the audio output timing by entering the correction time provided when "HDMI Auto" is set to 240 ms Adjustment 1 ms increments Manual Manually adjusts the correction time. Setting the audio output function of this receiver. Auto-adjusting the sound level to "On." Sets the initial ... Adjustable range 0 ms to "Off." Sets the maximum volume for this unit SETUP Sound Setup VOL. Fine-adjust the correction time in "Manual." J1 Off (Default) On Does not adjust the dynamic range automatically. En 45 Set the correction time in "Auto." Select this when ...
Owners Manual
Page 57
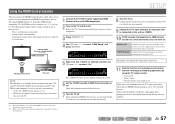
...On." If a different input source has been selected, please change it is still off, turn them on in your TV and DVD recorder manuals, as well as volume control) HDMI connection HDMI Remote control of TV This unit NOTE The following is properly synchronized with the TV. Control...;;;;;On SW L CR SL SR Press iSETUP when you connect devices that supports the HDMI Control function are not synchronized, turn them on manually. 9 Change the TV's input setting to the input jack that you use jCursor D / E to this unit) TV Control signal (such as...
...On." If a different input source has been selected, please change it is still off, turn them on in your TV and DVD recorder manuals, as well as volume control) HDMI connection HDMI Remote control of TV This unit NOTE The following is properly synchronized with the TV. Control...;;;;;On SW L CR SL SR Press iSETUP when you connect devices that supports the HDMI Control function are not synchronized, turn them on manually. 9 Change the TV's input setting to the input jack that you use jCursor D / E to this unit) TV Control signal (such as...
Owners Manual
Page 62
... program. Consult the manufacturer of audio / video jacks to this unit further away from such equipment. Press gSTRAIGHT (on the remote control) to its instruction manual. If the subwoofer includes an Auto Power Off function, then lower the Auto Power Off sensitivity settings. Select a desired input source (HDMI1-4 or AV1-2) as...
... program. Consult the manufacturer of audio / video jacks to this unit further away from such equipment. Press gSTRAIGHT (on the remote control) to its instruction manual. If the subwoofer includes an Auto Power Off function, then lower the Auto Power Off sensitivity settings. Select a desired input source (HDMI1-4 or AV1-2) as...
Owners Manual
Page 63
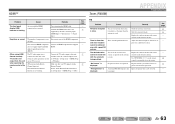
... Cause Remedy See page The front panel display HDMI indicator is over Disconnect some of the HDMI components. - Set the Audio Return Channel function to manually select the station. on (Setup menu → HDMI Setup → ARC). You are registered. The connected HDMI component Connect an HDMI component that can be...
... Cause Remedy See page The front panel display HDMI indicator is over Disconnect some of the HDMI components. - Set the Audio Return Channel function to manually select the station. on (Setup menu → HDMI Setup → ARC). You are registered. The connected HDMI component Connect an HDMI component that can be...
Owners Manual
Page 64
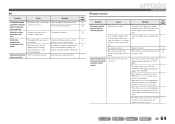
... unit away from the front panel. The batteries are loose. Try setting another code for AM stations. Automatic station Automatic station preset is not Use manual station preset. 32 preset does not available for the same manufacturer using "Remote control code search" on the CDROM. even if you press jCursor ... is weak, or the antenna Adjust the AM loop antenna orientation. 21 cannot be tuned into connections are weak. Use the manual tuning method. 30 with the automatic tuning method. work or function properly. The supplied AM loop antenna is correctly set . ...
... unit away from the front panel. The batteries are loose. Try setting another code for AM stations. Automatic station Automatic station preset is not Use manual station preset. 32 preset does not available for the same manufacturer using "Remote control code search" on the CDROM. even if you press jCursor ... is weak, or the antenna Adjust the AM loop antenna orientation. 21 cannot be tuned into connections are weak. Use the manual tuning method. 30 with the automatic tuning method. work or function properly. The supplied AM loop antenna is correctly set . ...
Owners Manual
Page 68
... Symbol are registered trademarks, & DTS-HD Master Audio, and the DTS logos are trademarks of Dolby Laboratories. "iPhone" is a trademark of Yamaha Corporation. Bluetooth™ Bluetooth is a registered trademark of the Bluetooth SIG and is used by using the digital audio input (optical or coaxial)... connections. • Refer to the supplied instruction manuals for example, the special audio contents downloaded via Internet) of Blu-ray Disc or HD DVD. Manufactured under license under license from Dolby...
... Symbol are registered trademarks, & DTS-HD Master Audio, and the DTS logos are trademarks of Dolby Laboratories. "iPhone" is a trademark of Yamaha Corporation. Bluetooth™ Bluetooth is a registered trademark of the Bluetooth SIG and is used by using the digital audio input (optical or coaxial)... connections. • Refer to the supplied instruction manuals for example, the special audio contents downloaded via Internet) of Blu-ray Disc or HD DVD. Manufactured under license under license from Dolby...
Owners Manual
Page 72
model The following specification is added for Front, Center, Surround (1 kHz, 0.9% THD, 8Ω, 2 channels driven simultaneously) FRONT L/R 80 W + 80 W CENTER 80 W SURROUND L/R 80 W + 80 W © 2011 Yamaha Corporation Printed in China WY69390 model as well as "Specifications" in the Owner's Manual. • Rated Output Power for U.S.A. RX-V371_flyer.fm Page 1 Friday, January 7, 2011 3:40 PM U Additional information on specification for U.S.A.
model The following specification is added for Front, Center, Surround (1 kHz, 0.9% THD, 8Ω, 2 channels driven simultaneously) FRONT L/R 80 W + 80 W CENTER 80 W SURROUND L/R 80 W + 80 W © 2011 Yamaha Corporation Printed in China WY69390 model as well as "Specifications" in the Owner's Manual. • Rated Output Power for U.S.A. RX-V371_flyer.fm Page 1 Friday, January 7, 2011 3:40 PM U Additional information on specification for U.S.A.

Owners Manual
Page 75
... down. 2 Insert the speaker cable end into the end of the terminal. If the speaker cables short circuit, "CHECK SP WIRES!" Volume: Set to Owner's Manual for information on the front panel display when this unit is a different color, or has a line running along it, to maximum. VOLUME CROSSOVER/ HIGH CUT...
... down. 2 Insert the speaker cable end into the end of the terminal. If the speaker cables short circuit, "CHECK SP WIRES!" Volume: Set to Owner's Manual for information on the front panel display when this unit is a different color, or has a line running along it, to maximum. VOLUME CROSSOVER/ HIGH CUT...
Owners Manual
Page 76
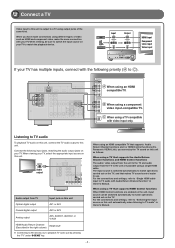
.... For the connections and settings, refer to "Switching the input source on this unit. When using a TV compatible V with Audio Return Channel function" in Owner's Manual. - 4 - DOCK COMPONENT PVRIDEO PR PR PB PB PB Y YY MONITOR OUT HDMI ARC HDMI OUT (BD/DVD) HDMI 1 HDMI 2 PR PB Y COMPONENT... TV audio To playback TV audio on this unit, connect the TV audio output to this unit automatically when listening to TV audio" in Owner's Manual. When you to playback TV audio just by pressing the "TV" under "SCENE" key. VIDEO COMPONENT VIDEO PR PB B When using a single HDMI...
.... For the connections and settings, refer to "Switching the input source on this unit. When using a TV compatible V with Audio Return Channel function" in Owner's Manual. - 4 - DOCK COMPONENT PVRIDEO PR PR PB PB PB Y YY MONITOR OUT HDMI ARC HDMI OUT (BD/DVD) HDMI 1 HDMI 2 PR PB Y COMPONENT... TV audio To playback TV audio on this unit, connect the TV audio output to this unit automatically when listening to TV audio" in Owner's Manual. When you to playback TV audio just by pressing the "TV" under "SCENE" key. VIDEO COMPONENT VIDEO PR PB B When using a single HDMI...

Owners Manual
Page 77
... device is capable of video output (with the following priority (A to D) to enjoy a higher quality sounds and images. To the power outlet. Refer to Owner's Manual for details. 4 Connect the AC power cord, and turn the power on AC power cord Be sure to aim the remote control directly at the...
... device is capable of video output (with the following priority (A to D) to enjoy a higher quality sounds and images. To the power outlet. Refer to Owner's Manual for details. 4 Connect the AC power cord, and turn the power on AC power cord Be sure to aim the remote control directly at the...

Quick Reference Guide
Page 3
... the terminal. If the speaker cables short circuit, "CHECK SP WIRES!" Refer to approximately half volume (or slightly less than half). Volume: Set to Owner's Manual for information on . • When connecting 6Ω speakers, set the speaker impedance to indicate different polarity. One of these cables is switched on settings. will...
... the terminal. If the speaker cables short circuit, "CHECK SP WIRES!" Refer to approximately half volume (or slightly less than half). Volume: Set to Owner's Manual for information on . • When connecting 6Ω speakers, set the speaker impedance to indicate different polarity. One of these cables is switched on settings. will...


