Operating Guide
Page 4
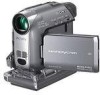
... be damaged, or this first (continued) Notes on use Your camcorder is not possible due to a malfunction of the camcorder, storage media, etc. • TV color systems differ depending on the LCD screen and the viewfinder. On using the supplied software (stored on... the picture and sound are incompatible) (p. 106). • "Memory Stick Duo" marked with , (p. 107). Viewfinder LCD panel Battery pack • Before connecting your camcorder to another device with two kinds of operations guides. - "Operating Guide" (This manual) - However, there may be copyrighted....
... be damaged, or this first (continued) Notes on use Your camcorder is not possible due to a malfunction of the camcorder, storage media, etc. • TV color systems differ depending on the LCD screen and the viewfinder. On using the supplied software (stored on... the picture and sound are incompatible) (p. 106). • "Memory Stick Duo" marked with , (p. 107). Viewfinder LCD panel Battery pack • Before connecting your camcorder to another device with two kinds of operations guides. - "Operating Guide" (This manual) - However, there may be copyrighted....
Operating Guide
Page 5
...procedures. Change the screen language before using a digital still camera, and therefore may appear different. • The on the model DCR-HC42. About the Carl Zeiss lens Your camcorder is equipped with a Carl Zeiss lens, which was developed jointly by Carl Zeiss, in each local language are used on this...video cameras and offers a quality typical of light from a subject coming into the lens. 5 On this manual • The images of the LCD screen and the viewfinder used in this manual are based on -screen displays in Germany, and Sony Corporation, and produces superior images.
...procedures. Change the screen language before using a digital still camera, and therefore may appear different. • The on the model DCR-HC42. About the Carl Zeiss lens Your camcorder is equipped with a Carl Zeiss lens, which was developed jointly by Carl Zeiss, in each local language are used on this...video cameras and offers a quality typical of light from a subject coming into the lens. 5 On this manual • The images of the LCD screen and the viewfinder used in this manual are based on -screen displays in Germany, and Sony Corporation, and produces superior images.
Operating Guide
Page 6
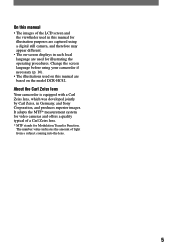
... 1: Checking supplied items 9 Step 2: Charging the battery pack 10 Step 3: Turning the power on and holding your camcorder firmly ...........14 Step 4: Adjusting the LCD panel and viewfinder 15 Step 5: Using the touch panel 16 Changing the language setting 16 Checking the screen ... or a "Memory Stick Duo 18 Step 8: Selecting the aspect ratio (16:9 or 4:3) of the recording picture (DCR-HC42 19 Recording/Playback Recording/Playback with ease (Easy Handycam 20 Recording 22 Playback 23 Functions used for recording/playback, etc 24 Recording To use zoom To record in dark places...
... 1: Checking supplied items 9 Step 2: Charging the battery pack 10 Step 3: Turning the power on and holding your camcorder firmly ...........14 Step 4: Adjusting the LCD panel and viewfinder 15 Step 5: Using the touch panel 16 Changing the language setting 16 Checking the screen ... or a "Memory Stick Duo 18 Step 8: Selecting the aspect ratio (16:9 or 4:3) of the recording picture (DCR-HC42 19 Recording/Playback Recording/Playback with ease (Easy Handycam 20 Recording 22 Playback 23 Functions used for recording/playback, etc 24 Recording To use zoom To record in dark places...

Operating Guide
Page 7
... Playing the picture on a TV 34 Using the Menu Using the menu items 36 Menu items 38 CAMERA SET menu 40 Settings to adjust your camcorder to a recorded tape 63 Continued 7 EFFECT/SLIDE SHOW/INT.REC-STL, etc.) EDIT/PLAY menu 52 Settings for the "Memory Stick Duo" (QUALITY/...SET/WORLD TIME/LANGUAGE) Customizing Personal Menu 57 Dubbing/Editing Connecting to a VCR or TV 59 Dubbing to other basic settings (REC MODE/ MULTI-SOUND/LCD/VF SET/DISP OUTPUT/USB, etc.) TIME/LANGU. menu 48 Special effects on pictures or additional functions on a tape or other recording devices 60 ...
... Playing the picture on a TV 34 Using the Menu Using the menu items 36 Menu items 38 CAMERA SET menu 40 Settings to adjust your camcorder to a recorded tape 63 Continued 7 EFFECT/SLIDE SHOW/INT.REC-STL, etc.) EDIT/PLAY menu 52 Settings for the "Memory Stick Duo" (QUALITY/...SET/WORLD TIME/LANGUAGE) Customizing Personal Menu 57 Dubbing/Editing Connecting to a VCR or TV 59 Dubbing to other basic settings (REC MODE/ MULTI-SOUND/LCD/VF SET/DISP OUTPUT/USB, etc.) TIME/LANGU. menu 48 Special effects on pictures or additional functions on a tape or other recording devices 60 ...
Operating Guide
Page 12
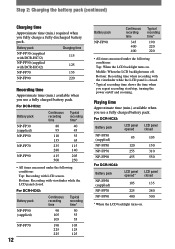
...Bottom: Recording time when recording with LCD screen. Middle: When the LCD backlight turns off and zooming. For DCR-HC32: Battery pack LCD panel LCD panel opened closed NP-FP30 (supplied) NP-FP50 85 105 120 150 NP-FP70 NP-FP90 255 310 455 550 For DCR-HC42: Battery pack NP-FP50 (supplied...) NP-FP70 NP-FP90 LCD panel opened* 105 225 400 LCD panel closed . Playing time Approximate time (min.) available when you fully charge a fully discharged battery...
...Bottom: Recording time when recording with LCD screen. Middle: When the LCD backlight turns off and zooming. For DCR-HC32: Battery pack LCD panel LCD panel opened closed NP-FP30 (supplied) NP-FP50 85 105 120 150 NP-FP70 NP-FP90 255 310 455 550 For DCR-HC42: Battery pack NP-FP50 (supplied...) NP-FP70 NP-FP90 LCD panel opened* 105 225 400 LCD panel closed . Playing time Approximate time (min.) available when you fully charge a fully discharged battery...
Operating Guide
Page 14
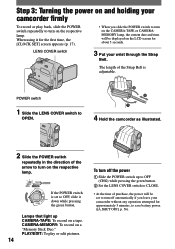
...; When you slide the POWER switch to turn on the CAMERA-TAPE or CAMERAMEMORY lamp, the current date and time will be displayed on the LCD screen for approximately 5 minutes, to save battery power. ([A.SHUT OFF], p. 56). The length of the arrow to turn on the respective lamp. LENS COVER ...: To play back, slide the POWER switch repeatedly to turn on the respective lamp. POWER switch 1 Slide the LENS COVER switch to OPEN. 4 Hold the camcorder as illustrated. 2 Slide the POWER switch repeatedly in the direction of the Strap Belt is set to turn off the power Slide the POWER...
...; When you slide the POWER switch to turn on the CAMERA-TAPE or CAMERAMEMORY lamp, the current date and time will be displayed on the LCD screen for approximately 5 minutes, to save battery power. ([A.SHUT OFF], p. 56). The length of the arrow to turn on the respective lamp. LENS COVER ...: To play back, slide the POWER switch repeatedly to turn on the respective lamp. POWER switch 1 Slide the LENS COVER switch to OPEN. 4 Hold the camcorder as illustrated. 2 Slide the POWER switch repeatedly in the direction of the Strap Belt is set to turn off the power Slide the POWER...
Operating Guide
Page 15
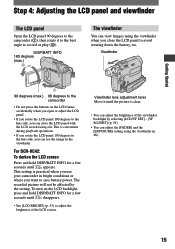
...;nder You can view images using the viewfinder (p. 48). 15 For DCR-HC42: To darken the LCD screen Press and hold DISP/BATT INFO for a few seconds until appears. The recorded picture will not be affected by selecting [LCD/VF SET] - [VF B.LIGHT] (p. 54). • You can adjust ...EXPOSURE] setting using the viewfinder when you can close the LCD panel to record or play (). Getting Started Step 4: Adjusting the LCD panel and viewfinder The LCD panel Open the LCD panel 90 degrees to the camcorder (), then rotate it until the picture is clear. •...
...;nder You can view images using the viewfinder (p. 48). 15 For DCR-HC42: To darken the LCD screen Press and hold DISP/BATT INFO for a few seconds until appears. The recorded picture will not be affected by selecting [LCD/VF SET] - [VF B.LIGHT] (p. 54). • You can adjust ...EXPOSURE] setting using the viewfinder when you can close the LCD panel to record or play (). Getting Started Step 4: Adjusting the LCD panel and viewfinder The LCD panel Open the LCD panel 90 degrees to the camcorder (), then rotate it until the picture is clear. •...

Operating Guide
Page 16
... the screen indicators (Display guide) You can change the settings (p. 36) using the touch panel. When you press the buttons on the LCD screen. 16 Select area for guide. Place your hand on the rear side of each indicator that you want to toggle. Changing the language...the indicators in [LANGUAGE] on the screen. If you cannot find the indicator you want to check, touch / to check. Touch [MENU] during Easy Handycam operation. 6 0 min MENU 1/3 TELE MACRO SPOT FOCUS 0:00:00 DISP GUIDE EXPOSURE FADER 2 Touch [DISP GUIDE]. DISP/BATT INFO 1 Touch . Select ...
... the screen indicators (Display guide) You can change the settings (p. 36) using the touch panel. When you press the buttons on the LCD screen. 16 Select area for guide. Place your hand on the rear side of each indicator that you want to toggle. Changing the language...the indicators in [LANGUAGE] on the screen. If you cannot find the indicator you want to check, touch / to check. Touch [MENU] during Easy Handycam operation. 6 0 min MENU 1/3 TELE MACRO SPOT FOCUS 0:00:00 DISP GUIDE EXPOSURE FADER 2 Touch [DISP GUIDE]. DISP/BATT INFO 1 Touch . Select ...
Operating Guide
Page 19
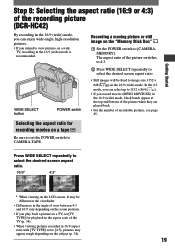
... back. • For the number of recordable pictures, see page 45. WIDE SELECT button POWER switch Recording a moving picture or still image on the LCD screen. In the 4:3 mode, you can enjoy wide-angle, high-resolution pictures. • If you intend to [4:3], pictures may be fixed... 1152 × 648 ( ) in the 16:9 (wide) mode. Getting Started Step 8: Selecting the aspect ratio (16:9 or 4:3) of the recording picture (DCR-HC42) By recording in the 16:9 (wide) mode, you can select up to [CAMERAMEMORY]. It may appear rough depending on a wide TV, recording in the 16...
... back. • For the number of recordable pictures, see page 45. WIDE SELECT button POWER switch Recording a moving picture or still image on the LCD screen. In the 4:3 mode, you can enjoy wide-angle, high-resolution pictures. • If you intend to [4:3], pictures may be fixed... 1152 × 648 ( ) in the 16:9 (wide) mode. Getting Started Step 8: Selecting the aspect ratio (16:9 or 4:3) of the recording picture (DCR-HC42) By recording in the 16:9 (wide) mode, you can select up to [CAMERAMEMORY]. It may appear rough depending on a wide TV, recording in the 16...
Operating Guide
Page 24
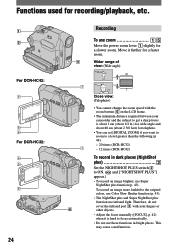
Therefore, do not cover the infrared port with the zoom buttons on the LCD frame. • The minimum distance required between your fingers or other objects. • Adjust the focus manually ([FOCUS], p. 42) when it further for ... cannot change the zoom speed with your camcorder and the subject to get a sharp focus is hard to the original colors, use zoom Move the power zoom lever slightly for a slower zoom. This may cause a malfunction. Functions used for recording/playback, etc. 1 2 For DCR-HC42: 4 5 6 For DCR-HC32: 4 5 6 24 Recording To ...
Therefore, do not cover the infrared port with the zoom buttons on the LCD frame. • The minimum distance required between your fingers or other objects. • Adjust the focus manually ([FOCUS], p. 42) when it further for ... cannot change the zoom speed with your camcorder and the subject to get a sharp focus is hard to the original colors, use zoom Move the power zoom lever slightly for a slower zoom. This may cause a malfunction. Functions used for recording/playback, etc. 1 2 For DCR-HC42: 4 5 6 For DCR-HC32: 4 5 6 24 Recording To ...
Operating Guide
Page 25
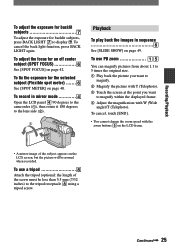
... the exposure for the selected subject (Flexible spot meter See [SPOT METER] on page 42. To record in mirror mode Open the LCD panel 90 degrees to the camcorder (), then rotate it 180 degrees to the lens side (). 2 1 Playback To play back the images in sequence See ...[SLIDE SHOW] on the LCD screen, but the picture will be less than 5.5 mm (7/32 inches) to the tripod receptacle using a tripod ...
... the exposure for the selected subject (Flexible spot meter See [SPOT METER] on page 42. To record in mirror mode Open the LCD panel 90 degrees to the camcorder (), then rotate it 180 degrees to the lens side (). 2 1 Playback To play back the images in sequence See ...[SLIDE SHOW] on the LCD screen, but the picture will be less than 5.5 mm (7/32 inches) to the tripod receptacle using a tripod ...
Operating Guide
Page 30
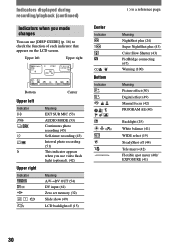
... changes You can use video flash light (optional). (42) Meaning A/VDV OUT (54) DV input (61) Zero set memory (32) Slide show (49) LCD backlight off (44) Tele macro (42) Flexible spot meter (40)/ EXPOSURE (41) 30 Indicators displayed during recording/playback (continued) Indicators when you use [DISP GUIDE...
... changes You can use video flash light (optional). (42) Meaning A/VDV OUT (54) DV input (61) Zero set memory (32) Slide show (49) LCD backlight off (44) Tele macro (42) Flexible spot meter (40)/ EXPOSURE (41) 30 Indicators displayed during recording/playback (continued) Indicators when you use [DISP GUIDE...
Operating Guide
Page 36
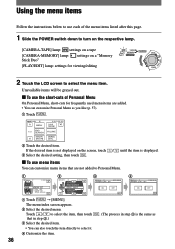
... as 36 Unavailable items will be grayed out. To use each of Personal Menu On Personal Menu, short-cuts for viewing/editing 2 Touch the LCD screen to select the menu item.
... as 36 Unavailable items will be grayed out. To use each of Personal Menu On Personal Menu, short-cuts for viewing/editing 2 Touch the LCD screen to select the menu item.

Operating Guide
Page 39
...; END SEARCH STANDARD SET menu (p. 53) REC MODE AUDIO MODE VOLUME* × MULTI-SOUND × AUDIO MIX × EXT SUR MIC*2 LCD/VF SET A/V DV OUT × VIDEO INPUT × TV TYPE*2 USB-CAMERA USB-PLY/EDT × DISP GUIDE* DATA CODE... items () vary depending on the position of lamp: TAPE EDIT/PLAY menu (p. 52) VAR. Position of the lamp. *These functions are available during Easy Handycam operation.
...; END SEARCH STANDARD SET menu (p. 53) REC MODE AUDIO MODE VOLUME* × MULTI-SOUND × AUDIO MIX × EXT SUR MIC*2 LCD/VF SET A/V DV OUT × VIDEO INPUT × TV TYPE*2 USB-CAMERA USB-PLY/EDT × DISP GUIDE* DATA CODE... items () vary depending on the position of lamp: TAPE EDIT/PLAY menu (p. 52) VAR. Position of the lamp. *These functions are available during Easy Handycam operation.
Operating Guide
Page 41
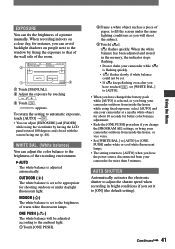
...ONE PUSH]. Frame a white object such as a piece of the room. 2 1 3 Touch [MANUAL]. Adjust the exposure by having the LCD panel rotated 180 degrees and closed with the screen facing out (p. 48). To return the setting to that of the wall side of paper, to... better color balance adjustment. • Redo the [ONE PUSH] procedure if you change the [PROGRAM AE] settings, or bring your camcorder outdoors from your camcorder while is flashing quickly. • flashes slowly if white balance could not be appropriate for shooting outdoors or under white...
...ONE PUSH]. Frame a white object such as a piece of the room. 2 1 3 Touch [MANUAL]. Adjust the exposure by having the LCD panel rotated 180 degrees and closed with the screen facing out (p. 48). To return the setting to that of the wall side of paper, to... better color balance adjustment. • Redo the [ONE PUSH] procedure if you change the [PROGRAM AE] settings, or bring your camcorder outdoors from your camcorder while is flashing quickly. • flashes slowly if white balance could not be appropriate for shooting outdoors or under white...
Operating Guide
Page 44
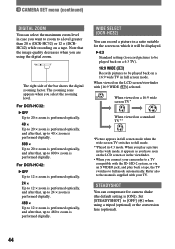
...TV in full screen mode. Refer also to the manuals supplied with your camcorder to 480 × zoom is performed digitally. For DCR-HC32: OFF Up to 20 × zoom is performed ... optically, and after that, up to a TV compatible with [16:9 WIDE ( )] selected. WIDE SELECT (DCR-HC32) You can record a picture in a ratio suitable for camera shake (the default setting is performed digitally... recording on a tape. When viewed on the LCD screen or in the viewfinder. • When you want to zoom to full mode automatically. For DCR-HC42: OFF Up to 12 × ...
...TV in full screen mode. Refer also to the manuals supplied with your camcorder to 480 × zoom is performed digitally. For DCR-HC32: OFF Up to 20 × zoom is performed ... optically, and after that, up to a TV compatible with [16:9 WIDE ( )] selected. WIDE SELECT (DCR-HC32) You can record a picture in a ratio suitable for camera shake (the default setting is performed digitally... recording on a tape. When viewed on the LCD screen or in the viewfinder. • When you want to zoom to full mode automatically. For DCR-HC42: OFF Up to 12 × ...
Operating Guide
Page 48
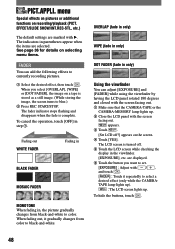
...BLACK FADER MOSAIC FADER MONOTONE When fading in the viewfinder. [EXPOSURE], etc. appears. Touch . [Set LCD off . Touch the LCD screen while checking the display in , the picture gradually changes from color to color. are selected. menu Special effects on ...[FADER] : Touch it gradually changes from black-and-white to black-and-white. To hide the buttons, touch . 48 PICT.APPLI. The LCD screen is complete. The fader indicator stops flashing and disappears when the fade is turned off ?] appears on recording/playback (PICT. TAPE ...
...BLACK FADER MOSAIC FADER MONOTONE When fading in the viewfinder. [EXPOSURE], etc. appears. Touch . [Set LCD off . Touch the LCD screen while checking the display in , the picture gradually changes from color to color. are selected. menu Special effects on ...[FADER] : Touch it gradually changes from black-and-white to black-and-white. To hide the buttons, touch . 48 PICT.APPLI. The LCD screen is complete. The fader indicator stops flashing and disappears when the fade is turned off ?] appears on recording/playback (PICT. TAPE ...
Operating Guide
Page 53
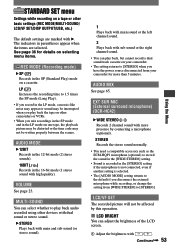
... (DCR-HC42) WIDE STEREO ( ) Records 2 channel sound with / . LCD/VF SET The recorded picture will not be affected by connecting a microphone (optional). See page 36 for more presence by this operation. LCD BRIGHT You can play back, but cannot record a dual sound track cassette on your camcorder.... microphone while recording, or change the setting from [WIDE STEREO] to [STEREO] when you have the power source disconnected from your camcorder for details on selecting menu items. REC MODE (Recording mode) SP () Records in the LP mode on one...
... (DCR-HC42) WIDE STEREO ( ) Records 2 channel sound with / . LCD/VF SET The recorded picture will not be affected by connecting a microphone (optional). See page 36 for more presence by this operation. LCD BRIGHT You can play back, but cannot record a dual sound track cassette on your camcorder.... microphone while recording, or change the setting from [WIDE STEREO] to [STEREO] when you have the power source disconnected from your camcorder for details on selecting menu items. REC MODE (Recording mode) SP () Records in the LP mode on one...
Operating Guide
Page 54
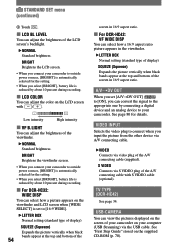
... and an analog device to outside power sources, [BRIGHT] is automatically selected for details. TV TYPE (DCR-HC42) See page 34. A/VDV OUT When you set [A/VDV OUT] ( ) to [ON], you can select how a picture appears on the LCD screen with S VIDEO cable (optional). S VIDEO Connects via video plug of your camcorder.
... and an analog device to outside power sources, [BRIGHT] is automatically selected for details. TV TYPE (DCR-HC42) See page 34. A/VDV OUT When you set [A/VDV OUT] ( ) to [ON], you can select how a picture appears on the LCD screen with S VIDEO cable (optional). S VIDEO Connects via video plug of your camcorder.

Operating Guide
Page 56
... product in Asia, Middle East, Canada, Latin America or in the viewfinder. WORLD TIME When using your camcorder for details on the TV screen, LCD screen, and in accordance with the time difference. You can select the language to [NEVER]. OPPOSITE Scrolls the menu...Spanish, Brazilian-Portuguese, or Korean. • Traditional Chinese is automatically turned off ) 5 min The camcorder is also available on the LCD screen. A.SHUT OFF (Auto shut off when you do not operate your camcorder abroad, you start/stop recording, or operate the touch panel. DISP OUTPUT ...
... product in Asia, Middle East, Canada, Latin America or in the viewfinder. WORLD TIME When using your camcorder for details on the TV screen, LCD screen, and in accordance with the time difference. You can select the language to [NEVER]. OPPOSITE Scrolls the menu...Spanish, Brazilian-Portuguese, or Korean. • Traditional Chinese is automatically turned off ) 5 min The camcorder is also available on the LCD screen. A.SHUT OFF (Auto shut off when you do not operate your camcorder abroad, you start/stop recording, or operate the touch panel. DISP OUTPUT ...


