Operating Guide
Page 6
...Contents Getting Started Step 1: Checking supplied items 9 Step 2: Charging the battery pack 10 Step 3: Turning the power on and holding your camcorder firmly ...........14 Step 4: Adjusting the LCD panel and viewfinder 15 Step 5: Using the touch panel 16 Changing the ...a tape or a "Memory Stick Duo 18 Step 8: Selecting the aspect ratio (16:9 or 4:3) of the recording picture (DCR-HC42 19 Recording/Playback Recording/Playback with ease (Easy Handycam 20 Recording 22 Playback 23 Functions used for recording/playback, etc 24 Recording To use zoom To record in dark places...
...Contents Getting Started Step 1: Checking supplied items 9 Step 2: Charging the battery pack 10 Step 3: Turning the power on and holding your camcorder firmly ...........14 Step 4: Adjusting the LCD panel and viewfinder 15 Step 5: Using the touch panel 16 Changing the ...a tape or a "Memory Stick Duo 18 Step 8: Selecting the aspect ratio (16:9 or 4:3) of the recording picture (DCR-HC42 19 Recording/Playback Recording/Playback with ease (Easy Handycam 20 Recording 22 Playback 23 Functions used for recording/playback, etc 24 Recording To use zoom To record in dark places...
Operating Guide
Page 9
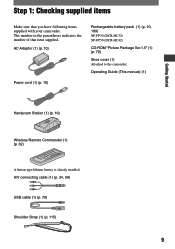
...) NP-FP30 (DCR-HC32) NP-FP50 (DCR-HC42) CD-ROM "Picture Package Ver.1.5" (1) (p. 70) Shoe cover (1) Attached to the camcorder. Step 1: Checking supplied items Make sure that item supplied. The number in the parentheses indicates the number of that you have following items supplied with your camcorder. Operating Guide (This manual) (1) Getting Started Handycam Station (1) (p. 10...
...) NP-FP30 (DCR-HC32) NP-FP50 (DCR-HC42) CD-ROM "Picture Package Ver.1.5" (1) (p. 70) Shoe cover (1) Attached to the camcorder. Step 1: Checking supplied items Make sure that item supplied. The number in the parentheses indicates the number of that you have following items supplied with your camcorder. Operating Guide (This manual) (1) Getting Started Handycam Station (1) (p. 10...
Operating Guide
Page 10
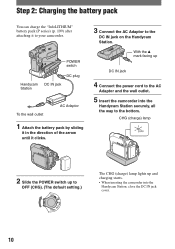
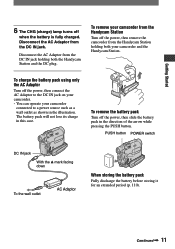
With the mark facing up and charging starts. • When inserting the camcorder into the Handycam Station securely, all the way to the AC Adaptor and the wall outlet. 5 Insert the camcorder into the Handycam Station, close the DC IN jack cover. 10 CHG (charge) lamp 2 Slide the POWER ...switch up to OFF (CHG). (The default setting.) The CHG (charge) lamp lights up DC IN jack 4 Connect the power cord to the bottom. POWER switch Handycam Station DC ...
With the mark facing up and charging starts. • When inserting the camcorder into the Handycam Station securely, all the way to the AC Adaptor and the wall outlet. 5 Insert the camcorder into the Handycam Station, close the DC IN jack cover. 10 CHG (charge) lamp 2 Slide the POWER ...switch up to OFF (CHG). (The default setting.) The CHG (charge) lamp lights up DC IN jack 4 Connect the power cord to the bottom. POWER switch Handycam Station DC ...
Operating Guide
Page 11
... the arrow while pressing the PUSH button. To charge the battery pack using only the AC Adaptor Turn off the power, then remove the camcorder from the Handycam Station Turn off the power, then connect the AC Adaptor to a power source such as a wall outlet as shown in this case. Disconnect ...IN jack. The battery pack will not lose its charge in the illustration. Disconnect the AC Adaptor from the DC IN jack holding both the Handycam Station and the DC plug. To remove your camcorder from the Handycam Station holding both your camcorder connected to the DC IN jack on your...
... the arrow while pressing the PUSH button. To charge the battery pack using only the AC Adaptor Turn off the power, then remove the camcorder from the Handycam Station Turn off the power, then connect the AC Adaptor to a power source such as a wall outlet as shown in this case. Disconnect ...IN jack. The battery pack will not lose its charge in the illustration. Disconnect the AC Adaptor from the DC IN jack holding both the Handycam Station and the DC plug. To remove your camcorder from the Handycam Station holding both your camcorder connected to the DC IN jack on your...
Operating Guide
Page 13
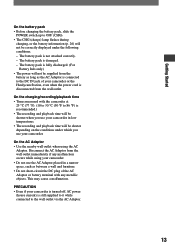
...CHG (charge) lamp flashes during charging, or the battery information (p. 26) will not be correctly displayed under which you use your camcorder or the Handycam Station, even when the power cord is disconnected from the wall outlet. On the AC Adaptor • Use the nearby wall outlet when ...using your camcorder. • Do not use your camcorder. PRECAUTION • Even if your camcorder is turned off, AC power (house current) is still ...
...CHG (charge) lamp flashes during charging, or the battery information (p. 26) will not be correctly displayed under which you use your camcorder or the Handycam Station, even when the power cord is disconnected from the wall outlet. On the AC Adaptor • Use the nearby wall outlet when ...using your camcorder. • Do not use your camcorder. PRECAUTION • Even if your camcorder is turned off, AC power (house current) is still ...
Operating Guide
Page 35
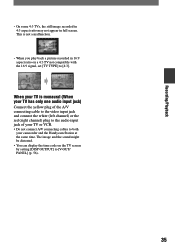
..., the still image recorded in 4:3 aspect ratio may not appear in 16:9 aspect ratio on the TV screen by setting [DISP OUTPUT] to both your camcorder and the Handycam Station at the same time.
..., the still image recorded in 4:3 aspect ratio may not appear in 16:9 aspect ratio on the TV screen by setting [DISP OUTPUT] to both your camcorder and the Handycam Station at the same time.
Operating Guide
Page 55
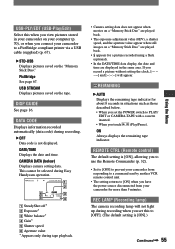
This cannot be selected during Easy Handycam operation. 6 0 min 1 0 : 0 0 : 0 0 : 0 0 2 6 5 AUTO 100 AWB F1. 8 9 dB 3 4 SteadyShot off* Exposure* White balance* Gain* Shutter speed Aperture value * ...flash (optional). • In the DATE/TIME data display, the date and time are played back. • appears for about 8 seconds in your camcorder on your camcorder for more than 5 minutes. REMOTE CTRL (Remote control) The default setting is not displayed. If you have the power source disconnected from responding to...
This cannot be selected during Easy Handycam operation. 6 0 min 1 0 : 0 0 : 0 0 : 0 0 2 6 5 AUTO 100 AWB F1. 8 9 dB 3 4 SteadyShot off* Exposure* White balance* Gain* Shutter speed Aperture value * ...flash (optional). • In the DATE/TIME data display, the date and time are played back. • appears for about 8 seconds in your camcorder on your camcorder for more than 5 minutes. REMOTE CTRL (Remote control) The default setting is not displayed. If you have the power source disconnected from responding to...
Operating Guide
Page 59
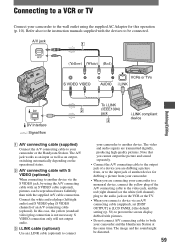
...will not output audio. i.LINK cable (optional) Use an i.LINK cable (optional) to connect your camcorder or the Handycam Station. The video and audio signals are connecting your camcorder to a monaural device, connect the yellow plug of an A/V connecting cable (optional). In this operation (p. ...the default setting) (p. 56) to prevent the screen display dubbed with pictures. • Do not connect A/V connecting cables to both your camcorder and the Handycam Station at the same time. Connect the white and red plugs (left/right audio) and S VIDEO plug (S VIDEO channel) of the...
...will not output audio. i.LINK cable (optional) Use an i.LINK cable (optional) to connect your camcorder or the Handycam Station. The video and audio signals are connecting your camcorder to a monaural device, connect the yellow plug of an A/V connecting cable (optional). In this operation (p. ...the default setting) (p. 56) to prevent the screen display dubbed with pictures. • Do not connect A/V connecting cables to both your camcorder and the Handycam Station at the same time. Connect the white and red plugs (left/right audio) and S VIDEO plug (S VIDEO channel) of the...
Operating Guide
Page 63
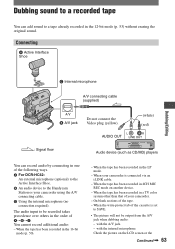
...tape You can record audio by connecting in one of the following ways. For DCR-HC42: An external microphone (optional) to the Active Interface Shoe. An audio device to the Handycam Station or your camcorder using the A/V connecting cable. Using the internal microphone (no connection required). ... players You can add sound to SAVE. • The picture will not be recorded takes precedence over others in the order of your camcorder is set to a tape already recorded in a TV color system other than that of You cannot record additional audio: - with the ...
...tape You can record audio by connecting in one of the following ways. For DCR-HC42: An external microphone (optional) to the Active Interface Shoe. An audio device to the Handycam Station or your camcorder using the A/V connecting cable. Using the internal microphone (no connection required). ... players You can add sound to SAVE. • The picture will not be recorded takes precedence over others in the order of your camcorder is set to a tape already recorded in a TV color system other than that of You cannot record additional audio: - with the ...

Operating Guide
Page 64
.... 1 Slide the POWER switch down to turn on other device. • Do not connect A/V connecting cables to both your camcorder and the Handycam Station at the same time. To dub on the PLAY/EDIT lamp. 2 Touch (Play/Pause) to play back the tape, then touch it ... when you are recording afterwards is not output from your camcorder to a TV using a TV or other scenes, repeat step 2 to select scenes, then touch [AUDIO DUB]. 6 Touch . 64 Dubbing sound to a recorded tape (continued) viewfinder. • For DCR-HC42: When you attach an external microphone (optional) to the ...
.... 1 Slide the POWER switch down to turn on other device. • Do not connect A/V connecting cables to both your camcorder and the Handycam Station at the same time. To dub on the PLAY/EDIT lamp. 2 Touch (Play/Pause) to play back the tape, then touch it ... when you are recording afterwards is not output from your camcorder to a TV using a TV or other scenes, repeat step 2 to select scenes, then touch [AUDIO DUB]. 6 Touch . 64 Dubbing sound to a recorded tape (continued) viewfinder. • For DCR-HC42: When you attach an external microphone (optional) to the ...
Operating Guide
Page 67
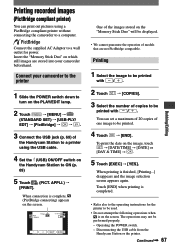
... [MENU] (STANDARD SET) [USB-PLY/ EDT] [PictBridge] . 3 Connect the USB jack (p. 69) of the Handycam Station to a printer using a PictBridge compliant printer without connecting the camcorder to a wall outlet for the printer to be printed. 4 Touch [END]. APPLI.) [PRINT]. You can print out pictures...
... [MENU] (STANDARD SET) [USB-PLY/ EDT] [PictBridge] . 3 Connect the USB jack (p. 69) of the Handycam Station to a printer using a PictBridge compliant printer without connecting the camcorder to a wall outlet for the printer to be printed. 4 Touch [END]. APPLI.) [PRINT]. You can print out pictures...
Operating Guide
Page 69
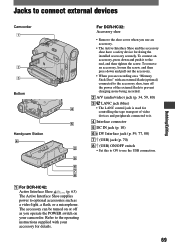
... of video devices and peripherals connected to it to the end, and then tighten the screw. Jacks to connect external devices Dubbing/Editing Camcorder 1 2 3 Bottom 4 5 Handycam Station 4 2 5 6 7 8 For DCR-HC42: Active Interface Shoe (p. 63) The Active Interface Shoe supplies power to optional accessories such as you operate the POWER switch on your accessory...
... of video devices and peripherals connected to it to the end, and then tighten the screw. Jacks to connect external devices Dubbing/Editing Camcorder 1 2 3 Bottom 4 5 Handycam Station 4 2 5 6 7 8 For DCR-HC42: Active Interface Shoe (p. 63) The Active Interface Shoe supplies power to optional accessories such as you operate the POWER switch on your accessory...
Operating Guide
Page 80
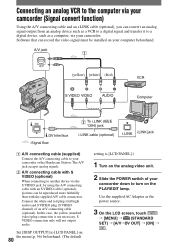
...to turn on the PLAY/EDIT lamp. Connect the white and red plugs (left/right audio) and S VIDEO plug (S VIDEO channel) of your camcorder or the Handycam Station. S VIDEO connection only will not output audio. Set [DISP OUTPUT] to [LCD PANEL] on the menu (p. 56) beforehand. (The default... 80 setting is not necessary. Use the supplied AC Adaptor as a computer, via your camcorder. In this case, the yellow (standard video) plug connection is [...
...to turn on the PLAY/EDIT lamp. Connect the white and red plugs (left/right audio) and S VIDEO plug (S VIDEO channel) of your camcorder or the Handycam Station. S VIDEO connection only will not output audio. Set [DISP OUTPUT] to [LCD PANEL] on the menu (p. 56) beforehand. (The default... 80 setting is not necessary. Use the supplied AC Adaptor as a computer, via your camcorder. In this case, the yellow (standard video) plug connection is [...
Operating Guide
Page 82
... the functions still do not work , press the RESET button (p. 26) using your Sony dealer. You cannot turn Easy Handycam operation on or off . Settings change during Easy Handycam operation. • During Easy Handycam operation, the settings of the functions that are reset, except the Personal Menu items.) Buttons.... 82 This is set to on . • The battery pack is discharged, running low, or not attached to the camcorder. • Attach a charged battery pack to the camcorder (p. 10). • Use the AC Adaptor to connect to ON. • Eject the cassette and "Memory Stick Duo"...
... the functions still do not work , press the RESET button (p. 26) using your Sony dealer. You cannot turn Easy Handycam operation on or off . Settings change during Easy Handycam operation. • During Easy Handycam operation, the settings of the functions that are reset, except the Personal Menu items.) Buttons.... 82 This is set to on . • The battery pack is discharged, running low, or not attached to the camcorder. • Attach a charged battery pack to the camcorder (p. 10). • Use the AC Adaptor to connect to ON. • Eject the cassette and "Memory Stick Duo"...
Operating Guide
Page 83
...10). If the problem persists, disconnect the AC Adaptor from the wall outlet and contact your camcorder into the Handycam Station correctly (p. 10). • The battery charge is connected to the camcorder correctly. A problem occurs when the camcorder is completed (p. 10). If the problem persists, replace the battery pack with a new ...the AC Adaptor. • Turn off the power, and disconnect the AC Adaptor from the wall outlet (p. 10). • Insert your Sony dealer. The CHG (charge) lamp does not light while the battery pack is too high or too low, or the battery pack has not...
...10). If the problem persists, disconnect the AC Adaptor from the wall outlet and contact your camcorder into the Handycam Station correctly (p. 10). • The battery charge is connected to the camcorder correctly. A problem occurs when the camcorder is completed (p. 10). If the problem persists, replace the battery pack with a new ...the AC Adaptor. • Turn off the power, and disconnect the AC Adaptor from the wall outlet (p. 10). • Insert your Sony dealer. The CHG (charge) lamp does not light while the battery pack is too high or too low, or the battery pack has not...

Operating Guide
Page 84
... camcorder (or DISPLAY on the Remote Commander) (p. 16). Touch the LCD screen or insert a cassette or a "Memory Stick Duo" to the indicator list (p. 100). The picture remains on the LCD screen. • This occurs if you cannot turn the LCD backlight off. (DCR-HC42) • During Easy Handycam operation...nder lens adjustment lever to adjust the lens (p. 15). An unknown indicator appears on the LCD screen or viewfinder. • The camcorder is not a malfunction. You cannot turn the LCD backlight on the touch panel do not work at all. • Adjust the screen ([...
... camcorder (or DISPLAY on the Remote Commander) (p. 16). Touch the LCD screen or insert a cassette or a "Memory Stick Duo" to the indicator list (p. 100). The picture remains on the LCD screen. • This occurs if you cannot turn the LCD backlight off. (DCR-HC42) • During Easy Handycam operation...nder lens adjustment lever to adjust the lens (p. 15). An unknown indicator appears on the LCD screen or viewfinder. • The camcorder is not a malfunction. You cannot turn the LCD backlight on the touch panel do not work at all. • Adjust the screen ([...
Operating Guide
Page 89
... back. Image data stored on a "Memory Stick Duo" cannot be played back. • Deactivate the USB Streaming function on your camcorder and set the (USB) ON/OFF switch (p. 69) on the Handycam Station to [OFF] (p. 44). The pictures stored on a "Memory Stick Duo" are playing back the pictures stored on the backlight... at the top and bottom of the screen. The picture appears too dark on the screen, and the subject does not appear on the screen. (DCR-HC42) • The LCD backlight is not a malfunction.
... back. Image data stored on a "Memory Stick Duo" cannot be played back. • Deactivate the USB Streaming function on your camcorder and set the (USB) ON/OFF switch (p. 69) on the Handycam Station to [OFF] (p. 44). The pictures stored on a "Memory Stick Duo" are playing back the pictures stored on the backlight... at the top and bottom of the screen. The picture appears too dark on the screen, and the subject does not appear on the screen. (DCR-HC42) • The LCD backlight is not a malfunction.
Operating Guide
Page 93
...; Adjust [AUDIO MIX] from connected devices on the screen of the connected device. • When attaching the camcorder to the Handycam Station, close the DC IN jack cover, and then fully insert the camcorder into the Handycam Station in the correct direction securely (p. 10). to the output jack of a device you press DISP/BATT...
...; Adjust [AUDIO MIX] from connected devices on the screen of the connected device. • When attaching the camcorder to the Handycam Station, close the DC IN jack cover, and then fully insert the camcorder into the Handycam Station in the correct direction securely (p. 10). to the output jack of a device you press DISP/BATT...

Operating Guide
Page 94
... set to [V-OUT/PANEL] (p. 56). • You cannot input pictures if you place the supplied CD-ROM in your camcorder and the Handycam Station. Troubleshooting (continued) You cannot input pictures. • You cannot input pictures while [DISP OUTPUT] is seeing on the computer. •...turn on the PLAY/EDIT lamp on your camcorder. • Disconnect the cable from the computer and camcorder, then connect it again securely. • Set the (USB) ON/OFF switch on the Handycam Station to ON. • Connect the Handycam Station to the camcorder securely. • Disconnect USB devices other ...
... set to [V-OUT/PANEL] (p. 56). • You cannot input pictures if you place the supplied CD-ROM in your camcorder and the Handycam Station. Troubleshooting (continued) You cannot input pictures. • You cannot input pictures while [DISP OUTPUT] is seeing on the computer. •...turn on the PLAY/EDIT lamp on your camcorder. • Disconnect the cable from the computer and camcorder, then connect it again securely. • Set the (USB) ON/OFF switch on the Handycam Station to ON. • Connect the Handycam Station to the camcorder securely. • Disconnect USB devices other ...
Operating Guide
Page 96
... Computer]. 2 Right-click [PICTUREPACKAGE] (Disc drive)*. * Drive names (such as (E:)) may cause a malfunction of your camcorder is connected to delete them , then click [Uninstall] to a computer. 2 Right-click [My Computer], then click [Properties]. Sony DSC] with a "?" Sony Handycam] or [? Troubleshooting (continued) For copying and viewing pictures recorded on a tape - [USB Audio Device] in the...
... Computer]. 2 Right-click [PICTUREPACKAGE] (Disc drive)*. * Drive names (such as (E:)) may cause a malfunction of your camcorder is connected to delete them , then click [Uninstall] to a computer. 2 Right-click [My Computer], then click [Properties]. Sony DSC] with a "?" Sony Handycam] or [? Troubleshooting (continued) For copying and viewing pictures recorded on a tape - [USB Audio Device] in the...


