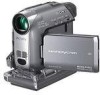
Operating Guide
Page 3
... equipment generates, uses, and can be used with Part 15 of the following measures: - If this equipment. Record the serial number in a residential installation. Continued 3 Increase the separation between the equipment and receiver. - Owner's Record The model and serial numbers are cautioned that any changes or modifications not expressly approved in this manual could void your Sony dealer regarding this device must accept...
... equipment generates, uses, and can be used with Part 15 of the following measures: - If this equipment. Record the serial number in a residential installation. Continued 3 Increase the separation between the equipment and receiver. - Owner's Record The model and serial numbers are cautioned that any changes or modifications not expressly approved in this manual could void your Sony dealer regarding this device must accept...
Operating Guide
Page 5
... -screen displays in Germany, and Sony Corporation, and produces superior images. Change the screen language before using a digital still camera, and therefore may appear different. • The on the model DCR-HC42. It adopts the MTF* measurement system for video cameras and offers a quality typical of light from a subject coming into the lens. 5 On this manual • The images of the LCD screen and the viewfinder used for illustrating the operating procedures...
... -screen displays in Germany, and Sony Corporation, and produces superior images. Change the screen language before using a digital still camera, and therefore may appear different. • The on the model DCR-HC42. It adopts the MTF* measurement system for video cameras and offers a quality typical of light from a subject coming into the lens. 5 On this manual • The images of the LCD screen and the viewfinder used for illustrating the operating procedures...
Operating Guide
Page 6
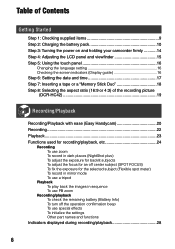
... 16 Changing the language setting 16 Checking the screen indicators (Display guide 16 Step 6: Setting the date and time 17 Step 7: Inserting a tape or a "Memory Stick Duo 18 Step 8: Selecting the aspect ratio (16:9 or 4:3) of the recording picture (DCR-HC42 19 Recording/Playback Recording/Playback with ease (Easy Handycam 20 Recording 22 Playback 23 Functions used for recording/playback, etc 24 Recording To use zoom To record in dark places (NightShot plus) To adjust the exposure for backlit subjects To adjust the focus for...
... 16 Changing the language setting 16 Checking the screen indicators (Display guide 16 Step 6: Setting the date and time 17 Step 7: Inserting a tape or a "Memory Stick Duo 18 Step 8: Selecting the aspect ratio (16:9 or 4:3) of the recording picture (DCR-HC42 19 Recording/Playback Recording/Playback with ease (Easy Handycam 20 Recording 22 Playback 23 Functions used for recording/playback, etc 24 Recording To use zoom To record in dark places (NightShot plus) To adjust the exposure for backlit subjects To adjust the focus for...
Operating Guide
Page 25
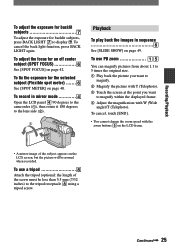
... normal when recorded. To use PB zoom You can magnify pictures from about 1.1 to 5 times the original size. Play back the picture you want to magnify. Magnify the picture with T (Telephoto). Touch the screen at the point you want to the lens side (). 2 1 Playback To play back the images in sequence See [SLIDE SHOW] on page 40. To adjust the focus for...
... normal when recorded. To use PB zoom You can magnify pictures from about 1.1 to 5 times the original size. Play back the picture you want to magnify. Magnify the picture with T (Telephoto). Touch the screen at the point you want to the lens side (). 2 1 Playback To play back the images in sequence See [SLIDE SHOW] on page 40. To adjust the focus for...
Operating Guide
Page 28
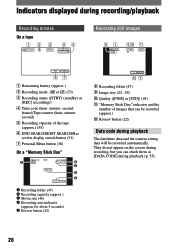
.../Rec review display switch button (31) Personal Menu button (36) On a "Memory Stick Duo" A B C D E Recording folder (47) Recording capacity (approx.) Movie size (46) Recording start indicator (appears for about 5 seconds) Review button (22) P-MENU qs 7 Recording folder (47) Image size (22 , 45) Quality ([FINE] or [STD]) (45) "Memory Stick Duo" indicator and the number of images that can check them as [DATA CODE] during playback The date/time data and the camera setting data...
.../Rec review display switch button (31) Personal Menu button (36) On a "Memory Stick Duo" A B C D E Recording folder (47) Recording capacity (approx.) Movie size (46) Recording start indicator (appears for about 5 seconds) Review button (22) P-MENU qs 7 Recording folder (47) Image size (22 , 45) Quality ([FINE] or [STD]) (45) "Memory Stick Duo" indicator and the number of images that can check them as [DATA CODE] during playback The date/time data and the camera setting data...
Operating Guide
Page 43
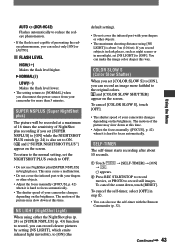
...; Adjust the focus manually ([FOCUS], p. 42) when it is hard to focus automatically. • The shutter speed of your camcorder changes depending on the brightness. The motion of the picture may slow down at this way. Continued 43 Using the Menu To return to the normal setting, set the NIGHTSHOT PLUS switch to OFF. • Do not use the self-timer with your camcorder for more faithful to record still images. COLOR SLOW S (Color Slow Shutter...
...; Adjust the focus manually ([FOCUS], p. 42) when it is hard to focus automatically. • The shutter speed of your camcorder changes depending on the brightness. The motion of the picture may slow down at this way. Continued 43 Using the Menu To return to the normal setting, set the NIGHTSHOT PLUS switch to OFF. • Do not use the self-timer with your camcorder for more faithful to record still images. COLOR SLOW S (Color Slow Shutter...
Operating Guide
Page 50
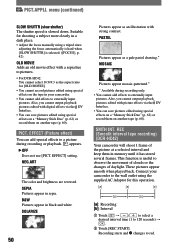
.... Connect your camcorder. • You cannot add effects to pictures. • For DCR-HC42: You cannot select 16:9/4:3 as a pale pastel drawing.* MOSAIC Pictures appear mosaic-patterned.* * Available during recording or playback. Suitable for shooting a subject more clearly in memory until it has stored several frames. NEG.ART The color and brightness are reversed. PICT.APPLI. menu (continued) SLOW SHUTTR (slow shutter) The shutter speed is selected. ([FOCUS...
.... Connect your camcorder. • You cannot add effects to pictures. • For DCR-HC42: You cannot select 16:9/4:3 as a pale pastel drawing.* MOSAIC Pictures appear mosaic-patterned.* * Available during recording or playback. Suitable for shooting a subject more clearly in memory until it has stored several frames. NEG.ART The color and brightness are reversed. PICT.APPLI. menu (continued) SLOW SHUTTR (slow shutter) The shutter speed is selected. ([FOCUS...
Operating Guide
Page 53
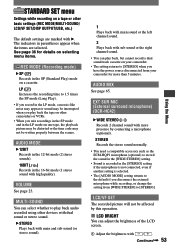
... mode on one tape, the playback picture may be distorted or the time code may be interrupted when you mix recordings in the SP mode and in parentheses appear when the items are marked with high quality). EXT SUR MIC (External surround microphone) (DCR-HC42) WIDE STEREO ( ) Records 2 channel sound with more presence by this operation. LCD BRIGHT You can adjust the brightness of the LCD screen. Adjust...
... mode on one tape, the playback picture may be distorted or the time code may be interrupted when you mix recordings in the SP mode and in parentheses appear when the items are marked with high quality). EXT SUR MIC (External surround microphone) (DCR-HC42) WIDE STEREO ( ) Records 2 channel sound with more presence by this operation. LCD BRIGHT You can adjust the brightness of the LCD screen. Adjust...
Operating Guide
Page 55
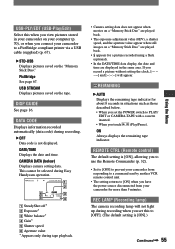
... set the POWER switch to PLAY/ EDIT or CAMERA-TAPE with a cassette inserted. • When you connect your camcorder for a picture recorded using a flash (optional). • In the DATE/TIME data display, the date and time are displayed in the same area. CAMERA DATA (below . • When you set this when you have the power source disconnected from your camcorder to a PictBridge compliant printer via a USB cable (supplied) (p. 67). STD-USB Displays pictures saved on the tape. DATE/TIME Displays the date and time...
... set the POWER switch to PLAY/ EDIT or CAMERA-TAPE with a cassette inserted. • When you connect your camcorder for a picture recorded using a flash (optional). • In the DATE/TIME data display, the date and time are displayed in the same area. CAMERA DATA (below . • When you set this when you have the power source disconnected from your camcorder to a PictBridge compliant printer via a USB cable (supplied) (p. 67). STD-USB Displays pictures saved on the tape. DATE/TIME Displays the date and time...
Operating Guide
Page 60
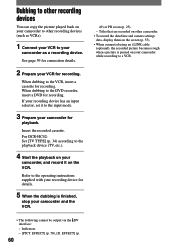
... recording. Insert the recorded cassette. Indicators - [PICT. If your recording device has an input selector, set it on your camcorder to other camcorder. • To record the date/time and camera settings data, display them on the screen (p. 55). • When connected using an i.LINK cable (optional), the recorded picture becomes rough when a picture is paused on your camcorder while recording to the operating instructions supplied with your recording device for details. 5 When the dubbing is finished, stop your VCR for connection...
... recording. Insert the recorded cassette. Indicators - [PICT. If your recording device has an input selector, set it on your camcorder to other camcorder. • To record the date/time and camera settings data, display them on the screen (p. 55). • When connected using an i.LINK cable (optional), the recorded picture becomes rough when a picture is paused on your camcorder while recording to the operating instructions supplied with your recording device for details. 5 When the dubbing is finished, stop your VCR for connection...
Operating Guide
Page 63
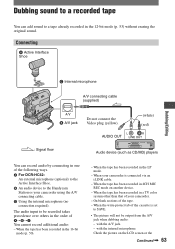
... audio input to a tape already recorded in the 16-bit mode (p. 50). - Connecting Active Interface Shoe Dubbing/Editing Internal microphone A/V connecting cable (supplied) A/V jack Do not connect the Video plug (yellow). When the tape has been recorded in 4CH MIC REC mode on the LCD screen or the Continued 63 Check the picture on another device. - When the tape has been recorded in the 12-bit mode (p. 53) without erasing the original sound. AUDIO OUT (white) (red...
... audio input to a tape already recorded in the 16-bit mode (p. 50). - Connecting Active Interface Shoe Dubbing/Editing Internal microphone A/V connecting cable (supplied) A/V jack Do not connect the Video plug (yellow). When the tape has been recorded in 4CH MIC REC mode on the LCD screen or the Continued 63 Check the picture on another device. - When the tape has been recorded in the 12-bit mode (p. 53) without erasing the original sound. AUDIO OUT (white) (red...
Operating Guide
Page 69
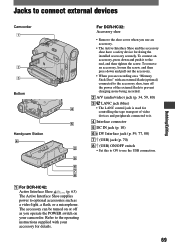
... shoe, turn off as a video light, a flash, or a microphone. To connect an accessory, press down and pull out the accessory. • When you are recording on a "Memory Stick Duo" with your camcorder. Jacks to connect external devices Dubbing/Editing Camcorder 1 2 3 Bottom 4 5 Handycam Station 4 2 5 6 7 8 For DCR-HC42: Active Interface Shoe (p. 63) The Active Interface Shoe supplies power to optional accessories such as you operate the POWER switch on your...
... shoe, turn off as a video light, a flash, or a microphone. To connect an accessory, press down and pull out the accessory. • When you are recording on a "Memory Stick Duo" with your camcorder. Jacks to connect external devices Dubbing/Editing Camcorder 1 2 3 Bottom 4 5 Handycam Station 4 2 5 6 7 8 For DCR-HC42: Active Interface Shoe (p. 63) The Active Interface Shoe supplies power to optional accessories such as you operate the POWER switch on your...
Operating Guide
Page 76
... "Music Contents") are the copyrighted work of the respective owners thereof and are not permitted to use (including, without limitation, copying, modifying, reproducing, uploading, transmitting or placing to the external network accessible to the public, transferring, distributing, lending, licensing, selling and publishing) any license or right to use the Music Contents. To view the PDF, Adobe Reader is recommended. Double-click...
... "Music Contents") are the copyrighted work of the respective owners thereof and are not permitted to use (including, without limitation, copying, modifying, reproducing, uploading, transmitting or placing to the external network accessible to the public, transferring, distributing, lending, licensing, selling and publishing) any license or right to use the Music Contents. To view the PDF, Adobe Reader is recommended. Double-click...
Operating Guide
Page 80
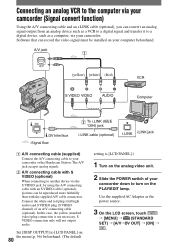
... your camcorder. Connect the white and red plugs (left/right audio) and S VIDEO plug (S VIDEO channel) of your computer beforehand. S VIDEO connection only will not output audio. Software that can record the video signal must be reproduced more faithfully than with an S VIDEO cable (optional), pictures can convert an analog signal output from an analog device such as a VCR to a digital signal and transfer it to a digital device, such as the power source. 3 On the LCD screen, touch [MENU...
... your camcorder. Connect the white and red plugs (left/right audio) and S VIDEO plug (S VIDEO channel) of your computer beforehand. S VIDEO connection only will not output audio. Software that can record the video signal must be reproduced more faithfully than with an S VIDEO cable (optional), pictures can convert an analog signal output from an analog device such as a VCR to a digital signal and transfer it to a digital device, such as the power source. 3 On the LCD screen, touch [MENU...

Operating Guide
Page 90
... displayed pictures are using an S VIDEO plug, make sure the red and white plugs of the tape. The sound breaks off. • Clean the head using the cleaning cassette (optional) (p. 112). Noises appear and is displayed on the screen. • The tape was recorded on the screen. • The tape you are playing was recorded in the beginning or middle of the A/V connecting cable are playing was recorded without setting the date and time. • A blank section on the tape is displayed...
... displayed pictures are using an S VIDEO plug, make sure the red and white plugs of the tape. The sound breaks off. • Clean the head using the cleaning cassette (optional) (p. 112). Noises appear and is displayed on the screen. • The tape was recorded on the screen. • The tape you are playing was recorded in the beginning or middle of the A/V connecting cable are playing was recorded without setting the date and time. • A blank section on the tape is displayed...
Operating Guide
Page 95
... Properties] screen appears. 3 Click the [Device Manager] tab. 4 If the devices below to install the USB driver correctly. For Windows 98/Windows 98SE/Windows Me When copying or playing the pictures on a tape using a computer, the operation is connected to the computer with an i.LINK cable (optional) and use an i.LINK cable. To copy recordings from the computer. • Slide the POWER switch down to turn on the PLAY/EDIT lamp on your camcorder, set [USB-PLY...
... Properties] screen appears. 3 Click the [Device Manager] tab. 4 If the devices below to install the USB driver correctly. For Windows 98/Windows 98SE/Windows Me When copying or playing the pictures on a tape using a computer, the operation is connected to the computer with an i.LINK cable (optional) and use an i.LINK cable. To copy recordings from the computer. • Slide the POWER switch down to turn on the PLAY/EDIT lamp on your camcorder, set [USB-PLY...
Operating Guide
Page 96
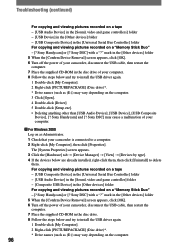
... Device Removal] screen appears, click [OK]. 6 Turn off the power of your camcorder, disconnect the USB cable, then restart the computer. 7 Place the supplied CD-ROM in the disc drive of your computer. For Windows 2000 Log on as (E:)) may vary depending on a "Memory Stick Duo" - [? Troubleshooting (continued) For copying and viewing pictures recorded on a tape - [USB Audio Device] in the [Sound, video and game controllers] folder - [USB Device] in the [Other devices] folder - [USB Composite Device] in the [Universal Serial...
... Device Removal] screen appears, click [OK]. 6 Turn off the power of your camcorder, disconnect the USB cable, then restart the computer. 7 Place the supplied CD-ROM in the disc drive of your computer. For Windows 2000 Log on as (E:)) may vary depending on a "Memory Stick Duo" - [? Troubleshooting (continued) For copying and viewing pictures recorded on a tape - [USB Audio Device] in the [Sound, video and game controllers] folder - [USB Device] in the [Other devices] folder - [USB Composite Device] in the [Universal Serial...
Operating Guide
Page 97
... [Universal Serial Bus Controller] folder - [USB Audio Device] in the [Sound, video and game controller] folder - [USB Device] in the disc drive of your computer. 9 Follow the steps below are already installed, right-click them, then click [Uninstall] to the Windows computer. • Display pictures recorded on a "Memory Stick Duo" - [? mark in the [Other devices] folder 6 When the [Confirm Device Removal] screen appears, click [OK]. 7 Turn off the power of your camcorder, disconnect the USB cable...
... [Universal Serial Bus Controller] folder - [USB Audio Device] in the [Sound, video and game controller] folder - [USB Device] in the disc drive of your computer. 9 Follow the steps below are already installed, right-click them, then click [Uninstall] to the Windows computer. • Display pictures recorded on a "Memory Stick Duo" - [? mark in the [Other devices] folder 6 When the [Confirm Device Removal] screen appears, click [OK]. 7 Turn off the power of your camcorder, disconnect the USB cable...
Operating Guide
Page 106
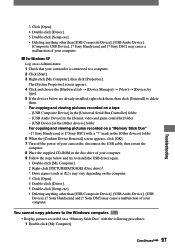
...-plated connector Generally, clean the gold-plated connector on use mini DV format cassettes only. The cassette should then be indicated correctly. Notes on a cassette with the mark. Do not put in its case, and stored in another video camera connected to your camcorder. When you record You cannot record software on your camcorder that contains copyright control signals for a long time Remove the cassette and store it...
...-plated connector Generally, clean the gold-plated connector on use mini DV format cassettes only. The cassette should then be indicated correctly. Notes on a cassette with the mark. Do not put in its case, and stored in another video camera connected to your camcorder. When you record You cannot record software on your camcorder that contains copyright control signals for a long time Remove the cassette and store it...
Operating Guide
Page 121
... Battery Recording 22 Recording capacity 28 Cassette 28 Memory Stick 28 Recording time 12, 46 REC CTRL (Recording control 61 REC FOLDER (Recording folder 47 REC LAMP 55 REC lamp (Recording lamp 26 REC MODE (Recording mode 53 Rec review 31 REC START/STOP 22 REMAINING 55 Remaining battery 28 Remote Commander 32 REMOTE CTRL (Remote control 55 Remote sensor 26 RESET button 26 Reversal Playback 52 Review button 28 S Searching for the starting point 31 Self-diagnosis display ........ 100 SELF-TIMER 43 SEPIA 50 Setting the date...
... Battery Recording 22 Recording capacity 28 Cassette 28 Memory Stick 28 Recording time 12, 46 REC CTRL (Recording control 61 REC FOLDER (Recording folder 47 REC LAMP 55 REC lamp (Recording lamp 26 REC MODE (Recording mode 53 Rec review 31 REC START/STOP 22 REMAINING 55 Remaining battery 28 Remote Commander 32 REMOTE CTRL (Remote control 55 Remote sensor 26 RESET button 26 Reversal Playback 52 Review button 28 S Searching for the starting point 31 Self-diagnosis display ........ 100 SELF-TIMER 43 SEPIA 50 Setting the date...


