Operating Guide
Page 2
You can help preserve our environment by returning your used rechargeable batteries to discontinue midway (fail), restart the application or disconnect and connect the communication cable (USB, etc.) again. Battery pack This device complies with Canadian ICES-003. 2 Notice If static electricity or electromagnetism causes data transfer to the collection and ...
You can help preserve our environment by returning your used rechargeable batteries to discontinue midway (fail), restart the application or disconnect and connect the communication cable (USB, etc.) again. Battery pack This device complies with Canadian ICES-003. 2 Notice If static electricity or electromagnetism causes data transfer to the collection and ...
Operating Guide
Page 3
...of Conformity Trade Name: SONY Model No.: DCR-HC32 Responsible Party: Sony Electronics Inc. Increase the separation between the equipment and receiver. - The supplied interface cable must be used in the...customers in this manual could void your Sony dealer regarding this product. Telephone No.: 858-942-2230 This device complies with the Handycam Station Model DCRA-C121 and AC Adaptor... does cause harmful interference to Part 15 of Conformity Trade Name: SONY Model No.: DCR-HC42 Responsible Party: Sony Electronics Inc. Address: 16450 W. Operation is to be determined by...
...of Conformity Trade Name: SONY Model No.: DCR-HC32 Responsible Party: Sony Electronics Inc. Increase the separation between the equipment and receiver. - The supplied interface cable must be used in the...customers in this manual could void your Sony dealer regarding this product. Telephone No.: 858-942-2230 This device complies with the Handycam Station Model DCRA-C121 and AC Adaptor... does cause harmful interference to Part 15 of Conformity Trade Name: SONY Model No.: DCR-HC42 Responsible Party: Sony Electronics Inc. Address: 16450 W. Operation is to be determined by...
Operating Guide
Page 4
...such materials may be copyrighted. To view your camcorder to a malfunction of the sun only in the proper direction. If you insert the connector plug forcibly in color) that is grayed out is not possible due to another device with a USB or i.LINK cable, be damaged, or this first ...(continued) Notes on the supplied CDROM) On the types of recording media you can use in your camcorder • A mini DV cassette marked with (mini DV cassettes with Cassette ...
...such materials may be copyrighted. To view your camcorder to a malfunction of the sun only in the proper direction. If you insert the connector plug forcibly in color) that is grayed out is not possible due to another device with a USB or i.LINK cable, be damaged, or this first ...(continued) Notes on the supplied CDROM) On the types of recording media you can use in your camcorder • A mini DV cassette marked with (mini DV cassettes with Cassette ...
Operating Guide
Page 9
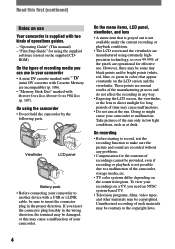
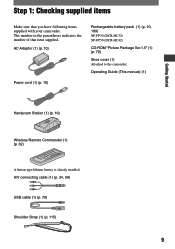
... Started Handycam Station (1) (p. 10) Wireless Remote Commander (1) (p. 32) A button-type lithium battery is already installed. Step 1: Checking supplied items Make sure that item supplied. AC Adaptor (1) (p. 10) Power cord (1) (p. 10) Rechargeable battery pack (1) (p. 10, 109) NP-FP30 (DCR-HC32) NP-FP50 (DCR-HC42) CD-ROM "Picture Package Ver.1.5" (1) (p. 70) Shoe cover (1) Attached to the camcorder...
... Started Handycam Station (1) (p. 10) Wireless Remote Commander (1) (p. 32) A button-type lithium battery is already installed. Step 1: Checking supplied items Make sure that item supplied. AC Adaptor (1) (p. 10) Power cord (1) (p. 10) Rechargeable battery pack (1) (p. 10, 109) NP-FP30 (DCR-HC32) NP-FP50 (DCR-HC42) CD-ROM "Picture Package Ver.1.5" (1) (p. 70) Shoe cover (1) Attached to the camcorder...

Operating Guide
Page 34
...will view pictures on. Slide the POWER switch down to turn on the VCR to the screen size of an A/V connecting cable (optional). For DCR-HC42: To set the aspect ratio according to the connected TV (16:9/4:3) Change the setting according to LINE. Connect the white and red ... according to the manual supplied with an S VIDEO cable (optional), pictures can be connected. In this case, the yellow (standard video) plug connection is connected to a VCR Connect your camcorder to the LINE IN input on a TV Connect your camcorder to [4:3], or when the picture's aspect ratio switches...
...will view pictures on. Slide the POWER switch down to turn on the VCR to the screen size of an A/V connecting cable (optional). For DCR-HC42: To set the aspect ratio according to the connected TV (16:9/4:3) Change the setting according to LINE. Connect the white and red ... according to the manual supplied with an S VIDEO cable (optional), pictures can be connected. In this case, the yellow (standard video) plug connection is connected to a VCR Connect your camcorder to the LINE IN input on a TV Connect your camcorder to [4:3], or when the picture's aspect ratio switches...
Operating Guide
Page 35
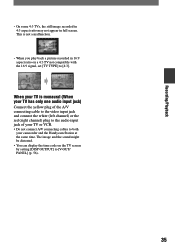
... white (left channel) or the red (right channel) plug to the audio input jack of your TV or VCR. • Do not connect A/V connecting cables to both your camcorder and the Handycam Station at the same time. When your TV is not a malfunction. • When you play back a picture recorded in full screen.
... white (left channel) or the red (right channel) plug to the audio input jack of your TV or VCR. • Do not connect A/V connecting cables to both your camcorder and the Handycam Station at the same time. When your TV is not a malfunction. • When you play back a picture recorded in full screen.
Operating Guide
Page 54
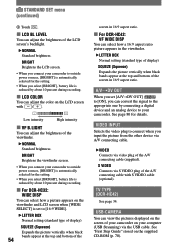
...cable with / . Low intensity High intensity VF B.LIGHT You can view the pictures displayed on the screen of your camcorder to outside power sources, [BRIGHT] is automatically selected for the setting. • When you set to outside power sources, [BRIGHT] is automatically selected for details. TV TYPE (DCR-HC42... 16:9 aspect ratio. For DCR-HC42: VF WIDE DISP You can adjust the brightness of the LCD screen's backlight. NORMAL Standard brightness. BRIGHT Brightens the LCD screen. • When you connect your camcorder on the supplied CD-ROM (p. 70)....
...cable with / . Low intensity High intensity VF B.LIGHT You can view the pictures displayed on the screen of your camcorder to outside power sources, [BRIGHT] is automatically selected for the setting. • When you set to outside power sources, [BRIGHT] is automatically selected for details. TV TYPE (DCR-HC42... 16:9 aspect ratio. For DCR-HC42: VF WIDE DISP You can adjust the brightness of the LCD screen's backlight. NORMAL Standard brightness. BRIGHT Brightens the LCD screen. • When you connect your camcorder on the supplied CD-ROM (p. 70)....
Operating Guide
Page 55
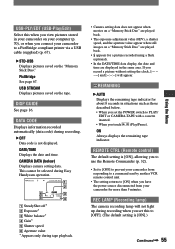
...to PLAY/ EDIT or CAMERA-TAPE with a cassette inserted. • When you connect your camcorder to [OFF]. (The default setting is [ON].) Continued 55 Using the Menu...USB-PLY/EDT (USB-Play/Edit) Select this to a PictBridge compliant printer via a USB cable (supplied) (p. 67). STD-USB Displays pictures saved on your computer (p. 70), ...or when you touch (Play/Pause). This cannot be selected during Easy Handycam operation. 6 0 min 1 0 : 0 0 : 0 0 : 0 0 2 6 5 AUTO 100 AWB F1. 8 9 dB 3 4 &#...
...to PLAY/ EDIT or CAMERA-TAPE with a cassette inserted. • When you connect your camcorder to [OFF]. (The default setting is [ON].) Continued 55 Using the Menu...USB-PLY/EDT (USB-Play/Edit) Select this to a PictBridge compliant printer via a USB cable (supplied) (p. 67). STD-USB Displays pictures saved on your computer (p. 70), ...or when you touch (Play/Pause). This cannot be selected during Easy Handycam operation. 6 0 min 1 0 : 0 0 : 0 0 : 0 0 2 6 5 AUTO 100 AWB F1. 8 9 dB 3 4 &#...
Operating Guide
Page 59
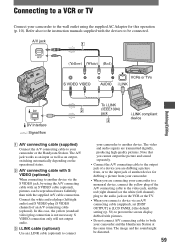
Connecting to a VCR or TV Connect your camcorder or the Handycam Station. Connect the white and red plugs (left/right audio) and S VIDEO plug (S VIDEO channel) of the A/V connecting cable to the video jack, and the red (right channel) or the white (left channel) plug to ...DV Interface : Signal flow To i.LINK 2 (IEEE1394) jack i.LINK compliant 3 device A/V connecting cable (supplied) Connect the A/V connecting cable to your camcorder to both your camcorder and the Handycam Station at the same time. In this operation (p. 10). The A/V jack works as an input as well as...
Connecting to a VCR or TV Connect your camcorder or the Handycam Station. Connect the white and red plugs (left/right audio) and S VIDEO plug (S VIDEO channel) of the A/V connecting cable to the video jack, and the red (right channel) or the white (left channel) plug to ...DV Interface : Signal flow To i.LINK 2 (IEEE1394) jack i.LINK compliant 3 device A/V connecting cable (supplied) Connect the A/V connecting cable to your camcorder to both your camcorder and the Handycam Station at the same time. In this operation (p. 10). The A/V jack works as an input as well as...
Operating Guide
Page 60
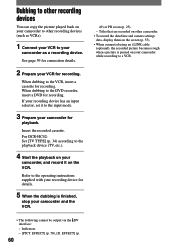
...cassette for recording. For DCR-HC42: Set [TV TYPE] (p. 34) according to the playback device (TV, etc.). 4 Start the playback on your camcorder for playback. Refer to the operating instructions supplied with your recording device for details. 5 When the dubbing is paused on your camcorder and the VCR. ... devices You can copy the picture played back on your camcorder to other camcorder. • To record the date/time and camera settings data, display them on the screen (p. 55). • When connected using an i.LINK cable (optional), the recorded picture becomes rough when a picture ...
...cassette for recording. For DCR-HC42: Set [TV TYPE] (p. 34) according to the playback device (TV, etc.). 4 Start the playback on your camcorder for playback. Refer to the operating instructions supplied with your recording device for details. 5 When the dubbing is paused on your camcorder and the VCR. ... devices You can copy the picture played back on your camcorder to other camcorder. • To record the date/time and camera settings data, display them on the screen (p. 55). • When connected using an i.LINK cable (optional), the recorded picture becomes rough when a picture ...
Operating Guide
Page 61
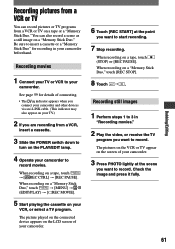
...program. The pictures on the VCR or TV appear on the screen of connecting. • The indicator appears when you connect your camcorder and other devices via an i.LINK cable. (This indicator may also appear on your TV.) 2 If you want to record movies. When recording on a tape or a ..."Memory Stick Duo." Recording movies 1 Connect your TV or VCR to turn on your camcorder. Be sure to insert a cassette or a "Memory Stick ...
...program. The pictures on the VCR or TV appear on the screen of connecting. • The indicator appears when you connect your camcorder and other devices via an i.LINK cable. (This indicator may also appear on your TV.) 2 If you want to record movies. When recording on a tape or a ..."Memory Stick Duo." Recording movies 1 Connect your TV or VCR to turn on your camcorder. Be sure to insert a cassette or a "Memory Stick ...
Operating Guide
Page 63
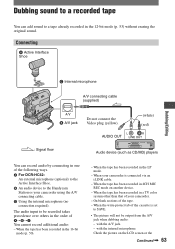
... system other than that of the following ways. For DCR-HC42: An external microphone (optional) to the Active Interface Shoe. An audio device to a tape already recorded in one of your camcorder using the A/V connecting cable. Using the internal microphone (no connection required). Dubbing...AUDIO OUT (white) (red) : Signal flow Audio device (such as CD/MD) players You can add sound to the Handycam Station or your camcorder. - When the write-protect tab of the tape. - with the A/V jack. - On blank sections of the cassette is connected ...
... system other than that of the following ways. For DCR-HC42: An external microphone (optional) to the Active Interface Shoe. An audio device to a tape already recorded in one of your camcorder using the A/V connecting cable. Using the internal microphone (no connection required). Dubbing...AUDIO OUT (white) (red) : Signal flow Audio device (such as CD/MD) players You can add sound to the Handycam Station or your camcorder. - When the write-protect tab of the tape. - with the A/V jack. - On blank sections of the cassette is connected ...

Operating Guide
Page 64
However, sound you are recording afterwards is not output from your camcorder beforehand. 1 Slide the POWER switch down to turn on other device. • Do not connect A/V connecting cables to both your camcorder to a TV using a TV or other scenes, repeat step 2 to select scenes, then touch [AUDIO DUB]....a recorded tape (continued) viewfinder. • For DCR-HC42: When you attach an external microphone (optional) to the Active Interface Shoe, you can check the picture and the sound by connecting your camcorder and the Handycam Station at the same time. The sound may be distorted....
However, sound you are recording afterwards is not output from your camcorder beforehand. 1 Slide the POWER switch down to turn on other device. • Do not connect A/V connecting cables to both your camcorder to a TV using a TV or other scenes, repeat step 2 to select scenes, then touch [AUDIO DUB]....a recorded tape (continued) viewfinder. • For DCR-HC42: When you attach an external microphone (optional) to the Active Interface Shoe, you can check the picture and the sound by connecting your camcorder and the Handycam Station at the same time. The sound may be distorted....
Operating Guide
Page 67
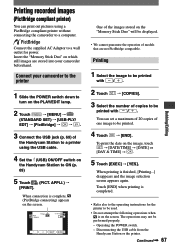
... [MENU] (STANDARD SET) [USB-PLY/ EDT] [PictBridge] . 3 Connect the USB jack (p. 69) of the Handycam Station to a printer using a PictBridge compliant printer without connecting the camcorder to a wall outlet for the printer to ON (p. 69) 5 Touch (PICT. APPLI.) [PRINT]. The operations may not be performed...printed with / . 2 Touch [COPIES]. 3 Select the number of copies to be printed. 4 Touch [END]. Operating the POWER switch. - Disconnecting the USB cable from the Handycam Station or the printer.
... [MENU] (STANDARD SET) [USB-PLY/ EDT] [PictBridge] . 3 Connect the USB jack (p. 69) of the Handycam Station to a printer using a PictBridge compliant printer without connecting the camcorder to a wall outlet for the printer to ON (p. 69) 5 Touch (PICT. APPLI.) [PRINT]. The operations may not be performed...printed with / . 2 Touch [COPIES]. 3 Select the number of copies to be printed. 4 Touch [END]. Operating the POWER switch. - Disconnecting the USB cable from the Handycam Station or the printer.
Operating Guide
Page 68
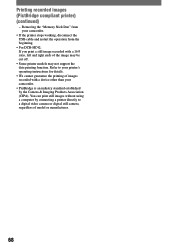
... standard established by the Camera & Imaging Products Association (CIPA). Removing the "Memory Stick Duo" from your camcorder. • If the printer stops working, disconnect the USB cable and restart the operation from the beginning. • For DCR-HC42: If you print a still image recorded with a 16:9 ratio, left and right ends of images recorded...
... standard established by the Camera & Imaging Products Association (CIPA). Removing the "Memory Stick Duo" from your camcorder. • If the printer stops working, disconnect the USB cable and restart the operation from the beginning. • For DCR-HC42: If you print a still image recorded with a 16:9 ratio, left and right ends of images recorded...

Operating Guide
Page 70
...64257;les to a computer. Video Capturing Tool You can view the picture your camcorder to create a video CD. Image data is good for Windows computers. For details on a computer. ImageMixer VCD2 - i.LINK cable (only for Windows user) This method is compatible with added music and visual styles... using pictures recorded on a tape. Copying tape to Video CD You can view the pictures copied from your camcorder by date. • The CD-ROM ...
...64257;les to a computer. Video Capturing Tool You can view the picture your camcorder to create a video CD. Image data is good for Windows computers. For details on a computer. ImageMixer VCD2 - i.LINK cable (only for Windows user) This method is compatible with added music and visual styles... using pictures recorded on a tape. Copying tape to Video CD You can view the pictures copied from your camcorder by date. • The CD-ROM ...
Operating Guide
Page 71
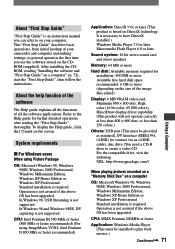
...: Microsoft Windows 98, Windows 98SE, Windows 2000 Professional, Windows Millennium Edition, Windows XP Home Edition or Windows XP Professional Standard installation is based on your camcorder and computer and making settings, to general operation the first time you can refer to create a video CD. Operation is required. This "First Step...; 600 dots, or less than 256 colors.) Others: USB port (This must be provided as standard), DV Interface (IEEE1394, i.LINK) (to connect via an i.LINK cable), disc drive (You need a CD-R drive to on DirectX technology.
...: Microsoft Windows 98, Windows 98SE, Windows 2000 Professional, Windows Millennium Edition, Windows XP Home Edition or Windows XP Professional Standard installation is based on your camcorder and computer and making settings, to general operation the first time you can refer to create a video CD. Operation is required. This "First Step...; 600 dots, or less than 256 colors.) Others: USB port (This must be provided as standard), DV Interface (IEEE1394, i.LINK) (to connect via an i.LINK cable), disc drive (You need a CD-R drive to on DirectX technology.
Operating Guide
Page 72
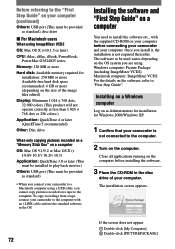
... Step Guide" on your computer (continued) Others: USB port (This must be used varies depending on the computer before connecting your camcorder and your camcorder to the computer. Windows computer: Picture Package (including ImageMixer VCD2) Macintosh computer: ImageMixer VCD2 For the details on the software, refer...Close all applications running on the OS system you install it, the installation is not connected to install the software etc., with an i.LINK cable and use the standard software in the disc drive of the image files edited) Display: Minimum 1 024 × 768 dots,...
... Step Guide" on your computer (continued) Others: USB port (This must be used varies depending on the computer before connecting your camcorder and your camcorder to the computer. Windows computer: Picture Package (including ImageMixer VCD2) Macintosh computer: ImageMixer VCD2 For the details on the software, refer...Close all applications running on the OS system you install it, the installation is not connected to install the software etc., with an i.LINK cable and use the standard software in the disc drive of the image files edited) Display: Minimum 1 024 × 768 dots,...
Operating Guide
Page 77
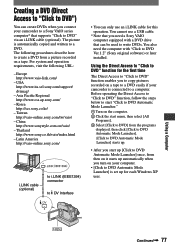
... Continued 77 USA http://www.ita.sel.sony.com/support/ dvimag/ - China http://www.sonystyle.com.cn/vaio/ - You also need a Sony VAIO computer equipped with a DVD drive that can create DVDs when you connect your camcorder to a Sony VAIO series computer* that you start up [Click to... you need the computer with "Click to DVD" via an i.LINK cable (optional). Creating a DVD (Direct Access to "Click to DVD") You can be used to write DVDs. Latin America http://vaio-online.sony.com/ i.LINK cable (optional) to i.LINK (IEEE1394) connector to DV Interface • You...
... Continued 77 USA http://www.ita.sel.sony.com/support/ dvimag/ - China http://www.sonystyle.com.cn/vaio/ - You also need a Sony VAIO computer equipped with a DVD drive that can create DVDs when you connect your camcorder to a Sony VAIO series computer* that you start up [Click to... you need the computer with "Click to DVD" via an i.LINK cable (optional). Creating a DVD (Direct Access to "Click to DVD") You can be used to write DVDs. Latin America http://vaio-online.sony.com/ i.LINK cable (optional) to i.LINK (IEEE1394) connector to DV Interface • You...
Operating Guide
Page 78
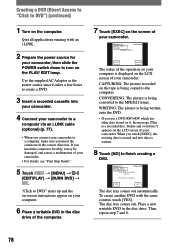
... DVD. • If you use a DVD-RW/+RW which has other data stored on it, the message [This is displayed on the screen of your camcorder. • For details, see "First Step Guide". 5 Touch [MENU] (EDIT/PLAY) [BURN DVD] . When... you insert the connector forcibly, it takes a few hours to create a DVD. 3 Insert a recorded cassette into your camcorder. 4 Connect your camcorder to a computer via an i.LINK cable (optional) (p. 77). • When you insert the connector in the disc drive. Place a new writable DVD in the correct direction...
... DVD. • If you use a DVD-RW/+RW which has other data stored on it, the message [This is displayed on the screen of your camcorder. • For details, see "First Step Guide". 5 Touch [MENU] (EDIT/PLAY) [BURN DVD] . When... you insert the connector forcibly, it takes a few hours to create a DVD. 3 Insert a recorded cassette into your camcorder. 4 Connect your camcorder to a computer via an i.LINK cable (optional) (p. 77). • When you insert the connector in the disc drive. Place a new writable DVD in the correct direction...


