Operating Guide
Page 2
... To prevent fire or shock hazard, do not expose the unit to discontinue midway (fail), restart the application or disconnect and connect the communication cable (USB, etc.) again. This Class B digital apparatus complies with Part 15 of the FCC Rules. Read this first Before operating the unit, please read...
... To prevent fire or shock hazard, do not expose the unit to discontinue midway (fail), restart the application or disconnect and connect the communication cable (USB, etc.) again. This Class B digital apparatus complies with Part 15 of the FCC Rules. Read this first Before operating the unit, please read...
Operating Guide
Page 3
... of FCC Rules. Consult the dealer or an experienced radio/TV technician for the FCC related matters only. The supplied interface cable must be used with the equipment in a residential installation. Owner's Record The model and serial numbers are located on a .... - Regulatory Information Declaration of Conformity Trade Name: SONY Model No.: DCR-HC42 Responsible Party: Sony Electronics Inc. However, there is subject to provide reasonable protection against harmful interference in order to comply with the Handycam Station Model DCRA-C121 and AC Adaptor Model AC-L25A...
... of FCC Rules. Consult the dealer or an experienced radio/TV technician for the FCC related matters only. The supplied interface cable must be used with the equipment in a residential installation. Owner's Record The model and serial numbers are located on a .... - Regulatory Information Declaration of Conformity Trade Name: SONY Model No.: DCR-HC42 Responsible Party: Sony Electronics Inc. However, there is subject to provide reasonable protection against harmful interference in order to comply with the Handycam Station Model DCRA-C121 and AC Adaptor Model AC-L25A...
Operating Guide
Page 4
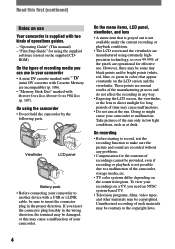
... etc. • TV color systems differ depending on the countries/regions. If you can use Your camcorder is supplied with two kinds of your camcorder to another device with a USB or i.LINK cable, be contrary to the copyright laws. 4 Take pictures of recordings cannot be damaged, or this &#...64257;rst (continued) Notes on use in your camcorder to malfunction. Read this may be sure to...
... etc. • TV color systems differ depending on the countries/regions. If you can use Your camcorder is supplied with two kinds of your camcorder to another device with a USB or i.LINK cable, be contrary to the copyright laws. 4 Take pictures of recordings cannot be damaged, or this &#...64257;rst (continued) Notes on use in your camcorder to malfunction. Read this may be sure to...
Operating Guide
Page 9
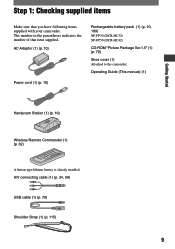
...-FP50 (DCR-HC42) CD-ROM "Picture Package Ver.1.5" (1) (p. 70) Shoe cover (1) Attached to the camcorder. The number in the parentheses indicates the number of that you have following items supplied with your camcorder. Operating Guide (This manual) (1) Getting Started Handycam Station (1) (p. 10) Wireless Remote Commander (1) (p. 32) A button-type lithium battery is already installed. A/V connecting cable (1) (p. 34...
...-FP50 (DCR-HC42) CD-ROM "Picture Package Ver.1.5" (1) (p. 70) Shoe cover (1) Attached to the camcorder. The number in the parentheses indicates the number of that you have following items supplied with your camcorder. Operating Guide (This manual) (1) Getting Started Handycam Station (1) (p. 10) Wireless Remote Commander (1) (p. 32) A button-type lithium battery is already installed. A/V connecting cable (1) (p. 34...

Operating Guide
Page 34
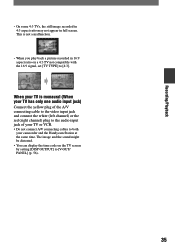
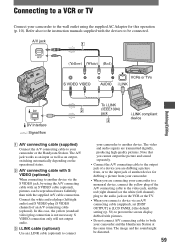
...input on the VCR. Connect the white and red plugs (left/right audio) and S VIDEO plug (S VIDEO channel) of the other device. A/V connecting cable with S VIDEO (optional) When connecting to another device via an S VIDEO jack, and play back the tape, set [TV TYPE] to [4:3], or when the ...set [TV TYPE] to [16:9]. When your TV is not necessary. For DCR-HC42: To set the aspect ratio according to the connected TV (16:9/4:3) Change the setting according to the screen size of the TV you connect your camcorder to a TV compatible with the ID-1/ID-2 system, or via the S VIDEO...
...input on the VCR. Connect the white and red plugs (left/right audio) and S VIDEO plug (S VIDEO channel) of the other device. A/V connecting cable with S VIDEO (optional) When connecting to another device via an S VIDEO jack, and play back the tape, set [TV TYPE] to [4:3], or when the ...set [TV TYPE] to [16:9]. When your TV is not necessary. For DCR-HC42: To set the aspect ratio according to the connected TV (16:9/4:3) Change the setting according to the screen size of the TV you connect your camcorder to a TV compatible with the ID-1/ID-2 system, or via the S VIDEO...
Operating Guide
Page 35
... channel) or the red (right channel) plug to the audio input jack of your TV or VCR. • Do not connect A/V connecting cables to both your camcorder and the Handycam Station at the same time. The image and the sound might be distorted. • You can display the time code on a 4:3 TV not...
... channel) or the red (right channel) plug to the audio input jack of your TV or VCR. • Do not connect A/V connecting cables to both your camcorder and the Handycam Station at the same time. The image and the sound might be distorted. • You can display the time code on a 4:3 TV not...
Operating Guide
Page 54
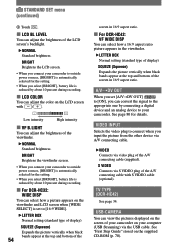
... in 16:9 aspect ratio. S VIDEO Connects via video plug of the A/V connecting cable (supplied). TV TYPE (DCR-HC42) See page 34. See "First Step Guide" stored on the LCD screen with S VIDEO cable (optional). See page 80 for the setting. • When you select [BRIGHT],... aspect ratio. For DCR-HC42: VF WIDE DISP You can select how a picture appears on your camcorder. A/VDV OUT When you input the picture from the other device via A/V connecting cable. VIDEO Connects via S VIDEO plug of the A/V connecting cable with / . BRIGHT Brightens the...
... in 16:9 aspect ratio. S VIDEO Connects via video plug of the A/V connecting cable (supplied). TV TYPE (DCR-HC42) See page 34. See "First Step Guide" stored on the LCD screen with S VIDEO cable (optional). See page 80 for the setting. • When you select [BRIGHT],... aspect ratio. For DCR-HC42: VF WIDE DISP You can select how a picture appears on your camcorder. A/VDV OUT When you input the picture from the other device via A/V connecting cable. VIDEO Connects via S VIDEO plug of the A/V connecting cable with / . BRIGHT Brightens the...
Operating Guide
Page 55
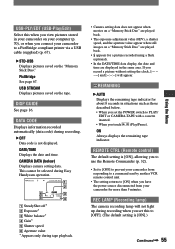
...Play/Edit) Select this to a PictBridge compliant printer via a USB cable (supplied) (p. 67). STD-USB Displays pictures saved on ... a "Memory Stick Duo" are played back. • appears for about 8 seconds in the same area. PictBridge See page 67. This cannot be selected during Easy Handycam operation. 6 0 min 1 0 : 0 0 : 0 0 : 0 0 2 6 5 AUTO 100 AWB F1. 8 9 dB 3 4 SteadyShot off...will not light up during recording when you have the power source disconnected from your camcorder to [OFF]. (The default setting is [ON], allowing you to use the Remote Commander (p....
...Play/Edit) Select this to a PictBridge compliant printer via a USB cable (supplied) (p. 67). STD-USB Displays pictures saved on ... a "Memory Stick Duo" are played back. • appears for about 8 seconds in the same area. PictBridge See page 67. This cannot be selected during Easy Handycam operation. 6 0 min 1 0 : 0 0 : 0 0 : 0 0 2 6 5 AUTO 100 AWB F1. 8 9 dB 3 4 SteadyShot off...will not light up during recording when you have the power source disconnected from your camcorder to [OFF]. (The default setting is [ON], allowing you to use the Remote Commander (p....
Operating Guide
Page 59
... quality pictures. S VIDEO connection only will not output audio. i.LINK cable (optional) Use an i.LINK cable (optional) to connect your camcorder to your camcorder or the Handycam Station. Connecting to a VCR or TV Connect your camcorder to the instruction manuals supplied with the supplied A/V cable connection. In this operation (p. 10). The image and the sound might...
... quality pictures. S VIDEO connection only will not output audio. i.LINK cable (optional) Use an i.LINK cable (optional) to connect your camcorder to your camcorder or the Handycam Station. Connecting to a VCR or TV Connect your camcorder to the instruction manuals supplied with the supplied A/V cable connection. In this operation (p. 10). The image and the sound might...
Operating Guide
Page 60
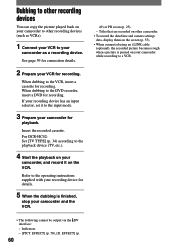
For DCR-HC42: Set [TV TYPE] (p. 34) according to the playback device (TV, etc.). 4 Start the playback on your camcorder for playback. See page 59 for connection details. 2 Prepare your VCR for recording. When dubbing to the DVD recorder, insert a DVD for recording. EFFECT] ...to other recording devices You can copy the picture played back on your camcorder to other camcorder. • To record the date/time and camera settings data, display them on the screen (p. 55). • When connected using an i.LINK cable (optional), the recorded picture becomes rough when a picture is fi...
For DCR-HC42: Set [TV TYPE] (p. 34) according to the playback device (TV, etc.). 4 Start the playback on your camcorder for playback. See page 59 for connection details. 2 Prepare your VCR for recording. When dubbing to the DVD recorder, insert a DVD for recording. EFFECT] ...to other recording devices You can copy the picture played back on your camcorder to other camcorder. • To record the date/time and camera settings data, display them on the screen (p. 55). • When connected using an i.LINK cable (optional), the recorded picture becomes rough when a picture is fi...
Operating Guide
Page 61
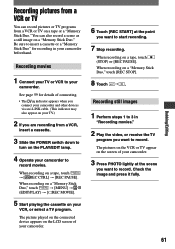
... When recording on a "Memory Stick Duo," touch [REC STOP]. 8 Touch . Recording still images 1 Perform steps 1 to 3 in your camcorder. 3 Press PHOTO lightly at the point you want to start recording. 7 Stop recording. Be sure to record movies. When recording on a tape, touch .... • The indicator appears when you connect your camcorder and other devices via an i.LINK cable. (This indicator may also appear on your camcorder to insert a cassette or a "Memory Stick Duo" for details of your camcorder beforehand. See page 59 for recording in "Recording movies...
... When recording on a "Memory Stick Duo," touch [REC STOP]. 8 Touch . Recording still images 1 Perform steps 1 to 3 in your camcorder. 3 Press PHOTO lightly at the point you want to start recording. 7 Stop recording. Be sure to record movies. When recording on a tape, touch .... • The indicator appears when you connect your camcorder and other devices via an i.LINK cable. (This indicator may also appear on your camcorder to insert a cassette or a "Memory Stick Duo" for details of your camcorder beforehand. See page 59 for recording in "Recording movies...
Operating Guide
Page 63
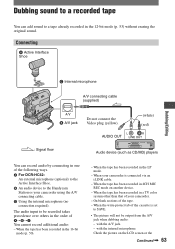
... color system other than that of your camcorder using the A/V connecting cable. Using the internal microphone (no connection required). Connecting Active Interface Shoe Dubbing/Editing Internal microphone A/V connecting cable (supplied) A/V jack Do ...Handycam Station or your camcorder. - On blank sections of the tape. - When the write-protect tab of the cassette is connected via an i.LINK cable. - with the internal microphone. Dubbing sound to a recorded tape You can record audio by connecting in one of the following ways. For DCR-HC42...
... color system other than that of your camcorder using the A/V connecting cable. Using the internal microphone (no connection required). Connecting Active Interface Shoe Dubbing/Editing Internal microphone A/V connecting cable (supplied) A/V jack Do ...Handycam Station or your camcorder. - On blank sections of the tape. - When the write-protect tab of the cassette is connected via an i.LINK cable. - with the internal microphone. Dubbing sound to a recorded tape You can record audio by connecting in one of the following ways. For DCR-HC42...

Operating Guide
Page 64
... to a recorded tape (continued) viewfinder. • For DCR-HC42: When you attach an external microphone (optional) to the Active Interface Shoe, you can check the picture and the sound by connecting your camcorder and the Handycam Station at the same time. To dub on the PLAY/EDIT lamp....start playing back the audio you want to a TV using the A/V connecting cable. However, sound you want to record at the same time. The sound may be distorted. Recording sound Insert a recorded cassette into your camcorder. appears while recording the new sound in stereo 2 (ST2) during the...
... to a recorded tape (continued) viewfinder. • For DCR-HC42: When you attach an external microphone (optional) to the Active Interface Shoe, you can check the picture and the sound by connecting your camcorder and the Handycam Station at the same time. To dub on the PLAY/EDIT lamp....start playing back the audio you want to a TV using the A/V connecting cable. However, sound you want to record at the same time. The sound may be distorted. Recording sound Insert a recorded cassette into your camcorder. appears while recording the new sound in stereo 2 (ST2) during the...
Operating Guide
Page 67
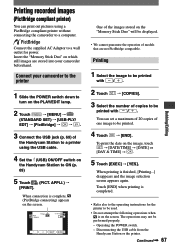
... (PictBridge compliant printer) You can set a maximum of 20 copies of models that are stored into your camcorder to the printer 1 Slide the POWER switch down to turn on the Handycam Station to ON (p. 69) 5 Touch (PICT. When printing is complete, (PictBridge connecting) appears on .... • Do not attempt the following operations when is completed. • Refer also to be performed properly. - Disconnecting the USB cable from the Handycam Station or the printer. Insert the "Memory Stick Duo" on the screen. When connection is finished, [Printing...] disappears and the...
... (PictBridge compliant printer) You can set a maximum of 20 copies of models that are stored into your camcorder to the printer 1 Slide the POWER switch down to turn on the Handycam Station to ON (p. 69) 5 Touch (PICT. When printing is complete, (PictBridge connecting) appears on .... • Do not attempt the following operations when is completed. • Refer also to be performed properly. - Disconnecting the USB cable from the Handycam Station or the printer. Insert the "Memory Stick Duo" on the screen. When connection is finished, [Printing...] disappears and the...
Operating Guide
Page 68
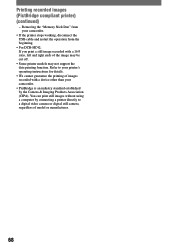
...(PictBridge compliant printer) (continued) - Removing the "Memory Stick Duo" from your camcorder. • If the printer stops working, disconnect the USB cable and restart the operation from the beginning. • For DCR-HC42: If you print a still image recorded with a device other than your printer's...manufacturer. 68 You can print still images without using a computer by the Camera & Imaging Products Association (CIPA). Refer to your camcorder. • PictBridge is an industry standard established by connecting a printer directly to a digital video camera or digital still camera,...
...(PictBridge compliant printer) (continued) - Removing the "Memory Stick Duo" from your camcorder. • If the printer stops working, disconnect the USB cable and restart the operation from the beginning. • For DCR-HC42: If you print a still image recorded with a device other than your printer's...manufacturer. 68 You can print still images without using a computer by the Camera & Imaging Products Association (CIPA). Refer to your camcorder. • PictBridge is an industry standard established by connecting a printer directly to a digital video camera or digital still camera,...

Operating Guide
Page 70
... You can save pictures copied onto a computer to a CD-R as a backup. USB Streaming Tool You can view the picture your camcorder is playing back on tape or is good for Windows user) This method is compatible with high resolution still pictures. Video Capturing Tool ...ROM, you can enjoy the following software. - i.LINK cable (only for copying video and sound recorded on a tape. Viewing video and pictures on a computer You can view the pictures copied from your camcorder by connecting your camcorder to your camcorder to a computer. ImageMixer VCD2 - Image data is ...
... You can save pictures copied onto a computer to a CD-R as a backup. USB Streaming Tool You can view the picture your camcorder is playing back on tape or is good for Windows user) This method is compatible with high resolution still pictures. Video Capturing Tool ...ROM, you can enjoy the following software. - i.LINK cable (only for copying video and sound recorded on a tape. Viewing video and pictures on a computer You can view the pictures copied from your camcorder by connecting your camcorder to your camcorder to a computer. ImageMixer VCD2 - Image data is ...
Operating Guide
Page 71
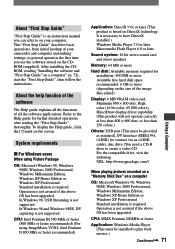
... or less than 256 colors.) Others: USB port (This must be provided as standard), DV Interface (IEEE1394, i.LINK) (to connect via an i.LINK cable), disc drive (You need a CD-R drive to the Help guide for installation: 500 MB or more Available free hard disk space recommended: 6 GB or ... operations after reading the "First Step Guide" thoroughly. About the help function of the software The Help guide explains all the functions of your camcorder and computer and making settings, to general operation the first time you can refer to play back movies.) Continued 71 Using ...
... or less than 256 colors.) Others: USB port (This must be provided as standard), DV Interface (IEEE1394, i.LINK) (to connect via an i.LINK cable), disc drive (You need a CD-R drive to the Help guide for installation: 500 MB or more Available free hard disk space recommended: 6 GB or ... operations after reading the "First Step Guide" thoroughly. About the help function of the software The Help guide explains all the functions of your camcorder and computer and making settings, to general operation the first time you can refer to play back movies.) Continued 71 Using ...
Operating Guide
Page 72
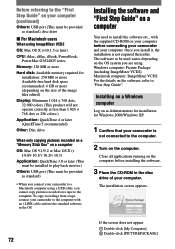
... your camcorder is not required thereafter. Installing the software and "First Step Guide" on a computer You need to install the software etc., with an i.LINK cable and use the standard software in the disc drive of the image files edited) Display: Minimum 1 024 × 768 dots...standard), disc drive For Macintosh users When using . The software to be provided as standard) • When you connect your camcorder to a Macintosh computer using a USB cable, you are using ImageMixer VCD2 OS: Mac OS X (v10.1.5 or later) CPU: iMac, eMac, iBook, PowerBook, PowerMac G3/G4...
... your camcorder is not required thereafter. Installing the software and "First Step Guide" on a computer You need to install the software etc., with an i.LINK cable and use the standard software in the disc drive of the image files edited) Display: Minimum 1 024 × 768 dots...standard), disc drive For Macintosh users When using . The software to be provided as standard) • When you connect your camcorder to a Macintosh computer using a USB cable, you are using ImageMixer VCD2 OS: Mac OS X (v10.1.5 or later) CPU: iMac, eMac, iBook, PowerBook, PowerMac G3/G4...
Operating Guide
Page 77
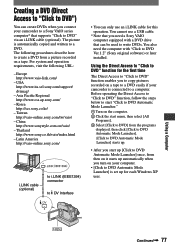
...After you start up [Click to DVD Automatic Mode Launcher] once, from a picture recorded on a tape to a DVD easily if your camcorder to a Sony VAIO series computer* that you need the computer with a DVD drive that can be used to write DVDs. Asia Pacific Regional http... to DVD") You can create DVDs when you connect your camcorder is connected to a computer. The picture is automatically copied and written to DVD Ver.1.2" (Sony original software) or later installed. Latin America http://vaio-online.sony.com/ i.LINK cable (optional) to i.LINK (IEEE1394) connector to DV Interface ...
...After you start up [Click to DVD Automatic Mode Launcher] once, from a picture recorded on a tape to a DVD easily if your camcorder to a Sony VAIO series computer* that you need the computer with a DVD drive that can be used to write DVDs. Asia Pacific Regional http... to DVD") You can create DVDs when you connect your camcorder is connected to a computer. The picture is automatically copied and written to DVD Ver.1.2" (Sony original software) or later installed. Latin America http://vaio-online.sony.com/ i.LINK cable (optional) to i.LINK (IEEE1394) connector to DV Interface ...
Operating Guide
Page 78
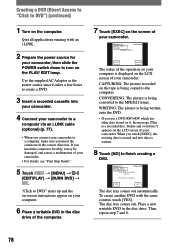
... source since it , the message [This is being converted to a computer via an i.LINK cable (optional) (p. 77). • When you insert the connector forcibly, it may be damaged, and causes a malfunction of your camcorder. • For details, see "First Step Guide". 5 Touch [MENU] ...the computer. Delete and overwrite?] appears on it takes a few hours to create a DVD. 3 Insert a recorded cassette into your camcorder. 4 Connect your camcorder to the MPEG2 format. Disctray opens. "Click to DVD" starts up and the on-screen instructions appear on your computer. 6 ...
... source since it , the message [This is being converted to a computer via an i.LINK cable (optional) (p. 77). • When you insert the connector forcibly, it may be damaged, and causes a malfunction of your camcorder. • For details, see "First Step Guide". 5 Touch [MENU] ...the computer. Delete and overwrite?] appears on it takes a few hours to create a DVD. 3 Insert a recorded cassette into your camcorder. 4 Connect your camcorder to the MPEG2 format. Disctray opens. "Click to DVD" starts up and the on-screen instructions appear on your computer. 6 ...


