Operating Guide
Page 2
... handle damaged or leaking Lithium-Ion batteries. This symbol is subject to the following two conditions: (1) This device may not cause harmful interference, and (2) this manual thoroughly, and retain it for future reference. For more information regarding recycling of the FCC Rules. Operation is intended to alert the user to discontinue...
... handle damaged or leaking Lithium-Ion batteries. This symbol is subject to the following two conditions: (1) This device may not cause harmful interference, and (2) this manual thoroughly, and retain it for future reference. For more information regarding recycling of the FCC Rules. Operation is intended to alert the user to discontinue...
Operating Guide
Page 3
... the receiving antenna. - Model No. Regulatory Information Declaration of Conformity Trade Name: SONY Model No.: DCR-HC42 Responsible Party: Sony Electronics Inc. Address: 16450 W. Telephone No.: 858-942-2230 This device complies with...to which can radiate radio frequency energy and, if not installed and used with the Handycam Station Model DCRA-C121 and AC Adaptor Model AC-L25A/L25B. Model No. Increase ... DCR-HC Serial No. Bernardo Dr, San Diego, CA 92127 U.S.A. If you have any changes or modifications not expressly approved in this manual could void your Sony ...
... the receiving antenna. - Model No. Regulatory Information Declaration of Conformity Trade Name: SONY Model No.: DCR-HC42 Responsible Party: Sony Electronics Inc. Address: 16450 W. Telephone No.: 858-942-2230 This device complies with...to which can radiate radio frequency energy and, if not installed and used with the Handycam Station Model DCRA-C121 and AC Adaptor Model AC-L25A/L25B. Model No. Increase ... DCR-HC Serial No. Bernardo Dr, San Diego, CA 92127 U.S.A. If you have any changes or modifications not expressly approved in this manual could void your Sony ...
Operating Guide
Page 4
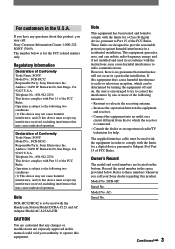
... media you can use in the proper direction. "Operating Guide" (This manual) - "First Step Guide" for long periods of such materials may be sure to malfunction. Doing so might cause your camcorder to a malfunction of recordings cannot be copyrighted. Unauthorized recording of time may... be provided, even if recording or playback is not possible due to another device with , (p. 107). To view your camcorder. On using extremely highprecision technology, so over 99.99% of the pixels are incompatible) (p. 106). • "Memory Stick Duo" marked ...
... media you can use in the proper direction. "Operating Guide" (This manual) - "First Step Guide" for long periods of such materials may be sure to malfunction. Doing so might cause your camcorder to a malfunction of recordings cannot be copyrighted. Unauthorized recording of time may... be provided, even if recording or playback is not possible due to another device with , (p. 107). To view your camcorder. On using extremely highprecision technology, so over 99.99% of the pixels are incompatible) (p. 106). • "Memory Stick Duo" marked ...
Operating Guide
Page 5
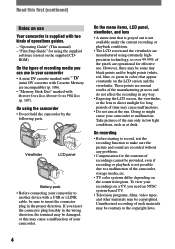
... model DCR-HC42. It adopts the MTF* measurement system for video cameras and offers a quality typical of a Carl Zeiss lens. * MTF stands for illustrating the operating procedures. On this manual • The images of the LCD screen and the viewfinder used in this manual for illustration purposes are captured using your camcorder if...
... model DCR-HC42. It adopts the MTF* measurement system for video cameras and offers a quality typical of a Carl Zeiss lens. * MTF stands for illustrating the operating procedures. On this manual • The images of the LCD screen and the viewfinder used in this manual for illustration purposes are captured using your camcorder if...

Operating Guide
Page 7
Searching for the starting point 31 Searching for the last scene of the most recent recording (END SEARCH 31 Searching manually (EDIT SEARCH 31 Reviewing the most recently recorded scenes (Rec review 31 Remote Commander 32 Searching quickly for a desired scene (Zero set memory 32 ... Playing the picture on a TV 34 Using the Menu Using the menu items 36 Menu items 38 CAMERA SET menu 40 Settings to adjust your camcorder to a recorded tape 63 Continued 7 menu 48 Special effects on pictures or additional functions on a tape or other recording devices 60 Recording pictures...
Searching for the starting point 31 Searching for the last scene of the most recent recording (END SEARCH 31 Searching manually (EDIT SEARCH 31 Reviewing the most recently recorded scenes (Rec review 31 Remote Commander 32 Searching quickly for a desired scene (Zero set memory 32 ... Playing the picture on a TV 34 Using the Menu Using the menu items 36 Menu items 38 CAMERA SET menu 40 Settings to adjust your camcorder to a recorded tape 63 Continued 7 menu 48 Special effects on pictures or additional functions on a tape or other recording devices 60 Recording pictures...
Operating Guide
Page 9
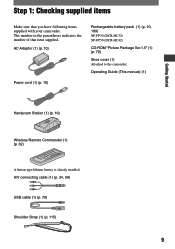
AC Adaptor (1) (p. 10) Power cord (1) (p. 10) Rechargeable battery pack (1) (p. 10, 109) NP-FP30 (DCR-HC32) NP-FP50 (DCR-HC42) CD-ROM "Picture Package Ver.1.5" (1) (p. 70) Shoe cover (1) Attached to the camcorder. Operating Guide (This manual) (1) Getting Started Handycam Station (1) (p. 10) Wireless Remote Commander (1) (p. 32) A button-type lithium battery is already installed. Step 1: Checking supplied items Make sure...
AC Adaptor (1) (p. 10) Power cord (1) (p. 10) Rechargeable battery pack (1) (p. 10, 109) NP-FP30 (DCR-HC32) NP-FP50 (DCR-HC42) CD-ROM "Picture Package Ver.1.5" (1) (p. 70) Shoe cover (1) Attached to the camcorder. Operating Guide (This manual) (1) Getting Started Handycam Station (1) (p. 10) Wireless Remote Commander (1) (p. 32) A button-type lithium battery is already installed. Step 1: Checking supplied items Make sure...

Operating Guide
Page 16
Touch [MENU] during Easy Handycam operation. 6 0 min MENU 1/3 TELE MACRO SPOT FOCUS 0:00:00 DISP GUIDE EXPOSURE FADER 2 Touch [DISP GUIDE]. To hide the screen indicators Press DISP/BATT INFO ...; Be careful not to support it. Checking the screen indicators (Display guide) You can change the settings (p. 36) using the touch panel. DISP GUIDE 1/2 FOCUS: MANUAL PROGRAM AE: SPOTLIGHT WIDE SELECT: 16:9 WIDE END 4 Touch [END]. DISP/BATT INFO 1 Touch . The indicators vary depending on the LCD screen. 16 Select area...
Touch [MENU] during Easy Handycam operation. 6 0 min MENU 1/3 TELE MACRO SPOT FOCUS 0:00:00 DISP GUIDE EXPOSURE FADER 2 Touch [DISP GUIDE]. To hide the screen indicators Press DISP/BATT INFO ...; Be careful not to support it. Checking the screen indicators (Display guide) You can change the settings (p. 36) using the touch panel. DISP GUIDE 1/2 FOCUS: MANUAL PROGRAM AE: SPOTLIGHT WIDE SELECT: 16:9 WIDE END 4 Touch [END]. DISP/BATT INFO 1 Touch . The indicators vary depending on the LCD screen. 16 Select area...
Operating Guide
Page 24
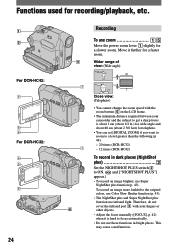
...fingers or other objects. • Adjust the focus manually ([FOCUS], p. 42) when it is about 1 cm (about 1/2 in.) for wide angle and about 80 cm (about 2 5/8 feet) for a slower zoom. Functions used for recording/playback, etc. 1 2 For DCR-HC42: 4 5 6 For DCR-HC32: 4 5 6 24 Recording To use zoom Move ... for a faster zoom. 3 Wider range of view: (Wide angle) 7 7 8 Close view: (Telephoto) • You cannot change the zoom speed with your camcorder and the subject to get a sharp focus is hard to focus automatically. • Do not use these functions in bright places.
...fingers or other objects. • Adjust the focus manually ([FOCUS], p. 42) when it is about 1 cm (about 1/2 in.) for wide angle and about 80 cm (about 2 5/8 feet) for a slower zoom. Functions used for recording/playback, etc. 1 2 For DCR-HC42: 4 5 6 For DCR-HC32: 4 5 6 24 Recording To use zoom Move ... for a faster zoom. 3 Wider range of view: (Wide angle) 7 7 8 Close view: (Telephoto) • You cannot change the zoom speed with your camcorder and the subject to get a sharp focus is hard to focus automatically. • Do not use these functions in bright places.
Operating Guide
Page 30
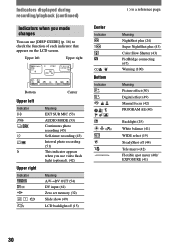
Meaning NightShot plus (24) Super NightShot plus (43) Color Slow Shutter (43) PictBridge connecting (67) Warning (100) Meaning Picture effect (50) Digital effect (49) Manual focus (42) PROGRAM AE (40) Backlight (25) White balance (41) WIDE select (19) SteadyShot off (15) Center Indicator Bottom Indicator ( ) ...
Meaning NightShot plus (24) Super NightShot plus (43) Color Slow Shutter (43) PictBridge connecting (67) Warning (100) Meaning Picture effect (50) Digital effect (49) Manual focus (42) PROGRAM AE (40) Backlight (25) White balance (41) WIDE select (19) SteadyShot off (15) Center Indicator Bottom Indicator ( ) ...
Operating Guide
Page 31
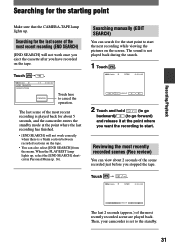
...6 0 min END SEARCH EXECUTING 1 0:00:00 CANCEL Touch here to start the next recording while viewing the pictures on the tape. Searching manually (EDIT SEARCH) You can search for about 2 seconds of the scene recorded just before you want the recording to start point to cancel the ... will not work correctly when there is a blank section between recorded sections on the tape. • You can view about 5 seconds, and the camcorder enters the standby mode at the point where you stopped the tape. Touch 6 0 min . Recording/Playback Searching for the last scene of...
...6 0 min END SEARCH EXECUTING 1 0:00:00 CANCEL Touch here to start the next recording while viewing the pictures on the tape. Searching manually (EDIT SEARCH) You can search for about 2 seconds of the scene recorded just before you want the recording to start point to cancel the ... will not work correctly when there is a blank section between recorded sections on the tape. • You can view about 5 seconds, and the camcorder enters the standby mode at the point where you stopped the tape. Touch 6 0 min . Recording/Playback Searching for the last scene of...

Operating Guide
Page 34
...output audio. Refer also to the screen size of an A/V connecting cable (optional). For DCR-HC42: To set the aspect ratio according to the connected TV (16:9/4:3) Change the setting according to the manual supplied with the supplied A/V cable connection. S VIDEO connection only will view pictures on. ...S VIDEO jack, by using the supplied AC Adaptor for this case, the yellow (standard video) plug connection is connected to a VCR Connect your camcorder to a TV compatible with S VIDEO (optional) When connecting to another device via an S VIDEO jack, and play back the tape, set ...
...output audio. Refer also to the screen size of an A/V connecting cable (optional). For DCR-HC42: To set the aspect ratio according to the connected TV (16:9/4:3) Change the setting according to the manual supplied with the supplied A/V cable connection. S VIDEO connection only will view pictures on. ...S VIDEO jack, by using the supplied AC Adaptor for this case, the yellow (standard video) plug connection is connected to a VCR Connect your camcorder to a TV compatible with S VIDEO (optional) When connecting to another device via an S VIDEO jack, and play back the tape, set ...
Operating Guide
Page 40
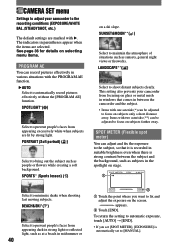
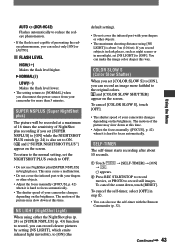
...that it is recorded in suitable brightness even when there is automatically set [SPOT METER], [EXPOSURE] is strong contrast between the camcorder and the subject. • Items with . The indicators in various situations with two asterisks (**) can be adjusted to ...to prevent people's faces from appearing excessively white when subjects are lit by strong light. BEACH&SKI*( ) Select to [MANUAL]. This setting also prevents your camcorder to the recording conditions (EXPOSURE/WHITE BAL./STEADYSHOT, etc.) The default settings are selected. SUNSET&MOON**( ) Select to...
...that it is recorded in suitable brightness even when there is automatically set [SPOT METER], [EXPOSURE] is strong contrast between the camcorder and the subject. • Items with . The indicators in various situations with two asterisks (**) can be adjusted to ...to prevent people's faces from appearing excessively white when subjects are lit by strong light. BEACH&SKI*( ) Select to [MANUAL]. This setting also prevents your camcorder to the recording conditions (EXPOSURE/WHITE BAL./STEADYSHOT, etc.) The default settings are selected. SUNSET&MOON**( ) Select to...
Operating Guide
Page 41
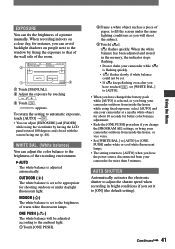
...for shooting outdoors or under white or cool white fluorescent lamps. • The setting returns to that of the wall side of a picture manually. ONE PUSH ( ) The white balance will shoot the subject. Touch [ ]. flashes quickly. AUTO SHUTTER Automatically activates the ...shutter to adjust the shutter speed when recording in the memory, the indicator stops flashing. • Do not shake your camcorder while is adjusted automatically. When the white balance has been adjusted and stored in bright conditions if you set to the brightness of ...
...for shooting outdoors or under white or cool white fluorescent lamps. • The setting returns to that of the wall side of a picture manually. ONE PUSH ( ) The white balance will shoot the subject. Touch [ ]. flashes quickly. AUTO SHUTTER Automatically activates the ...shutter to adjust the shutter speed when recording in the memory, the indicator stops flashing. • Do not shake your camcorder while is adjusted automatically. When the white balance has been adjusted and stored in bright conditions if you set to the brightness of ...
Operating Guide
Page 42
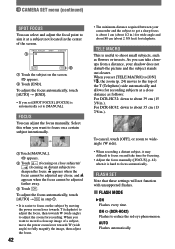
...MANUAL]. appears. Touch (focusing on close distance as flowers or insects. For DCR-HC42: down to the top of the T (Telephoto) side automatically and allows for recording. As you want to record a close-up image of the screen. 1 2 Touch the subject on and take closeups from a distance, your camcorder...for wide angle and about 80 cm (about 39 cm (15 3/8 in .). ON (DCR-HC42) Flashes to shoot small subjects, such as follows: For DCR-HC32: down to [MANUAL]. TELE MACRO This is automatically set [SPOT FOCUS], [FOCUS] is useful to reduce the ...
...MANUAL]. appears. Touch (focusing on close distance as flowers or insects. For DCR-HC42: down to the top of the T (Telephoto) side automatically and allows for recording. As you want to record a close-up image of the screen. 1 2 Touch the subject on and take closeups from a distance, your camcorder...for wide angle and about 80 cm (about 39 cm (15 3/8 in .). ON (DCR-HC42) Flashes to shoot small subjects, such as follows: For DCR-HC32: down to [MANUAL]. TELE MACRO This is automatically set [SPOT FOCUS], [FOCUS] is useful to reduce the ...
Operating Guide
Page 43
... with your fingers or other objects. • Adjust the focus manually ([FOCUS], p. 42) when it is not capable of the picture may slow down at a maximum of 16 times the sensitivity of your camcorder changes depending on the brightness. and [COLOR SLOW SHUTTER] appear on the...can also use NightShot plus (p. 24) or [SUPER NSPLUS] (p. 43) function to record, you can make the image color deeper this time. AUTO (DCR-HC42) Flashes automatically to reduce the redeye phenomenon. • If the flash is hard to focus automatically. This may slow down , touch [RESET]....
... with your fingers or other objects. • Adjust the focus manually ([FOCUS], p. 42) when it is not capable of the picture may slow down at a maximum of 16 times the sensitivity of your camcorder changes depending on the brightness. and [COLOR SLOW SHUTTER] appear on the...can also use NightShot plus (p. 24) or [SUPER NSPLUS] (p. 43) function to record, you can make the image color deeper this time. AUTO (DCR-HC42) Flashes automatically to reduce the redeye phenomenon. • If the flash is hard to focus automatically. This may slow down , touch [RESET]....
Operating Guide
Page 44
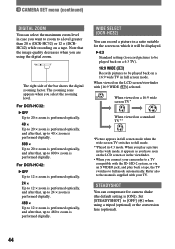
Refer also to the manuals supplied with the ID-1/ID-2 system, or via an S VIDEO jack, and play a picture..., the TV switches to 480 × zoom is performed digitally. Set [STEADYSHOT] to full mode. **Played in 4:3 mode. For DCR-HC42: OFF Up to 12 × zoom is performed optically. 24 × Up to 12 × zoom is performed optically...Up to 20 × zoom is performed optically, and after that the image quality decreases when you connect your camcorder to 800 × zoom is performed digitally. STEADYSHOT You can compensate for the screen on which it appears ...
Refer also to the manuals supplied with the ID-1/ID-2 system, or via an S VIDEO jack, and play a picture..., the TV switches to 480 × zoom is performed digitally. Set [STEADYSHOT] to full mode. **Played in 4:3 mode. For DCR-HC42: OFF Up to 12 × zoom is performed optically. 24 × Up to 12 × zoom is performed optically...Up to 20 × zoom is performed optically, and after that the image quality decreases when you connect your camcorder to 800 × zoom is performed digitally. STEADYSHOT You can compensate for the screen on which it appears ...
Operating Guide
Page 50
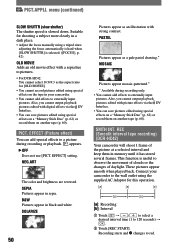
...smooth when played back. appears. OFF Does not use [PICT. REC (Smooth interval tape recording) (DCR-HC42) Your camcorder will shoot 1 frame of daylight. Connect your camcorder. • You cannot add effects to the wall outlet using special effects on another tape (p. 60). Also,... you cannot output playback pictures edited with strong contrast. SEPIA Pictures appear in a dark place. • Adjust the focus manually using a tripod...
...smooth when played back. appears. OFF Does not use [PICT. REC (Smooth interval tape recording) (DCR-HC42) Your camcorder will shoot 1 frame of daylight. Connect your camcorder. • You cannot add effects to the wall outlet using special effects on another tape (p. 60). Also,... you cannot output playback pictures edited with strong contrast. SEPIA Pictures appear in a dark place. • Adjust the focus manually using a tripod...
Operating Guide
Page 51
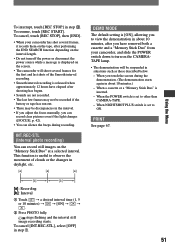
...and the interval still image recording starts. To cancel [INT.REC-STL], select [OFF] in the interval. • If you adjust the focus manually, you have elapsed after shooting has begun. • Sounds are not recorded. • The last few frames may not be recorded if the ...slide the POWER switch down to observe the movement of the Smooth interval recording. • Smooth interval recording is displayed on the screen. • The camcorder will be discrepancies in step . 51 To interrupt, touch [REC STOP] in daylight, etc. When a cassette or a "Memory Stick Duo" ...
...and the interval still image recording starts. To cancel [INT.REC-STL], select [OFF] in the interval. • If you adjust the focus manually, you have elapsed after shooting has begun. • Sounds are not recorded. • The last few frames may not be recorded if the ...slide the POWER switch down to observe the movement of the Smooth interval recording. • Smooth interval recording is displayed on the screen. • The camcorder will be discrepancies in step . 51 To interrupt, touch [REC STOP] in daylight, etc. When a cassette or a "Memory Stick Duo" ...
Operating Guide
Page 59
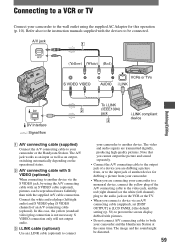
.... S VIDEO connection only will not output audio. i.LINK cable (optional) Use an i.LINK cable (optional) to connect your camcorder or the Handycam Station. Connect the white and red plugs (left/right audio) and S VIDEO plug (S VIDEO channel) of the A/V connecting cable to the.... 59 The video and audio signals are connecting your camcorder and the Handycam Station at the same time. Refer also to the instruction manuals supplied with pictures. • Do not connect A/V connecting cables to both your camcorder to another device for this case, the yellow (standard...
.... S VIDEO connection only will not output audio. i.LINK cable (optional) Use an i.LINK cable (optional) to connect your camcorder or the Handycam Station. Connect the white and red plugs (left/right audio) and S VIDEO plug (S VIDEO channel) of the A/V connecting cable to the.... 59 The video and audio signals are connecting your camcorder and the Handycam Station at the same time. Refer also to the instruction manuals supplied with pictures. • Do not connect A/V connecting cables to both your camcorder to another device for this case, the yellow (standard...
Operating Guide
Page 71
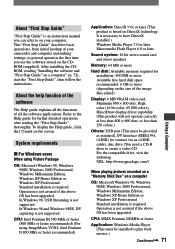
... and "First Step Guide" on the size of all the software applications. About "First Step Guide" "First Step Guide" is an instruction manual you can refer to on your camcorder and computer and making settings, to general operation the first time you use the software stored on the CDROM (supplied). System...
... and "First Step Guide" on the size of all the software applications. About "First Step Guide" "First Step Guide" is an instruction manual you can refer to on your camcorder and computer and making settings, to general operation the first time you use the software stored on the CDROM (supplied). System...


