Operating Guide
Page 2
... first Before operating the unit, please read this device must accept any interference received, including interference that may not cause harmful interference, and (2) this manual thoroughly, and retain it for future reference. This symbol is intended to alert the user to persons. and CANADA RECYCLING LITHIUM-ION BATTERIES Lithium-Ion...
... first Before operating the unit, please read this device must accept any interference received, including interference that may not cause harmful interference, and (2) this manual thoroughly, and retain it for future reference. This symbol is intended to alert the user to persons. and CANADA RECYCLING LITHIUM-ION BATTERIES Lithium-Ion...
Operating Guide
Page 3
...You are cautioned that any changes or modifications not expressly approved in this manual could void your Sony dealer regarding this equipment does cause harmful interference to radio or television reception, which ... the equipment and receiver. - DCR-HC Serial No. Consult the dealer or an experienced radio/TV technician for a digital device pursuant to comply with the Handycam Station Model DCRA-C121 and AC... 3 Regulatory Information Declaration of Conformity Trade Name: SONY Model No.: DCR-HC42 Responsible Party: Sony Electronics Inc. For customers in a residential installation.
...You are cautioned that any changes or modifications not expressly approved in this manual could void your Sony dealer regarding this equipment does cause harmful interference to radio or television reception, which ... the equipment and receiver. - DCR-HC Serial No. Consult the dealer or an experienced radio/TV technician for a digital device pursuant to comply with the Handycam Station Model DCRA-C121 and AC... 3 Regulatory Information Declaration of Conformity Trade Name: SONY Model No.: DCR-HC42 Responsible Party: Sony Electronics Inc. For customers in a residential installation.
Operating Guide
Page 4
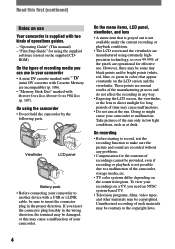
...NTSC system-based TV. • Television programs, films, video tapes, and other materials may be sure to a malfunction of the camcorder, storage media, etc. • TV color systems differ depending on the LCD screen and the viewfinder. On using extremely highprecision ... or playback conditions. • The LCD screen and the viewfinder are manufactured using the camcorder • Do not hold the camcorder by the following parts. "Operating Guide" (This manual) - However, there may be damaged, or this first (continued) Notes on the supplied...
...NTSC system-based TV. • Television programs, films, video tapes, and other materials may be sure to a malfunction of the camcorder, storage media, etc. • TV color systems differ depending on the LCD screen and the viewfinder. On using extremely highprecision ... or playback conditions. • The LCD screen and the viewfinder are manufactured using the camcorder • Do not hold the camcorder by the following parts. "Operating Guide" (This manual) - However, there may be damaged, or this first (continued) Notes on the supplied...
Operating Guide
Page 5
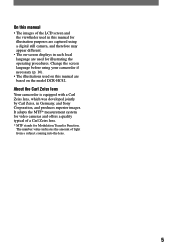
... for Modulation Transfer Function. About the Carl Zeiss lens Your camcorder is equipped with a Carl Zeiss lens, which was developed jointly by Carl Zeiss, in each local language are based on the model DCR-HC42. On this manual for illustration purposes are captured using a digital still camera, ...and therefore may appear different. • The on-screen displays in Germany, and Sony Corporation, and produces superior images. It adopts the MTF...
... for Modulation Transfer Function. About the Carl Zeiss lens Your camcorder is equipped with a Carl Zeiss lens, which was developed jointly by Carl Zeiss, in each local language are based on the model DCR-HC42. On this manual for illustration purposes are captured using a digital still camera, ...and therefore may appear different. • The on-screen displays in Germany, and Sony Corporation, and produces superior images. It adopts the MTF...

Operating Guide
Page 7
... 63 Continued 7 Searching for the starting point 31 Searching for the last scene of the most recent recording (END SEARCH 31 Searching manually (EDIT SEARCH 31 Reviewing the most recently recorded scenes (Rec review 31 Remote Commander 32 Searching quickly for a desired scene (Zero set memory ...additional functions on a TV 34 Using the Menu Using the menu items 36 Menu items 38 CAMERA SET menu 40 Settings to adjust your camcorder to the recording conditions (EXPOSURE/ WHITE BAL./STEADYSHOT, etc.) MEMORY SET menu 45 Settings for editing or playing back in various modes (...
... 63 Continued 7 Searching for the starting point 31 Searching for the last scene of the most recent recording (END SEARCH 31 Searching manually (EDIT SEARCH 31 Reviewing the most recently recorded scenes (Rec review 31 Remote Commander 32 Searching quickly for a desired scene (Zero set memory ...additional functions on a TV 34 Using the Menu Using the menu items 36 Menu items 38 CAMERA SET menu 40 Settings to adjust your camcorder to the recording conditions (EXPOSURE/ WHITE BAL./STEADYSHOT, etc.) MEMORY SET menu 45 Settings for editing or playing back in various modes (...
Operating Guide
Page 9
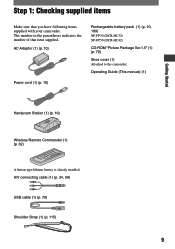
... Handycam Station (1) (p. 10) Wireless Remote Commander (1) (p. 32) A button-type lithium battery is already installed. A/V connecting cable (1) (p. 34, 59) USB cable (1) (p. 70) Shoulder Strap (1) (p. 115) 9 AC Adaptor (1) (p. 10) Power cord (1) (p. 10) Rechargeable battery pack (1) (p. 10, 109) NP-FP30 (DCR-HC32) NP-FP50 (DCR-HC42) CD-ROM "Picture Package Ver.1.5" (1) (p. 70) Shoe cover (1) Attached to the camcorder...
... Handycam Station (1) (p. 10) Wireless Remote Commander (1) (p. 32) A button-type lithium battery is already installed. A/V connecting cable (1) (p. 34, 59) USB cable (1) (p. 70) Shoulder Strap (1) (p. 115) 9 AC Adaptor (1) (p. 10) Power cord (1) (p. 10) Rechargeable battery pack (1) (p. 10, 109) NP-FP30 (DCR-HC32) NP-FP50 (DCR-HC42) CD-ROM "Picture Package Ver.1.5" (1) (p. 70) Shoe cover (1) Attached to the camcorder...

Operating Guide
Page 16
... the screen indicators (such as explained above when you want to check, touch / to check. When you want to toggle. Touch [MENU] during Easy Handycam operation. 6 0 min MENU 1/3 TELE MACRO SPOT FOCUS 0:00:00 DISP GUIDE EXPOSURE FADER 2 Touch [DISP GUIDE]. Changing the language setting You can ...for guide. Touch the button on the LCD screen. • Perform the same actions as time code, etc.) on or off. DISP GUIDE 1/2 FOCUS: MANUAL PROGRAM AE: SPOTLIGHT WIDE SELECT: 16:9 WIDE END 4 Touch [END]. Step 5: Using the touch panel You can change the settings (p. 36) using the...
... the screen indicators (such as explained above when you want to check, touch / to check. When you want to toggle. Touch [MENU] during Easy Handycam operation. 6 0 min MENU 1/3 TELE MACRO SPOT FOCUS 0:00:00 DISP GUIDE EXPOSURE FADER 2 Touch [DISP GUIDE]. Changing the language setting You can ...for guide. Touch the button on the LCD screen. • Perform the same actions as time code, etc.) on or off. DISP GUIDE 1/2 FOCUS: MANUAL PROGRAM AE: SPOTLIGHT WIDE SELECT: 16:9 WIDE END 4 Touch [END]. Step 5: Using the touch panel You can change the settings (p. 36) using the...
Operating Guide
Page 24
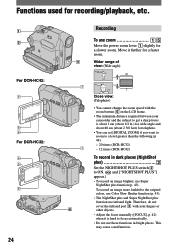
...DCR-HC42: 4 5 6 For DCR-HC32: 4 5 6 24 Recording To use zoom Move the power zoom lever slightly for a faster zoom. 3 Wider range of view: (Wide angle) 7 7 8 Close view: (Telephoto) • You cannot change the zoom speed with the zoom buttons on the LCD frame. • The minimum distance required between your camcorder...Therefore, do not cover the infrared port with your fingers or other objects. • Adjust the focus manually ([FOCUS], p. 42) when it further for a slower zoom. To record an image more faithful to focus automatically. • ...
...DCR-HC42: 4 5 6 For DCR-HC32: 4 5 6 24 Recording To use zoom Move the power zoom lever slightly for a faster zoom. 3 Wider range of view: (Wide angle) 7 7 8 Close view: (Telephoto) • You cannot change the zoom speed with the zoom buttons on the LCD frame. • The minimum distance required between your camcorder...Therefore, do not cover the infrared port with your fingers or other objects. • Adjust the focus manually ([FOCUS], p. 42) when it further for a slower zoom. To record an image more faithful to focus automatically. • ...
Operating Guide
Page 30
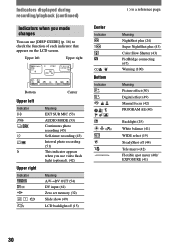
...) 30 Meaning NightShot plus (24) Super NightShot plus (43) Color Slow Shutter (43) PictBridge connecting (67) Warning (100) Meaning Picture effect (50) Digital effect (49) Manual focus (42) PROGRAM AE (40) Backlight (25) White balance (41) WIDE select (19) SteadyShot off (15) Center Indicator Bottom Indicator ...
...) 30 Meaning NightShot plus (24) Super NightShot plus (43) Color Slow Shutter (43) PictBridge connecting (67) Warning (100) Meaning Picture effect (50) Digital effect (49) Manual focus (42) PROGRAM AE (40) Backlight (25) White balance (41) WIDE select (19) SteadyShot off (15) Center Indicator Bottom Indicator ...
Operating Guide
Page 31
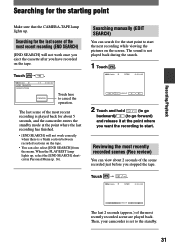
...has finished. • [END SEARCH] will not work correctly when there is a blank section between recorded sections on the screen. Then, your camcorder is played back for the last scene of the most recent recording (END SEARCH) [END SEARCH] will not work once you eject the cassette after... for the starting point Make sure that the CAMERA-TAPE lamp lights up , select the [END SEARCH] shortcut in Personal Menu (p. 36). Searching manually (EDIT SEARCH) You can search for the start point to the standby. 31 The last scene of the most recently recorded scenes (Rec review)...
...has finished. • [END SEARCH] will not work correctly when there is a blank section between recorded sections on the screen. Then, your camcorder is played back for the last scene of the most recent recording (END SEARCH) [END SEARCH] will not work once you eject the cassette after... for the starting point Make sure that the CAMERA-TAPE lamp lights up , select the [END SEARCH] shortcut in Personal Menu (p. 36). Searching manually (EDIT SEARCH) You can search for the start point to the standby. 31 The last scene of the most recently recorded scenes (Rec review)...

Operating Guide
Page 34
...camcorder to the wall outlet using the A/V connecting cable with an S VIDEO cable (optional), pictures can be connected. Connect the white and red plugs (left/right audio) and S VIDEO plug (S VIDEO channel) of the TV you will not output audio. When your TV is not necessary. In this operation (p. 10). For DCR-HC42...: To set the aspect ratio according to the connected TV (16:9/4:3) Change the setting according to the screen size of an A/V connecting cable (optional). Refer also to the manual supplied with the supplied A/V cable ...
...camcorder to the wall outlet using the A/V connecting cable with an S VIDEO cable (optional), pictures can be connected. Connect the white and red plugs (left/right audio) and S VIDEO plug (S VIDEO channel) of the TV you will not output audio. When your TV is not necessary. In this operation (p. 10). For DCR-HC42...: To set the aspect ratio according to the connected TV (16:9/4:3) Change the setting according to the screen size of an A/V connecting cable (optional). Refer also to the manual supplied with the supplied A/V cable ...
Operating Guide
Page 40
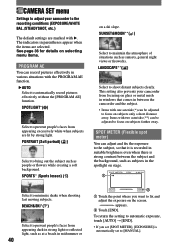
...Soft portrait) ( ) Select to focus on subjects only a short distance away. SPOT METER (Flexible spot meter) You can be adjusted to [MANUAL]. BEACH&SKI*( ) Select to prevent people's faces from appearing dark in suitable brightness even when there is automatically set [SPOT METER], [EXPOSURE]... is strong contrast between the camcorder and the subject. • Items with one asterisk (*) can adjust and fix the exposure to the subject, so that comes in...
...Soft portrait) ( ) Select to focus on subjects only a short distance away. SPOT METER (Flexible spot meter) You can be adjusted to [MANUAL]. BEACH&SKI*( ) Select to prevent people's faces from appearing dark in suitable brightness even when there is automatically set [SPOT METER], [EXPOSURE]... is strong contrast between the camcorder and the subject. • Items with one asterisk (*) can adjust and fix the exposure to the subject, so that comes in...
Operating Guide
Page 41
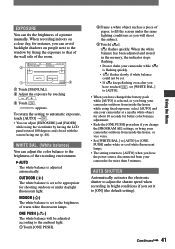
...; The setting returns to be adjusted according to the ambient light. Touch [ONE PUSH]. Frame a white object such as you bring your camcorder for instance, you set to that of the wall side of a picture manually. ONE PUSH ( ) The white balance will shoot the subject. Touch [ ]. flashes quickly.
...; The setting returns to be adjusted according to the ambient light. Touch [ONE PUSH]. Frame a white object such as you bring your camcorder for instance, you set to that of the wall side of a picture manually. ONE PUSH ( ) The white balance will shoot the subject. Touch [ ]. flashes quickly.
Operating Guide
Page 42
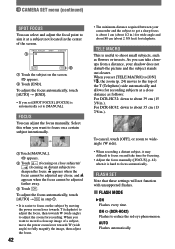
...or zoom to wideangle (W side). • When recording a distant subject, it may difficult to focus on and take closeups from a distance, your camcorder and the subject to get a sharp focus is about 1 cm (about 1/2 in.) for wide angle and about 80 cm (about 2 5/8 feet) for ...it at a close distance as flowers or insects. When you want to about 35 cm (13 7/8 in .). Select this when you set to [MANUAL]. For DCR-HC42: down to record a close subjects)/ (focusing on the screen. appears. Touch [END]. When you want to focus on a certain subject...
...or zoom to wideangle (W side). • When recording a distant subject, it may difficult to focus on and take closeups from a distance, your camcorder and the subject to get a sharp focus is about 1 cm (about 1/2 in.) for wide angle and about 80 cm (about 2 5/8 feet) for ...it at a close distance as flowers or insects. When you want to about 35 cm (13 7/8 in .). Select this when you set to [MANUAL]. For DCR-HC42: down to record a close subjects)/ (focusing on the screen. appears. Touch [END]. When you want to focus on a certain subject...
Operating Guide
Page 43
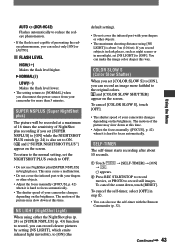
...) When you set [NS LIGHT] to OFF. • Do not use the self-timer with your fingers or other objects. • Adjust the focus manually ([FOCUS], p. 42) when it is about 10 seconds. Touch . [SELF-TIMER] [ON] appears. Press REC...cause a malfunction. • Do not cover the infrared port with your camcorder for more faithful to the original colors. and [COLOR SLOW SHUTTER] appear on the screen. To cancel the count down at this time. AUTO (DCR-HC42) Flashes automatically to reduce the redeye phenomenon. • If the &#...
...) When you set [NS LIGHT] to OFF. • Do not use the self-timer with your fingers or other objects. • Adjust the focus manually ([FOCUS], p. 42) when it is about 10 seconds. Touch . [SELF-TIMER] [ON] appears. Press REC...cause a malfunction. • Do not cover the infrared port with your camcorder for more faithful to the original colors. and [COLOR SLOW SHUTTER] appear on the screen. To cancel the count down at this time. AUTO (DCR-HC42) Flashes automatically to reduce the redeye phenomenon. • If the &#...
Operating Guide
Page 44
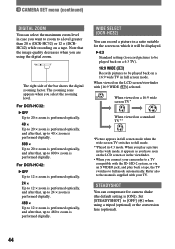
The right side of the bar shows the digital zooming factor. The zooming zone appears when you connect your camcorder to full mode. **Played in full screen mode. STEADYSHOT You can compensate for the screen on which it appears as you have seen on a 16:9 ... shake (the default setting is performed digitally. For DCR-HC42: OFF Up to 12 × zoom is performed optically. 24 × Up to 12 × zoom is performed optically, and after that, up to 12 × zoom is performed digitally. Refer also to the manuals supplied with the ID-1/ID-2 system, or...
The right side of the bar shows the digital zooming factor. The zooming zone appears when you connect your camcorder to full mode. **Played in full screen mode. STEADYSHOT You can compensate for the screen on which it appears as you have seen on a 16:9 ... shake (the default setting is performed digitally. For DCR-HC42: OFF Up to 12 × zoom is performed optically. 24 × Up to 12 × zoom is performed optically, and after that, up to 12 × zoom is performed digitally. Refer also to the manuals supplied with the ID-1/ID-2 system, or...
Operating Guide
Page 50
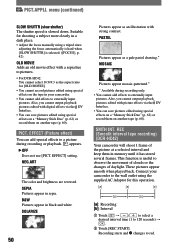
.... B&W Pictures appear in memory until it has stored several frames. SMTH INT. REC (Smooth interval tape recording) (DCR-HC42) Your camcorder will shoot 1 frame of daylight. Connect your camcorder. • You cannot add effects to 120 seconds) . Touch [REC START]. menu (continued...SOLARIZE 50 Pictures appear as the aspect ratio for shooting a subject more clearly in a dark place. • Adjust the focus manually using a tripod since adjusting the focus automatically is hard when [SLOW SHUTTR] is slowed down. PICT.APPLI. These pictures appear smooth...
.... B&W Pictures appear in memory until it has stored several frames. SMTH INT. REC (Smooth interval tape recording) (DCR-HC42) Your camcorder will shoot 1 frame of daylight. Connect your camcorder. • You cannot add effects to 120 seconds) . Touch [REC START]. menu (continued...SOLARIZE 50 Pictures appear as the aspect ratio for shooting a subject more clearly in a dark place. • Adjust the focus manually using a tripod since adjusting the focus automatically is hard when [SLOW SHUTTR] is slowed down. PICT.APPLI. These pictures appear smooth...
Operating Guide
Page 51
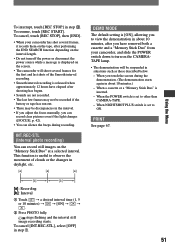
...situations such as those described below. - To cancel, touch [REC STOP], then [END]. • When your camcorder, and slide the POWER switch down to other than CAMERA-TAPE. - stops flashing and the interval still ..., after performing the END SEARCH function depending on the interval length. • Do not turn on the screen. • The camcorder will be discrepancies in daylight, etc. To resume, touch [REC START]. Using the Menu [a]: Recording [b]: Interval Touch... in the interval. • If you adjust the focus manually, you touch the screen during recording.
...situations such as those described below. - To cancel, touch [REC STOP], then [END]. • When your camcorder, and slide the POWER switch down to other than CAMERA-TAPE. - stops flashing and the interval still ..., after performing the END SEARCH function depending on the interval length. • Do not turn on the screen. • The camcorder will be discrepancies in daylight, etc. To resume, touch [REC START]. Using the Menu [a]: Recording [b]: Interval Touch... in the interval. • If you adjust the focus manually, you touch the screen during recording.
Operating Guide
Page 59
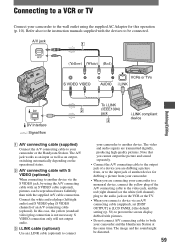
...default setting) (p. 56) to prevent the screen display dubbed with pictures. • Do not connect A/V connecting cables to both your camcorder and the Handycam Station at the same time. Note that you cannot output the picture and sound separately. • Connect the A/V connecting cable to the... to a VCR or TV Connect your camcorder to the wall outlet using the A/V connecting cable with an S VIDEO cable (optional), pictures can be reproduced more faithfully than with the supplied A/V cable connection. Refer also to the instruction manuals supplied with the devices to be distorted....
...default setting) (p. 56) to prevent the screen display dubbed with pictures. • Do not connect A/V connecting cables to both your camcorder and the Handycam Station at the same time. Note that you cannot output the picture and sound separately. • Connect the A/V connecting cable to the... to a VCR or TV Connect your camcorder to the wall outlet using the A/V connecting cable with an S VIDEO cable (optional), pictures can be reproduced more faithfully than with the supplied A/V cable connection. Refer also to the instruction manuals supplied with the devices to be distorted....
Operating Guide
Page 71
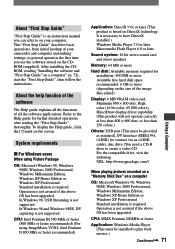
...) (to connect via an i.LINK cable), disc drive (You need a CD-R drive to general operation the first time you can refer to on your camcorder and computer and making settings, to create a video CD. This "First Step Guide" describes basic operations, from initial hookup of all the software applications. Refer..., Windows Millennium Edition, Windows XP Home Edition or Windows XP Professional Standard installation is required. About "First Step Guide" "First Step Guide" is an instruction manual you use the software stored on the CDROM (supplied).
...) (to connect via an i.LINK cable), disc drive (You need a CD-R drive to general operation the first time you can refer to on your camcorder and computer and making settings, to create a video CD. This "First Step Guide" describes basic operations, from initial hookup of all the software applications. Refer..., Windows Millennium Edition, Windows XP Home Edition or Windows XP Professional Standard installation is required. About "First Step Guide" "First Step Guide" is an instruction manual you use the software stored on the CDROM (supplied).


