Operating Guide
Page 4
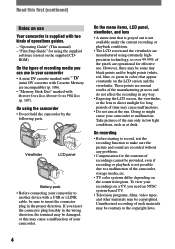
... and lens • A menu item that appear constantly on the supplied CDROM) On the types of operations guides. - Doing so might cause your camcorder to malfunction. Take pictures of the pixels are incompatible) (p. 106). • "Memory Stick Duo" marked with , (p. 107). On using extremely highprecision...are normal results of the manufacturing process and do not affect the recording in any problems. • Compensation for long periods of the camcorder, storage media, etc. • TV color systems differ depending on a TV, you insert the connector plug forcibly in the wrong ...
... and lens • A menu item that appear constantly on the supplied CDROM) On the types of operations guides. - Doing so might cause your camcorder to malfunction. Take pictures of the pixels are incompatible) (p. 106). • "Memory Stick Duo" marked with , (p. 107). On using extremely highprecision...are normal results of the manufacturing process and do not affect the recording in any problems. • Compensation for long periods of the camcorder, storage media, etc. • TV color systems differ depending on a TV, you insert the connector plug forcibly in the wrong ...
Operating Guide
Page 5
About the Carl Zeiss lens Your camcorder is equipped with a Carl Zeiss lens, which was developed jointly by Carl Zeiss, in this manual are used in Germany, and Sony Corporation, and produces superior images. It adopts the MTF* measurement system for video cameras and offers a quality...before using your camcorder if necessary (p. 16). • The illustrations used on this manual for illustration purposes are captured using a digital still camera, and therefore may appear different. • The on-screen displays in each local language are based on the model DCR-HC42. On this ...
About the Carl Zeiss lens Your camcorder is equipped with a Carl Zeiss lens, which was developed jointly by Carl Zeiss, in this manual are used in Germany, and Sony Corporation, and produces superior images. It adopts the MTF* measurement system for video cameras and offers a quality...before using your camcorder if necessary (p. 16). • The illustrations used on this manual for illustration purposes are captured using a digital still camera, and therefore may appear different. • The on-screen displays in each local language are based on the model DCR-HC42. On this ...
Operating Guide
Page 6
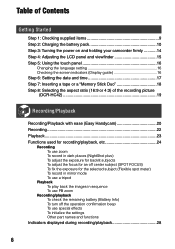
...Contents Getting Started Step 1: Checking supplied items 9 Step 2: Charging the battery pack 10 Step 3: Turning the power on and holding your camcorder firmly ...........14 Step 4: Adjusting the LCD panel and viewfinder 15 Step 5: Using the touch panel 16 Changing the ...a tape or a "Memory Stick Duo 18 Step 8: Selecting the aspect ratio (16:9 or 4:3) of the recording picture (DCR-HC42 19 Recording/Playback Recording/Playback with ease (Easy Handycam 20 Recording 22 Playback 23 Functions used for recording/playback, etc 24 Recording To use zoom To record in dark places...
...Contents Getting Started Step 1: Checking supplied items 9 Step 2: Charging the battery pack 10 Step 3: Turning the power on and holding your camcorder firmly ...........14 Step 4: Adjusting the LCD panel and viewfinder 15 Step 5: Using the touch panel 16 Changing the ...a tape or a "Memory Stick Duo 18 Step 8: Selecting the aspect ratio (16:9 or 4:3) of the recording picture (DCR-HC42 19 Recording/Playback Recording/Playback with ease (Easy Handycam 20 Recording 22 Playback 23 Functions used for recording/playback, etc 24 Recording To use zoom To record in dark places...

Operating Guide
Page 7
... Playing the picture on a TV 34 Using the Menu Using the menu items 36 Menu items 38 CAMERA SET menu 40 Settings to adjust your camcorder to a recorded tape 63 Continued 7
... Playing the picture on a TV 34 Using the Menu Using the menu items 36 Menu items 38 CAMERA SET menu 40 Settings to adjust your camcorder to a recorded tape 63 Continued 7

Operating Guide
Page 8
... a DVD (Direct Access to "Click to DVD 77 Connecting an analog VCR to the computer via your camcorder (Signal convert function 80 Troubleshooting Troubleshooting 82 Warning indicators and messages 100 Additional Information Using your camcorder abroad 105 Usable cassette tapes 106 About the "Memory Stick 107 About the "InfoLITHIUM" battery pack 109...
... a DVD (Direct Access to "Click to DVD 77 Connecting an analog VCR to the computer via your camcorder (Signal convert function 80 Troubleshooting Troubleshooting 82 Warning indicators and messages 100 Additional Information Using your camcorder abroad 105 Usable cassette tapes 106 About the "Memory Stick 107 About the "InfoLITHIUM" battery pack 109...
Operating Guide
Page 9
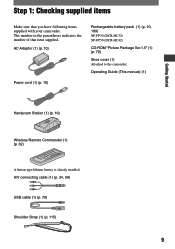
...) Power cord (1) (p. 10) Rechargeable battery pack (1) (p. 10, 109) NP-FP30 (DCR-HC32) NP-FP50 (DCR-HC42) CD-ROM "Picture Package Ver.1.5" (1) (p. 70) Shoe cover (1) Attached to the camcorder. Step 1: Checking supplied items Make sure that item supplied. Operating Guide (This manual) (1) Getting Started Handycam Station (1) (p. 10) Wireless Remote Commander (1) (p. 32) A button-type lithium battery is...
...) Power cord (1) (p. 10) Rechargeable battery pack (1) (p. 10, 109) NP-FP30 (DCR-HC32) NP-FP50 (DCR-HC42) CD-ROM "Picture Package Ver.1.5" (1) (p. 70) Shoe cover (1) Attached to the camcorder. Step 1: Checking supplied items Make sure that item supplied. Operating Guide (This manual) (1) Getting Started Handycam Station (1) (p. 10) Wireless Remote Commander (1) (p. 32) A button-type lithium battery is...
Operating Guide
Page 10
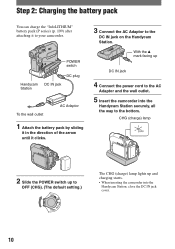
...the mark facing up and charging starts. • When inserting the camcorder into the Handycam Station securely, all the way to the bottom. CHG (charge) lamp 2 ...cord to the AC Adaptor and the wall outlet. 5 Insert the camcorder into the Handycam Station, close the DC IN jack cover. 10 POWER switch Handycam Station DC plug DC IN jack To the wall outlet AC Adaptor... battery pack by sliding it in the direction of the arrow until it to the DC IN jack on the Handycam Station. Step 2: Charging the battery pack You can charge the "InfoLITHIUM" battery pack (P series) (p. 109...
...the mark facing up and charging starts. • When inserting the camcorder into the Handycam Station securely, all the way to the bottom. CHG (charge) lamp 2 ...cord to the AC Adaptor and the wall outlet. 5 Insert the camcorder into the Handycam Station, close the DC IN jack cover. 10 POWER switch Handycam Station DC plug DC IN jack To the wall outlet AC Adaptor... battery pack by sliding it in the direction of the arrow until it to the DC IN jack on the Handycam Station. Step 2: Charging the battery pack You can charge the "InfoLITHIUM" battery pack (P series) (p. 109...
Operating Guide
Page 11
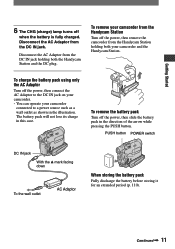
...from the DC IN jack. To charge the battery pack using only the AC Adaptor Turn off the power, then remove the camcorder from the Handycam Station holding both your camcorder connected to a power source such as a wall outlet as shown in this case. Disconnect the AC Adaptor from the DC IN... jack holding both the Handycam Station and the DC plug. To remove your camcorder from the Handycam Station Turn off the power, then connect the AC Adaptor to the DC IN jack on your...
...from the DC IN jack. To charge the battery pack using only the AC Adaptor Turn off the power, then remove the camcorder from the Handycam Station holding both your camcorder connected to a power source such as a wall outlet as shown in this case. Disconnect the AC Adaptor from the DC IN... jack holding both the Handycam Station and the DC plug. To remove your camcorder from the Handycam Station Turn off the power, then connect the AC Adaptor to the DC IN jack on your...
Operating Guide
Page 13
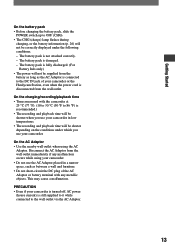
...Adaptor. The battery pack is still supplied to it while connected to the wall outlet via the AC Adaptor. 13 PRECAUTION • Even if your camcorder is turned off, AC power (house current) is not attached correctly. - Getting Started On the battery pack • Before changing the battery pack,...not be supplied from the battery as long as between a wall and furniture. • Do not short-circuit the DC plug of your camcorder or the Handycam Station, even when the power cord is disconnected from the wall outlet immediately if any metallic objects. The battery pack is damaged. -
...Adaptor. The battery pack is still supplied to it while connected to the wall outlet via the AC Adaptor. 13 PRECAUTION • Even if your camcorder is turned off, AC power (house current) is not attached correctly. - Getting Started On the battery pack • Before changing the battery pack,...not be supplied from the battery as long as between a wall and furniture. • Do not short-circuit the DC plug of your camcorder or the Handycam Station, even when the power cord is disconnected from the wall outlet immediately if any metallic objects. The battery pack is damaged. -
Operating Guide
Page 14
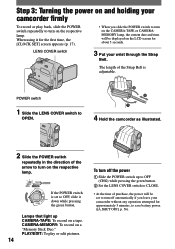
...Put your wrist through the Strap Belt. If the POWER switch is adjustable. POWER switch 1 Slide the LENS COVER switch to OPEN. 4 Hold the camcorder as illustrated. 2 Slide the POWER switch repeatedly in the direction of purchase, the power will be displayed on the LCD screen for the first... time, the [CLOCK SET] screen appears (p. 17). • When you leave your camcorder without any operation attempted for approximately 5 minutes, to turn on the CAMERA-TAPE or CAMERAMEMORY lamp, the current date and time will be set to...
...Put your wrist through the Strap Belt. If the POWER switch is adjustable. POWER switch 1 Slide the LENS COVER switch to OPEN. 4 Hold the camcorder as illustrated. 2 Slide the POWER switch repeatedly in the direction of purchase, the power will be displayed on the LCD screen for the first... time, the [CLOCK SET] screen appears (p. 17). • When you leave your camcorder without any operation attempted for approximately 5 minutes, to turn on the CAMERA-TAPE or CAMERAMEMORY lamp, the current date and time will be set to...
Operating Guide
Page 15
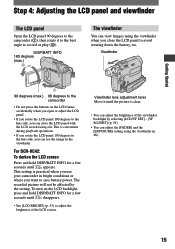
Viewfinder 1 90 degrees (max.) 90 degrees to the camcorder • Do not press the buttons on the LCD backlight, press and hold DISP/BATT INFO for a few seconds until appears. For DCR-HC42: To darken the LCD screen Press and hold DISP/BATT INFO for a few seconds until disappears. • See...or play (). Getting Started Step 4: Adjusting the LCD panel and viewfinder The LCD panel Open the LCD panel 90 degrees to the camcorder (), then rotate it until the picture is clear. • You can adjust the brightness of the LCD screen. DISP/BATT INFO 180 degrees ...
Viewfinder 1 90 degrees (max.) 90 degrees to the camcorder • Do not press the buttons on the LCD backlight, press and hold DISP/BATT INFO for a few seconds until appears. For DCR-HC42: To darken the LCD screen Press and hold DISP/BATT INFO for a few seconds until disappears. • See...or play (). Getting Started Step 4: Adjusting the LCD panel and viewfinder The LCD panel Open the LCD panel 90 degrees to the camcorder (), then rotate it until the picture is clear. • You can adjust the brightness of the LCD screen. DISP/BATT INFO 180 degrees ...

Operating Guide
Page 17
... AE OK 3 Select [CLOCK SET] with / , then touch . 6 0 min -:--:-- For midnight, set it to step 4 when you do not use your camcorder for about 3 months, the built-in rechargeable battery gets discharged and the date and time settings may be cleared from the memory. For midday, set... MENU ROTATE A.SHUT OFF CLOCK SET WORLD --:--:-- CLOCK SET -:--:-- Getting Started Step 6: Setting the date and time Set the date and time when using this camcorder for the first time. 1 Touch 6 0 min [MENU]. -:--:-- DATE 2005Y JAN M 1D 12: 00 AM OK 5 Set [M] (month), [D] (day), hour...
... AE OK 3 Select [CLOCK SET] with / , then touch . 6 0 min -:--:-- For midnight, set it to step 4 when you do not use your camcorder for about 3 months, the built-in rechargeable battery gets discharged and the date and time settings may be cleared from the memory. For midday, set... MENU ROTATE A.SHUT OFF CLOCK SET WORLD --:--:-- CLOCK SET -:--:-- Getting Started Step 6: Setting the date and time Set the date and time when using this camcorder for the first time. 1 Touch 6 0 min [MENU]. -:--:-- DATE 2005Y JAN M 1D 12: 00 AM OK 5 Set [M] (month), [D] (day), hour...
Operating Guide
Page 18
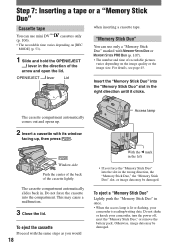
..." slot in once. • When the access lamp is reading/writing data. This may be damaged. Do not shake or knock your camcorder is lit or flashing, your camcorder, turn the power off, eject the "Memory Stick Duo," or remove the battery pack. Otherwise, image data may cause a malfunction. 3 Close the...
..." slot in once. • When the access lamp is reading/writing data. This may be damaged. Do not shake or knock your camcorder is lit or flashing, your camcorder, turn the power off, eject the "Memory Stick Duo," or remove the battery pack. Otherwise, image data may cause a malfunction. 3 Close the...
Operating Guide
Page 24
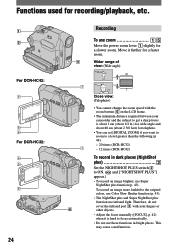
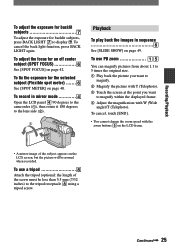
... the LCD frame. • The minimum distance required between your camcorder and the subject to get a sharp focus is hard to focus automatically. • Do not use infrared light. Functions used for recording/playback, etc. 1 2 For DCR-HC42: 4 5 6 For DCR-HC32: 4 5 6 24 Recording To use zoom Move the power.... • You can set [DIGITAL ZOOM] if you want to zoom to a level greater than the following (p 44): - 20 times (DCR-HC32) - 12 times (DCR-HC42) To record in dark places (NightShot plus Set the NIGHTSHOT PLUS switch to ON. ( and ["NIGHTSHOT PLUS"] appear.) • To...
... the LCD frame. • The minimum distance required between your camcorder and the subject to get a sharp focus is hard to focus automatically. • Do not use infrared light. Functions used for recording/playback, etc. 1 2 For DCR-HC42: 4 5 6 For DCR-HC32: 4 5 6 24 Recording To use zoom Move the power.... • You can set [DIGITAL ZOOM] if you want to zoom to a level greater than the following (p 44): - 20 times (DCR-HC32) - 12 times (DCR-HC42) To record in dark places (NightShot plus Set the NIGHTSHOT PLUS switch to ON. ( and ["NIGHTSHOT PLUS"] appear.) • To...
Operating Guide
Page 25
... LIGHT to the lens side (). 2 1 Playback To play back the images in mirror mode Open the LCD panel 90 degrees to the camcorder (), then rotate it 180 degrees to display . To cancel, touch [END]. • You cannot change the zoom speed with W (Wide angle)/T (Telephoto). To...
... LIGHT to the lens side (). 2 1 Playback To play back the images in mirror mode Open the LCD panel 90 degrees to the camcorder (), then rotate it 180 degrees to display . To cancel, touch [END]. • You cannot change the zoom speed with W (Wide angle)/T (Telephoto). To...
Operating Guide
Page 26
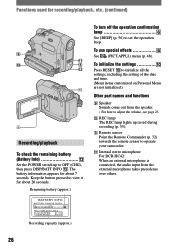
... switch up in red during recording (p. 55). Remote sensor Point the Remote Commander (p. 32) towards the remote sensor to operate your camcorder. Internal stereo microphone For DCR-HC42: When an external microphone is connected, the audio input from the speaker. • For how to adjust the volume, see page 23. ...
... switch up in red during recording (p. 55). Remote sensor Point the Remote Commander (p. 32) towards the remote sensor to operate your camcorder. Internal stereo microphone For DCR-HC42: When an external microphone is connected, the audio input from the speaker. • For how to adjust the volume, see page 23. ...
Operating Guide
Page 29
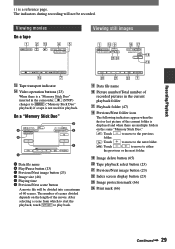
... a maximum of the current folder is a reference page. wa ws 7 Data file name Picture number/Total number of recorded pictures in the camcorder, (STOP) changes to play back. to move to the previous : Touch to move to the next folder. : Touch / to move to either the previous or...
... a maximum of the current folder is a reference page. wa ws 7 Data file name Picture number/Total number of recorded pictures in the camcorder, (STOP) changes to play back. to move to the previous : Touch to move to the next folder. : Touch / to move to either the previous or...
Operating Guide
Page 31
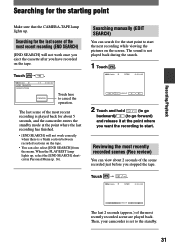
... just before you stopped the tape. The last scene of the most recently recorded scenes (Rec review) You can view about 5 seconds, and the camcorder enters the standby mode at the point where the last recording has finished. • [END SEARCH] will not work correctly when there is ... SEARCH EXECUTING 1 0:00:00 CANCEL Touch here to the standby. 31 Reviewing the most recent recording is set to cancel the operation. Then, your camcorder is played back for the starting point Make sure that the CAMERA-TAPE lamp lights up , select the [END SEARCH] shortcut in Personal Menu (p. ...
... just before you stopped the tape. The last scene of the most recently recorded scenes (Rec review) You can view about 5 seconds, and the camcorder enters the standby mode at the point where the last recording has finished. • [END SEARCH] will not work correctly when there is ... SEARCH EXECUTING 1 0:00:00 CANCEL Touch here to the standby. 31 Reviewing the most recent recording is set to cancel the operation. Then, your camcorder is played back for the starting point Make sure that the CAMERA-TAPE lamp lights up , select the [END SEARCH] shortcut in Personal Menu (p. ...

Operating Guide
Page 32
... the time code and the tape counter. • Zero set memory) 1 During playback, press ZERO SET MEMORY at a point you want to operate your camcorder (p. 26). 32 • To change the battery, see page 114. The tape counter is reset to locate later on the tape counter. • There may...
... the time code and the tape counter. • Zero set memory) 1 During playback, press ZERO SET MEMORY at a point you want to operate your camcorder (p. 26). 32 • To change the battery, see page 114. The tape counter is reset to locate later on the tape counter. • There may...

Operating Guide
Page 34
...A/V connecting cable (optional). Playing the picture on a TV Connect your camcorder to the wall outlet using the A/V connecting cable with an S VIDEO cable (optional), pictures can be connected. In this operation (p. 10). For DCR-HC42: To set the aspect ratio according to the connected TV (16:9/4:3) ... jack, by using the supplied AC Adaptor for this case, the yellow (standard video) plug connection is connected to a VCR Connect your camcorder to [4:3], or when the picture's aspect ratio switches between 16:9 and 4:3, the image may jitter. 34 Refer also to the manual supplied...
...A/V connecting cable (optional). Playing the picture on a TV Connect your camcorder to the wall outlet using the A/V connecting cable with an S VIDEO cable (optional), pictures can be connected. In this operation (p. 10). For DCR-HC42: To set the aspect ratio according to the connected TV (16:9/4:3) ... jack, by using the supplied AC Adaptor for this case, the yellow (standard video) plug connection is connected to a VCR Connect your camcorder to [4:3], or when the picture's aspect ratio switches between 16:9 and 4:3, the image may jitter. 34 Refer also to the manual supplied...


