Operating Guide
Page 9
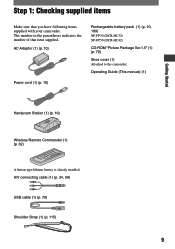
... Started Handycam Station (1) (p. 10) Wireless Remote Commander (1) (p. 32) A button-type lithium battery is already installed. A/V connecting cable (1) (p. 34, 59) USB cable (1) (p. 70) Shoulder Strap (1) (p. 115) 9 AC Adaptor (1) (p. 10) Power cord (1) (p. 10) Rechargeable battery pack (1) (p. 10, 109) NP-FP30 (DCR-HC32) NP-FP50 (DCR-HC42) CD-ROM "Picture Package Ver.1.5" (1) (p. 70) Shoe cover (1) Attached to the camcorder. The...
... Started Handycam Station (1) (p. 10) Wireless Remote Commander (1) (p. 32) A button-type lithium battery is already installed. A/V connecting cable (1) (p. 34, 59) USB cable (1) (p. 70) Shoulder Strap (1) (p. 115) 9 AC Adaptor (1) (p. 10) Power cord (1) (p. 10) Rechargeable battery pack (1) (p. 10, 109) NP-FP30 (DCR-HC32) NP-FP50 (DCR-HC42) CD-ROM "Picture Package Ver.1.5" (1) (p. 70) Shoe cover (1) Attached to the camcorder. The...
Operating Guide
Page 10
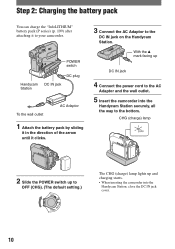
With the mark facing up and charging starts. • When inserting the camcorder into the Handycam Station securely, all the way to the bottom. POWER switch Handycam Station DC plug DC IN jack To the wall outlet AC Adaptor 1 Attach the battery pack by sliding it in the direction ... to OFF (CHG). (The default setting.) The CHG (charge) lamp lights up DC IN jack 4 Connect the power cord to the AC Adaptor and the wall outlet. 5 Insert the camcorder into the Handycam Station, close the DC IN jack cover. 10 Step 2: Charging the battery pack You can charge the "InfoLITHIUM" ...
With the mark facing up and charging starts. • When inserting the camcorder into the Handycam Station securely, all the way to the bottom. POWER switch Handycam Station DC plug DC IN jack To the wall outlet AC Adaptor 1 Attach the battery pack by sliding it in the direction ... to OFF (CHG). (The default setting.) The CHG (charge) lamp lights up DC IN jack 4 Connect the power cord to the AC Adaptor and the wall outlet. 5 Insert the camcorder into the Handycam Station, close the DC IN jack cover. 10 Step 2: Charging the battery pack You can charge the "InfoLITHIUM" ...
Operating Guide
Page 13
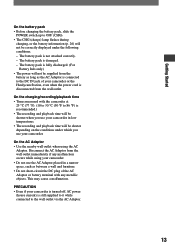
...is not attached correctly. - On the AC Adaptor • Use the nearby wall outlet when using your camcorder. • Do not use your camcorder or the Handycam Station, even when the power cord is disconnected from the battery as long as the AC Adaptor is fully discharged. (For Battery Info only....) • The power will be supplied from the wall outlet. This may cause a malfunction. The battery pack is ...
...is not attached correctly. - On the AC Adaptor • Use the nearby wall outlet when using your camcorder. • Do not use your camcorder or the Handycam Station, even when the power cord is disconnected from the battery as long as the AC Adaptor is fully discharged. (For Battery Info only....) • The power will be supplied from the wall outlet. This may cause a malfunction. The battery pack is ...
Operating Guide
Page 111
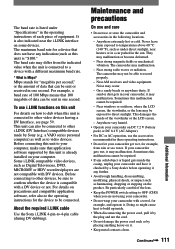
...64257;cations" in one second. This damages the inside . • When disconnecting the power cord, pull it may not be repaired. • If any solid object or liquid gets inside the casing, unplug your camcorder and have any further. • Avoid rough handling, disassembling, modifying, physical shock,... LCD screen. - The baud rate is listed under direct sunlight, near the i.LINK interface on your camcorder, it by Sony (e.g. The maximum baud rate for the device to your camcorder gets wet, it . • Keep metal contacts clean. They may malfunction. Doing so might cause ...
...64257;cations" in one second. This damages the inside . • When disconnecting the power cord, pull it may not be repaired. • If any solid object or liquid gets inside the casing, unplug your camcorder and have any further. • Avoid rough handling, disassembling, modifying, physical shock,... LCD screen. - The baud rate is listed under direct sunlight, near the i.LINK interface on your camcorder, it by Sony (e.g. The maximum baud rate for the device to your camcorder gets wet, it . • Keep metal contacts clean. They may malfunction. Doing so might cause ...
Operating Guide
Page 118
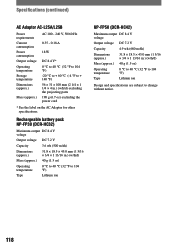
...× 3/4 × 1 13/16 in.) (w/h/d) Mass (approx.) 40 g (1.5 oz) Operating temperature Type 0 °C to 40 °C (32 °F to 104 °F) Lithium ion NP-FP50 (DCR-HC42) Maximum output DC 8.4 V voltage Output voltage DC 7.2 V Capacity 4.9 wh (680 mAh) Dimensions (approx.) 31.8 × 18.5 × 45.0 mm (1 5/16 × 3/4 × 1 13/...cations are subject to + 140 °F) 56 × 31 × 100 mm (2 1/4 × 1 1/4 × 4 in.) (w/h/d) excluding the projecting parts 190 g (6.7 oz) excluding the power cord * See the label on the AC Adaptor for other specifications.
...× 3/4 × 1 13/16 in.) (w/h/d) Mass (approx.) 40 g (1.5 oz) Operating temperature Type 0 °C to 40 °C (32 °F to 104 °F) Lithium ion NP-FP50 (DCR-HC42) Maximum output DC 8.4 V voltage Output voltage DC 7.2 V Capacity 4.9 wh (680 mAh) Dimensions (approx.) 31.8 × 18.5 × 45.0 mm (1 5/16 × 3/4 × 1 13/...cations are subject to + 140 °F) 56 × 31 × 100 mm (2 1/4 × 1 1/4 × 4 in.) (w/h/d) excluding the projecting parts 190 g (6.7 oz) excluding the power cord * See the label on the AC Adaptor for other specifications.
Operating Guide
Page 121
... effect 50 Pixela user support center .... 76 Playback 23 Double speed 52 Frame 52 Reverse 52 Slow 52 Playing time 12 PORTRAIT (Soft portrait) ... 40 Power cord 9 POWER switch 14 Previous/Next image button 29 Print 67 Print mark 66 PROGRAM AE 40, 91 P.MENU .... menu (Picture Application menu 48 PICT.
... effect 50 Pixela user support center .... 76 Playback 23 Double speed 52 Frame 52 Reverse 52 Slow 52 Playing time 12 PORTRAIT (Soft portrait) ... 40 Power cord 9 POWER switch 14 Previous/Next image button 29 Print 67 Print mark 66 PROGRAM AE 40, 91 P.MENU .... menu (Picture Application menu 48 PICT.


