Operating Guide
Page 4
... low light conditions, such as at the sun. Take pictures of the sun only in your camcorder • A mini DV cassette marked with (mini DV cassettes with Cassette Memory are incompatible) (p. 106). • "Memory Stick Duo" marked with two kinds of operations guides. - On recording • Before starting to ...and do not affect the recording in color) that is grayed out is not possible due to malfunction. Doing so might cause your camcorder to a malfunction of the camcorder, storage media, etc. • TV color systems differ depending on a TV, you can use . On the menu items, ...
... low light conditions, such as at the sun. Take pictures of the sun only in your camcorder • A mini DV cassette marked with (mini DV cassettes with Cassette Memory are incompatible) (p. 106). • "Memory Stick Duo" marked with two kinds of operations guides. - On recording • Before starting to ...and do not affect the recording in color) that is grayed out is not possible due to malfunction. Doing so might cause your camcorder to a malfunction of the camcorder, storage media, etc. • TV color systems differ depending on a TV, you can use . On the menu items, ...
Operating Guide
Page 6
... camcorder firmly ...........14 Step 4: Adjusting the LCD panel and viewfinder 15 Step 5: Using the touch panel 16 Changing the language setting 16 Checking the screen indicators (Display guide 16 Step 6: Setting the date and time 17 Step 7: Inserting a tape or a "Memory Stick... Duo 18 Step 8: Selecting the aspect ratio (16:9 or 4:3) of the recording picture (DCR-HC42 19 Recording/Playback Recording/Playback with ease (Easy Handycam 20 Recording 22 Playback 23 Functions used for recording/playback, etc 24 ...
... camcorder firmly ...........14 Step 4: Adjusting the LCD panel and viewfinder 15 Step 5: Using the touch panel 16 Changing the language setting 16 Checking the screen indicators (Display guide 16 Step 6: Setting the date and time 17 Step 7: Inserting a tape or a "Memory Stick... Duo 18 Step 8: Selecting the aspect ratio (16:9 or 4:3) of the recording picture (DCR-HC42 19 Recording/Playback Recording/Playback with ease (Easy Handycam 20 Recording 22 Playback 23 Functions used for recording/playback, etc 24 ...

Operating Guide
Page 7
...40 Settings to adjust your camcorder to a recorded tape 63 Continued 7 menu 48 Special effects on pictures or additional functions on a tape or other recording devices 60 Recording pictures from a VCR or TV 61 Dubbing pictures from a tape to a "Memory Stick Duo 62 Dubbing sound to... the recording conditions (EXPOSURE/ WHITE BAL./STEADYSHOT, etc.) MEMORY SET menu 45 Settings for editing or playing back in various modes (VAR.SPD PB/END SEARCH, ...
...40 Settings to adjust your camcorder to a recorded tape 63 Continued 7 menu 48 Special effects on pictures or additional functions on a tape or other recording devices 60 Recording pictures from a VCR or TV 61 Dubbing pictures from a tape to a "Memory Stick Duo 62 Dubbing sound to... the recording conditions (EXPOSURE/ WHITE BAL./STEADYSHOT, etc.) MEMORY SET menu 45 Settings for editing or playing back in various modes (VAR.SPD PB/END SEARCH, ...

Operating Guide
Page 8
Deleting recorded pictures from the "Memory Stick Duo 65 Marking images on the "Memory Stick Duo" with specific information (Image protection/Print mark 66 Printing recorded images (PictBridge compliant printer 67 Jacks to connect external ...to DVD 77 Connecting an analog VCR to the computer via your camcorder (Signal convert function 80 Troubleshooting Troubleshooting 82 Warning indicators and messages 100 Additional Information Using your camcorder abroad 105 Usable cassette tapes 106 About the "Memory Stick 107 About the "InfoLITHIUM" battery pack 109 About i.LINK 110 ...
Deleting recorded pictures from the "Memory Stick Duo 65 Marking images on the "Memory Stick Duo" with specific information (Image protection/Print mark 66 Printing recorded images (PictBridge compliant printer 67 Jacks to connect external ...to DVD 77 Connecting an analog VCR to the computer via your camcorder (Signal convert function 80 Troubleshooting Troubleshooting 82 Warning indicators and messages 100 Additional Information Using your camcorder abroad 105 Usable cassette tapes 106 About the "Memory Stick 107 About the "InfoLITHIUM" battery pack 109 About i.LINK 110 ...
Operating Guide
Page 14
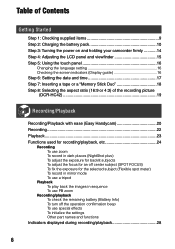
... power. ([A.SHUT OFF], p. 56). PLAY/EDIT: To play back, slide the POWER switch repeatedly to turn on a "Memory Stick Duo." If the POWER switch is adjustable. LENS COVER switch 3 Put your camcorder without any operation attempted for about 5 seconds. The length of the arrow to turn on the CAMERA-TAPE or... CAMERAMEMORY lamp, the current date and time will be set to OPEN. 4 Hold the camcorder as illustrated. 2 Slide the POWER switch repeatedly in the direction of the Strap Belt is set to turn off automatically if you slide the ...
... power. ([A.SHUT OFF], p. 56). PLAY/EDIT: To play back, slide the POWER switch repeatedly to turn on a "Memory Stick Duo." If the POWER switch is adjustable. LENS COVER switch 3 Put your camcorder without any operation attempted for about 5 seconds. The length of the arrow to turn on the CAMERA-TAPE or... CAMERAMEMORY lamp, the current date and time will be set to OPEN. 4 Hold the camcorder as illustrated. 2 Slide the POWER switch repeatedly in the direction of the Strap Belt is set to turn off automatically if you slide the ...
Operating Guide
Page 18
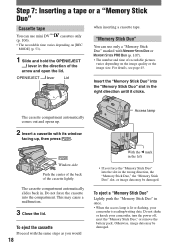
...once. • When the access lamp is lit or flashing, your camcorder, turn the power off, eject the "Memory Stick Duo," or remove the battery pack. Do not force the cassette into the "Memory Stick Duo" slot in the direction of the arrow and open the lid. Access ... then press . This may be damaged. OPEN/EJECT lever Lid "Memory Stick Duo" You can use only a "Memory Stick Duo" marked with or (p. 107). • The number and time of the cassette lightly. Do not shake or knock your camcorder is reading/writing data. You can use mini DV cassettes only (p....
...once. • When the access lamp is lit or flashing, your camcorder, turn the power off, eject the "Memory Stick Duo," or remove the battery pack. Do not force the cassette into the "Memory Stick Duo" slot in the direction of the arrow and open the lid. Access ... then press . This may be damaged. OPEN/EJECT lever Lid "Memory Stick Duo" You can use only a "Memory Stick Duo" marked with or (p. 107). • The number and time of the cassette lightly. Do not shake or knock your camcorder is reading/writing data. You can use mini DV cassettes only (p....
Operating Guide
Page 19
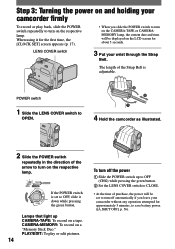
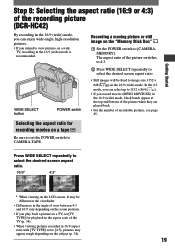
WIDE SELECT button POWER switch Recording a moving picture or still image on the "Memory Stick Duo" Set the POWER switch to select the desired screen aspect ratio. 16:9* 4:3* * When viewing on the LCD screen. Selecting the aspect ratio for .... • If you intend to view pictures on the subject (p. 34). 19 Getting Started Step 8: Selecting the aspect ratio (16:9 or 4:3) of the recording picture (DCR-HC42) By recording in the 16:9 (wide) mode, you can select up to 1152 × 864 ( ). • If you record movies (MPEG MOVIE EX) in the...
WIDE SELECT button POWER switch Recording a moving picture or still image on the "Memory Stick Duo" Set the POWER switch to select the desired screen aspect ratio. 16:9* 4:3* * When viewing on the LCD screen. Selecting the aspect ratio for .... • If you intend to view pictures on the subject (p. 34). 19 Getting Started Step 8: Selecting the aspect ratio (16:9 or 4:3) of the recording picture (DCR-HC42) By recording in the 16:9 (wide) mode, you can select up to 1152 × 864 ( ). • If you record movies (MPEG MOVIE EX) in the...
Operating Guide
Page 21
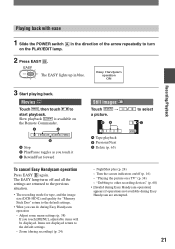
...touch it Rewind/Fast forward To cancel Easy Handycam operation Press EASY again. Zoom (during Easy Handycam are returned to the previous situation. • The recording mode for tape, and the image size (DCR-HC42) and quality for "Memory Stick Duo" return to turn on a TV" (p. 34...) - NightShot plus (p. 24) - "Dubbing to select C MENU - Easy Handycam operation ON Recording/Playback 3 Start playing back. The EASY lamp turns ...
...touch it Rewind/Fast forward To cancel Easy Handycam operation Press EASY again. Zoom (during Easy Handycam are returned to the previous situation. • The recording mode for tape, and the image size (DCR-HC42) and quality for "Memory Stick Duo" return to turn on a TV" (p. 34...) - NightShot plus (p. 24) - "Dubbing to select C MENU - Easy Handycam operation ON Recording/Playback 3 Start playing back. The EASY lamp turns ...
Operating Guide
Page 22
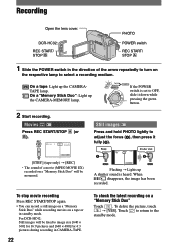
DCR-HC32: REC START/ STOP PHOTO POWER switch REC START/ STOP 1 Slide the POWER switch in standby mode. Movies Press REC START/STOP (or ). Still images Press and hold PHOTO lightly to turn on a "Memory Stick Duo" Touch . Touch to return to select a recording medium.... • The sound of the arrow repeatedly to adjust the focus (), then press it down while pressing the green button. 2 Start recording. For DCR-HC42: Still images will be fixed to image size [640 × 360] for 16:9 pictures and [640 × 480] for 4:3 pictures during...
DCR-HC32: REC START/ STOP PHOTO POWER switch REC START/ STOP 1 Slide the POWER switch in standby mode. Movies Press REC START/STOP (or ). Still images Press and hold PHOTO lightly to turn on a "Memory Stick Duo" Touch . Touch to return to select a recording medium.... • The sound of the arrow repeatedly to adjust the focus (), then press it down while pressing the green button. 2 Start recording. For DCR-HC42: Still images will be fixed to image size [640 × 360] for 16:9 pictures and [640 × 480] for 4:3 pictures during...

Operating Guide
Page 23
... find [VOLUME] in [MENU]. , touch To search for more than 3 minutes. SPD PB], p. 52). To display pictures on a "Memory Stick Duo" on the PLAY/EDIT lamp. The most recently recorded image is engaged for a scene during playback Touch and hold / during playback (Picture Search),...playback. Playback 1 Slide the POWER switch in the direction of the arrow repeatedly to select a picture with / , then touch (p. 47). On a "Memory Stick Duo" : Touch / to turn on the Index screen Still images Touch . Touch the picture you touch it Rewind/Fast forward ...
... find [VOLUME] in [MENU]. , touch To search for more than 3 minutes. SPD PB], p. 52). To display pictures on a "Memory Stick Duo" on the PLAY/EDIT lamp. The most recently recorded image is engaged for a scene during playback Touch and hold / during playback (Picture Search),...playback. Playback 1 Slide the POWER switch in the direction of the arrow repeatedly to select a picture with / , then touch (p. 47). On a "Memory Stick Duo" : Touch / to turn on the Index screen Still images Touch . Touch the picture you touch it Rewind/Fast forward ...
Operating Guide
Page 28
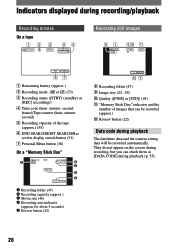
...Recording capacity of the tape (approx.) (55) END SEARCH/EDIT SEARCH/Rec review display switch button (31) Personal Menu button (36) On a "Memory Stick Duo" A B C D E Recording folder (47) Recording capacity (approx.) Movie size (46) Recording start indicator (appears for... qs 7 Recording folder (47) Image size (22 , 45) Quality ([FINE] or [STD]) (45) "Memory Stick Duo" indicator and the number of images that can check them as [DATA CODE] during playback The date/time data and the camera setting data...
...Recording capacity of the tape (approx.) (55) END SEARCH/EDIT SEARCH/Rec review display switch button (31) Personal Menu button (36) On a "Memory Stick Duo" A B C D E Recording folder (47) Recording capacity (approx.) Movie size (46) Recording start indicator (appears for... qs 7 Recording folder (47) Image size (22 , 45) Quality ([FINE] or [STD]) (45) "Memory Stick Duo" indicator and the number of images that can check them as [DATA CODE] during playback The date/time data and the camera setting data...
Operating Guide
Page 29
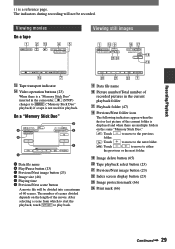
...; Tape transport indicator Video operation buttons (23) When there is displayed and when there are multiple folders on the length of the movie. On a "Memory Stick Duo" D A 0:00:00 E B F C Data file name Play/Pause button (23) Previous/Next image button (... picture of 60 scenes. w; wa ws 7 Data file name Picture number/Total number of recorded pictures in the camcorder, (STOP) changes to either the previous or the next folder. Image delete button (65) Tape playback select button (23...
...; Tape transport indicator Video operation buttons (23) When there is displayed and when there are multiple folders on the length of the movie. On a "Memory Stick Duo" D A 0:00:00 E B F C Data file name Play/Pause button (23) Previous/Next image button (... picture of 60 scenes. w; wa ws 7 Data file name Picture number/Total number of recorded pictures in the camcorder, (STOP) changes to either the previous or the next folder. Image delete button (65) Tape playback select button (23...

Operating Guide
Page 45
..., etc.) The default settings are selected. The maximum number of images are recorded when you have space for fewer than 3 images remaining on the "Memory Stick Duo." QUALITY FINE ( ) Records still images at the best exposure. • The flash (optional) will not function... is available for details on selecting menu items. STILL SET For DCR-HC42: BURST You can compare the 3 images and select an image recorded at the fine image quality level. Capacity of the "Memory Stick Duo" (MB) and the number of recordable pictures In 4:3 aspect ratio 1152...
..., etc.) The default settings are selected. The maximum number of images are recorded when you have space for fewer than 3 images remaining on the "Memory Stick Duo." QUALITY FINE ( ) Records still images at the best exposure. • The flash (optional) will not function... is available for details on selecting menu items. STILL SET For DCR-HC42: BURST You can compare the 3 images and select an image recorded at the fine image quality level. Capacity of the "Memory Stick Duo" (MB) and the number of recordable pictures In 4:3 aspect ratio 1152...

Operating Guide
Page 46
...selected for an image size of [640 × 480] - approx. 500kB. - [FINE] is selected for an image size of the "Memory Stick Duo" (MB) and the recordable time (hour: minute: second) 320 × 240 160 × 112 8MB 16MB 32MB 64MB 128MB 256MB ...Sony Corporation. approx. 60kB. • The image size of [1152 × 864] - Top: [FINE] is selected for an image size of [640 × 360] - Bottom: [STANDARD] is selected for an image size of [640 × 480] - approx. 150kB. - [STANDARD] is selected for image quality. MEMORY SET menu (continued) In 16:9 aspect ratio (DCR-HC42...
...selected for an image size of [640 × 480] - approx. 500kB. - [FINE] is selected for an image size of the "Memory Stick Duo" (MB) and the recordable time (hour: minute: second) 320 × 240 160 × 112 8MB 16MB 32MB 64MB 128MB 256MB ...Sony Corporation. approx. 60kB. • The image size of [1152 × 864] - Top: [FINE] is selected for an image size of [640 × 360] - Bottom: [STANDARD] is selected for an image size of [640 × 480] - approx. 150kB. - [STANDARD] is selected for image quality. MEMORY SET menu (continued) In 16:9 aspect ratio (DCR-HC42...

Operating Guide
Page 47
... . 47 Touch [YES] twice . Operate the POWER switch/operation buttons. - Touch [YES] . • You cannot delete the created folders using your camcorder. NEW FOLDER You can create a new folder (102MSDCF to format the "Memory Stick Duo" (p. 47), or delete them using your computer. • The number of folders increases. Eject the...
... . 47 Touch [YES] twice . Operate the POWER switch/operation buttons. - Touch [YES] . • You cannot delete the created folders using your camcorder. NEW FOLDER You can create a new folder (102MSDCF to format the "Memory Stick Duo" (p. 47), or delete them using your computer. • The number of folders increases. Eject the...

Operating Guide
Page 49
... your recordings. Touch the desired effect. Adjust the effect with / , then touch . Using the Menu SLIDE SHOW Plays back the images stored on a "Memory Stick Duo," or in a folder in sequence (slide show with / before touching [START]. • If movies are played back in sequence. Touch [REPEAT]. Select...
... your recordings. Touch the desired effect. Adjust the effect with / , then touch . Using the Menu SLIDE SHOW Plays back the images stored on a "Memory Stick Duo," or in a folder in sequence (slide show with / before touching [START]. • If movies are played back in sequence. Touch [REPEAT]. Select...
Operating Guide
Page 50
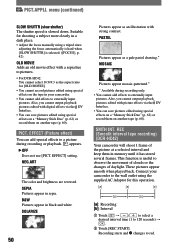
PICT. REC (Smooth interval tape recording) (DCR-HC42) Your camcorder will shoot 1 frame of daylight. Connect your camcorder. • You cannot add effects to 120 seconds) . Touch [REC START]. Recording starts and changes to observe the movement... Also, you cannot output playback pictures edited with digital effects via the DV Interface. • You can save pictures edited using special effects on a "Memory Stick Duo" (p. 62) or record them on the tape in a dark place. • Adjust the focus manually using a tripod since adjusting the focus ...
PICT. REC (Smooth interval tape recording) (DCR-HC42) Your camcorder will shoot 1 frame of daylight. Connect your camcorder. • You cannot add effects to 120 seconds) . Touch [REC START]. Recording starts and changes to observe the movement... Also, you cannot output playback pictures edited with digital effects via the DV Interface. • You can save pictures edited using special effects on a "Memory Stick Duo" (p. 62) or record them on the tape in a dark place. • Adjust the focus manually using a tripod since adjusting the focus ...
Operating Guide
Page 51
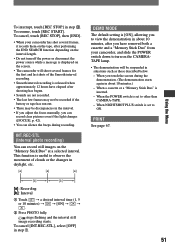
...; Do not turn on the "Memory Stick Duo" at a selected interval. When you to ON. When a cassette or a "Memory Stick Duo" is [ON], allowing you touch the screen during recording. When NIGHTSHOT PLUS switch is displayed on the screen. • The camcorder will be discrepancies in situations such...as those described below. - When the POWER switch is released when approximately 12 hours have removed both a cassette and a "Memory Stick Duo" from your camcorder has shot several frames for the first and last shots of clouds or the changes in about 10 minutes.) - This...
...; Do not turn on the "Memory Stick Duo" at a selected interval. When you to ON. When a cassette or a "Memory Stick Duo" is [ON], allowing you touch the screen during recording. When NIGHTSHOT PLUS switch is displayed on the screen. • The camcorder will be discrepancies in situations such...as those described below. - When the POWER switch is released when approximately 12 hours have removed both a cassette and a "Memory Stick Duo" from your camcorder has shot several frames for the first and last shots of clouds or the changes in about 10 minutes.) - This...
Operating Guide
Page 55
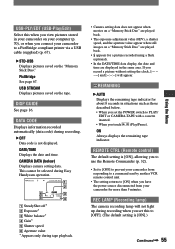
... (0EV), a shutter speed, and the aperture value appear when still images on a "Memory Stick Duo" are played back. • appears for a picture recorded using a flash... to use the Remote Commander (p. 32). • Set to [OFF] to prevent your camcorder to [ON] when you view pictures stored in situations such as those described below ) Displays... not light up during recording when you set the POWER switch to [OFF]. (The default setting is not displayed. This cannot be selected during Easy Handycam operation. 6 0 min 1 0 : 0 0 : 0 0 : 0 0 2 6 5 AUTO 100 AWB F1. 8 9 dB 3 4 &#...
... (0EV), a shutter speed, and the aperture value appear when still images on a "Memory Stick Duo" are played back. • appears for a picture recorded using a flash... to use the Remote Commander (p. 32). • Set to [OFF] to prevent your camcorder to [ON] when you view pictures stored in situations such as those described below ) Displays... not light up during recording when you set the POWER switch to [OFF]. (The default setting is not displayed. This cannot be selected during Easy Handycam operation. 6 0 min 1 0 : 0 0 : 0 0 : 0 0 2 6 5 AUTO 100 AWB F1. 8 9 dB 3 4 &#...
Operating Guide
Page 61
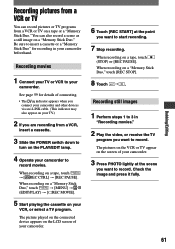
... you want to start recording. 7 Stop recording. When recording on a "Memory Stick Duo," touch [MENU] (EDIT/PLAY) [ REC MOVIE]. 5 Start playing the cassette on the PLAY/EDIT lamp. 4 Operate your camcorder beforehand. Recording still images 1 Perform steps 1 to 3 in your camcorder to record. The picture played on the connected device appears...
... you want to start recording. 7 Stop recording. When recording on a "Memory Stick Duo," touch [MENU] (EDIT/PLAY) [ REC MOVIE]. 5 Start playing the cassette on the PLAY/EDIT lamp. 4 Operate your camcorder beforehand. Recording still images 1 Perform steps 1 to 3 in your camcorder to record. The picture played on the connected device appears...


