Operating Guide
Page 14
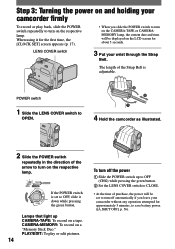
...set to OFF, slide it down while pressing the green button. CAMERA-MEMORY: To record on a tape. POWER switch 1 Slide the LENS COVER switch to OPEN. 4 Hold the camcorder as illustrated. 2 Slide the POWER switch repeatedly in the direction of the arrow to turn on the respective lamp. PLAY/EDIT: To... is adjustable. Step 3: Turning the power on and holding your camcorder firmly To record or play or edit pictures. 14 To turn off the power Slide the POWER switch up CAMERA-TAPE: To record on a "Memory Stick Duo." LENS COVER switch 3 Put your wrist through the Strap Belt.
...set to OFF, slide it down while pressing the green button. CAMERA-MEMORY: To record on a tape. POWER switch 1 Slide the LENS COVER switch to OPEN. 4 Hold the camcorder as illustrated. 2 Slide the POWER switch repeatedly in the direction of the arrow to turn on the respective lamp. PLAY/EDIT: To... is adjustable. Step 3: Turning the power on and holding your camcorder firmly To record or play or edit pictures. 14 To turn off the power Slide the POWER switch up CAMERA-TAPE: To record on a "Memory Stick Duo." LENS COVER switch 3 Put your wrist through the Strap Belt.

Operating Guide
Page 20
...lightly to OFF, slide it down while pressing the green button. 2 Press EASY . Recording with ease (Easy Handycam) With this Easy Handycam operation, most of the arrow repeatedly to turn on the respective lamp to select a recording medium. The EASY lights up... in the direction of the camera settings are automatically adjusted Open the lens cover. Easy Handycam operation ON 3 Start recording. optimally, which frees you from detailed adjustment. B Since only basic functions become available and DCR-HC32: E screen font size increases for easy viewing, even A &#...
...lightly to OFF, slide it down while pressing the green button. 2 Press EASY . Recording with ease (Easy Handycam) With this Easy Handycam operation, most of the arrow repeatedly to turn on the respective lamp to select a recording medium. The EASY lights up... in the direction of the camera settings are automatically adjusted Open the lens cover. Easy Handycam operation ON 3 Start recording. optimally, which frees you from detailed adjustment. B Since only basic functions become available and DCR-HC32: E screen font size increases for easy viewing, even A &#...
Operating Guide
Page 22
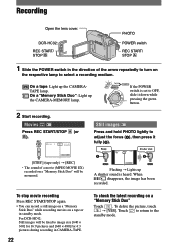
...the latest recording on a "Memory Stick Duo" Touch . If the POWER switch is heard. Recording Open the lens cover. On a "Memory Stick Duo": Light up the CAMERATAPE lamp. Touch to return to image size [640 ×...215; 480] for 4:3 pictures during recording in standby mode. On a tape: Light up the CAMERA-MEMORY lamp. DCR-HC32: REC START/ STOP PHOTO POWER switch REC START/ STOP 1 Slide the POWER switch in ... lightly to select a recording medium. For DCR-HC42: Still images will be fixed to the standby mode. To delete the picture, touch [YES].
...the latest recording on a "Memory Stick Duo" Touch . If the POWER switch is heard. Recording Open the lens cover. On a "Memory Stick Duo": Light up the CAMERATAPE lamp. Touch to return to image size [640 ×...215; 480] for 4:3 pictures during recording in standby mode. On a tape: Light up the CAMERA-MEMORY lamp. DCR-HC32: REC START/ STOP PHOTO POWER switch REC START/ STOP 1 Slide the POWER switch in ... lightly to select a recording medium. For DCR-HC42: Still images will be fixed to the standby mode. To delete the picture, touch [YES].
Operating Guide
Page 120
... menu 53 TIME/LANGU. Index (continued) FORMAT 47, 107 Frame-by-frame playback.... 52 Full charge 11 G Getting started 9, 72, 76 H Handycam Station 9 Hand pad 115 Help 71 Holding the camcorder......... 14 I Icon ...... See Display indicators ID-1/ID-2 system 34, 44 Image delete button 29 Image protection 66 Image quality (QUALITY 45... back light 54 LCD BRIGHT 53 LCD COLOR 54 LCD panel 15 LCD BL LEVEL .......... 54 LCD BRIGHT 53 LCD COLOR 54 LCD screen 15 LENS COVER switch.......... 14 Lid 18 LP (Long Play 53 LUMI.
... menu 53 TIME/LANGU. Index (continued) FORMAT 47, 107 Frame-by-frame playback.... 52 Full charge 11 G Getting started 9, 72, 76 H Handycam Station 9 Hand pad 115 Help 71 Holding the camcorder......... 14 I Icon ...... See Display indicators ID-1/ID-2 system 34, 44 Image delete button 29 Image protection 66 Image quality (QUALITY 45... back light 54 LCD BRIGHT 53 LCD COLOR 54 LCD panel 15 LCD BL LEVEL .......... 54 LCD BRIGHT 53 LCD COLOR 54 LCD screen 15 LENS COVER switch.......... 14 Lid 18 LP (Long Play 53 LUMI.


