
Operating Guide
Page 20
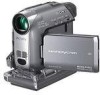
... 1 to 8 (p. 9 to adjust the focus. Recording still images : Light up in blue. The EASY lights up the CAMERA-MEMORY lamp. lightly to 19) before operation. B Since only basic functions become available and DCR-HC32: E screen font size increases for easy viewing, even A first...ease (Easy Handycam) With this Easy Handycam operation, most of the arrow repeatedly to turn on the respective lamp to record. Still images (4:3) Press PHOTO . [STBY] [REC] To stop recording, press (or ) again. 20 Flashing Lights up the ...
... 1 to 8 (p. 9 to adjust the focus. Recording still images : Light up in blue. The EASY lights up the CAMERA-MEMORY lamp. lightly to 19) before operation. B Since only basic functions become available and DCR-HC32: E screen font size increases for easy viewing, even A first...ease (Easy Handycam) With this Easy Handycam operation, most of the arrow repeatedly to turn on the respective lamp to record. Still images (4:3) Press PHOTO . [STBY] [REC] To stop recording, press (or ) again. 20 Flashing Lights up the ...
Operating Guide
Page 22
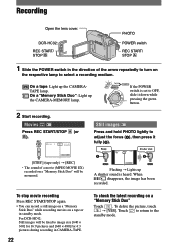
...is set to the standby mode. A B Flashing Lights up the CAMERA-MEMORY lamp. To delete the picture, touch [YES]. When disappears, the image has been recorded. For DCR-HC42: Still images will be fixed to select a recording medium. DCR-HC32: REC START/ STOP PHOTO ... in standby mode. If the POWER switch is heard. Recording Open the lens cover. On a tape: Light up the CAMERATAPE lamp. Still images Press and hold PHOTO lightly to adjust the focus (), then press it down while pressing the green button. 2 Start recording. Movies...
...is set to the standby mode. A B Flashing Lights up the CAMERA-MEMORY lamp. To delete the picture, touch [YES]. When disappears, the image has been recorded. For DCR-HC42: Still images will be fixed to select a recording medium. DCR-HC32: REC START/ STOP PHOTO ... in standby mode. If the POWER switch is heard. Recording Open the lens cover. On a tape: Light up the CAMERATAPE lamp. Still images Press and hold PHOTO lightly to adjust the focus (), then press it down while pressing the green button. 2 Start recording. Movies...
Operating Guide
Page 38
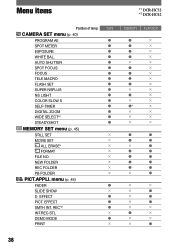
... SLIDE SHOW × D. Menu items *1 DCR-HC32 *2 DCR-HC42 Position of lamp: TAPE CAMERA SET menu (p. 40) PROGRAM AE SPOT METER EXPOSURE WHITE BAL. AUTO SHUTTER SPOT FOCUS FOCUS TELE MACRO FLASH SET SUPER NSPLUS NS LIGHT COLOR SLOW S SELF-TIMER ...
... SLIDE SHOW × D. Menu items *1 DCR-HC32 *2 DCR-HC42 Position of lamp: TAPE CAMERA SET menu (p. 40) PROGRAM AE SPOT METER EXPOSURE WHITE BAL. AUTO SHUTTER SPOT FOCUS FOCUS TELE MACRO FLASH SET SUPER NSPLUS NS LIGHT COLOR SLOW S SELF-TIMER ...
Operating Guide
Page 43
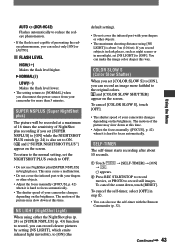
...SUPER NSPLUS] (p. 43) function to record, you can record clearer pictures by setting [NS LIGHT], which emits infrared light (invisible), to focus automatically. • The shutter speed of your camcorder changes depending on the brightness. If you record subjects in dark places, such as night ...not cover the infrared port with the Remote Commander (p. 32). To cancel the self-timer, select [OFF] in bright places. AUTO (DCR-HC42) Flashes automatically to reduce the redeye phenomenon. • If the flash is not capable of preventing the redeye phenomenon, you can select ...
...SUPER NSPLUS] (p. 43) function to record, you can record clearer pictures by setting [NS LIGHT], which emits infrared light (invisible), to focus automatically. • The shutter speed of your camcorder changes depending on the brightness. If you record subjects in dark places, such as night ...not cover the infrared port with the Remote Commander (p. 32). To cancel the self-timer, select [OFF] in bright places. AUTO (DCR-HC42) Flashes automatically to reduce the redeye phenomenon. • If the flash is not capable of preventing the redeye phenomenon, you can select ...
Operating Guide
Page 119
...EFFECT (Digital effect 49, 92 E EASY button 20 Easy Handycam 20 EDIT SEARCH 31 END SEARCH 31, 52 END SEARCH/EDIT... NO. (File number) ...... 47 FINE 45 First Step Guide 70, 76 Fixing the exposure 25 FLASH LEVEL 43 FLASH MODE 42 FLASH (Flash motion) ........ 49 FLASH SET 42 FOCUS 42, 88 Folder NEW FOLDER 47 PB FOLDER (Playback folder 47 REC FOLDER (Recording...A/V jack 34, 59, 63, 80 Access lamp 18 Active Interface Shoe........... 69 AC Adaptor 9 Adjusting exposure for back light 88 ALL ERASE 47 Aspect ratio 19 AUDIO MIX 53, 65 AUDIO MODE 53 AUD DUB CTRL (Audio dubbing 52 AUTO...
...EFFECT (Digital effect 49, 92 E EASY button 20 Easy Handycam 20 EDIT SEARCH 31 END SEARCH 31, 52 END SEARCH/EDIT... NO. (File number) ...... 47 FINE 45 First Step Guide 70, 76 Fixing the exposure 25 FLASH LEVEL 43 FLASH MODE 42 FLASH (Flash motion) ........ 49 FLASH SET 42 FOCUS 42, 88 Folder NEW FOLDER 47 PB FOLDER (Playback folder 47 REC FOLDER (Recording...A/V jack 34, 59, 63, 80 Access lamp 18 Active Interface Shoe........... 69 AC Adaptor 9 Adjusting exposure for back light 88 ALL ERASE 47 Aspect ratio 19 AUDIO MIX 53, 65 AUDIO MODE 53 AUD DUB CTRL (Audio dubbing 52 AUTO...


