Operating Guide
Page 4
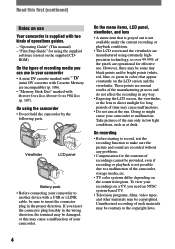
... extremely highprecision technology, so over 99.99% of the pixels are incompatible) (p. 106). • "Memory Stick Duo" marked with a USB or i.LINK cable, be copyrighted. To view your camcorder to another device with , (p. 107). On using the supplied software (stored on the LCD screen and...64257;nder, or the lens to insert the connector plug in your camcorder to the copyright laws. 4 Doing so might cause your camcorder • A mini DV cassette marked with (mini DV cassettes with Cassette Memory are operational for effective use in the proper direction. However, there...
... extremely highprecision technology, so over 99.99% of the pixels are incompatible) (p. 106). • "Memory Stick Duo" marked with a USB or i.LINK cable, be copyrighted. To view your camcorder to another device with , (p. 107). On using the supplied software (stored on the LCD screen and...64257;nder, or the lens to insert the connector plug in your camcorder to the copyright laws. 4 Doing so might cause your camcorder • A mini DV cassette marked with (mini DV cassettes with Cassette Memory are operational for effective use in the proper direction. However, there...
Operating Guide
Page 6
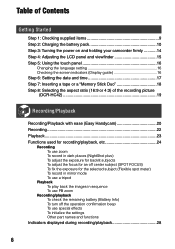
... camcorder firmly ...........14 Step 4: Adjusting the LCD panel and viewfinder 15 Step 5: Using the touch panel 16 Changing the language setting 16 Checking the screen indicators (Display guide 16 Step 6: Setting the date and time 17 Step 7: Inserting a tape or a "Memory Stick... Duo 18 Step 8: Selecting the aspect ratio (16:9 or 4:3) of the recording picture (DCR-HC42 19 Recording/Playback Recording/Playback with ease (Easy Handycam 20 Recording 22 Playback 23 Functions used for recording/playback, etc 24 ...
... camcorder firmly ...........14 Step 4: Adjusting the LCD panel and viewfinder 15 Step 5: Using the touch panel 16 Changing the language setting 16 Checking the screen indicators (Display guide 16 Step 6: Setting the date and time 17 Step 7: Inserting a tape or a "Memory Stick... Duo 18 Step 8: Selecting the aspect ratio (16:9 or 4:3) of the recording picture (DCR-HC42 19 Recording/Playback Recording/Playback with ease (Easy Handycam 20 Recording 22 Playback 23 Functions used for recording/playback, etc 24 ...

Operating Guide
Page 7
... pictures or additional functions on a tape or other recording devices 60 Recording pictures from a VCR or TV 61 Dubbing pictures from a tape to a "Memory Stick Duo 62 Dubbing sound to other basic settings (REC MODE/ MULTI-SOUND/LCD/VF SET/DISP OUTPUT/USB, etc.) TIME/LANGU. menu 56 (CLOCK SET...TV 34 Using the Menu Using the menu items 36 Menu items 38 CAMERA SET menu 40 Settings to adjust your camcorder to the recording conditions (EXPOSURE/ WHITE BAL./STEADYSHOT, etc.) MEMORY SET menu 45 Settings for editing or playing back in various modes (VAR.SPD PB/END SEARCH, etc.) STANDARD ...
... pictures or additional functions on a tape or other recording devices 60 Recording pictures from a VCR or TV 61 Dubbing pictures from a tape to a "Memory Stick Duo 62 Dubbing sound to other basic settings (REC MODE/ MULTI-SOUND/LCD/VF SET/DISP OUTPUT/USB, etc.) TIME/LANGU. menu 56 (CLOCK SET...TV 34 Using the Menu Using the menu items 36 Menu items 38 CAMERA SET menu 40 Settings to adjust your camcorder to the recording conditions (EXPOSURE/ WHITE BAL./STEADYSHOT, etc.) MEMORY SET menu 45 Settings for editing or playing back in various modes (VAR.SPD PB/END SEARCH, etc.) STANDARD ...

Operating Guide
Page 8
Deleting recorded pictures from the "Memory Stick Duo 65 Marking images on the "Memory Stick Duo" with specific information (Image protection/Print mark 66 Printing recorded images (PictBridge compliant printer 67 Jacks to connect external ...to DVD 77 Connecting an analog VCR to the computer via your camcorder (Signal convert function 80 Troubleshooting Troubleshooting 82 Warning indicators and messages 100 Additional Information Using your camcorder abroad 105 Usable cassette tapes 106 About the "Memory Stick 107 About the "InfoLITHIUM" battery pack 109 About i.LINK 110 ...
Deleting recorded pictures from the "Memory Stick Duo 65 Marking images on the "Memory Stick Duo" with specific information (Image protection/Print mark 66 Printing recorded images (PictBridge compliant printer 67 Jacks to connect external ...to DVD 77 Connecting an analog VCR to the computer via your camcorder (Signal convert function 80 Troubleshooting Troubleshooting 82 Warning indicators and messages 100 Additional Information Using your camcorder abroad 105 Usable cassette tapes 106 About the "Memory Stick 107 About the "InfoLITHIUM" battery pack 109 About i.LINK 110 ...
Operating Guide
Page 14
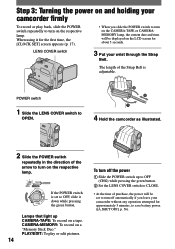
... power will be set to OFF, slide it for the first time, the [CLOCK SET] screen appears (p. 17). • When you leave your camcorder without any operation attempted for about 5 seconds. PLAY/EDIT: To play back, slide the POWER switch repeatedly to turn on a tape. Step 3: Turning the power... be displayed on the LCD screen for approximately 5 minutes, to save battery power. ([A.SHUT OFF], p. 56). The length of the arrow to turn on a "Memory Stick Duo." LENS COVER switch 3 Put your wrist through the Strap Belt. When using it down while pressing the green button.
... power will be set to OFF, slide it for the first time, the [CLOCK SET] screen appears (p. 17). • When you leave your camcorder without any operation attempted for about 5 seconds. PLAY/EDIT: To play back, slide the POWER switch repeatedly to turn on a tape. Step 3: Turning the power... be displayed on the LCD screen for approximately 5 minutes, to save battery power. ([A.SHUT OFF], p. 56). The length of the arrow to turn on a "Memory Stick Duo." LENS COVER switch 3 Put your wrist through the Strap Belt. When using it down while pressing the green button.
Operating Guide
Page 18
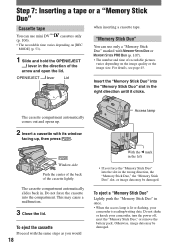
...• The recordable time varies depending on the image quality or the image size. Insert the "Memory Stick Duo" into the slot in the wrong direction, the "Memory Stick Duo," the "Memory Stick Duo" slot, or image data may be damaged. To eject the cassette Proceed with its window facing...into the compartment. Do not shake or knock your camcorder is lit or flashing, your camcorder, turn the power off, eject the "Memory Stick Duo," or remove the battery pack. OPEN/EJECT lever Lid "Memory Stick Duo" You can use only a "Memory Stick Duo" marked with or (p. 107). • ...
...• The recordable time varies depending on the image quality or the image size. Insert the "Memory Stick Duo" into the slot in the wrong direction, the "Memory Stick Duo," the "Memory Stick Duo" slot, or image data may be damaged. To eject the cassette Proceed with its window facing...into the compartment. Do not shake or knock your camcorder is lit or flashing, your camcorder, turn the power off, eject the "Memory Stick Duo," or remove the battery pack. OPEN/EJECT lever Lid "Memory Stick Duo" You can use only a "Memory Stick Duo" marked with or (p. 107). • ...
Operating Guide
Page 19
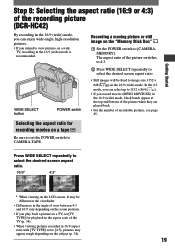
... ( ) in 16:9 aspect ratio with [TV TYPE] set the POWER switch to view pictures on the LCD screen. It may appear rough depending on the "Memory Stick Duo" Set the POWER switch to 1152 × 864 ( ). • If you record movies (MPEG MOVIE EX) in the 16:9 (wide) mode,... • For the number of recordable pictures, see page 45. Getting Started Step 8: Selecting the aspect ratio (16:9 or 4:3) of the recording picture (DCR-HC42) By recording in the 16:9 (wide) mode, you can select up to [CAMERAMEMORY]. Selecting the aspect ratio for playback in the aspect ratio of the...
... ( ) in 16:9 aspect ratio with [TV TYPE] set the POWER switch to view pictures on the LCD screen. It may appear rough depending on the "Memory Stick Duo" Set the POWER switch to 1152 × 864 ( ). • If you record movies (MPEG MOVIE EX) in the 16:9 (wide) mode,... • For the number of recordable pictures, see page 45. Getting Started Step 8: Selecting the aspect ratio (16:9 or 4:3) of the recording picture (DCR-HC42) By recording in the 16:9 (wide) mode, you can select up to [CAMERAMEMORY]. Selecting the aspect ratio for playback in the aspect ratio of the...
Operating Guide
Page 21
... returned to the previous situation. • The recording mode for tape, and the image size (DCR-HC42) and quality for "Memory Stick Duo" return to other recording devices" (p. 60) • [Invalid during Easy Handycam operation] appears if operations not available during recording) (p. 24) Still images Touch a picture. "Dubbing to the default settings. • What...
... returned to the previous situation. • The recording mode for tape, and the image size (DCR-HC42) and quality for "Memory Stick Duo" return to other recording devices" (p. 60) • [Invalid during Easy Handycam operation] appears if operations not available during recording) (p. 24) Still images Touch a picture. "Dubbing to the default settings. • What...
Operating Guide
Page 22
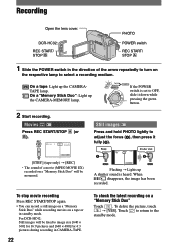
... recording Press REC START/STOP again. • You can record a still image on a "Memory Stick Duo" while recording movies on a "Memory Stick Duo" will be monaural. To delete the picture, touch [YES]. DCR-HC32: REC START/ STOP PHOTO POWER switch REC START/ STOP 1 Slide...Movies Press REC START/STOP (or ). A B Flashing Lights up A shutter sound is set to turn on a "Memory Stick Duo" Touch . For DCR-HC42: Still images will be fixed to image size [640 × 360] for 16:9 pictures and [640 × 480] for 4:3 pictures...
... recording Press REC START/STOP again. • You can record a still image on a "Memory Stick Duo" while recording movies on a "Memory Stick Duo" will be monaural. To delete the picture, touch [YES]. DCR-HC32: REC START/ STOP PHOTO POWER switch REC START/ STOP 1 Slide...Movies Press REC START/STOP (or ). A B Flashing Lights up A shutter sound is set to turn on a "Memory Stick Duo" Touch . For DCR-HC42: Still images will be fixed to image size [640 × 360] for 16:9 pictures and [640 × 480] for 4:3 pictures...

Operating Guide
Page 23
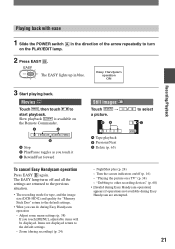
... Stop Play/Pause toggles as you touch it Rewind/Fast forward • Playback automatically stops if pause is displayed. On a "Memory Stick Duo" : Touch / to the index screen. Movie icon 23 The most recently recorded image is engaged for a scene during ...touch to adjust the volume. • If you want to turn on the Index screen Still images Touch . To display pictures on a "Memory Stick Duo" on the PLAY/EDIT lamp. Recording/Playback 2 Start playing back. To adjust the volume Touch [VOLUME], then / to start...
... Stop Play/Pause toggles as you touch it Rewind/Fast forward • Playback automatically stops if pause is displayed. On a "Memory Stick Duo" : Touch / to the index screen. Movie icon 23 The most recently recorded image is engaged for a scene during ...touch to adjust the volume. • If you want to turn on the Index screen Still images Touch . To display pictures on a "Memory Stick Duo" on the PLAY/EDIT lamp. Recording/Playback 2 Start playing back. To adjust the volume Touch [VOLUME], then / to start...
Operating Guide
Page 28
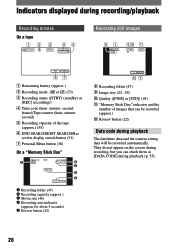
...Recording capacity of the tape (approx.) (55) END SEARCH/EDIT SEARCH/Rec review display switch button (31) Personal Menu button (36) On a "Memory Stick Duo" A B C D E Recording folder (47) Recording capacity (approx.) Movie size (46) Recording start indicator (appears for... qs 7 Recording folder (47) Image size (22 , 45) Quality ([FINE] or [STD]) (45) "Memory Stick Duo" indicator and the number of images that can check them as [DATA CODE] during playback The date/time data and the camera setting data...
...Recording capacity of the tape (approx.) (55) END SEARCH/EDIT SEARCH/Rec review display switch button (31) Personal Menu button (36) On a "Memory Stick Duo" A B C D E Recording folder (47) Recording capacity (approx.) Movie size (46) Recording start indicator (appears for... qs 7 Recording folder (47) Image size (22 , 45) Quality ([FINE] or [STD]) (45) "Memory Stick Duo" indicator and the number of images that can check them as [DATA CODE] during playback The date/time data and the camera setting data...
Operating Guide
Page 29
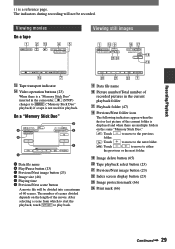
...;le name Picture number/Total number of 60 scenes. w; Recording/Playback ( ) is not used for playback. The indicators during recording will be recorded. On a "Memory Stick Duo" D A 0:00:00 E B F C Data file name Play/Pause button (23) Previous/Next image button (23) Image ... Playing time Previous/Next scene button A movie file will not be divided into a maximum of recorded pictures in the camcorder, (STOP) changes to ("Memory Stick Duo" playback) if a tape is a reference page.
...;le name Picture number/Total number of 60 scenes. w; Recording/Playback ( ) is not used for playback. The indicators during recording will be recorded. On a "Memory Stick Duo" D A 0:00:00 E B F C Data file name Play/Pause button (23) Previous/Next image button (23) Image ... Playing time Previous/Next scene button A movie file will not be divided into a maximum of recorded pictures in the camcorder, (STOP) changes to ("Memory Stick Duo" playback) if a tape is a reference page.

Operating Guide
Page 45
...etc.) The default settings are selected. BRKTG] will be recorded in parentheses appear when the items are marked with . Capacity of the "Memory Stick Duo" (MB) and the number of recordable pictures In 4:3 aspect ratio 1152 × 864 * 8MB 15 37 16MB 30 74 32MB... 5900 14500 * The image size of the screen, [IMAGE SIZE] is available for details on the "Memory Stick Duo." QUALITY FINE ( ) Records still images at the standard image quality level. For DCR-HC42: IMAGE SIZE 1152 × 864 ( ) Records still images clearly. 640 × 480...
...etc.) The default settings are selected. BRKTG] will be recorded in parentheses appear when the items are marked with . Capacity of the "Memory Stick Duo" (MB) and the number of recordable pictures In 4:3 aspect ratio 1152 × 864 * 8MB 15 37 16MB 30 74 32MB... 5900 14500 * The image size of the screen, [IMAGE SIZE] is available for details on the "Memory Stick Duo." QUALITY FINE ( ) Records still images at the standard image quality level. For DCR-HC42: IMAGE SIZE 1152 × 864 ( ) Records still images clearly. 640 × 480...

Operating Guide
Page 46
...215; 360] - approx. 160kB. 46 - [STANDARD] is selected for an image size of [640 × 480] - MEMORY SET menu (continued) In 16:9 aspect ratio (DCR-HC42) 1152 × 648 640 × 360 8MB 16MB 32MB 64MB 128MB 256MB 512MB 1GB 20 48 40 96 81 190 160... selected for an image size of [1152 × 648] - approx. 120kB. - [STANDARD] is selected for image quality. • When using the "Memory Stick Duo" made by Sony Corporation. approx. 150kB. - [STANDARD] is selected for an image size of [1152 × 864] - Bottom: [STANDARD] is selected for more movie recording...
...215; 360] - approx. 160kB. 46 - [STANDARD] is selected for an image size of [640 × 480] - MEMORY SET menu (continued) In 16:9 aspect ratio (DCR-HC42) 1152 × 648 640 × 360 8MB 16MB 32MB 64MB 128MB 256MB 512MB 1GB 20 48 40 96 81 190 160... selected for an image size of [1152 × 648] - approx. 120kB. - [STANDARD] is selected for image quality. • When using the "Memory Stick Duo" made by Sony Corporation. approx. 150kB. - [STANDARD] is selected for an image size of [1152 × 864] - Bottom: [STANDARD] is selected for more movie recording...

Operating Guide
Page 47
... playback. Touch [YES] . • You cannot delete the created folders using your camcorder. You will not be deleted even when you record a picture in sequence even if the "Memory Stick Duo" is displayed: - The file number is reset when a new folder is created ...or the recording folder is automatically created. REC FOLDER (Recording folder) Select the folder to 0001 each time the "Memory Stick Duo" is formatted at the factory and does not require formatting. Operate the POWER switch/operation buttons. - Formatting is displayed: - FILE NO...
... playback. Touch [YES] . • You cannot delete the created folders using your camcorder. You will not be deleted even when you record a picture in sequence even if the "Memory Stick Duo" is displayed: - The file number is reset when a new folder is created ...or the recording folder is automatically created. REC FOLDER (Recording folder) Select the folder to 0001 each time the "Memory Stick Duo" is formatted at the factory and does not require formatting. Operate the POWER switch/operation buttons. - Formatting is displayed: - FILE NO...

Operating Guide
Page 49
Using the Menu SLIDE SHOW Plays back the images stored on a "Memory Stick Duo," or in a folder in a previously recorded still image (e.g. To cancel [SLIDE SHOW], touch [END]. KEY], the image when you select [STILL] or [LUMI. TRAIL ...
Using the Menu SLIDE SHOW Plays back the images stored on a "Memory Stick Duo," or in a folder in a previously recorded still image (e.g. To cancel [SLIDE SHOW], touch [END]. KEY], the image when you select [STILL] or [LUMI. TRAIL ...
Operating Guide
Page 50
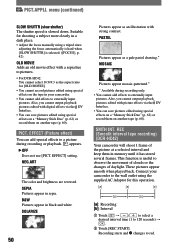
...sepia hue to pictures. • For DCR-HC42: You cannot select 16:9/4:3 as the aspect ratio for [OLD MOVIE]. • You cannot record pictures edited using the supplied AC Adaptor for shooting a subject more clearly in your camcorder to 120 seconds) . &#...DCR-HC42) Your camcorder will shoot 1 frame of daylight. PICT.APPLI. SEPIA Pictures appear in black and white. Recording starts and changes to externally input pictures. EFFECT (Picture effect) You can save pictures edited using special effects on a "Memory Stick Duo" (p. 62) or record them in memory...
...sepia hue to pictures. • For DCR-HC42: You cannot select 16:9/4:3 as the aspect ratio for [OLD MOVIE]. • You cannot record pictures edited using the supplied AC Adaptor for shooting a subject more clearly in your camcorder to 120 seconds) . &#...DCR-HC42) Your camcorder will shoot 1 frame of daylight. PICT.APPLI. SEPIA Pictures appear in black and white. Recording starts and changes to externally input pictures. EFFECT (Picture effect) You can save pictures edited using special effects on a "Memory Stick Duo" (p. 62) or record them in memory...
Operating Guide
Page 51
.... • If you adjust the focus manually, you have removed both a cassette and a "Memory Stick Duo" from your camcorder, and slide the POWER switch down to turn on the "Memory Stick Duo" at a selected interval. When the POWER switch is released when approximately 12 hours have elapsed... the power source while a message is displayed on the screen. • The camcorder will be discrepancies in situations such as those described below. - DEMO MODE The default setting is inserted. - When a cassette or a "Memory Stick Duo" is [ON], allowing you to other than CAMERA-TAPE. - Using the...
.... • If you adjust the focus manually, you have removed both a cassette and a "Memory Stick Duo" from your camcorder, and slide the POWER switch down to turn on the "Memory Stick Duo" at a selected interval. When the POWER switch is released when approximately 12 hours have elapsed... the power source while a message is displayed on the screen. • The camcorder will be discrepancies in situations such as those described below. - DEMO MODE The default setting is inserted. - When a cassette or a "Memory Stick Duo" is [ON], allowing you to other than CAMERA-TAPE. - Using the...
Operating Guide
Page 55
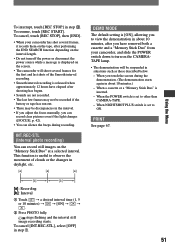
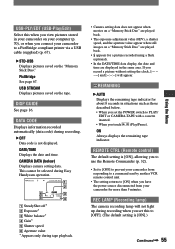
... value appear when still images on a "Memory Stick Duo" are played back. • appears for a picture recorded using a flash (optional). • In the DATE/TIME data display, the date and time are displayed in your camcorder on your computer (p. 70), or when you... returns to [ON] when you touch (Play/Pause). DATE/TIME Displays the date and time. PictBridge See page 67. This cannot be selected during Easy Handycam operation. 6 0 min 1 0 : 0 0 : 0 0 : 0 0 2 6 5 AUTO 100 AWB F1. 8 9 dB 3 4 SteadyShot off* Exposure* White balance* Gain...
... value appear when still images on a "Memory Stick Duo" are played back. • appears for a picture recorded using a flash (optional). • In the DATE/TIME data display, the date and time are displayed in your camcorder on your computer (p. 70), or when you... returns to [ON] when you touch (Play/Pause). DATE/TIME Displays the date and time. PictBridge See page 67. This cannot be selected during Easy Handycam operation. 6 0 min 1 0 : 0 0 : 0 0 : 0 0 2 6 5 AUTO 100 AWB F1. 8 9 dB 3 4 SteadyShot off* Exposure* White balance* Gain...
Operating Guide
Page 61
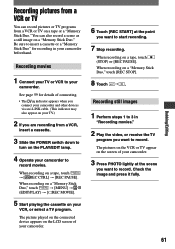
... other devices via an i.LINK cable. (This indicator may also appear on your camcorder beforehand. When recording on a "Memory Stick Duo," touch [MENU] (EDIT/PLAY) [ REC MOVIE]. 5 Start playing the cassette on a "Memory Stick Duo," touch [REC STOP]. 8 Touch . Recording still images 1 ... to 3 in your TV.) 2 If you are recording from a VCR or TV on a "Memory Stick Duo." Check the image and press it fully. 61 Recording movies 1 Connect your camcorder. See page 59 for recording in "Recording movies." 2 Play the video, or receive the TV ...
... other devices via an i.LINK cable. (This indicator may also appear on your camcorder beforehand. When recording on a "Memory Stick Duo," touch [MENU] (EDIT/PLAY) [ REC MOVIE]. 5 Start playing the cassette on a "Memory Stick Duo," touch [REC STOP]. 8 Touch . Recording still images 1 ... to 3 in your TV.) 2 If you are recording from a VCR or TV on a "Memory Stick Duo." Check the image and press it fully. 61 Recording movies 1 Connect your camcorder. See page 59 for recording in "Recording movies." 2 Play the video, or receive the TV ...


