User's Guide
Page 3
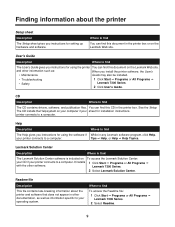
Contents Finding information about the printer 9 Setting up the printer 11 Checking the box contents...11 Installing another language control panel 11 Getting the printer ready to fax...12 Choosing a fax connection...12 Connecting directly to a telephone wall jack 13 Connecting to a telephone...13 Connecting to an ... control panel menus...22 Using the Copy menu...23 Using the Scan menu...24 Using the Fax menu...24 Learning about the software 26 Using the printer software...26 Using the Productivity Suite...26 Using the All-In-One Center...27 Opening the All-In-One Center...27 Using the ...
Contents Finding information about the printer 9 Setting up the printer 11 Checking the box contents...11 Installing another language control panel 11 Getting the printer ready to fax...12 Choosing a fax connection...12 Connecting directly to a telephone wall jack 13 Connecting to a telephone...13 Connecting to an ... control panel menus...22 Using the Copy menu...23 Using the Scan menu...24 Using the Fax menu...24 Learning about the software 26 Using the printer software...26 Using the Productivity Suite...26 Using the All-In-One Center...27 Opening the All-In-One Center...27 Using the ...
User's Guide
Page 6
... the print cartridges...73 Cleaning the scanner glass...73 Ordering supplies...74 Recycling Lexmark products...74 Troubleshooting...75 Setup troubleshooting...75 Incorrect language appears on the display 75 Power button is not lit...76 Software does not install...76 Page does not print...77 Cannot print from digital... camera using PictBridge 79 Print troubleshooting...79 Improving print quality...79 Poor text and graphic quality...80 Poor quality at the edges of the page...81 Printer does not print ...
... the print cartridges...73 Cleaning the scanner glass...73 Ordering supplies...74 Recycling Lexmark products...74 Troubleshooting...75 Setup troubleshooting...75 Incorrect language appears on the display 75 Power button is not lit...76 Software does not install...76 Page does not print...77 Cannot print from digital... camera using PictBridge 79 Print troubleshooting...79 Improving print quality...79 Poor text and graphic quality...80 Poor quality at the edges of the page...81 Printer does not print ...
User's Guide
Page 7
... Network name does not appear in the list 92 Jams and misfeeds troubleshooting 92 Paper jam in the printer...92 Paper jam in the ADF...92 Paper or specialty media misfeeds...93 Printer does not feed paper, envelopes, or specialty media 93 Banner paper jams...94 Error messages...94 Black Ink Low... Unsupported...97 Failed to Connect...97 Phone Line Error...98 Remote Fax Error...98 Phone Line Busy...99 Memory Full...100 Removing and reinstalling the software 100 Notices...102 Power consumption...106 Index...108 7
... Network name does not appear in the list 92 Jams and misfeeds troubleshooting 92 Paper jam in the printer...92 Paper jam in the ADF...92 Paper or specialty media misfeeds...93 Printer does not feed paper, envelopes, or specialty media 93 Banner paper jams...94 Error messages...94 Black Ink Low... Unsupported...97 Failed to Connect...97 Phone Line Error...98 Remote Fax Error...98 Phone Line Busy...99 Memory Full...100 Removing and reinstalling the software 100 Notices...102 Power consumption...106 Index...108 7
User's Guide
Page 9
... You can find The Lexmark Solution Center software is included on your computer if your printer connects to find The Help gives you instructions for setting up hardware and software. Lexmark Solution Center Description Where to find this CD in any Lexmark software program, click Help, your sheet for installation instructions. Lexmark 7300 Series. 2 Select Lexmark Solution Center. Tips...
... You can find The Lexmark Solution Center software is included on your computer if your printer connects to find The Help gives you instructions for setting up hardware and software. Lexmark Solution Center Description Where to find this CD in any Lexmark software program, click Help, your sheet for installation instructions. Lexmark 7300 Series. 2 Select Lexmark Solution Center. Tips...
User's Guide
Page 11
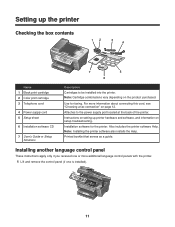
...Note: Installing the printer software also installs the Help. Installing another language control panel These instructions apply only if you received one or more information about connecting this cord, see "Choosing a fax connection" on page 12. Installation software for faxing. ...Attaches to be installed into the printer. Instructions on setting up the printer Checking the box contents 12 3 4 x 7 5 6 Name 1 Black print cartridge 2 Color ...
...Note: Installing the printer software also installs the Help. Installing another language control panel These instructions apply only if you received one or more information about connecting this cord, see "Choosing a fax connection" on page 12. Installation software for faxing. ...Attaches to be installed into the printer. Instructions on setting up the printer Checking the box contents 12 3 4 x 7 5 6 Name 1 Black print cartridge 2 Color ...
User's Guide
Page 16
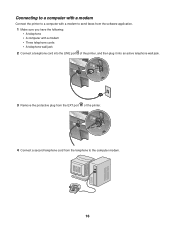
Connecting to a computer with a modem Connect the printer to a computer with a modem • Three telephone cords • A telephone wall jack 2 Connect a telephone cord into an active telephone wall jack. LINE EXT LINE EXT 4 Connect a second telephone cord from the telephone to send faxes from the EXT port of the printer, and then plug it into the LINE port of the printer. LINE EXT LINE EXT 3 Remove the protective plug from the software application. 1 Make sure you have the following: • A telephone • A computer with a modem to the computer modem. 16
Connecting to a computer with a modem Connect the printer to a computer with a modem • Three telephone cords • A telephone wall jack 2 Connect a telephone cord into an active telephone wall jack. LINE EXT LINE EXT 4 Connect a second telephone cord from the telephone to send faxes from the EXT port of the printer, and then plug it into the LINE port of the printer. LINE EXT LINE EXT 3 Remove the protective plug from the software application. 1 Make sure you have the following: • A telephone • A computer with a modem to the computer modem. 16
User's Guide
Page 26
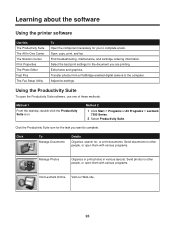
... Start ΠPrograms or All Programs ΠLexmark 7300 Series. 2 Select Productivity Suite. Send documents to other people, or open the Productivity Suite software, use one of these methods: Method 1 From the desktop, double-click the Productivity Suite icon. Learning about the software Using the printer software Use this The Productivity Suite The All-In...
... Start ΠPrograms or All Programs ΠLexmark 7300 Series. 2 Select Productivity Suite. Send documents to other people, or open the Productivity Suite software, use one of these methods: Method 1 From the desktop, double-click the Productivity Suite icon. Learning about the software Using the printer software Use this The Productivity Suite The All-In...
User's Guide
Page 27
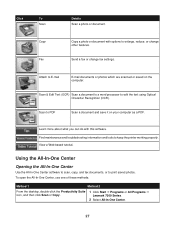
...-based tutorial. Click To Scan Details Scan a photo or document. Copy Fax Copy a photo or document with this software. Scan & Edit Text (OCR) Scan a document to a word processor to print saved photos. Learn more about ...what you can do with options to keep the printer working properly. Find maintenance and troubleshooting information and tools to enlarge, reduce, or change fax settings. To ...Scan or Copy. 1 Click Start ΠPrograms or All Programs ΠLexmark 7300 Series. 2 Select All-In-One Center. 27
...-based tutorial. Click To Scan Details Scan a photo or document. Copy Fax Copy a photo or document with this software. Scan & Edit Text (OCR) Scan a document to a word processor to print saved photos. Learn more about ...what you can do with options to keep the printer working properly. Find maintenance and troubleshooting information and tools to enlarge, reduce, or change fax settings. To ...Scan or Copy. 1 Click Start ΠPrograms or All Programs ΠLexmark 7300 Series. 2 Select All-In-One Center. 27
User's Guide
Page 30
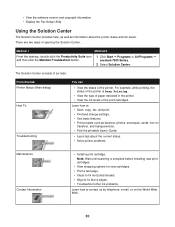
.... • Use basic features. • Print projects such as information about the current status. • Solve printer problems. Maintenance Contact Information • Install a print cartridge. • View the software version and copyright information • Display the Fax Setup Utility Using the Solution Center The Solution Center provides help, ...From the desktop, double-click the Productivity Suite icon, and then click the Maintain/Troubleshoot button. 1 Click Start Œ Programs or All Programs Œ Lexmark 7300 Series. 2 Select Solution Center. There are two ways of the...
.... • Use basic features. • Print projects such as information about the current status. • Solve printer problems. Maintenance Contact Information • Install a print cartridge. • View the software version and copyright information • Display the Fax Setup Utility Using the Solution Center The Solution Center provides help, ...From the desktop, double-click the Productivity Suite icon, and then click the Maintain/Troubleshoot button. 1 Click Start Œ Programs or All Programs Œ Lexmark 7300 Series. 2 Select Solution Center. There are two ways of the...
User's Guide
Page 66
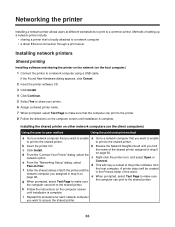
... want to enable a Go to a network computer that the computer can print to the shared printer. A printer object will copy a subset of the printer software from f Enter the shared names of the shared printer assigned in step 6 d From the "Connect Your Printer" dialog, select the on the host computer. page 66. i Repeat this procedure for each...
... want to enable a Go to a network computer that the computer can print to the shared printer. A printer object will copy a subset of the printer software from f Enter the shared names of the shared printer assigned in step 6 d From the "Connect Your Printer" dialog, select the on the host computer. page 66. i Repeat this procedure for each...
User's Guide
Page 67
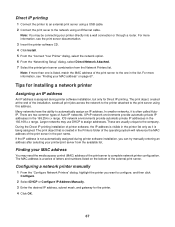
...series of the external print server. The MAC address is not automatically assigned during printer software installation, but only for the printer. 4 Click OK. 67 For more than one is assigned during printer software installation, you want to configure, and then click Configure. 2 Select DHCP or... the company. These are two common types of printer software, the IP address is often called AutoIP. Note: If more information, see the print server documentation. 3 Insert the printer software CD. 4 Click Install. 5 From the "Connect Your Printer" dialog, select the network option. 6 From ...
...series of the external print server. The MAC address is not automatically assigned during printer software installation, but only for the printer. 4 Click OK. 67 For more than one is assigned during printer software installation, you want to configure, and then click Configure. 2 Select DHCP or... the company. These are two common types of printer software, the IP address is often called AutoIP. Note: If more information, see the print server documentation. 3 Insert the printer software CD. 4 Click Install. 5 From the "Connect Your Printer" dialog, select the network option. 6 From ...
User's Guide
Page 68
... on remote subnets The printer software CD can automatically find the printer/print server, wait a few minutes, and then try running the CD again. If the printer and print server are located on the print server. For more information, see the printer or print server setup documentation.... 3 Make sure the correct lights are secure. For more information, see the print server documentation. 4 If the printer software CD cannot find the printers that are located on another network (called a subnet), you are using to the network. 6 See the print server documentation...
... on remote subnets The printer software CD can automatically find the printer/print server, wait a few minutes, and then try running the CD again. If the printer and print server are located on the print server. For more information, see the printer or print server setup documentation.... 3 Make sure the correct lights are secure. For more information, see the print server documentation. 4 If the printer software CD cannot find the printers that are located on another network (called a subnet), you are using to the network. 6 See the print server documentation...
User's Guide
Page 79
... more information, see "Removing and reinstalling the software" on the computer screen. c Select your operating system. d Select your printer model. Cannot print from digital camera using PictBridge Enable PictBridge printing on page 74. 79 See the digital camera documentation to check for the document. Use Lexmark Premium Photo Paper if you want , follow...
... more information, see "Removing and reinstalling the software" on the computer screen. c Select your operating system. d Select your printer model. Cannot print from digital camera using PictBridge Enable PictBridge printing on page 74. 79 See the digital camera documentation to check for the document. Use Lexmark Premium Photo Paper if you want , follow...
User's Guide
Page 80
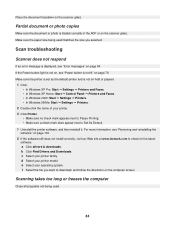
...visit our Web site at www.lexmark.com to download, and follow the directions on page 79. a Click drivers & downloads. To avoid ink smudging when you want to check for the latest software. Use only new, unwrinkled paper. 1 Uninstall the printer software, and then reinstall it to ...dry. e Select your printer model. d Select your operating system. Poor text and graphic quality Examples of paper. ...
...visit our Web site at www.lexmark.com to download, and follow the directions on page 79. a Click drivers & downloads. To avoid ink smudging when you want to check for the latest software. Use only new, unwrinkled paper. 1 Uninstall the printer software, and then reinstall it to ...dry. e Select your printer model. d Select your operating system. Poor text and graphic quality Examples of paper. ...
User's Guide
Page 82
... Make sure the document or photo is not lit" on page 100. 2 If the software still does not install correctly, visit our Web site at www.lexmark.com to Set As Default. 1 Uninstall the printer software, and then reinstall it . If the Power button light is not on, see "Removing... and reinstalling the software" on page 76. b Click Find Drivers and Downloads. For more information, see "...
... Make sure the document or photo is not lit" on page 100. 2 If the software still does not install correctly, visit our Web site at www.lexmark.com to Set As Default. 1 Uninstall the printer software, and then reinstall it . If the Power button light is not on, see "Removing... and reinstalling the software" on page 76. b Click Find Drivers and Downloads. For more information, see "...
User's Guide
Page 84
...in the ADF or on page 76. d Select your printer. 3 Click Printer. • Make sure no check mark appears next to Pause Printing. • Make sure a check mark does appear next to Set As Default. 1 Uninstall the printer software, and then reinstall it. For more information, see ..."Removing and reinstalling the software" on the scanner glass. b Click Find Drivers and Downloads. Place the document facedown on page 100. 2 If the software still does not install correctly, visit our Web site at www.lexmark.com to...
...in the ADF or on page 76. d Select your printer. 3 Click Printer. • Make sure no check mark appears next to Pause Printing. • Make sure a check mark does appear next to Set As Default. 1 Uninstall the printer software, and then reinstall it. For more information, see ..."Removing and reinstalling the software" on the scanner glass. b Click Find Drivers and Downloads. Place the document facedown on page 100. 2 If the software still does not install correctly, visit our Web site at www.lexmark.com to...
User's Guide
Page 85
...such as a USB hub or switch box. 2 Directly connect the cable to a lower value: 1 Click Start ΠPrograms or All Programs ΠLexmark 7300 Series. 2 Select All-In-One Center. 3 From the Scan area, click See More Scan Settings. 4 Click Display Advanced Scan Settings. 5 From ..., gently wipe it . If the scanner glass is displayed, see "Removing and reinstalling the software" on the computer screen. To change the scanning resolution to the printer and the computer. 1 Uninstall the printer software, and then reinstall it with a clean, lint-free cloth dampened with the USB symbol. ...
...such as a USB hub or switch box. 2 Directly connect the cable to a lower value: 1 Click Start ΠPrograms or All Programs ΠLexmark 7300 Series. 2 Select All-In-One Center. 3 From the Scan area, click See More Scan Settings. 4 Click Display Advanced Scan Settings. 5 From ..., gently wipe it . If the scanner glass is displayed, see "Removing and reinstalling the software" on the computer screen. To change the scanning resolution to the printer and the computer. 1 Uninstall the printer software, and then reinstall it with a clean, lint-free cloth dampened with the USB symbol. ...
User's Guide
Page 91
... for any obvious damage. 2 Firmly plug one end of the Ethernet cable into the printer or the print server. 3 Firmly plug the other end of the previous actions fixes the problem, uninstall the printer software, and reinstall it will reduce the speed for future faxes until you are using a ...USB cable: 1 Check the USB cable for any obvious damage. 2 Firmly plug the rectangular end of the USB cable into the USB port of printers found on . • The...
... for any obvious damage. 2 Firmly plug one end of the Ethernet cable into the printer or the print server. 3 Firmly plug the other end of the previous actions fixes the problem, uninstall the printer software, and reinstall it will reduce the speed for future faxes until you are using a ...USB cable: 1 Check the USB cable for any obvious damage. 2 Firmly plug the rectangular end of the USB cable into the USB port of printers found on . • The...
User's Guide
Page 100
... Start ΠPrograms or All Programs ΠLexmark 7300 Series. 4 Select Uninstall. 5 Follow the instructions on the computer screen to remove the printer software. 6 Restart the computer before reinstalling the printer software. 100 Memory Full If applicable, to Delay Fax. 4 Press . Removing and reinstalling the software If the printer is not functioning properly, or if a communications error...
... Start ΠPrograms or All Programs ΠLexmark 7300 Series. 4 Select Uninstall. 5 Follow the instructions on the computer screen to remove the printer software. 6 Restart the computer before reinstalling the printer software. 100 Memory Full If applicable, to Delay Fax. 4 Press . Removing and reinstalling the software If the printer is not functioning properly, or if a communications error...
User's Guide
Page 110
...80 print speed is slow 81 printer does not print or respond 81 printer does not feed paper, envelopes, or specialty media 93 printer does not print or respond 81 printer received blank fax 89 printer software reinstalling 100 removing 100 using 26 printer status 31 printer to be configured does not ...appear in list of printers found on network 91 printing blocked fax list 62...
...80 print speed is slow 81 printer does not print or respond 81 printer does not feed paper, envelopes, or specialty media 93 printer does not print or respond 81 printer received blank fax 89 printer software reinstalling 100 removing 100 using 26 printer status 31 printer to be configured does not ...appear in list of printers found on network 91 printing blocked fax list 62...


