User's Guide
Page 3
... jack 13 Connecting to a telephone...13 Connecting to an answering machine...14 Connecting to a computer with a modem 16 Learning about the printer 18 Understanding the parts of the printer 18 Using the control panel buttons and menus 20 Using the control panel...20 Navigating the control panel menus...22 Using the... Copy menu...23 Using the Scan menu...24 Using the Fax menu...24 Learning about the software 26 Using the printer software...26 Using the Productivity Suite...26 Using the All-In-One Center...27 Opening the All-In-One Center...27 Using the Scanning & ...
... jack 13 Connecting to a telephone...13 Connecting to an answering machine...14 Connecting to a computer with a modem 16 Learning about the printer 18 Understanding the parts of the printer 18 Using the control panel buttons and menus 20 Using the control panel...20 Navigating the control panel menus...22 Using the... Copy menu...23 Using the Scan menu...24 Using the Fax menu...24 Learning about the software 26 Using the printer software...26 Using the Productivity Suite...26 Using the All-In-One Center...27 Opening the All-In-One Center...27 Using the Scanning & ...
User's Guide
Page 5
... Adding text captions to a photo page...65 Networking the printer 66 Installing network printers...66 Shared printing...66 Direct IP printing...67 Tips for installing a network printer...67 Assigning an IP address...67 Finding your MAC address...67 Configuring a network printer manually...67 Finding a printer/print server located on remote subnets 68 Network troubleshooting tips...
... Adding text captions to a photo page...65 Networking the printer 66 Installing network printers...66 Shared printing...66 Direct IP printing...67 Tips for installing a network printer...67 Assigning an IP address...67 Finding your MAC address...67 Configuring a network printer manually...67 Finding a printer/print server located on remote subnets 68 Network troubleshooting tips...
User's Guide
Page 6
...72 Wiping the print cartridge nozzles and contacts 72 Preserving the print cartridges...73 Cleaning the scanner glass...73 Ordering supplies...74 Recycling Lexmark products...74 Troubleshooting...75 Setup troubleshooting...75 Incorrect language appears on the display 75 Power button is not lit...76 Software does not...79 Print troubleshooting...79 Improving print quality...79 Poor text and graphic quality...80 Poor quality at the edges of the page...81 Printer does not print or respond...81 Print speed is slow...81 Partial document or photo prints...82 Copy troubleshooting...82 Copier does not...
...72 Wiping the print cartridge nozzles and contacts 72 Preserving the print cartridges...73 Cleaning the scanner glass...73 Ordering supplies...74 Recycling Lexmark products...74 Troubleshooting...75 Setup troubleshooting...75 Incorrect language appears on the display 75 Power button is not lit...76 Software does not...79 Print troubleshooting...79 Improving print quality...79 Poor text and graphic quality...80 Poor quality at the edges of the page...81 Printer does not print or respond...81 Print speed is slow...81 Partial document or photo prints...82 Copy troubleshooting...82 Copier does not...
User's Guide
Page 7
... a blank fax...89 Received fax has poor print quality...90 Network troubleshooting...91 The printer to be configured does not appear in the list of printers found on your network 91 Cannot print to the network printer...91 Network name does not appear in the list 92 Jams and misfeeds troubleshooting 92... Paper jam in the printer...92 Paper jam in the ADF...92 Paper or specialty media misfeeds...93 Printer does not feed paper, envelopes, or specialty media 93 Banner paper jams...94 Error messages...94 Black Ink...
... a blank fax...89 Received fax has poor print quality...90 Network troubleshooting...91 The printer to be configured does not appear in the list of printers found on your network 91 Cannot print to the network printer...91 Network name does not appear in the list 92 Jams and misfeeds troubleshooting 92... Paper jam in the printer...92 Paper jam in the ADF...92 Paper or specialty media misfeeds...93 Printer does not feed paper, envelopes, or specialty media 93 Banner paper jams...94 Error messages...94 Black Ink...
User's Guide
Page 9
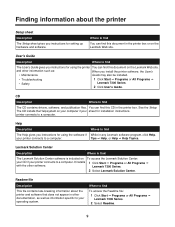
... setting up hardware and software. Where to find You can find this document in the printer box or on To access the Lexmark Solution Center: your CD if your printer connects to your sheet for installation instructions. You can find this document on your computer ...as well as : When you instructions for using the software if While in the printer box. and other software. Lexmark 7300 Series. 2 Select Lexmark Solution Center. Where to find The User's Guide gives you install the printer software, the User's • Maintenance Guide may also be installed. • ...
... setting up hardware and software. Where to find You can find this document in the printer box or on To access the Lexmark Solution Center: your CD if your printer connects to your sheet for installation instructions. You can find this document on your computer ...as well as : When you instructions for using the software if While in the printer box. and other software. Lexmark 7300 Series. 2 Select Lexmark Solution Center. Where to find The User's Guide gives you install the printer software, the User's • Maintenance Guide may also be installed. • ...

User's Guide
Page 10
Record the following information (located on the store receipt and the back of the printer), and have it ready when you contact us so that we may serve you need. Note: All paths for the information you faster: • Machine ...Type number • Serial number • Date purchased • Store where purchased 10 Where to find Visit our Web site at www.lexmark.com. 1 Go to change. Web site Description Our Web site contains a variety of the page. 3 Select the link for the Web site are subject to...
Record the following information (located on the store receipt and the back of the printer), and have it ready when you contact us so that we may serve you need. Note: All paths for the information you faster: • Machine ...Type number • Serial number • Date purchased • Store where purchased 10 Where to find Visit our Web site at www.lexmark.com. 1 Go to change. Web site Description Our Web site contains a variety of the page. 3 Select the link for the Web site are subject to...
User's Guide
Page 11
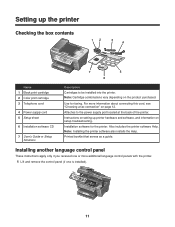
...instructions apply only if you received one is installed). 11 Installation software for faxing. For more additional language control panels with the printer. 1 Lift and remove the control panel (if one or more information about connecting this cord, see "Choosing a fax ...connection" on page 12. Attaches to be installed into the printer. Printed booklet that serves as a guide. Also includes the printer software Help. Instructions on setting up the printer Checking the box contents 12 3 4 x 7 5 6 Name 1 Black print cartridge 2 Color...
...instructions apply only if you received one is installed). 11 Installation software for faxing. For more additional language control panels with the printer. 1 Lift and remove the control panel (if one or more information about connecting this cord, see "Choosing a fax ...connection" on page 12. Attaches to be installed into the printer. Printed booklet that serves as a guide. Also includes the printer software Help. Instructions on setting up the printer Checking the box contents 12 3 4 x 7 5 6 Name 1 Black print cartridge 2 Color...
User's Guide
Page 12
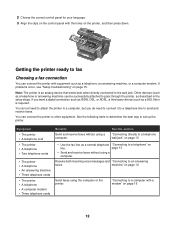
...; Three telephone cords Benefits Send and receive faxes without using a computer. page 13 • Send and receive faxes without using a computer. Note: The printer is required. See the following table to determine the best way to a telephone" on page 13 • Use the fax line as a normal telephone ..."Connecting to set up the printer. If you do need to attach the printer to a computer, but you want a digital connection such as ISDN, DSL, or ADSL, a third-party device (such as described...
...; Three telephone cords Benefits Send and receive faxes without using a computer. page 13 • Send and receive faxes without using a computer. Note: The printer is required. See the following table to determine the best way to a telephone" on page 13 • Use the fax line as a normal telephone ..."Connecting to set up the printer. If you do need to attach the printer to a computer, but you want a digital connection such as ISDN, DSL, or ADSL, a third-party device (such as described...
User's Guide
Page 13
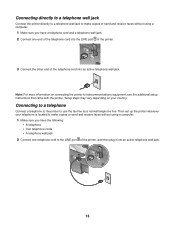
...active telephone wall jack. Setup steps may vary depending on connecting the printer to telecommunications equipment, see the additional setup instructions that came with the printer. Connecting directly to a telephone wall jack Connect the printer directly to a telephone wall jack to make copies or send and ... cords • A telephone wall jack 2 Connect one end of the telephone cord into the LINE port of the printer. Connecting to a telephone Connect a telephone to the printer to use the fax line as a normal telephone line. LINE EXT 3 Connect the other end of the telephone cord...
...active telephone wall jack. Setup steps may vary depending on connecting the printer to telecommunications equipment, see the additional setup instructions that came with the printer. Connecting directly to a telephone wall jack Connect the printer directly to a telephone wall jack to make copies or send and ... cords • A telephone wall jack 2 Connect one end of the telephone cord into the LINE port of the printer. Connecting to a telephone Connect a telephone to the printer to use the fax line as a normal telephone line. LINE EXT 3 Connect the other end of the telephone cord...
User's Guide
Page 14
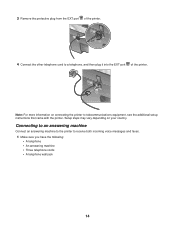
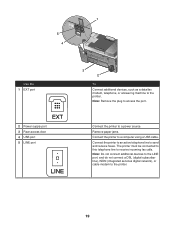
... an answering machine Connect an answering machine to the printer to a telephone, and then plug it into the EXT port of the printer. Setup steps may vary depending on connecting the printer to telecommunications equipment, see the additional setup instructions that came with the printer. LINE EXT LINE EXT 4 Connect the other telephone cord...: • A telephone • An answering machine • Three telephone cords • A telephone wall jack 14 3 Remove the protective plug from the EXT port of the printer. LINE EXT Note: For more information on your country.
... an answering machine Connect an answering machine to the printer to a telephone, and then plug it into the EXT port of the printer. Setup steps may vary depending on connecting the printer to telecommunications equipment, see the additional setup instructions that came with the printer. LINE EXT LINE EXT 4 Connect the other telephone cord...: • A telephone • An answering machine • Three telephone cords • A telephone wall jack 14 3 Remove the protective plug from the EXT port of the printer. LINE EXT Note: For more information on your country.
User's Guide
Page 15
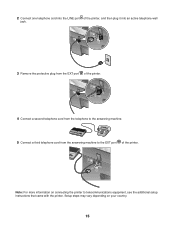
... the answering machine. 5 Connect a third telephone cord from the EXT port of the printer, and then plug it into an active telephone wall jack. 2 Connect one telephone cord into the LINE port of the printer. LINE EXT Note: For more information on your country. 15 LINE EXT LINE EXT 3 ...Remove the protective plug from the answering machine to the EXT port of the printer. LINE EXT LINE EXT 4 Connect a second telephone cord from the telephone to telecommunications equipment, see the additional setup instructions that came with the...
... the answering machine. 5 Connect a third telephone cord from the EXT port of the printer, and then plug it into an active telephone wall jack. 2 Connect one telephone cord into the LINE port of the printer. LINE EXT Note: For more information on your country. 15 LINE EXT LINE EXT 3 ...Remove the protective plug from the answering machine to the EXT port of the printer. LINE EXT LINE EXT 4 Connect a second telephone cord from the telephone to telecommunications equipment, see the additional setup instructions that came with the...
User's Guide
Page 16
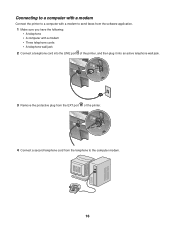
LINE EXT LINE EXT 3 Remove the protective plug from the software application. 1 Make sure you have the following: • A telephone • A computer with a modem to the computer modem. 16 Connecting to a computer with a modem Connect the printer to a computer with a modem • Three telephone cords • A telephone wall jack 2 Connect a telephone cord into the LINE port of the printer. LINE EXT LINE EXT 4 Connect a second telephone cord from the telephone to send faxes from the EXT port of the printer, and then plug it into an active telephone wall jack.
LINE EXT LINE EXT 3 Remove the protective plug from the software application. 1 Make sure you have the following: • A telephone • A computer with a modem to the computer modem. 16 Connecting to a computer with a modem Connect the printer to a computer with a modem • Three telephone cords • A telephone wall jack 2 Connect a telephone cord into the LINE port of the printer. LINE EXT LINE EXT 4 Connect a second telephone cord from the telephone to send faxes from the EXT port of the printer, and then plug it into an active telephone wall jack.

User's Guide
Page 17
LINE EXT LINE EXT Note: For more information on your country. 17 Setup steps may vary depending on connecting the printer to the EXT port of the printer. 5 Connect a third telephone cord from the computer modem to telecommunications equipment, see the additional setup instructions that came with the printer.
LINE EXT LINE EXT Note: For more information on your country. 17 Setup steps may vary depending on connecting the printer to the EXT port of the printer. 5 Connect a third telephone cord from the computer modem to telecommunications equipment, see the additional setup instructions that came with the printer.
User's Guide
Page 18
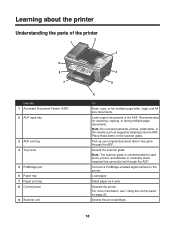
...copy, or fax multiple-page letter, legal, and A4 size documents. Load paper. Stack paper as magazine clippings) into the ADF. Operate the printer. Recommended for card stock, photos, and delicate or unusually sized originals that cannot be fed through the ADF. Access the scanner glass. Connect a ...PictBridge-enabled digital camera to the printer. Note: Do not load postcards, photos, small items, or thin media (such as it has gone through the ADF. Pick up your...
...copy, or fax multiple-page letter, legal, and A4 size documents. Load paper. Stack paper as magazine clippings) into the ADF. Operate the printer. Recommended for card stock, photos, and delicate or unusually sized originals that cannot be fed through the ADF. Access the scanner glass. Connect a ...PictBridge-enabled digital camera to the printer. Note: Do not load postcards, photos, small items, or thin media (such as it has gone through the ADF. Pick up your...
User's Guide
Page 19
... cable modem to a computer using a USB cable. Note: Remove the plug to a power source. Connect the printer to access the port. Connect the printer to an active telephone line to receive incoming fax calls. The printer must be connected to this telephone line to send and receive faxes. 1 LINE EXT 5 4 LINE EXT Use...
... cable modem to a computer using a USB cable. Note: Remove the plug to a power source. Connect the printer to access the port. Connect the printer to an active telephone line to receive incoming fax calls. The printer must be connected to this telephone line to send and receive faxes. 1 LINE EXT 5 4 LINE EXT Use...
User's Guide
Page 22
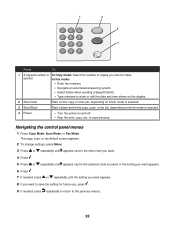
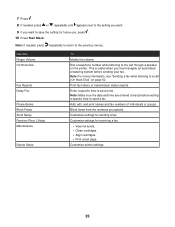
... which mode is selected. 3 Start Black Start a black-and-white copy, scan, or fax job, depending on which mode is selected. 4 Power • Turn the printer on and off. • Stop the print, copy, fax, or scan process.
... which mode is selected. 3 Start Black Start a black-and-white copy, scan, or fax job, depending on which mode is selected. 4 Power • Turn the printer on and off. • Stop the print, copy, fax, or scan process.
User's Guide
Page 23
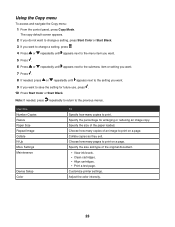
...; Align cartridges. • Print a test page. Using the Copy menu To access and navigate the Copy menu: 1 From the control panel, press Copy Mode. Customize printer settings. Adjust the color intensity. 23 Note: If needed , press or repeatedly until appears next to the setting you want. 9 If you want to the...
...; Align cartridges. • Print a test page. Using the Copy menu To access and navigate the Copy menu: 1 From the control panel, press Copy Mode. Customize printer settings. Adjust the color intensity. 23 Note: If needed , press or repeatedly until appears next to the setting you want. 9 If you want to the...

User's Guide
Page 24
..., press . 5 Press or repeatedly until appears next to the menu item you want. 6 Press . 7 Press or repeatedly until appears next to the previous menus. Customize printer settings. The fax default screen appears. 2 If you do not want to change a setting, press Start Color or Start Black. 4 If you want to change...
..., press . 5 Press or repeatedly until appears next to the menu item you want. 6 Press . 7 Press or repeatedly until appears next to the previous menus. Customize printer settings. The fax default screen appears. 2 If you do not want to change a setting, press Start Color or Start Black. 4 If you want to change...
User's Guide
Page 25
...see "Sending a fax while listening to a call through a speaker on page 52. Customize settings for future use, press . 10 Press Start Black. Customize printer settings. 25 Note: If needed , press or repeatedly until appears next to the setting you want. 9 If you want to save the setting for sending... status reports. Enter a specific time to the previous menus. Dial a telephone number while listening to the call (On Hook Dial)" on the printer. Add, edit, and print names and fax numbers of individuals or groups. Use this Ringer Volume On Hook Dial Fax Reports Delay Fax Phone ...
...see "Sending a fax while listening to a call through a speaker on page 52. Customize settings for future use, press . 10 Press Start Black. Customize printer settings. 25 Note: If needed , press or repeatedly until appears next to the setting you want. 9 If you want to save the setting for sending... status reports. Enter a specific time to the previous menus. Dial a telephone number while listening to the call (On Hook Dial)" on the printer. Add, edit, and print names and fax numbers of individuals or groups. Use this Ringer Volume On Hook Dial Fax Reports Delay Fax Phone ...
User's Guide
Page 26
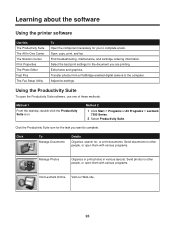
...graphics. Click To Manage Documents Details Organize, search for, or print documents. Method 2 1 Click Start ΠPrograms or All Programs ΠLexmark 7300 Series. 2 Select Productivity Suite. Select the best print settings for the document you want to complete. Send photos to other people, or open...use one of these methods: Method 1 From the desktop, double-click the Productivity Suite icon. Learning about the software Using the printer software Use this The Productivity Suite The All-In-One Center The Solution Center Print Properties The Photo Editor Fast Pics The Fax ...
...graphics. Click To Manage Documents Details Organize, search for, or print documents. Method 2 1 Click Start ΠPrograms or All Programs ΠLexmark 7300 Series. 2 Select Productivity Suite. Select the best print settings for the document you want to complete. Send photos to other people, or open...use one of these methods: Method 1 From the desktop, double-click the Productivity Suite icon. Learning about the software Using the printer software Use this The Productivity Suite The All-In-One Center The Solution Center Print Properties The Photo Editor Fast Pics The Fax ...


