User's Guide
Page 11
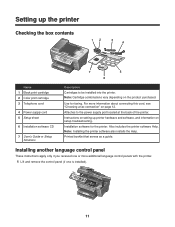
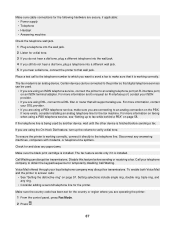
... up the printer Checking the box contents 12 3 4 x 7 5 6 Name 1 Black print cartridge 2 Color print cartridge 3 Telephone cord 4 Power supply cord 5 Setup sheet 6 Installation software CD 7 User's Guide or Setup Solutions Description Cartridges to the power supply port located at the back of the printer. Note: Installing the printer software also installs the Help. Installing another...
... up the printer Checking the box contents 12 3 4 x 7 5 6 Name 1 Black print cartridge 2 Color print cartridge 3 Telephone cord 4 Power supply cord 5 Setup sheet 6 Installation software CD 7 User's Guide or Setup Solutions Description Cartridges to the power supply port located at the back of the printer. Note: Installing the printer software also installs the Help. Installing another...
User's Guide
Page 19
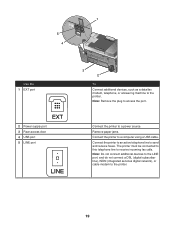
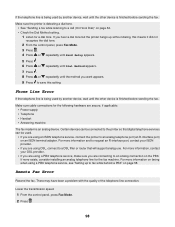
... telephone line to send and receive faxes. 1 LINE EXT 5 4 LINE EXT Use the 1 EXT port EXT 2 Power supply port 3 Rear access door 4 USB port 5 LINE port LINE 3 2 To Connect additional devices, such as a data/fax modem, telephone, or answering machine to a power source. Connect the printer to the printer. Note: Do not connect additional devices to the...
... telephone line to send and receive faxes. 1 LINE EXT 5 4 LINE EXT Use the 1 EXT port EXT 2 Power supply port 3 Rear access door 4 USB port 5 LINE port LINE 3 2 To Connect additional devices, such as a data/fax modem, telephone, or answering machine to a power source. Connect the printer to the printer. Note: Do not connect additional devices to the...
User's Guide
Page 76
...connected to the computer through another device: 1 Disconnect the USB cable from the printer. 2 Plug the cord all the way into the power supply port on the printer. 3 Plug the cord into an electrical outlet that your computer meets the minimum system requirements listed on the box. The ...USB port is not on, press Power. Power button is not lit 1 Disconnect the power supply cord from the wall outlet, and then from any obvious damage. 2 Firmly plug the rectangular end of ...
...connected to the computer through another device: 1 Disconnect the USB cable from the printer. 2 Plug the cord all the way into the power supply port on the printer. 3 Plug the cord into an electrical outlet that your computer meets the minimum system requirements listed on the box. The ...USB port is not on, press Power. Power button is not lit 1 Disconnect the power supply cord from the wall outlet, and then from any obvious damage. 2 Firmly plug the rectangular end of ...
User's Guide
Page 87
... line splitters. Call your local telephone company may disrupt fax transmissions. Make sure cable connections for the following hardware are secure, if applicable: • Power supply • Telephone • Handset • Answering machine Check the telephone wall jack. 1 Plug a telephone into the wall jack. 2 Listen for ...you are using an ISDN telephone service, connect the printer to make sure you want to send a fax to an analog telephone port (an R-interface port) on the PBX. Place a test call to the telephone number to which you are operating the printer: 1 From the ...
... line splitters. Call your local telephone company may disrupt fax transmissions. Make sure cable connections for the following hardware are secure, if applicable: • Power supply • Telephone • Handset • Answering machine Check the telephone wall jack. 1 Plug a telephone into the wall jack. 2 Listen for ...you are using an ISDN telephone service, connect the printer to make sure you want to send a fax to an analog telephone port (an R-interface port) on the PBX. Place a test call to the telephone number to which you are operating the printer: 1 From the ...
User's Guide
Page 98
... . 6 Press or repeatedly until Dial Method appears. 7 Press . 8 Press or repeatedly until the method you are secure, if applicable: • Power supply • Telephone • Handset • Answering machine The fax modem is an analog device. For more information, contact your ISDN provider. • ...If you are using an ISDN telephone service, connect the printer to an analog telephone port (an R-interface port) on faxing when using a PBX telephone service, make sure you want appears. 9 Press to a DSL filter or router that...
... . 6 Press or repeatedly until Dial Method appears. 7 Press . 8 Press or repeatedly until the method you are secure, if applicable: • Power supply • Telephone • Handset • Answering machine The fax modem is an analog device. For more information, contact your ISDN provider. • ...If you are using an ISDN telephone service, connect the printer to an analog telephone port (an R-interface port) on faxing when using a PBX telephone service, make sure you want appears. 9 Press to a DSL filter or router that...
User's Guide
Page 110
... tray 18 Automatic Document Feeder (ADF) 18 control panel 18 EXT port 19 LINE port 19 paper exit tray 18 paper tray 18 PictBridge port 18 power supply port 19 rear access door 19 scanner unit 18 top cover 18 USB port 19 peer-to-peer method 66 Phone Book, using 56 phone line... 81 poor scanned image quality 85 poor text and graphic quality 80 portrait orientation, selecting 32 postcards loading 37 printing 43 power button is not lit 76 power supply port 19 premium paper, loading 35 Preview section 28 previewing photos 29 print cartridge nozzles, cleaning 72 print cartridges aligning 71 cleaning...
... tray 18 Automatic Document Feeder (ADF) 18 control panel 18 EXT port 19 LINE port 19 paper exit tray 18 paper tray 18 PictBridge port 18 power supply port 19 rear access door 19 scanner unit 18 top cover 18 USB port 19 peer-to-peer method 66 Phone Book, using 56 phone line... 81 poor scanned image quality 85 poor text and graphic quality 80 portrait orientation, selecting 32 postcards loading 37 printing 43 power button is not lit 76 power supply port 19 premium paper, loading 35 Preview section 28 previewing photos 29 print cartridge nozzles, cleaning 72 print cartridges aligning 71 cleaning...


