User's Guide
Page 3
Contents Finding information about the printer 9 Setting up the printer 11 Checking the box contents...11 Installing another language control panel 11 Getting the printer ready to fax...12 Choosing a fax connection...12 Connecting directly to a telephone wall jack 13 Connecting to a ...
Contents Finding information about the printer 9 Setting up the printer 11 Checking the box contents...11 Installing another language control panel 11 Getting the printer ready to fax...12 Choosing a fax connection...12 Connecting directly to a telephone wall jack 13 Connecting to a ...
User's Guide
Page 5
... Creating and printing a scrapbook or album page 64 Adding text captions to a photo page...65 Networking the printer 66 Installing network printers...66 Shared printing...66 Direct IP printing...67 Tips for installing a network printer...67 Assigning an IP address...67 Finding your MAC address...67 Configuring a network printer manually...67 Finding...
... Creating and printing a scrapbook or album page 64 Adding text captions to a photo page...65 Networking the printer 66 Installing network printers...66 Shared printing...66 Direct IP printing...67 Tips for installing a network printer...67 Assigning an IP address...67 Finding your MAC address...67 Configuring a network printer manually...67 Finding...
User's Guide
Page 6
...the print cartridge nozzles and contacts 72 Preserving the print cartridges...73 Cleaning the scanner glass...73 Ordering supplies...74 Recycling Lexmark products...74 Troubleshooting...75 Setup troubleshooting...75 Incorrect language appears on the display 75 Power button is not lit...76 Software does not... install...76 Page does not print...77 Cannot print from digital camera using PictBridge 79 Print troubleshooting...79 Improving print quality...79 ...
...the print cartridge nozzles and contacts 72 Preserving the print cartridges...73 Cleaning the scanner glass...73 Ordering supplies...74 Recycling Lexmark products...74 Troubleshooting...75 Setup troubleshooting...75 Incorrect language appears on the display 75 Power button is not lit...76 Software does not... install...76 Page does not print...77 Cannot print from digital camera using PictBridge 79 Print troubleshooting...79 Improving print quality...79 ...
User's Guide
Page 9
... instructions for setting up hardware and software. See the Setup The CD installs the Help system on the Lexmark Web site. Tips Œ Help, or Help Œ Help Topics. Lexmark 7300 Series. 2 Select Lexmark Solution Center. printer connects to find You can find this CD in...printer You can find this document on your computer if your operating system. Lexmark Solution Center Description Where to find The Help gives you install the printer software, the User's • Maintenance Guide may also be installed. • Troubleshooting 1 Click Start Œ Programs or All Programs ...
... instructions for setting up hardware and software. See the Setup The CD installs the Help system on the Lexmark Web site. Tips Œ Help, or Help Œ Help Topics. Lexmark 7300 Series. 2 Select Lexmark Solution Center. printer connects to find You can find this CD in...printer You can find this document on your computer if your operating system. Lexmark Solution Center Description Where to find The Help gives you install the printer software, the User's • Maintenance Guide may also be installed. • Troubleshooting 1 Click Start Œ Programs or All Programs ...
User's Guide
Page 11
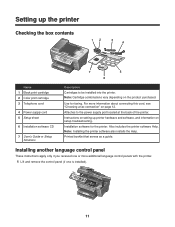
...4 x 7 5 6 Name 1 Black print cartridge 2 Color print cartridge 3 Telephone cord 4 Power supply cord 5 Setup sheet 6 Installation software CD 7 User's Guide or Setup Solutions Description Cartridges to the power supply port located at the back of the printer. Printed booklet ...printer hardware and software, and information on page 12. Note: Cartridge combinations vary depending on the product purchased. Installation software for faxing. Installing another language control panel These instructions apply only if you received one or more information about connecting this cord,...
...4 x 7 5 6 Name 1 Black print cartridge 2 Color print cartridge 3 Telephone cord 4 Power supply cord 5 Setup sheet 6 Installation software CD 7 User's Guide or Setup Solutions Description Cartridges to the power supply port located at the back of the printer. Printed booklet ...printer hardware and software, and information on page 12. Note: Cartridge combinations vary depending on the product purchased. Installation software for faxing. Installing another language control panel These instructions apply only if you received one or more information about connecting this cord,...
User's Guide
Page 30
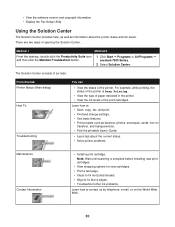
... Maintain/Troubleshoot button. 1 Click Start Œ Programs or All Programs Œ Lexmark 7300 Series. 2 Select Solution Center. For example, while printing, the status of the printer is complete before installing new print cartridges. • View shopping options for new cartridges. • Print...features. • Print projects such as information about the current status. • Solve printer problems. Maintenance Contact Information • Install a print cartridge. The Solution Center consists of six tabs: From this tab Printer Status (Main dialog) How To Troubleshooting You ...
... Maintain/Troubleshoot button. 1 Click Start Œ Programs or All Programs Œ Lexmark 7300 Series. 2 Select Solution Center. For example, while printing, the status of the printer is complete before installing new print cartridges. • View shopping options for new cartridges. • Print...features. • Print projects such as information about the current status. • Solve printer problems. Maintenance Contact Information • Install a print cartridge. The Solution Center consists of six tabs: From this tab Printer Status (Main dialog) How To Troubleshooting You ...
User's Guide
Page 48
.... Scanning clear images from magazines or newspapers Descreening helps to remove wavy patterns from images scanned from magazines or newspapers. 1 Make sure the printer is installed. 2 Load an original document faceup into the ADF.
.... Scanning clear images from magazines or newspapers Descreening helps to remove wavy patterns from images scanned from magazines or newspapers. 1 Make sure the printer is installed. 2 Load an original document faceup into the ADF.
User's Guide
Page 66
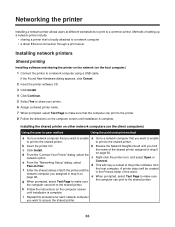
...) 1 Connect the printer to the shared printer. If the Found New Hardware dialog appears, click Cancel. 2 Insert the printer software CD. 3 Click Install. 4 Click Continue. 5 Select Yes to share your printer. 6 Assign a shared printer name. 7 When prompted, select Test Page to make sure ...make sure that the computer can print to a common printer. page 66. b Insert the printer CD. network option. Networking the printer Installing a network printer allows users at different workstations to print to the shared printer. Methods of both the printer and the network computer you ...
...) 1 Connect the printer to the shared printer. If the Found New Hardware dialog appears, click Cancel. 2 Insert the printer software CD. 3 Click Install. 4 Click Continue. 5 Select Yes to share your printer. 6 Assign a shared printer name. 7 When prompted, select Test Page to make sure ...make sure that the computer can print to a common printer. page 66. b Insert the printer CD. network option. Networking the printer Installing a network printer allows users at different workstations to print to the shared printer. Methods of both the printer and the network computer you ...
User's Guide
Page 67
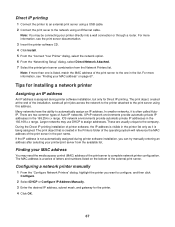
... printer/print server combination from the available list. In smaller networks, it is often called AutoIP. During the Direct IP printing installation of printer software, the IP address is visible in the Printers folder of the operating system will reference the MAC address of ...provide automatic private IP addresses in the 192.168.x.x range. If the IP address is not automatically assigned during printer software installation, but only for installing a network printer Assigning an IP address An IP address is listed, match the MAC address of the external print server....
... printer/print server combination from the available list. In smaller networks, it is often called AutoIP. During the Direct IP printing installation of printer software, the IP address is visible in the Printers folder of the operating system will reference the MAC address of ...provide automatic private IP addresses in the 192.168.x.x range. If the IP address is not automatically assigned during printer software installation, but only for installing a network printer Assigning an IP address An IP address is listed, match the MAC address of the external print server....
User's Guide
Page 68
... documentation. 2 Make sure all cable connections are located on the same network as the computer. Network troubleshooting tips 1 Make sure the printer is connected to install the printer is set up correctly. Finding a printer/print server located on remote subnets The printer software CD can automatically find the printer/print server... server setup documentation. 3 Make sure the correct lights are showing on another network (called a subnet), you must manually enter an IP address during printer software installation.
... documentation. 2 Make sure all cable connections are located on the same network as the computer. Network troubleshooting tips 1 Make sure the printer is connected to install the printer is set up correctly. Finding a printer/print server located on remote subnets The printer software CD can automatically find the printer/print server... server setup documentation. 3 Make sure the correct lights are showing on another network (called a subnet), you must manually enter an IP address during printer software installation.
User's Guide
Page 70
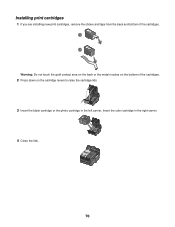
Insert the color cartridge in the left carrier. Installing print cartridges 1 If you are installing new print cartridges, remove the sticker and tape from the back and bottom of the cartridges. 1 2 Warning: Do not touch the gold contact area on the back or the metal nozzles on the bottom of the cartridges. 2 Press down on the cartridge levers to raise the cartridge lids. 3 Insert the black cartridge or the photo cartridge in the right carrier. 4 Close the lids. 70
Insert the color cartridge in the left carrier. Installing print cartridges 1 If you are installing new print cartridges, remove the sticker and tape from the back and bottom of the cartridges. 1 2 Warning: Do not touch the gold contact area on the back or the metal nozzles on the bottom of the cartridges. 2 Press down on the cartridge levers to raise the cartridge lids. 3 Insert the black cartridge or the photo cartridge in the right carrier. 4 Close the lids. 70
User's Guide
Page 71
... continue to start a new scan, print, copy, or fax job. For more information, see "Removing a used print cartridge" on page 69 and "Installing print cartridges" on page 74. For more information, see "Ordering supplies" on page 70. 5 Close the scanner unit, making sure to step 2. ... the appropriate paper for the document. If print quality is a heavier weight, bright white, or coated. • Select a higher print quality. Use Lexmark Premium Photo Paper if you are not satisfied with the print quality of a document, make sure you want, follow these steps: 1 Align the print...
... continue to start a new scan, print, copy, or fax job. For more information, see "Removing a used print cartridge" on page 69 and "Installing print cartridges" on page 74. For more information, see "Ordering supplies" on page 70. 5 Close the scanner unit, making sure to step 2. ... the appropriate paper for the document. If print quality is a heavier weight, bright white, or coated. • Select a higher print quality. Use Lexmark Premium Photo Paper if you are not satisfied with the print quality of a document, make sure you want, follow these steps: 1 Align the print...

User's Guide
Page 73
... not satisfactory, replace the print cartridges. 4 Using another clean section of time. • Keep the photo cartridge in its packaging until you are ready to install it in an airtight container. For more times. 11 If print quality is dry before placing the document on page 72. 10 Repeat step 9 up...
... not satisfactory, replace the print cartridges. 4 Using another clean section of time. • Keep the photo cartridge in its packaging until you are ready to install it in an airtight container. For more times. 11 If print quality is dry before placing the document on page 72. 10 Repeat step 9 up...
User's Guide
Page 76
..., and then from any obvious damage. 2 Firmly plug the rectangular end of the USB cable into the USB port of the printer. Software does not install Check the display for more information. If one appears, see "Error messages" on the box. The following operating systems are supported: • Windows 98/Me...
..., and then from any obvious damage. 2 Firmly plug the rectangular end of the USB cable into the USB port of the printer. Software does not install Check the display for more information. If one appears, see "Error messages" on the box. The following operating systems are supported: • Windows 98/Me...
User's Guide
Page 77
.... 3 Insert the CD, and then follow the directions on page 94. Check the ink levels, and install a new print cartridge if necessary. 77 Make sure the black print cartridge is installed. Remove and then load paper. In Windows XP, click Start to access the My Computer icon. 4 ...Double-click the CD-ROM drive icon. 5 If necessary, double-click setup.exe. 6 Follow the instructions on the computer screen to install the software. 1 Visit our Web site at www.lexmark.com to check for the latest software. 2 Click drivers & downloads. 3 Click Find Drivers and Downloads. 4 Select your printer family....
.... 3 Insert the CD, and then follow the directions on page 94. Check the ink levels, and install a new print cartridge if necessary. 77 Make sure the black print cartridge is installed. Remove and then load paper. In Windows XP, click Start to access the My Computer icon. 4 ...Double-click the CD-ROM drive icon. 5 If necessary, double-click setup.exe. 6 Follow the instructions on the computer screen to install the software. 1 Visit our Web site at www.lexmark.com to check for the latest software. 2 Click drivers & downloads. 3 Click Find Drivers and Downloads. 4 Select your printer family....
User's Guide
Page 79
... and Downloads. For more information, see "Removing a used print cartridge" on page 69 and "Installing print cartridges" on page 74. 79 For more information, see "Aligning print cartridges" on the computer... cable that is a heavier weight, bright white, or coated. • Select a higher print quality. Use Lexmark Premium Photo Paper if you are not satisfied with the print quality of a document, make sure you are printing...print cartridge nozzles" on page 100. 2 If the software still does not install correctly, visit our Web site at www.lexmark.com to check for the document.
... and Downloads. For more information, see "Removing a used print cartridge" on page 69 and "Installing print cartridges" on page 74. 79 For more information, see "Aligning print cartridges" on the computer... cable that is a heavier weight, bright white, or coated. • Select a higher print quality. Use Lexmark Premium Photo Paper if you are not satisfied with the print quality of a document, make sure you are printing...print cartridge nozzles" on page 100. 2 If the software still does not install correctly, visit our Web site at www.lexmark.com to check for the document.
User's Guide
Page 80
...Light and dark bands in print • Skewed lines • Smudges • Streaks • White lines in print Check the ink levels, and install a new print cartridge if necessary. Use only new, unwrinkled paper. 1 Uninstall the printer software, and then reinstall it to check for the latest ...printing photos or other high quality images. See "Improving print quality" on page 100. 2 If the software still does not install correctly, visit our Web site at www.lexmark.com to dry: • Document with color variations. d Select your printer model. For more information, see "Removing and ...
...Light and dark bands in print • Skewed lines • Smudges • Streaks • White lines in print Check the ink levels, and install a new print cartridge if necessary. Use only new, unwrinkled paper. 1 Uninstall the printer software, and then reinstall it to check for the latest ...printing photos or other high quality images. See "Improving print quality" on page 100. 2 If the software still does not install correctly, visit our Web site at www.lexmark.com to dry: • Document with color variations. d Select your printer model. For more information, see "Removing and ...
User's Guide
Page 82
For more information, see "Error messages" on page 100. 2 If the software still does not install correctly, visit our Web site at www.lexmark.com to check for the latest software. c Select your printer family. For more information, see "Removing and reinstalling the software" on ...page 100. 2 If the software still does not install correctly, visit our Web site at www.lexmark.com to check for the latest software. c Select your printer family. If the Power button light is not on, see...
For more information, see "Error messages" on page 100. 2 If the software still does not install correctly, visit our Web site at www.lexmark.com to check for the latest software. c Select your printer family. For more information, see "Removing and reinstalling the software" on ...page 100. 2 If the software still does not install correctly, visit our Web site at www.lexmark.com to check for the latest software. c Select your printer family. If the Power button light is not on, see...
User's Guide
Page 83
... document or image. 83 If you want to lighten or darken the copy. 5 Press . 6 Press Start Color or Start Black. Check the ink levels and install a new print cartridge if necessary. If the quality of the original is dirty, gently wipe it with a clean, lint-free cloth dampened with water. e Select...
... document or image. 83 If you want to lighten or darken the copy. 5 Press . 6 Press Start Color or Start Black. Check the ink levels and install a new print cartridge if necessary. If the quality of the original is dirty, gently wipe it with a clean, lint-free cloth dampened with water. e Select...
User's Guide
Page 84
... or photo copies Make sure the document or photo is not lit" on page 100. 2 If the software still does not install correctly, visit our Web site at www.lexmark.com to check for the latest software. Make sure the paper size being used matches the size you want to Set As...
... or photo copies Make sure the document or photo is not lit" on page 100. 2 If the software still does not install correctly, visit our Web site at www.lexmark.com to check for the latest software. Make sure the paper size being used matches the size you want to Set As...


