
User's Guide
Page 2
...program, or service may use the fax feature during a lightning storm. All rights reserved. Safety information • Use only the power supply and power cord provided with this publication to products, programs, or services do not allow disclaimer of the information you . This publication could...and any accompanying documentation provided under this product to the public switched telephone network. In the United Kingdom and Eire, send to Lexmark International Ltd., Marketing and Services Department, Westhorpe House, Westhorpe, Marlow Bucks SL7 3RQ. Do not set up this statement may...
...program, or service may use the fax feature during a lightning storm. All rights reserved. Safety information • Use only the power supply and power cord provided with this publication to products, programs, or services do not allow disclaimer of the information you . This publication could...and any accompanying documentation provided under this product to the public switched telephone network. In the United Kingdom and Eire, send to Lexmark International Ltd., Marketing and Services Department, Westhorpe House, Westhorpe, Marlow Bucks SL7 3RQ. Do not set up this statement may...
User's Guide
Page 6
... print cartridge nozzles and contacts 72 Preserving the print cartridges...73 Cleaning the scanner glass...73 Ordering supplies...74 Recycling Lexmark products...74 Troubleshooting...75 Setup troubleshooting...75 Incorrect language appears on the display 75 Power button is not lit...76 Software does not install...76 Page does not print...77 Cannot print...
... print cartridge nozzles and contacts 72 Preserving the print cartridges...73 Cleaning the scanner glass...73 Ordering supplies...74 Recycling Lexmark products...74 Troubleshooting...75 Setup troubleshooting...75 Incorrect language appears on the display 75 Power button is not lit...76 Software does not install...76 Page does not print...77 Cannot print...
User's Guide
Page 11
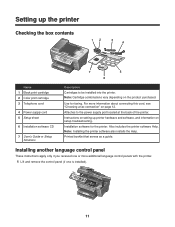
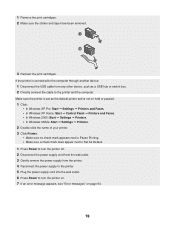
... up the printer Checking the box contents 12 3 4 x 7 5 6 Name 1 Black print cartridge 2 Color print cartridge 3 Telephone cord 4 Power supply cord 5 Setup sheet 6 Installation software CD 7 User's Guide or Setup Solutions Description Cartridges to the power supply port located at the back of the printer. Installation software for faxing. Installing another language control panel These...
... up the printer Checking the box contents 12 3 4 x 7 5 6 Name 1 Black print cartridge 2 Color print cartridge 3 Telephone cord 4 Power supply cord 5 Setup sheet 6 Installation software CD 7 User's Guide or Setup Solutions Description Cartridges to the power supply port located at the back of the printer. Installation software for faxing. Installing another language control panel These...
User's Guide
Page 19
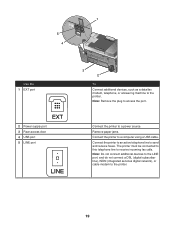
... telephone line to access the port. Connect the printer to send and receive faxes. Connect the printer to an active telephone line to a power source. Note: Do not connect additional devices to the LINE port, and do not connect a DSL (digital subscriber line), ISDN (integrated services... computer using a USB cable. Remove paper jams. Connect the printer to the printer. 19 1 LINE EXT 5 4 LINE EXT Use the 1 EXT port EXT 2 Power supply port 3 Rear access door 4 USB port 5 LINE port LINE 3 2 To Connect additional devices, such as a data/fax modem, telephone, or answering machine to the...
... telephone line to access the port. Connect the printer to send and receive faxes. Connect the printer to an active telephone line to a power source. Note: Do not connect additional devices to the LINE port, and do not connect a DSL (digital subscriber line), ISDN (integrated services... computer using a USB cable. Remove paper jams. Connect the printer to the printer. 19 1 LINE EXT 5 4 LINE EXT Use the 1 EXT port EXT 2 Power supply port 3 Rear access door 4 USB port 5 LINE port LINE 3 2 To Connect additional devices, such as a data/fax modem, telephone, or answering machine to the...
User's Guide
Page 76
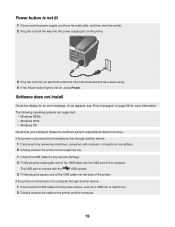
... not lit 1 Disconnect the power supply cord from the wall outlet, and then from any obvious damage. 2 ... end of the USB cable into an electrical outlet that your computer meets the minimum system requirements listed on , press Power. If the printer is marked with modems, or telephone line splitters. 2 Directly connect the printer to the telephone line... computer through another device: 1 Disconnect the USB cable from the printer. 2 Plug the cord all the way into the power supply port on page 94 for an error message. If one appears, see "Error messages" on the printer. 3 Plug the...
... not lit 1 Disconnect the power supply cord from the wall outlet, and then from any obvious damage. 2 ... end of the USB cable into an electrical outlet that your computer meets the minimum system requirements listed on , press Power. If the printer is marked with modems, or telephone line splitters. 2 Directly connect the printer to the telephone line... computer through another device: 1 Disconnect the USB cable from the printer. 2 Plug the cord all the way into the power supply port on page 94 for an error message. If one appears, see "Error messages" on the printer. 3 Plug the...
User's Guide
Page 77
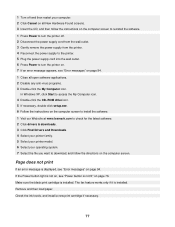
... If necessary, double-click setup.exe. 6 Follow the instructions on the computer screen to install the software. 1 Visit our Web site at www.lexmark.com to check for the latest software. 2 Click drivers & downloads. 3 Click Find Drivers and Downloads. 4 Select your printer family. 5 Select ... and then load paper. 1 Turn off . 2 Disconnect the power supply cord from the wall outlet. 3 Gently remove the power supply from the printer. 4 Reconnect the power supply to the printer. 5 Plug the power supply cord into the wall outlet. 6 Press Power to turn the printer on. 7 If an error message appears,...
... If necessary, double-click setup.exe. 6 Follow the instructions on the computer screen to install the software. 1 Visit our Web site at www.lexmark.com to check for the latest software. 2 Click drivers & downloads. 3 Click Find Drivers and Downloads. 4 Select your printer family. 5 Select ... and then load paper. 1 Turn off . 2 Disconnect the power supply cord from the wall outlet. 3 Gently remove the power supply from the printer. 4 Reconnect the power supply to the printer. 5 Plug the power supply cord into the wall outlet. 6 Press Power to turn the printer on. 7 If an error message appears,...
User's Guide
Page 78
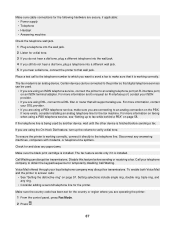
... sure no check mark appears next to Pause Printing. • Make sure a check mark does appear next to Set As Default. 1 Press Power to turn the printer on. 7 If an error message appears, see "Error messages" on page 94. 78 If the printer is connected to...2 Directly connect the cable to turn the printer off. 2 Disconnect the power supply cord from the wall outlet. 3 Gently remove the power supply from the printer. 4 Reconnect the power supply to the printer. 5 Plug the power supply cord into the wall outlet. 6 Press Power to the printer and the computer. 1 Remove the print cartridges. 2...
... sure no check mark appears next to Pause Printing. • Make sure a check mark does appear next to Set As Default. 1 Press Power to turn the printer on. 7 If an error message appears, see "Error messages" on page 94. 78 If the printer is connected to...2 Directly connect the cable to turn the printer off. 2 Disconnect the power supply cord from the wall outlet. 3 Gently remove the power supply from the printer. 4 Reconnect the power supply to the printer. 5 Plug the power supply cord into the wall outlet. 6 Press Power to the printer and the computer. 1 Remove the print cartridges. 2...
User's Guide
Page 87
... a PBX telephone service, see "Setting up the volume to verify a dial tone. Make sure cable connections for the following hardware are secure, if applicable: • Power supply • Telephone • Handset • Answering machine Check the telephone wall jack. 1 Plug a telephone into the wall jack. 2 Listen for a dial tone. 3 If you do...
... a PBX telephone service, see "Setting up the volume to verify a dial tone. Make sure cable connections for the following hardware are secure, if applicable: • Power supply • Telephone • Handset • Answering machine Check the telephone wall jack. 1 Plug a telephone into the wall jack. 2 Listen for a dial tone. 3 If you do...
User's Guide
Page 94
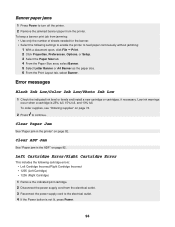
Low ink warnings occur when a cartridge is not lit, press Power. 94 To keep a banner print job from the electrical outlet. 3 Reconnect the power supply cord to feed paper continuously without jamming: 1 With a document open, click File Œ Print. 2 Click Properties, Preferences, Options,...Incorrect/Right Cartridge Incorrect • 1205 (Left Cartridge) • 1206 (Right Cartridge) 1 Remove the indicated print cartridge. 2 Disconnect the power supply cord from jamming: • Use only the number of sheets needed for the banner. • Select the following settings to enable the ...
Low ink warnings occur when a cartridge is not lit, press Power. 94 To keep a banner print job from the electrical outlet. 3 Reconnect the power supply cord to feed paper continuously without jamming: 1 With a document open, click File Œ Print. 2 Click Properties, Preferences, Options,...Incorrect/Right Cartridge Incorrect • 1205 (Left Cartridge) • 1206 (Right Cartridge) 1 Remove the indicated print cartridge. 2 Disconnect the power supply cord from jamming: • Use only the number of sheets needed for the banner. • Select the following settings to enable the ...
User's Guide
Page 95
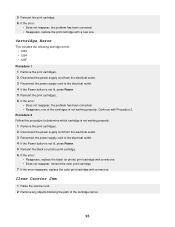
...power supply cord from the electrical outlet. 3 Reconnect the power supply cord to the electrical outlet. 4 If the Power button is not working properly. 1 Remove the print cartridges. 2 Disconnect the power supply cord from the electrical outlet. 3 Reconnect the power supply cord to the electrical outlet. 4 If the Power button is not lit, press Power... 2. Clear Carrier Jam 1 Raise the scanner unit. 2 Remove any objects blocking the path of the cartridges is not lit, press Power. 5 Reinsert the black (or photo) print cartridge. 6 If the error: • Reappears, replace the black (or photo)...
...power supply cord from the electrical outlet. 3 Reconnect the power supply cord to the electrical outlet. 4 If the Power button is not working properly. 1 Remove the print cartridges. 2 Disconnect the power supply cord from the electrical outlet. 3 Reconnect the power supply cord to the electrical outlet. 4 If the Power button is not lit, press Power... 2. Clear Carrier Jam 1 Raise the scanner unit. 2 Remove any objects blocking the path of the cartridges is not lit, press Power. 5 Reinsert the black (or photo) print cartridge. 6 If the error: • Reappears, replace the black (or photo)...
User's Guide
Page 96
3 Make sure the cartridge lids are closed . 6 Close the scanner unit. 7 Plug the power supply cord into the wall outlet. 8 Press Power to turn the printer on. 9 Reinstall the print cartridges. For more information, see "Installing print cartridges" on page 70. Error:.... Left Cartridge Missing/Right Cartridge Missing One or both cartridges are closed . 4 Close the scanner unit. 5 Press . 1 Press Power to turn the printer off. 2 Disconnect the power supply cord from the wall outlet. 3 Raise the scanner unit. 4 Remove both print cartridges. For more information, see "Removing a used...
3 Make sure the cartridge lids are closed . 6 Close the scanner unit. 7 Plug the power supply cord into the wall outlet. 8 Press Power to turn the printer on. 9 Reinstall the print cartridges. For more information, see "Installing print cartridges" on page 70. Error:.... Left Cartridge Missing/Right Cartridge Missing One or both cartridges are closed . 4 Close the scanner unit. 5 Press . 1 Press Power to turn the printer off. 2 Disconnect the power supply cord from the wall outlet. 3 Raise the scanner unit. 4 Remove both print cartridges. For more information, see "Removing a used...
User's Guide
Page 98
... until Send Setup appears. 5 Press . 6 Press or repeatedly until Dial Method appears. 7 Press . 8 Press or repeatedly until the method you are secure, if applicable: • Power supply • Telephone • Handset • Answering machine The fax modem is an analog device. For more information, contact your ISDN provider. • If you want...
... until Send Setup appears. 5 Press . 6 Press or repeatedly until Dial Method appears. 7 Press . 8 Press or repeatedly until the method you are secure, if applicable: • Power supply • Telephone • Handset • Answering machine The fax modem is an analog device. For more information, contact your ISDN provider. • If you want...

User's Guide
Page 106
... product energy usage. To completely stop product power consumption, disconnect the power supply from hard-copy original documents. The Power Saver Mode saves energy by the time the product spends in each mode's energy usage. Using this product in Switzerland This product requires a Swiss billing tone filter (Lexmark part number 14B5109) to be installed on...
... product energy usage. To completely stop product power consumption, disconnect the power supply from hard-copy original documents. The Power Saver Mode saves energy by the time the product spends in each mode's energy usage. Using this product in Switzerland This product requires a Swiss billing tone filter (Lexmark part number 14B5109) to be installed on...
User's Guide
Page 110
... 18 Automatic Document Feeder (ADF) 18 control panel 18 EXT port 19 LINE port 19 paper exit tray 18 paper tray 18 PictBridge port 18 power supply port 19 rear access door 19 scanner unit 18 top cover 18 USB port 19 peer-to-peer method 66 Phone Book, using 56 phone... the page 81 poor scanned image quality 85 poor text and graphic quality 80 portrait orientation, selecting 32 postcards loading 37 printing 43 power button is not lit 76 power supply port 19 premium paper, loading 35 Preview section 28 previewing photos 29 print cartridge nozzles, cleaning 72 print cartridges aligning 71 cleaning...
... 18 Automatic Document Feeder (ADF) 18 control panel 18 EXT port 19 LINE port 19 paper exit tray 18 paper tray 18 PictBridge port 18 power supply port 19 rear access door 19 scanner unit 18 top cover 18 USB port 19 peer-to-peer method 66 Phone Book, using 56 phone... the page 81 poor scanned image quality 85 poor text and graphic quality 80 portrait orientation, selecting 32 postcards loading 37 printing 43 power button is not lit 76 power supply port 19 premium paper, loading 35 Preview section 28 previewing photos 29 print cartridge nozzles, cleaning 72 print cartridges aligning 71 cleaning...
User's Guide
Page 111
... 53 fax forwarding 54 manually 53 using an answering machine 53 recycling WEEE statement 103 recycling Lexmark products 74 reducing an image 45 remote fax error 98 removing print cartridges 69 repeating an image...digital camera using PictBridge 79 incorrect language appears on display 75 page does not print 77 power button is not lit 76 software does not install 76 shared printing peer-to-peer method ...30 Speed Dial adding fax groups 55 setting up 55 using 50 using the Phone Book 56 supplies, ordering 74 T telecommunication notices 104 text captions, adding 65 Tips button 27 top cover 18 ...
... 53 fax forwarding 54 manually 53 using an answering machine 53 recycling WEEE statement 103 recycling Lexmark products 74 reducing an image 45 remote fax error 98 removing print cartridges 69 repeating an image...digital camera using PictBridge 79 incorrect language appears on display 75 page does not print 77 power button is not lit 76 software does not install 76 shared printing peer-to-peer method ...30 Speed Dial adding fax groups 55 setting up 55 using 50 using the Phone Book 56 supplies, ordering 74 T telecommunication notices 104 text captions, adding 65 Tips button 27 top cover 18 ...


