User's Guide
Page 3
... up the printer 11 Checking the box contents...11 Installing another language control panel 11 Getting the printer ready to fax...12 Choosing a fax connection...12 Connecting directly to a telephone wall jack 13 Connecting to a telephone...13 Connecting to an answering machine... Navigating the control panel menus...22 Using the Copy menu...23 Using the Scan menu...24 Using the Fax menu...24 Learning about the software 26 Using the printer software...26 Using the Productivity Suite...26 Using ... Using the Print Properties tabs...32 Using the Photo Editor...32 Using the Fax Setup Utility...33 3
... up the printer 11 Checking the box contents...11 Installing another language control panel 11 Getting the printer ready to fax...12 Choosing a fax connection...12 Connecting directly to a telephone wall jack 13 Connecting to a telephone...13 Connecting to an answering machine... Navigating the control panel menus...22 Using the Copy menu...23 Using the Scan menu...24 Using the Fax menu...24 Learning about the software 26 Using the printer software...26 Using the Productivity Suite...26 Using ... Using the Print Properties tabs...32 Using the Photo Editor...32 Using the Fax Setup Utility...33 3
User's Guide
Page 5
......53 Using Caller ID...53 Forwarding faxes...54 Printing fax activity reports...54 Setting up Quick Dial buttons and Speed Dial numbers 55 Setting up Quick Dial buttons using the control panel 55 Setting up ......57 Setting the number of rings before receiving a fax automatically 57 Setting up to fax while behind a PBX...58 Customizing fax settings...58 Customizing settings using the Fax Setup Utility 58 Setting up a fax header...60 Setting up a fax footer...61 Blocking unwanted changes to fax settings 61 Blocking junk faxes...62 Working with photos 63 Printing borderless photos...
......53 Using Caller ID...53 Forwarding faxes...54 Printing fax activity reports...54 Setting up Quick Dial buttons and Speed Dial numbers 55 Setting up Quick Dial buttons using the control panel 55 Setting up ......57 Setting the number of rings before receiving a fax automatically 57 Setting up to fax while behind a PBX...58 Customizing fax settings...58 Customizing settings using the Fax Setup Utility 58 Setting up a fax header...60 Setting up a fax footer...61 Blocking unwanted changes to fax settings 61 Blocking junk faxes...62 Working with photos 63 Printing borderless photos...
User's Guide
Page 6
......72 Wiping the print cartridge nozzles and contacts 72 Preserving the print cartridges...73 Cleaning the scanner glass...73 Ordering supplies...74 Recycling Lexmark products...74 Troubleshooting...75 Setup troubleshooting...75 Incorrect language appears on the display 75 Power button is not lit...76 Software does not install...76 Page does not......85 Poor scanned image quality...85 Partial document or photo scans...86 Cannot scan to an application...86 Cannot scan to a computer over a network 86 Fax troubleshooting...86 Tips for faxing using the Productivity Suite 86 Cannot send or receive...
......72 Wiping the print cartridge nozzles and contacts 72 Preserving the print cartridges...73 Cleaning the scanner glass...73 Ordering supplies...74 Recycling Lexmark products...74 Troubleshooting...75 Setup troubleshooting...75 Incorrect language appears on the display 75 Power button is not lit...76 Software does not install...76 Page does not......85 Poor scanned image quality...85 Partial document or photo scans...86 Cannot scan to an application...86 Cannot scan to a computer over a network 86 Fax troubleshooting...86 Tips for faxing using the Productivity Suite 86 Cannot send or receive...
User's Guide
Page 11
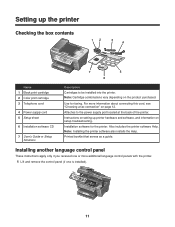
... one is installed). 11 Note: Installing the printer software also installs the Help. Printed booklet that serves as a guide. Installation software for faxing. Note: Cartridge combinations vary depending on setting up the printer Checking the box contents 12 3 4 x 7 5 6 Name 1 Black ...print cartridge 2 Color print cartridge 3 Telephone cord 4 Power supply cord 5 Setup sheet 6 Installation software CD 7 User's Guide or Setup Solutions Description Cartridges to the power supply port located at the back of the printer. Also includes the printer software...
... one is installed). 11 Note: Installing the printer software also installs the Help. Printed booklet that serves as a guide. Installation software for faxing. Note: Cartridge combinations vary depending on setting up the printer Checking the box contents 12 3 4 x 7 5 6 Name 1 Black ...print cartridge 2 Color print cartridge 3 Telephone cord 4 Power supply cord 5 Setup sheet 6 Installation software CD 7 User's Guide or Setup Solutions Description Cartridges to the power supply port located at the back of the printer. Also includes the printer software...
User's Guide
Page 12
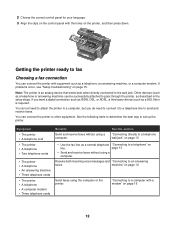
... to a computer, but you want a digital connection such as ISDN, DSL, or ADSL, a third-party device (such as described in the setup steps. Other devices (such as a telephone or answering machine) can connect the printer to a computer with the holes on the printer, and then... machine • Three telephone cords • The printer • A telephone • A computer modem • Three telephone cords Benefits Send and receive faxes without using the computer or the printer. If you do need to connect it to a telephone line to set up the printer. 2 Choose the correct...
... to a computer, but you want a digital connection such as ISDN, DSL, or ADSL, a third-party device (such as described in the setup steps. Other devices (such as a telephone or answering machine) can connect the printer to a computer with the holes on the printer, and then... machine • Three telephone cords • The printer • A telephone • A computer modem • Three telephone cords Benefits Send and receive faxes without using the computer or the printer. If you do need to connect it to a telephone line to set up the printer. 2 Choose the correct...
User's Guide
Page 13
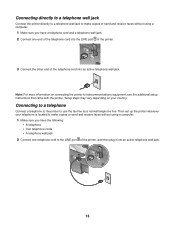
Connecting to a telephone Connect a telephone to the printer to telecommunications equipment, see the additional setup instructions that came with the printer. LINE EXT LINE EXT 13 LINE EXT 3 Connect the other end of the telephone cord into an active... printer wherever your country. Connecting directly to a telephone wall jack Connect the printer directly to a telephone wall jack to make copies or send and receive faxes without using a computer. 1 Make sure you have the following: • A telephone • Two telephone cords • A telephone wall jack 2 Connect one end of ...
Connecting to a telephone Connect a telephone to the printer to telecommunications equipment, see the additional setup instructions that came with the printer. LINE EXT LINE EXT 13 LINE EXT 3 Connect the other end of the telephone cord into an active... printer wherever your country. Connecting directly to a telephone wall jack Connect the printer directly to a telephone wall jack to make copies or send and receive faxes without using a computer. 1 Make sure you have the following: • A telephone • Two telephone cords • A telephone wall jack 2 Connect one end of ...
User's Guide
Page 14
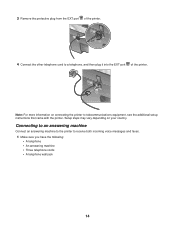
Connecting to an answering machine Connect an answering machine to the printer to telecommunications equipment, see the additional setup instructions that came with the printer. LINE EXT Note: For more information on your country. 3 Remove the protective plug from the EXT ...4 Connect the other telephone cord to a telephone, and then plug it into the EXT port of the printer. Setup steps may vary depending on connecting the printer to receive both incoming voice messages and faxes. 1 Make sure you have the following: • A telephone • An answering machine • Three telephone ...
Connecting to an answering machine Connect an answering machine to the printer to telecommunications equipment, see the additional setup instructions that came with the printer. LINE EXT Note: For more information on your country. 3 Remove the protective plug from the EXT ...4 Connect the other telephone cord to a telephone, and then plug it into the EXT port of the printer. Setup steps may vary depending on connecting the printer to receive both incoming voice messages and faxes. 1 Make sure you have the following: • A telephone • An answering machine • Three telephone ...

User's Guide
Page 24
... repeatedly until appears next to the submenu item you want or the setting you want to the previous menus. Use this Original Size Maintenance Device Setup To Specify the size of the original. • View ink levels. • Clean cartridges. • Align cartridges. • Print a test page. ... scan default screen appears. 2 Press or repeatedly until the scan destination you want appears. 3 If you do not want to change a setting, enter the fax number and press Start Black. 3 If you want to change a setting, press . 5 Press or repeatedly until appears next to the menu item you want...
... repeatedly until appears next to the submenu item you want or the setting you want to the previous menus. Use this Original Size Maintenance Device Setup To Specify the size of the original. • View ink levels. • Clean cartridges. • Align cartridges. • Print a test page. ... scan default screen appears. 2 Press or repeatedly until the scan destination you want appears. 3 If you do not want to change a setting, enter the fax number and press Start Black. 3 If you want to change a setting, press . 5 Press or repeatedly until appears next to the menu item you want...
User's Guide
Page 25
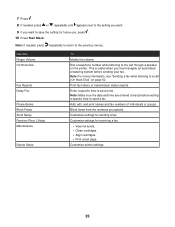
Use this Ringer Volume On Hook Dial Fax Reports Delay Fax Phone Books Block Faxes Send Setup Receive (Recv.) Setup Maintenance Device Setup To Modify the volume. Dial a telephone number while listening to the call (On Hook Dial)" on the printer. Enter a specific time to send a fax. Block faxes from the numbers you must navigate an automated answering system...
Use this Ringer Volume On Hook Dial Fax Reports Delay Fax Phone Books Block Faxes Send Setup Receive (Recv.) Setup Maintenance Device Setup To Modify the volume. Dial a telephone number while listening to the call (On Hook Dial)" on the printer. Enter a specific time to send a fax. Block faxes from the numbers you must navigate an automated answering system...
User's Guide
Page 26
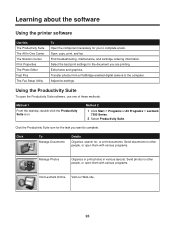
...software Use this The Productivity Suite The All-In-One Center The Solution Center Print Properties The Photo Editor Fast Pics The Fax Setup Utility To Open the component necessary for you to complete. Select the best print settings for the document you want to complete...Productivity Suite icon for , or print documents. Scan, copy, print, and fax. Edit photos and graphics. Transfer photos from a PictBridge-enabled digital camera to other people, or open them with various programs. Visit Lexmark Online Visit our Web site. 26 Find troubleshooting, maintenance, and cartridge ordering...
...software Use this The Productivity Suite The All-In-One Center The Solution Center Print Properties The Photo Editor Fast Pics The Fax Setup Utility To Open the component necessary for you to complete. Select the best print settings for the document you want to complete...Productivity Suite icon for , or print documents. Scan, copy, print, and fax. Edit photos and graphics. Transfer photos from a PictBridge-enabled digital camera to other people, or open them with various programs. Visit Lexmark Online Visit our Web site. 26 Find troubleshooting, maintenance, and cartridge ordering...
User's Guide
Page 29
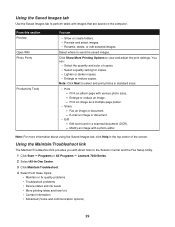
... copies. Using the Maintain/Troubleshoot link The Maintain/Troubleshoot link provides you with various photo sizes. - Select where to send the saved images. Fax an image or document. - Enlarge or reduce an image. - You can • Show or create folders. • Preview and select ...an image or document. • Edit - Print an album page with direct links to the Solution Center and the Fax Setup Utility. 1 Click Start Œ Programs or All Programs Œ Lexmark 7300 Series. 2 Select All-In-One Center. 3 Click Maintain/Troubleshoot. 4 Select from these topics: • Maintain...
... copies. Using the Maintain/Troubleshoot link The Maintain/Troubleshoot link provides you with various photo sizes. - Select where to send the saved images. Fax an image or document. - Enlarge or reduce an image. - You can • Show or create folders. • Preview and select ...an image or document. • Edit - Print an album page with direct links to the Solution Center and the Fax Setup Utility. 1 Click Start Œ Programs or All Programs Œ Lexmark 7300 Series. 2 Select All-In-One Center. 3 Click Maintain/Troubleshoot. 4 Select from these topics: • Maintain...
User's Guide
Page 30
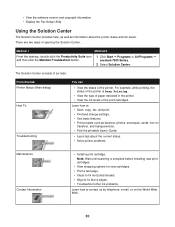
...the desktop, double-click the Productivity Suite icon, and then click the Maintain/Troubleshoot button. 1 Click Start Œ Programs or All Programs Œ Lexmark 7300 Series. 2 Select Solution Center. Note: Wait until scanning is Busy Printing. • View the type of paper detected in the printer. ...Solution Center. There are two ways of the print cartridges. • View the software version and copyright information • Display the Fax Setup Utility Using the Solution Center The Solution Center provides help, as well as banners, photos, envelopes, cards, iron-on the World Wide...
...the desktop, double-click the Productivity Suite icon, and then click the Maintain/Troubleshoot button. 1 Click Start Œ Programs or All Programs Œ Lexmark 7300 Series. 2 Select Solution Center. Note: Wait until scanning is Busy Printing. • View the type of paper detected in the printer. ...Solution Center. There are two ways of the print cartridges. • View the software version and copyright information • Display the Fax Setup Utility Using the Solution Center The Solution Center provides help, as well as banners, photos, envelopes, cards, iron-on the World Wide...
User's Guide
Page 33
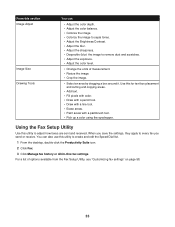
...Adjust the color level. • Change the units of options available from the Fax Setup Utility, see "Customizing fax settings" on page 58. 33 Use this utility to adjust how faxes are sent and received. Using the Fax Setup Utility Use this for text box placement and cutting and copying areas. •... to create and edit the Speed Dial list. 1 From the desktop, double-click the Productivity Suite icon. 2 Click Fax. 3 Click Manage fax history or All-In-One fax settings. You can also use this section Image Adjust Image Size Drawing Tools You can • Adjust the color depth....
...Adjust the color level. • Change the units of options available from the Fax Setup Utility, see "Customizing fax settings" on page 58. 33 Use this utility to adjust how faxes are sent and received. Using the Fax Setup Utility Use this for text box placement and cutting and copying areas. •... to create and edit the Speed Dial list. 1 From the desktop, double-click the Productivity Suite icon. 2 Click Fax. 3 Click Manage fax history or All-In-One fax settings. You can also use this section Image Adjust Image Size Drawing Tools You can • Adjust the color depth....
User's Guide
Page 50
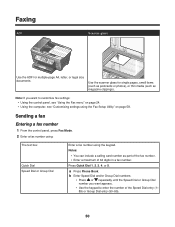
...letter, or legal size documents. a Press Phone Book. Sending a fax Entering a fax number 1 From the control panel, press Fax Mode. 2 Enter a fax number using: The text box Quick Dial Speed Dial or Group Dial Enter a fax number using the Fax Setup Utility" on page 24. • Using the computer, see "Using... the Fax menu" on page 58. Faxing ADF Scanner glass x Use the ADF for single pages, small items (such as ...
...letter, or legal size documents. a Press Phone Book. Sending a fax Entering a fax number 1 From the control panel, press Fax Mode. 2 Enter a fax number using: The text box Quick Dial Speed Dial or Group Dial Enter a fax number using the Fax Setup Utility" on page 24. • Using the computer, see "Using... the Fax menu" on page 58. Faxing ADF Scanner glass x Use the ADF for single pages, small items (such as ...
User's Guide
Page 58
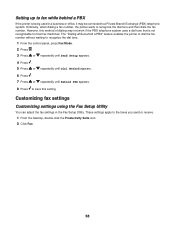
... if the PBX telephone system uses a dial tone that is being used in the Fax Setup Utility. Customizing fax settings Customizing settings using the Fax Setup Utility You can adjust the fax settings in a business or office, it may be connected to most fax machines. These settings apply to recognize the dial tone and then dials the...
... if the PBX telephone system uses a dial tone that is being used in the Fax Setup Utility. Customizing fax settings Customizing settings using the Fax Setup Utility You can adjust the fax settings in a business or office, it may be connected to most fax machines. These settings apply to recognize the dial tone and then dials the...

User's Guide
Page 60
..., or delete entries from the Speed Dial list, including Group Dial entries. 5 Click OK after you finish customizing the settings. 6 Close the Fax Setup Utility. Setting up a fax header During the initial setup of your printer, you were prompted to save the setting. 11 Press . 12 Press or repeatedly until Personalize appears. 6 Press . 7 Enter...
..., or delete entries from the Speed Dial list, including Group Dial entries. 5 Click OK after you finish customizing the settings. 6 Close the Fax Setup Utility. Setting up a fax header During the initial setup of your printer, you were prompted to save the setting. 11 Press . 12 Press or repeatedly until Personalize appears. 6 Press . 7 Enter...
User's Guide
Page 61
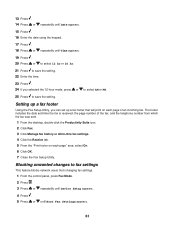
... The footer includes the date and time the fax is received, the page number of an incoming fax. Blocking unwanted changes to save the setting. 22 Enter the time. 23 Press . 24 If you can set up a fax footer Using the Fax Setup Utility, you selected the 12-hour mode, press... 1 From the desktop, double-click the Productivity Suite icon. 2 Click Fax. 3 Click Manage fax history or All-In-One fax settings. 4 Click the Receive tab. 5 From the "Print footer on each page" area, select On. 6 Click OK. 7 Close the Fax Setup Utility. 13 Press . 14 Press or repeatedly until Date appears. 15 ...
... The footer includes the date and time the fax is received, the page number of an incoming fax. Blocking unwanted changes to save the setting. 22 Enter the time. 23 Press . 24 If you can set up a fax footer Using the Fax Setup Utility, you selected the 12-hour mode, press... 1 From the desktop, double-click the Productivity Suite icon. 2 Click Fax. 3 Click Manage fax history or All-In-One fax settings. 4 Click the Receive tab. 5 From the "Print footer on each page" area, select On. 6 Click OK. 7 Close the Fax Setup Utility. 13 Press . 14 Press or repeatedly until Date appears. 15 ...
User's Guide
Page 108
...Speed Dial 55 using while listening to call 52 using with On Hook dial feature 52 using with the Fax Setup Utility 58 can receive but not send fax 88 can send but not receive fax 88 cannot print from digital camera using PictBridge 79 cannot print to network printer 91 cannot scan to...enlarging an image 45 reducing an image 45 repeating an image 45 custom size paper, loading 37 customizing settings copy 23 fax 24 Fax Setup Utility 58 scan 24 D defaults Copy menu 23 Fax menu 24 Scan menu 24 digital camera (PictBridge-enabled) 64 direct IP printing 67 distinctive ring patterns 57 documents copying...
...Speed Dial 55 using while listening to call 52 using with On Hook dial feature 52 using with the Fax Setup Utility 58 can receive but not send fax 88 can send but not receive fax 88 cannot print from digital camera using PictBridge 79 cannot print to network printer 91 cannot scan to...enlarging an image 45 reducing an image 45 repeating an image 45 custom size paper, loading 37 customizing settings copy 23 fax 24 Fax Setup Utility 58 scan 24 D defaults Copy menu 23 Fax menu 24 Scan menu 24 digital camera (PictBridge-enabled) 64 direct IP printing 67 distinctive ring patterns 57 documents copying...
User's Guide
Page 109
... reports 54 customizing settings 58 forwarding 54 receiving automatically 53 receiving manually 53 fax error message 97 fax footer, setting up 61 fax header, setting up 60 fax mode unsupported error message 97 Fax Setup Utility Connection/Dialing tab 60 customizing settings 58 Receive tab 60 Send tab 59 Speed Dial tab 60 using 33, 58...
... reports 54 customizing settings 58 forwarding 54 receiving automatically 53 receiving manually 53 fax error message 97 fax footer, setting up 61 fax header, setting up 60 fax mode unsupported error message 97 Fax Setup Utility Connection/Dialing tab 60 customizing settings 58 Receive tab 60 Send tab 59 Speed Dial tab 60 using 33, 58...
User's Guide
Page 111
... 54 manually 53 using an answering machine 53 recycling WEEE statement 103 recycling Lexmark products 74 reducing an image 45 remote fax error 98 removing print cartridges 69 repeating an image 45 reports, fax activity 54 reverse page order 41 right cartridge error 94 right cartridge missing error 96 ring ...76 software does not install 76 shared printing peer-to-peer method 66 point-and-print method 66 software All-In-One Center 27 Fax Setup Utility 33 Photo Editor 32 Print Properties 31 Productivity Suite 26 removing and reinstalling 100 Solution Center 30 software does not install 76 Solution...
... 54 manually 53 using an answering machine 53 recycling WEEE statement 103 recycling Lexmark products 74 reducing an image 45 remote fax error 98 removing print cartridges 69 repeating an image 45 reports, fax activity 54 reverse page order 41 right cartridge error 94 right cartridge missing error 96 ring ...76 software does not install 76 shared printing peer-to-peer method 66 point-and-print method 66 software All-In-One Center 27 Fax Setup Utility 33 Photo Editor 32 Print Properties 31 Productivity Suite 26 removing and reinstalling 100 Solution Center 30 software does not install 76 Solution...


