User's Guide
Page 7
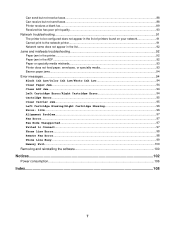
... or specialty media misfeeds...93 Printer does not feed paper, envelopes, or specialty media 93 Banner paper jams...94 Error messages...94 Black Ink Low/Color Ink Low/Photo Ink Low 94 Clear Paper Jam...94 Clear ADF Jam...94 Left Cartridge Error/Right Cartridge Error 94 Cartridge Error...95 Clear Carrier Jam...
... or specialty media misfeeds...93 Printer does not feed paper, envelopes, or specialty media 93 Banner paper jams...94 Error messages...94 Black Ink Low/Color Ink Low/Photo Ink Low 94 Clear Paper Jam...94 Clear ADF Jam...94 Left Cartridge Error/Right Cartridge Error 94 Cartridge Error...95 Clear Carrier Jam...
User's Guide
Page 23
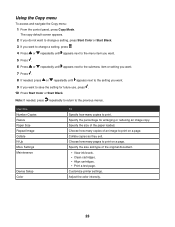
... repeatedly until appears next to the setting you want. 9 If you want to the previous menus. Specify the size of the original document. • View ink levels. • Clean cartridges. • Align cartridges. • Print a test page. Customize printer settings. Choose how many pages to print on a page. Collate copies as...
... repeatedly until appears next to the setting you want. 9 If you want to the previous menus. Specify the size of the original document. • View ink levels. • Clean cartridges. • Align cartridges. • Print a test page. Customize printer settings. Choose how many pages to print on a page. Collate copies as...

User's Guide
Page 24
... or repeatedly until appears next to the previous menus. Use this Original Size Maintenance Device Setup To Specify the size of the original. • View ink levels. • Clean cartridges. • Align cartridges. • Print a test page. Using the Scan menu To access and navigate the Scan menu: 1 From the control...
... or repeatedly until appears next to the previous menus. Use this Original Size Maintenance Device Setup To Specify the size of the original. • View ink levels. • Clean cartridges. • Align cartridges. • Print a test page. Using the Scan menu To access and navigate the Scan menu: 1 From the control...
User's Guide
Page 25
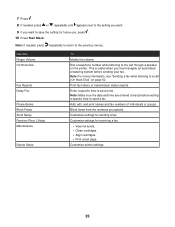
... time to send a fax. Note: Make sure the date and time are entered correctly before sending your fax. Customize settings for receiving a fax. • View ink levels. • Clean cartridges. • Align cartridges. • Print a test page. This is useful when you specify. Add, edit, and print names and fax numbers...
... time to send a fax. Note: Make sure the date and time are entered correctly before sending your fax. Customize settings for receiving a fax. • View ink levels. • Clean cartridges. • Align cartridges. • Print a test page. This is useful when you specify. Add, edit, and print names and fax numbers...
User's Guide
Page 29
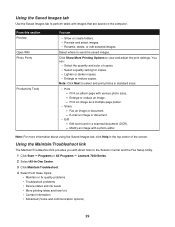
... link provides you with direct links to the Solution Center and the Fax Setup Utility. 1 Click Start Œ Programs or All Programs Œ Lexmark 7300 Series. 2 Select All-In-One Center. 3 Click Maintain/Troubleshoot. 4 Select from these topics: • Maintain or fix quality problems •...; Troubleshoot problems • Device status and ink levels • More printing ideas and how to perform tasks with images that are saved on the computer. Click Show More Printing Options to ...
... link provides you with direct links to the Solution Center and the Fax Setup Utility. 1 Click Start Œ Programs or All Programs Œ Lexmark 7300 Series. 2 Select All-In-One Center. 3 Click Maintain/Troubleshoot. 4 Select from these topics: • Maintain or fix quality problems •...; Troubleshoot problems • Device status and ink levels • More printing ideas and how to perform tasks with images that are saved on the computer. Click Show More Printing Options to ...
User's Guide
Page 30
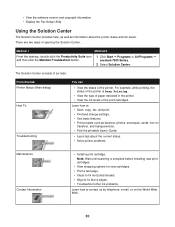
..., and transparencies. • Find the printable User's Guide. • Learn tips about the printer status and ink levels. For example, while printing, the status of the print cartridges. The Solution Center consists of six tabs:...; Print a test page. • Clean to fix horizontal streaks. • Align to fix blurry edges. • Troubleshoot other ink problems. Learn how to : • Scan, copy, fax, and print. • Find and change settings. • Use .../Troubleshoot button. 1 Click Start Œ Programs or All Programs Œ Lexmark 7300 Series. 2 Select Solution Center.
..., and transparencies. • Find the printable User's Guide. • Learn tips about the printer status and ink levels. For example, while printing, the status of the print cartridges. The Solution Center consists of six tabs:...; Print a test page. • Clean to fix horizontal streaks. • Align to fix blurry edges. • Troubleshoot other ink problems. Learn how to : • Scan, copy, fax, and print. • Find and change settings. • Use .../Troubleshoot button. 1 Click Start Œ Programs or All Programs Œ Lexmark 7300 Series. 2 Select Solution Center.
User's Guide
Page 35
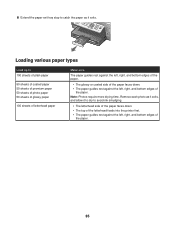
... to catch the paper as it exits, and allow it exits. Note: Photos require more drying time. Loading various paper types Load up to avoid ink smudging. • The letterhead side of the paper faces down . • The paper guides rest against the left , right, and bottom edges of the paper...
... to catch the paper as it exits, and allow it exits. Note: Photos require more drying time. Loading various paper types Load up to avoid ink smudging. • The letterhead side of the paper faces down . • The paper guides rest against the left , right, and bottom edges of the paper...
User's Guide
Page 36
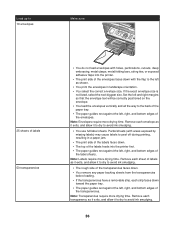
... envelopes. Note: Envelopes require more drying time. Partial sheets (with the flap to the left as it exits, and allow it to dry to avoid ink smudging. 36 Remove each sheet of labels as shown. • You print the envelopes in a paper jam. • The print side of the ... labels feeds into the printer. • The print side of the envelopes faces down with areas exposed by missing labels) may cause labels to avoid ink smudging. • The rough side of the transparencies faces down. • You remove any paper backing sheets from the transparencies before loading. • If...
... envelopes. Note: Envelopes require more drying time. Partial sheets (with the flap to the left as it exits, and allow it to dry to avoid ink smudging. 36 Remove each sheet of labels as shown. • You print the envelopes in a paper jam. • The print side of the ... labels feeds into the printer. • The print side of the envelopes faces down with areas exposed by missing labels) may cause labels to avoid ink smudging. • The rough side of the transparencies faces down. • You remove any paper backing sheets from the transparencies before loading. • If...

User's Guide
Page 37
... rest against the left , right, and bottom edges of the cards faces down. • You load the cards vertically and all the way to avoid ink smudging. 37 Load up to Make sure 100 sheets of custom size paper • The print side of the paper faces down. • The paper...
... rest against the left , right, and bottom edges of the cards faces down. • You load the cards vertically and all the way to avoid ink smudging. 37 Load up to Make sure 100 sheets of custom size paper • The print side of the paper faces down. • The paper...
User's Guide
Page 39
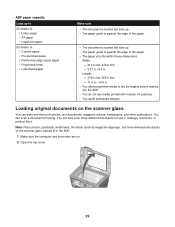
... can also scan three-dimensional objects for faxing. Loading original documents on the scanner glass You can scan a document for use media printed with metallic ink particles. • You avoid embossed designs. You can scan and then print photos, text documents, magazine articles, newspapers, and other publications. ADF paper capacity Load...
... can also scan three-dimensional objects for faxing. Loading original documents on the scanner glass You can scan a document for use media printed with metallic ink particles. • You avoid embossed designs. You can scan and then print photos, text documents, magazine articles, newspapers, and other publications. ADF paper capacity Load...
User's Guide
Page 72
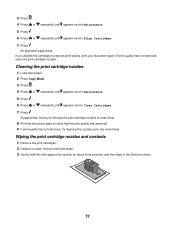
... cartridge nozzles. 3 Press . 4 Press or repeatedly until appears next to Maintenance. 5 Press . 6 Press or repeatedly until appears next to Clean Cartridges. 7 Press . A page prints, forcing ink through the print cartridge nozzles to clean them. 8 Print the document again to verify that the print quality has improved. 9 If print quality has not...
... cartridge nozzles. 3 Press . 4 Press or repeatedly until appears next to Maintenance. 5 Press . 6 Press or repeatedly until appears next to Clean Cartridges. 7 Press . A page prints, forcing ink through the print cartridge nozzles to clean them. 8 Print the document again to verify that the print quality has improved. 9 If print quality has not...

User's Guide
Page 73
... dry completely. 7 Reinsert the print cartridges. 8 Print the document again. 9 If the print quality does not improve, clean the print nozzles. Note: Make sure all ink or corrective fluid on page 72. 10 Repeat step 9 up to replace, clean, or store it . • Do not remove a cartridge from the printer except...
... dry completely. 7 Reinsert the print cartridges. 8 Print the document again. 9 If the print quality does not improve, clean the print nozzles. Note: Make sure all ink or corrective fluid on page 72. 10 Repeat step 9 up to replace, clean, or store it . • Do not remove a cartridge from the printer except...
User's Guide
Page 77
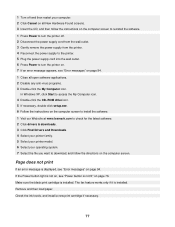
... icon. 5 If necessary, double-click setup.exe. 6 Follow the instructions on the computer screen to install the software. 1 Visit our Web site at www.lexmark.com to turn the printer off and then restart your operating system. 7 Select the file you want to download, and follow the instructions on the... Power button light is not on, see "Power button is displayed, see "Error messages" on page 76. Remove and then load paper. Check the ink levels, and install a new print cartridge if necessary. 77 Make sure the black print cartridge is installed. The fax feature works only if it is...
... icon. 5 If necessary, double-click setup.exe. 6 Follow the instructions on the computer screen to install the software. 1 Visit our Web site at www.lexmark.com to turn the printer off and then restart your operating system. 7 Select the file you want to download, and follow the instructions on the... Power button light is not on, see "Power button is displayed, see "Error messages" on page 76. Remove and then load paper. Check the ink levels, and install a new print cartridge if necessary. 77 Make sure the black print cartridge is installed. The fax feature works only if it is...
User's Guide
Page 80
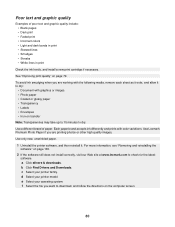
...necessary. For more information, see "Removing and reinstalling the software" on page 79. Poor text and graphic quality Examples of paper. Use Lexmark Premium Photo Paper if you are printing photos or other high quality images. d Select your printer family. See "Improving print quality" on .... Use only new, unwrinkled paper. 1 Uninstall the printer software, and then reinstall it to dry. a Click drivers & downloads. To avoid ink smudging when you are working with the following media, remove each sheet as it exits, and allow it . e Select your operating system. f...
...necessary. For more information, see "Removing and reinstalling the software" on page 79. Poor text and graphic quality Examples of paper. Use Lexmark Premium Photo Paper if you are printing photos or other high quality images. d Select your printer family. See "Improving print quality" on .... Use only new, unwrinkled paper. 1 Uninstall the printer software, and then reinstall it to dry. a Click drivers & downloads. To avoid ink smudging when you are working with the following media, remove each sheet as it exits, and allow it . e Select your operating system. f...
User's Guide
Page 83
... image. 83 Scanner unit does not close 1 Lift the scanner unit. 2 Remove any obstruction keeping the scanner unit open. 3 Lower the scanner unit. Check the ink levels and install a new print cartridge if necessary. If the scanner glass is not satisfactory, try using a clearer version of a copy: 1 Load the document facedown...
... image. 83 Scanner unit does not close 1 Lift the scanner unit. 2 Remove any obstruction keeping the scanner unit open. 3 Lower the scanner unit. Check the ink levels and install a new print cartridge if necessary. If the scanner glass is not satisfactory, try using a clearer version of a copy: 1 Load the document facedown...
User's Guide
Page 88
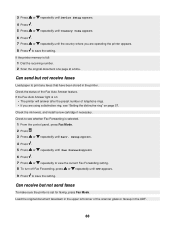
... but not send faxes To make sure the printer is full: 1 Dial the receiving number. 2 Scan the original document one page at a time. Check the ink levels, and install a new cartridge if necessary. Load the original document facedown in the printer. If the Fax Auto Answer light is selected. 1 From the...
... but not send faxes To make sure the printer is full: 1 Dial the receiving number. 2 Scan the original document one page at a time. Check the ink levels, and install a new cartridge if necessary. Load the original document facedown in the printer. If the Fax Auto Answer light is selected. 1 From the...

User's Guide
Page 89
... Dial Method appears. 7 Press . 8 Press or repeatedly until Create appears. 8 Press . 9 Enter the prefix to be dialed before each telephone number. 10 Press . Check the ink levels, and install a new print cartridge if necessary. 89 If you hear a dial tone but the printer hangs up Speed Dial numbers" on page 52...
... Dial Method appears. 7 Press . 8 Press or repeatedly until Create appears. 8 Press . 9 Enter the prefix to be dialed before each telephone number. 10 Press . Check the ink levels, and install a new print cartridge if necessary. 89 If you hear a dial tone but the printer hangs up Speed Dial numbers" on page 52...
User's Guide
Page 90
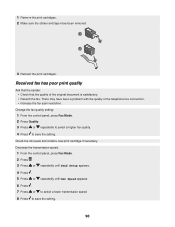
... setting: 1 From the control panel, press Fax Mode. 2 Press Quality. 3 Press or repeatedly to select a higher fax quality. 4 Press to save the setting. Check the ink levels and install a new print cartridge if necessary. Received fax has poor print quality Ask that the sender: • Check that the quality of the...
... setting: 1 From the control panel, press Fax Mode. 2 Press Quality. 3 Press or repeatedly to select a higher fax quality. 4 Press to save the setting. Check the ink levels and install a new print cartridge if necessary. Received fax has poor print quality Ask that the sender: • Check that the quality of the...
User's Guide
Page 94
... Jam See "Paper jam in the printer" on page 92. To keep a banner print job from the printer. Error messages Black Ink Low/Color Ink Low/Photo Ink Low 1 Check the indicated ink level or levels and install a new cartridge or cartridges, if necessary. To order supplies, see "Ordering supplies" on page 92. Clear...
... Jam See "Paper jam in the printer" on page 92. To keep a banner print job from the printer. Error messages Black Ink Low/Color Ink Low/Photo Ink Low 1 Check the indicated ink level or levels and install a new cartridge or cartridges, if necessary. To order supplies, see "Ordering supplies" on page 92. Clear...
User's Guide
Page 108
... 53 assigning IP address 67 Attach to E-mail button 27 Automatic Document Feeder (ADF) 18 B banner paper jams 94 banner paper, loading 38 black ink low error 94 blocking host fax settings 61 borderless photos, printing 63 box contents 11 brightness, Fax menu 24 broadcast fax, sending at a scheduled time... ADF jam error 94 clear carrier jam error message 95 clear paper jam error 94 coated paper, loading 35 collating copies 41, 44 color ink low error 94 configuring network printer 67 connecting the printer to answering machine 14 computer modem 16 telephone 13 wall jack 13 Contact Information tab...
... 53 assigning IP address 67 Attach to E-mail button 27 Automatic Document Feeder (ADF) 18 B banner paper jams 94 banner paper, loading 38 black ink low error 94 blocking host fax settings 61 borderless photos, printing 63 box contents 11 brightness, Fax menu 24 broadcast fax, sending at a scheduled time... ADF jam error 94 clear carrier jam error message 95 clear paper jam error 94 coated paper, loading 35 collating copies 41, 44 color ink low error 94 configuring network printer 67 connecting the printer to answering machine 14 computer modem 16 telephone 13 wall jack 13 Contact Information tab...


