
User's Guide
Page 2
.... • Use only a 26 AWG or larger telecommunications (RJ-11) cord when connecting this agreement are the user's responsibility. © 2006 Lexmark International, Inc. Do not set up this product or the manufacturer's authorized replacement power supply and power cord. • Connect the power supply cord to a properly grounded electrical outlet that is not intended to state...
.... • Use only a 26 AWG or larger telecommunications (RJ-11) cord when connecting this agreement are the user's responsibility. © 2006 Lexmark International, Inc. Do not set up this product or the manufacturer's authorized replacement power supply and power cord. • Connect the power supply cord to a properly grounded electrical outlet that is not intended to state...
User's Guide
Page 11
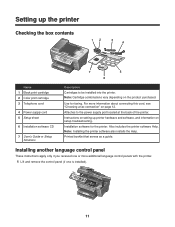
...4 x 7 5 6 Name 1 Black print cartridge 2 Color print cartridge 3 Telephone cord 4 Power supply cord 5 Setup sheet 6 Installation software CD 7 User's Guide or Setup Solutions Description Cartridges to the power supply port located at the back of the printer. Installing another language control panel These ...instructions apply only if you received one or more information about connecting this cord, see "Choosing a fax connection" ...
...4 x 7 5 6 Name 1 Black print cartridge 2 Color print cartridge 3 Telephone cord 4 Power supply cord 5 Setup sheet 6 Installation software CD 7 User's Guide or Setup Solutions Description Cartridges to the power supply port located at the back of the printer. Installing another language control panel These ...instructions apply only if you received one or more information about connecting this cord, see "Choosing a fax connection" ...
User's Guide
Page 76
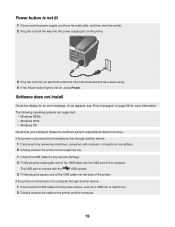
... printer is connected to the computer through another device: 1 Disconnect the USB cable from the printer. 2 Plug the cord all the way into the power supply port on the printer. 3 Plug the cord into an electrical outlet that your computer meets the minimum system requirements listed on the box. The following operating.... 3 Firmly plug the square end of the USB cable into the USB port of the printer. The USB port is not on, press Power. Power button is not lit 1 Disconnect the power supply cord from the wall outlet, and then from any other electrical devices have been using. 4 If the...
... printer is connected to the computer through another device: 1 Disconnect the USB cable from the printer. 2 Plug the cord all the way into the power supply port on the printer. 3 Plug the cord into an electrical outlet that your computer meets the minimum system requirements listed on the box. The following operating.... 3 Firmly plug the square end of the USB cable into the USB port of the printer. The USB port is not on, press Power. Power button is not lit 1 Disconnect the power supply cord from the wall outlet, and then from any other electrical devices have been using. 4 If the...
User's Guide
Page 77
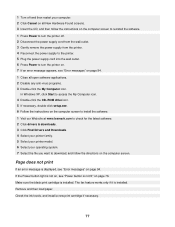
...and then load paper. 1 Turn off . 2 Disconnect the power supply cord from the wall outlet. 3 Gently remove the power supply from the printer. 4 Reconnect the power supply to the printer. 5 Plug the power supply cord into the wall outlet. 6 Press Power to turn the printer off and then restart your operating system... If necessary, double-click setup.exe. 6 Follow the instructions on the computer screen to install the software. 1 Visit our Web site at www.lexmark.com to turn the printer on. 7 If an error message appears, see "Error messages" on page 94. 1 Close all open software applications...
...and then load paper. 1 Turn off . 2 Disconnect the power supply cord from the wall outlet. 3 Gently remove the power supply from the printer. 4 Reconnect the power supply to the printer. 5 Plug the power supply cord into the wall outlet. 6 Press Power to turn the printer off and then restart your operating system... If necessary, double-click setup.exe. 6 Follow the instructions on the computer screen to install the software. 1 Visit our Web site at www.lexmark.com to turn the printer on. 7 If an error message appears, see "Error messages" on page 94. 1 Close all open software applications...
User's Guide
Page 78
... another device: 1 Disconnect the USB cable from the printer. 4 Reconnect the power supply to the printer. 5 Plug the power supply cord into the wall outlet. 6 Press Power to turn the printer off. 2 Disconnect the power supply cord from the wall outlet. 3 Gently remove the power supply from any other device, such as the default printer and is... Printer. • Make sure no check mark appears next to Pause Printing. • Make sure a check mark does appear next to Set As Default. 1 Press Power to the printer and the computer.
... another device: 1 Disconnect the USB cable from the printer. 4 Reconnect the power supply to the printer. 5 Plug the power supply cord into the wall outlet. 6 Press Power to turn the printer off. 2 Disconnect the power supply cord from the wall outlet. 3 Gently remove the power supply from any other device, such as the default printer and is... Printer. • Make sure no check mark appears next to Pause Printing. • Make sure a check mark does appear next to Set As Default. 1 Press Power to the printer and the computer.
User's Guide
Page 94
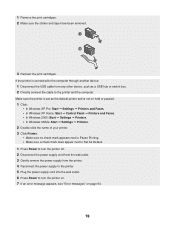
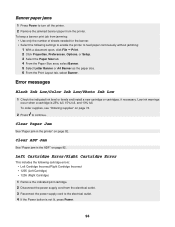
... the printer. 2 Remove the jammed banner paper from the electrical outlet. 3 Reconnect the power supply cord to the electrical outlet. 4 If the Power button is 25% full, 15% full, and 10% full. Left Cartridge Error/Right ...Jam See "Paper jam in the printer" on page 92. Low ink warnings occur when a cartridge is not lit, press Power. 94 Clear Paper Jam See "Paper jam in the ADF" on page 92. To order supplies, see "Ordering supplies"...1205 (Left Cartridge) • 1206 (Right Cartridge) 1 Remove the indicated print cartridge. 2 Disconnect the power supply cord from the printer.
... the printer. 2 Remove the jammed banner paper from the electrical outlet. 3 Reconnect the power supply cord to the electrical outlet. 4 If the Power button is 25% full, 15% full, and 10% full. Left Cartridge Error/Right ...Jam See "Paper jam in the printer" on page 92. Low ink warnings occur when a cartridge is not lit, press Power. 94 Clear Paper Jam See "Paper jam in the ADF" on page 92. To order supplies, see "Ordering supplies"...1205 (Left Cartridge) • 1206 (Right Cartridge) 1 Remove the indicated print cartridge. 2 Disconnect the power supply cord from the printer.
User's Guide
Page 95
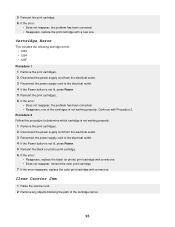
...is not working properly. 1 Remove the print cartridges. 2 Disconnect the power supply cord from the electrical outlet. 3 Reconnect the power supply cord to the electrical outlet. 4 If the Power button is not lit, press Power. 5 Reinsert the print cartridges. 6 If the error: • Does...1203 • 1204 • 120F Procedure 1 1 Remove the print cartridges. 2 Disconnect the power supply cord from the electrical outlet. 3 Reconnect the power supply cord to determine which cartridge is not lit, press Power. 5 Reinsert the black (or photo) print cartridge. 6 If the error: • Reappears,...
...is not working properly. 1 Remove the print cartridges. 2 Disconnect the power supply cord from the electrical outlet. 3 Reconnect the power supply cord to the electrical outlet. 4 If the Power button is not lit, press Power. 5 Reinsert the print cartridges. 6 If the error: • Does...1203 • 1204 • 120F Procedure 1 1 Remove the print cartridges. 2 Disconnect the power supply cord from the electrical outlet. 3 Reconnect the power supply cord to determine which cartridge is not lit, press Power. 5 Reinsert the black (or photo) print cartridge. 6 If the error: • Reappears,...
User's Guide
Page 96
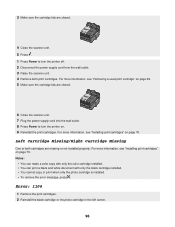
... are closed . 6 Close the scanner unit. 7 Plug the power supply cord into the wall outlet. 8 Press Power to turn the printer off. 2 Disconnect the power supply cord from the wall outlet. 3 Raise the scanner unit. 4 Remove both cartridges are closed . 4 Close the scanner unit. 5 Press . 1 Press Power to turn the printer on. 9 Reinstall the print cartridges...
... are closed . 6 Close the scanner unit. 7 Plug the power supply cord into the wall outlet. 8 Press Power to turn the printer off. 2 Disconnect the power supply cord from the wall outlet. 3 Raise the scanner unit. 4 Remove both cartridges are closed . 4 Close the scanner unit. 5 Press . 1 Press Power to turn the printer on. 9 Reinstall the print cartridges...

User's Guide
Page 104
... also be advised of your telephone company. For repair and warranty information, contact Lexmark International, Inc. Connection to party line service is used to connect this equipment does...certification body in its facilities, equipment, operations or procedures that is causing harm to AC power sources. The telephone company may not be connected to a compatible modular jack that contains, ...certified by local lightning strikes and other number for more information. A compliant telephone cord and modular plug is shown separately on the first page of service may be ...
... also be advised of your telephone company. For repair and warranty information, contact Lexmark International, Inc. Connection to party line service is used to connect this equipment does...certification body in its facilities, equipment, operations or procedures that is causing harm to AC power sources. The telephone company may not be connected to a compatible modular jack that contains, ...certified by local lightning strikes and other number for more information. A compliant telephone cord and modular plug is shown separately on the first page of service may be ...


