User's Guide
Page 3
...the control panel buttons and menus 20 Using the control panel...20 Navigating the control panel menus...22 Using the Copy menu...23 Using the Scan menu...24 Using the Fax menu...24 Learning about the software 26 Using the printer software...26 Using the Productivity Suite...26 Using the All...-In-One Center...27 Opening the All-In-One Center...27 Using the Scanning & Copying tab...28 Using the Saved Images tab...29 Using the Maintain/Troubleshoot link...29 Using the Solution Center...30 Using Print Properties...31 ...
...the control panel buttons and menus 20 Using the control panel...20 Navigating the control panel menus...22 Using the Copy menu...23 Using the Scan menu...24 Using the Fax menu...24 Learning about the software 26 Using the printer software...26 Using the Productivity Suite...26 Using the All...-In-One Center...27 Opening the All-In-One Center...27 Using the Scanning & Copying tab...28 Using the Saved Images tab...29 Using the Maintain/Troubleshoot link...29 Using the Solution Center...30 Using Print Properties...31 ...

User's Guide
Page 4
... Repeating an image on one page...45 Enlarging or reducing an image...45 Scanning...47 Scanning a document...47 Scanning documents or images for e-mailing 47 Scanning text for editing...48 Scanning images for editing...48 Scanning clear images from magazines or newspapers 48 Scanning to a computer over a network 49 Faxing...50 Sending a fax...50 Entering a fax number...
... Repeating an image on one page...45 Enlarging or reducing an image...45 Scanning...47 Scanning a document...47 Scanning documents or images for e-mailing 47 Scanning text for editing...48 Scanning images for editing...48 Scanning clear images from magazines or newspapers 48 Scanning to a computer over a network 49 Faxing...50 Sending a fax...50 Entering a fax number...
User's Guide
Page 6
...the print cartridge nozzles and contacts 72 Preserving the print cartridges...73 Cleaning the scanner glass...73 Ordering supplies...74 Recycling Lexmark products...74 Troubleshooting...75 Setup troubleshooting...75 Incorrect language appears on the display 75 Power button is not lit...76 ...document or photo copies...84 Scan troubleshooting...84 Scanner does not respond...84 Scanning takes too long or freezes the computer 84 Scan was not successful...85 Poor scanned image quality...85 Partial document or photo scans...86 Cannot scan to an application...86 Cannot scan to a computer over ...
...the print cartridge nozzles and contacts 72 Preserving the print cartridges...73 Cleaning the scanner glass...73 Ordering supplies...74 Recycling Lexmark products...74 Troubleshooting...75 Setup troubleshooting...75 Incorrect language appears on the display 75 Power button is not lit...76 ...document or photo copies...84 Scan troubleshooting...84 Scanner does not respond...84 Scanning takes too long or freezes the computer 84 Scan was not successful...85 Poor scanned image quality...85 Partial document or photo scans...86 Cannot scan to an application...86 Cannot scan to a computer over ...
User's Guide
Page 18
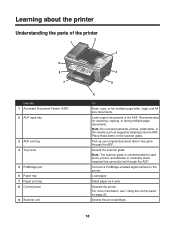
... exit tray 4 Top cover 5 PictBridge port 6 Paper tray 7 Paper exit tray 8 Control panel 9 Scanner unit 6 To Scan, copy, or fax multiple-page letter, legal, and A4 size documents. Note: The scanner glass is recommended for scanning, copying, or faxing multiple-page documents. Operate the printer. Recommended for card stock, photos, and delicate...
... exit tray 4 Top cover 5 PictBridge port 6 Paper tray 7 Paper exit tray 8 Control panel 9 Scanner unit 6 To Scan, copy, or fax multiple-page letter, legal, and A4 size documents. Note: The scanner glass is recommended for scanning, copying, or faxing multiple-page documents. Operate the printer. Recommended for card stock, photos, and delicate...

User's Guide
Page 20
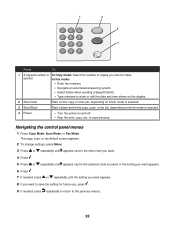
...• Insert a three-second pause in the number to be abbreviated or shortened using ellipses. 1 2 3 4 Press 1 One-Touch Dial buttons (1-5) 2 Copy Mode 3 Scan Mode 4 Fax Mode 5 Fax Auto Answer 6 Redial / Pause 7 Phone Book 7 6 5 To Access any of the programmed Speed Dial numbers (1-89) or Group Dial ...numbers (90-99). 20 Enter a pause only when you have already begun entering the number. Access the scan default screen and scan documents. Note: For information on setting the number of the five programmed Speed Dial numbers. Note: The mode is selected when ...
...• Insert a three-second pause in the number to be abbreviated or shortened using ellipses. 1 2 3 4 Press 1 One-Touch Dial buttons (1-5) 2 Copy Mode 3 Scan Mode 4 Fax Mode 5 Fax Auto Answer 6 Redial / Pause 7 Phone Book 7 6 5 To Access any of the programmed Speed Dial numbers (1-89) or Group Dial ...numbers (90-99). 20 Enter a pause only when you have already begun entering the number. Access the scan default screen and scan documents. Note: For information on setting the number of the five programmed Speed Dial numbers. Note: The mode is selected when ...
User's Guide
Page 21
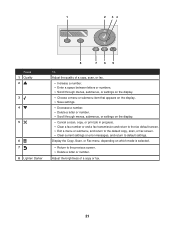
...8226; Scroll through menus, submenus, or settings on which mode is selected. • Return to default settings. Display the Copy, Scan, or Fax menu, depending on the display. • Cancel a scan, copy, or print job in progress. • Clear a fax number or end a fax transmission and return to the fax ...default screen. • Exit a menu or submenu, and return to the default copy, scan, or fax screen. • Clear current settings or error messages, and return to the previous screen. • Delete a letter or number.
...8226; Scroll through menus, submenus, or settings on which mode is selected. • Return to default settings. Display the Copy, Scan, or Fax menu, depending on the display. • Cancel a scan, copy, or print job in progress. • Clear a fax number or end a fax transmission and return to the fax ...default screen. • Exit a menu or submenu, and return to the default copy, scan, or fax screen. • Clear current settings or error messages, and return to the previous screen. • Delete a letter or number.
User's Guide
Page 22
...fax job, depending on which mode is selected. 4 Power • Turn the printer on and off. • Stop the print, copy, fax, or scan process. symbol In Fax mode: • Enter fax numbers. • Navigate an automated answering system. • Select letters when creating a Speed Dial ...list. • Type numbers to the previous menus. 22 Navigating the control panel menus 1 Press Copy Mode, Scan Mode, or Fax Mode. 1 1 2 3 4 5 6 7 8 9 *0# 2 3 4 Press To 1 A keypad number or In Copy mode: Select the number of copies...
...fax job, depending on which mode is selected. 4 Power • Turn the printer on and off. • Stop the print, copy, fax, or scan process. symbol In Fax mode: • Enter fax numbers. • Navigate an automated answering system. • Select letters when creating a Speed Dial ...list. • Type numbers to the previous menus. 22 Navigating the control panel menus 1 Press Copy Mode, Scan Mode, or Fax Mode. 1 1 2 3 4 5 6 7 8 9 *0# 2 3 4 Press To 1 A keypad number or In Copy mode: Select the number of copies...

User's Guide
Page 24
... or the setting you want to save the setting for future use, press . 11 Press Start Color or Start Black. The scan default screen appears. 2 Press or repeatedly until the scan destination you want appears. 3 If you do not want to change a setting, enter the fax number and press Start Black. 3 If... you want appears. 8 Press . 9 If needed , press repeatedly to return to the submenu item you want or the setting you want appears. 24 Using the Scan menu To access and navigate the Scan menu: 1 From the control panel, press...
... or the setting you want to save the setting for future use, press . 11 Press Start Color or Start Black. The scan default screen appears. 2 Press or repeatedly until the scan destination you want appears. 3 If you do not want to change a setting, enter the fax number and press Start Black. 3 If... you want appears. 8 Press . 9 If needed , press repeatedly to return to the submenu item you want or the setting you want appears. 24 Using the Scan menu To access and navigate the Scan menu: 1 From the control panel, press...
User's Guide
Page 26
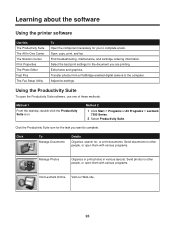
Scan, copy, print, and fax. Edit photos and graphics. Learning about the software Using the printer software Use this The Productivity Suite The All-In-One ... Organize or print photos in various layouts. Method 2 1 Click Start ΠPrograms or All Programs ΠLexmark 7300 Series. 2 Select Productivity Suite. Send photos to other people, or open them with various programs. Visit Lexmark Online Visit our Web site. 26 Send documents to complete. Find troubleshooting, maintenance, and cartridge ordering information...
Scan, copy, print, and fax. Edit photos and graphics. Learning about the software Using the printer software Use this The Productivity Suite The All-In-One ... Organize or print photos in various layouts. Method 2 1 Click Start ΠPrograms or All Programs ΠLexmark 7300 Series. 2 Select Productivity Suite. Send photos to other people, or open them with various programs. Visit Lexmark Online Visit our Web site. 26 Send documents to complete. Find troubleshooting, maintenance, and cartridge ordering information...
User's Guide
Page 27
...one of these methods: Method 1 Method 2 From the desktop, double-click the Productivity Suite icon, and then click Scan or Copy. 1 Click Start ΠPrograms or All Programs ΠLexmark 7300 Series. 2 Select All-In-One Center. 27 Using the All-In-One Center Opening the All-In-One ...Center Use the All-In-One Center software to scan, copy, and fax documents, or to keep the printer working properly. Scan & Edit Text (OCR) Scan a document to a...
...one of these methods: Method 1 Method 2 From the desktop, double-click the Productivity Suite icon, and then click Scan or Copy. 1 Click Start ΠPrograms or All Programs ΠLexmark 7300 Series. 2 Select All-In-One Center. 27 Using the All-In-One Center Opening the All-In-One ...Center Use the All-In-One Center software to scan, copy, and fax documents, or to keep the printer working properly. Scan & Edit Text (OCR) Scan a document to a...
User's Guide
Page 28
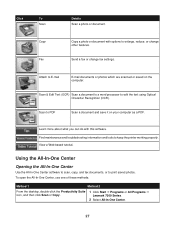
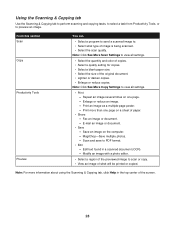
...type of the original document. • Lighten or darken copies. • Enlarge or reduce copies. Print more information about using the Scanning & Copying tab, click Help in a scanned document (OCR). - E-mail an image or document. • Save - Repeat an image several times on a sheet of the ...page. - Note: Click See More Copy Settings to . • Select what will be printed or copied. Using the Scanning & Copying tab Use the Scanning & Copying tab to perform scanning and copying tasks, to select a task from Productivity Tools, or to PDF format. • Edit - From this ...
...type of the original document. • Lighten or darken copies. • Enlarge or reduce copies. Print more information about using the Scanning & Copying tab, click Help in a scanned document (OCR). - E-mail an image or document. • Save - Repeat an image several times on a sheet of the ...page. - Note: Click See More Copy Settings to . • Select what will be printed or copied. Using the Scanning & Copying tab Use the Scanning & Copying tab to perform scanning and copying tasks, to select a task from Productivity Tools, or to PDF format. • Edit - From this ...
User's Guide
Page 29
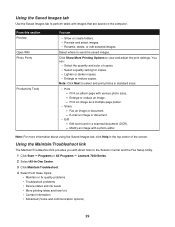
...: Click Next to perform tasks with direct links to the Solution Center and the Fax Setup Utility. 1 Click Start Œ Programs or All Programs Œ Lexmark 7300 Series. 2 Select All-In-One Center. 3 Click Maintain/Troubleshoot. 4 Select from these topics: • Maintain or fix quality problems • Troubleshoot problems • Device... to send the saved images. E-mail an image or document. • Edit - Note: For more information about using the Saved Images tab, click Help in a scanned document (OCR). -
...: Click Next to perform tasks with direct links to the Solution Center and the Fax Setup Utility. 1 Click Start Œ Programs or All Programs Œ Lexmark 7300 Series. 2 Select All-In-One Center. 3 Click Maintain/Troubleshoot. 4 Select from these topics: • Maintain or fix quality problems • Troubleshoot problems • Device... to send the saved images. E-mail an image or document. • Edit - Note: For more information about using the Saved Images tab, click Help in a scanned document (OCR). -
User's Guide
Page 30
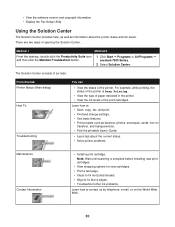
... page. • Clean to fix horizontal streaks. • Align to fix blurry edges. • Troubleshoot other ink problems. Learn how to : • Scan, copy, fax, and print. • Find and change settings. • Use basic features. • Print projects such as information about the current status....Suite icon, and then click the Maintain/Troubleshoot button. 1 Click Start Œ Programs or All Programs Œ Lexmark 7300 Series. 2 Select Solution Center. Note: Wait until scanning is Busy Printing. • View the type of paper detected in the printer. • View the ink levels...
... page. • Clean to fix horizontal streaks. • Align to fix blurry edges. • Troubleshoot other ink problems. Learn how to : • Scan, copy, fax, and print. • Find and change settings. • Use basic features. • Print projects such as information about the current status....Suite icon, and then click the Maintain/Troubleshoot button. 1 Click Start Œ Programs or All Programs Œ Lexmark 7300 Series. 2 Select Solution Center. Note: Wait until scanning is Busy Printing. • View the type of paper detected in the printer. • View the ink levels...
User's Guide
Page 38
..., see "Using Print Properties" on the ADF against the right and left edges of the paper. • You have selected the correct paper size for scanning, copying, and faxing. You can load up to print the banner. • The print side of the banner faces down into the paper tray with...
..., see "Using Print Properties" on the ADF against the right and left edges of the paper. • You have selected the correct paper size for scanning, copying, and faxing. You can load up to print the banner. • The print side of the banner faces down into the paper tray with...
User's Guide
Page 39
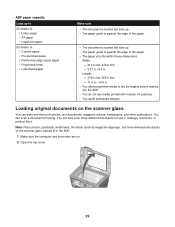
... The paper size fits within these dimensions: Width: - 210.0 mm-215.9 mm - 8.27 in.-8.5 in. Loading original documents on the scanner glass You can also scan three-dimensional objects for faxing. ADF paper capacity Load up to dry thoroughly before loading into the ADF. • You do not use in the... ADF. 1 Make sure the computer and the printer are on. 2 Open the top cover. 39 You can scan a document for use media printed with metallic ink particles. • You avoid embossed designs. Length: - 279.4 mm-355.6 mm - 11.0 in.-14.0 in. • ...
... The paper size fits within these dimensions: Width: - 210.0 mm-215.9 mm - 8.27 in.-8.5 in. Loading original documents on the scanner glass You can also scan three-dimensional objects for faxing. ADF paper capacity Load up to dry thoroughly before loading into the ADF. • You do not use in the... ADF. 1 Make sure the computer and the printer are on. 2 Open the top cover. 39 You can scan a document for use media printed with metallic ink particles. • You avoid embossed designs. Length: - 279.4 mm-355.6 mm - 11.0 in.-14.0 in. • ...
User's Guide
Page 40
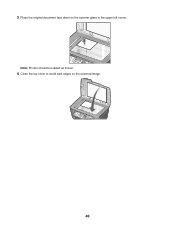
Note: Photos should be loaded as shown. 4 Close the top cover to avoid dark edges on the scanner glass in the upper left corner. 3 Place the original document face down on the scanned image. 40
Note: Photos should be loaded as shown. 4 Close the top cover to avoid dark edges on the scanner glass in the upper left corner. 3 Place the original document face down on the scanned image. 40
User's Guide
Page 47
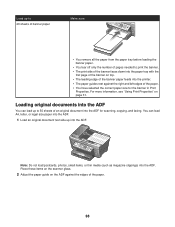
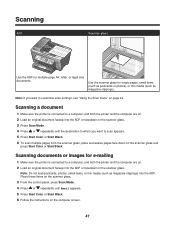
...for multiple-page A4, letter, or legal size documents. Note: Do not load postcards, photos, small items, or thin media (such as magazine clippings). Scanning ADF Scanner glass x Use the ADF for single pages, small items (such as postcards or photos), or thin media (such as magazine clippings) into the... ADF or facedown on the scanner glass. 3 Press Scan Mode. 4 Press or repeatedly until Email appears. 5 Press Start Color or Start Black. 6 Follow the instructions on the scanner glass.
...for multiple-page A4, letter, or legal size documents. Note: Do not load postcards, photos, small items, or thin media (such as magazine clippings). Scanning ADF Scanner glass x Use the ADF for single pages, small items (such as postcards or photos), or thin media (such as magazine clippings) into the... ADF or facedown on the scanner glass. 3 Press Scan Mode. 4 Press or repeatedly until Email appears. 5 Press Start Color or Start Black. 6 Follow the instructions on the scanner glass.
User's Guide
Page 48
...a computer, and both the printer and the computer are on. 2 Load an original document faceup into the ADF or facedown on the scanner glass. Scanning text for editing 1 Make sure the printer is connected to a computer, and both the printer and the computer are on. 2 Load an original document... faceup into the ADF or facedown on the scanner glass. 3 Double-click the Productivity Suite icon. 4 Click Scan & Edit Text (OCR). 5 Click Preview Now. 6 Select a word-processing program to edit the text. 7 Click Send Now. 8 Edit and save the document. ...
...a computer, and both the printer and the computer are on. 2 Load an original document faceup into the ADF or facedown on the scanner glass. Scanning text for editing 1 Make sure the printer is connected to a computer, and both the printer and the computer are on. 2 Load an original document... faceup into the ADF or facedown on the scanner glass. 3 Double-click the Productivity Suite icon. 4 Click Scan & Edit Text (OCR). 5 Click Preview Now. 6 Select a word-processing program to edit the text. 7 Click Send Now. 8 Edit and save the document. ...
User's Guide
Page 49
... on the scanner glass. After you want to send the scan. 11 Click Scan Now. Scanning to a computer over a network (Direct IP Printing). 2 Load an original document faceup into the ADF. 4 Click Scan. 5 Click Display Advanced Scan Settings. 6 Select the Image Patterns tab. 7 Select the... Remove image patterns from magazine/newspaper (descreen) check box. 8 From the "What is configured to scan over a network 1 Make sure: • The printer...
... on the scanner glass. After you want to send the scan. 11 Click Scan Now. Scanning to a computer over a network (Direct IP Printing). 2 Load an original document faceup into the ADF. 4 Click Scan. 5 Click Display Advanced Scan Settings. 6 Select the Image Patterns tab. 7 Select the... Remove image patterns from magazine/newspaper (descreen) check box. 8 From the "What is configured to scan over a network 1 Make sure: • The printer...
User's Guide
Page 51
... (broadcast fax), repeat step 2 and step 3, using any combination of the above methods, until a maximum of 30 fax numbers have been entered. The printer scans the document and sends the fax to select a number from the Speed Dial or Group Dial list. Note: Do not load postcards, photos, small items... control panel, press Fax Mode. 4 Enter a fax number; or press Phone Book to the number you entered. Sending a fax using the computer You can scan a document to the computer and then fax it to someone using the software. 1 Make sure the printer is on. 2 Load an original document faceup into...
... (broadcast fax), repeat step 2 and step 3, using any combination of the above methods, until a maximum of 30 fax numbers have been entered. The printer scans the document and sends the fax to select a number from the Speed Dial or Group Dial list. Note: Do not load postcards, photos, small items... control panel, press Fax Mode. 4 Enter a fax number; or press Phone Book to the number you entered. Sending a fax using the computer You can scan a document to the computer and then fax it to someone using the software. 1 Make sure the printer is on. 2 Load an original document faceup into...


