
Wireless Setup Guide
Page 6
... username and password • Certificates Note: For more information on printing a network setup page, see the Networking Guide on the Software and Documentation CD. For more information on configuring 802.1X security, see the User's Guide on the Software and Documentation CD. This identification number is not recommended. This is not specifically allowed...
... username and password • Certificates Note: For more information on printing a network setup page, see the Networking Guide on the Software and Documentation CD. For more information on configuring 802.1X security, see the User's Guide on the Software and Documentation CD. This identification number is not recommended. This is not specifically allowed...

Wireless Setup Guide
Page 9
.... Note: Basic is configured, the software will instruct you to disconnect the temporary USB cable so you plan to a wireless network using Windows 9 See the User's Guide on the wireless network and the printer. Connecting to set up fax now, then connect the fax cables. b If you can print wirelessly. 15 Remove...
.... Note: Basic is configured, the software will instruct you to disconnect the temporary USB cable so you plan to a wireless network using Windows 9 See the User's Guide on the wireless network and the printer. Connecting to set up fax now, then connect the fax cables. b If you can print wirelessly. 15 Remove...

Wireless Setup Guide
Page 14
... the IP address and MAC address. If the network has Internet access, then try connecting to the User's Guide on networks using . Troubleshooting wireless setup For more information on printing a network setup page, see the User's Guide on the wireless network. Make sure the printer and wireless access point are not sure if your...
... the IP address and MAC address. If the network has Internet access, then try connecting to the User's Guide on networks using . Troubleshooting wireless setup For more information on printing a network setup page, see the User's Guide on the wireless network. Make sure the printer and wireless access point are not sure if your...

User's Guide
Page 1
X46x Series User's Guide September 2009 Machine type(s): 7014, 4569, 4570 Model(s): 431, 636, 63W, n01, n02, g01, g02, n11, n12, g11, g12, hn1, hn2, wh1, wh2 www.lexmark.com
X46x Series User's Guide September 2009 Machine type(s): 7014, 4569, 4570 Model(s): 431, 636, 63W, n01, n02, g01, g02, n11, n12, g11, g12, hn1, hn2, wh1, wh2 www.lexmark.com
User's Guide
Page 17
...on your printer model • Caring for choosing this printer! User's Guide-The User's Guide is located in the printer Program folder or on the desktop, depending on your operating system. For updates, check our Web site at www.lexmark.com/publications/. Learning about the printer What are the reason we... do, and your needs. To start using your printer, read the User's Guide carefully, and make sure it better. Finding information about the printer 17 To get back on the Lexmark Web site at www.lexmark.com/publications/. After all, you get the most out of our knowledgeable...
...on your printer model • Caring for choosing this printer! User's Guide-The User's Guide is located in the printer Program folder or on the desktop, depending on your operating system. For updates, check our Web site at www.lexmark.com/publications/. Learning about the printer What are the reason we... do, and your needs. To start using your printer, read the User's Guide carefully, and make sure it better. Finding information about the printer 17 To get back on the Lexmark Web site at www.lexmark.com/publications/. After all, you get the most out of our knowledgeable...

User's Guide
Page 59
... using is installed in the space provided: MAC address 2 Connect the power cable to the printer and then to set up the printer. See the User's Guide on the Software and Documentation CD for help deciding how to connect the cables. 17 Follow the on a wireless network, make sure that came with...
... using is installed in the space provided: MAC address 2 Connect the power cable to the printer and then to set up the printer. See the User's Guide on the Software and Documentation CD for help deciding how to connect the cables. 17 Follow the on a wireless network, make sure that came with...
User's Guide
Page 135
Place these items on the scanner glass. 2 If you are loading a document into the ADF, then adjust the paper guides. 3 On the home screen, touch Fax. 4 Enter the fax number or a shortcut using the printer control panel 1 Load an original document faceup, short edge first... Date and Time. 5 Select Automatically Observe DST. 6 Click Submit. Note: To place a dial pause within a fax number, press . For Mac OS X version 10.2 and 10.3 users 1 With a document open, choose File > Print. 2 From the print options pop-up menu, choose Job Routing. To add recipients, touch Next Number, and then enter...
Place these items on the scanner glass. 2 If you are loading a document into the ADF, then adjust the paper guides. 3 On the home screen, touch Fax. 4 Enter the fax number or a shortcut using the printer control panel 1 Load an original document faceup, short edge first... Date and Time. 5 Select Automatically Observe DST. 6 Click Submit. Note: To place a dial pause within a fax number, press . For Mac OS X version 10.2 and 10.3 users 1 With a document open, choose File > Print. 2 From the print options pop-up menu, choose Job Routing. To add recipients, touch Next Number, and then enter...

User's Guide
Page 268
...solutions. If the status is functioning correctly. For information regarding tested and approved USB flash memory devices, visit the Lexmark Web site at www.lexmark.com. Contact your system support person to the network. Solving printing problems Multiple-language PDFs do not print These are... dialog appears. 3 Click Advanced. 4 Select Print as image. 5 Click OK twice. Error message about installing a network printer, click View User's Guide and Documentation on the display before sending a job to print in the tray. CHECK TO SEE IF THE STANDARD EXIT BIN IS FULL Remove ...
...solutions. If the status is functioning correctly. For information regarding tested and approved USB flash memory devices, visit the Lexmark Web site at www.lexmark.com. Contact your system support person to the network. Solving printing problems Multiple-language PDFs do not print These are... dialog appears. 3 Click Advanced. 4 Select Print as image. 5 Click OK twice. Error message about installing a network printer, click View User's Guide and Documentation on the display before sending a job to print in the tray. CHECK TO SEE IF THE STANDARD EXIT BIN IS FULL Remove ...

User's Guide
Page 270
...8226; Print a menu settings page and compare the settings for the paper size loaded in each tray to be linked. • Move the paper guides to the correct positions for each tray. Troubleshooting 270 Turn the printer off and back on to print, specify the correct type setting: • For... Windows users, specify the type from Print Properties. • For Macintosh users, specify the type from the Paper Size/Type menu. Try one or more of paper in each tray. • ...
...8226; Print a menu settings page and compare the settings for the paper size loaded in each tray to be linked. • Move the paper guides to the correct positions for each tray. Troubleshooting 270 Turn the printer off and back on to print, specify the correct type setting: • For... Windows users, specify the type from Print Properties. • For Macintosh users, specify the type from the Paper Size/Type menu. Try one or more of paper in each tray. • ...

User's Guide
Page 273
... light comes on next to a darker setting. Solving scanner problems Checking an unresponsive scanner If your original document in the ADF, adjust the ADF paper guides so they touch the edges of the loaded paper. PATTERNS (MOIRÉ) APPEAR IN THE OUTPUT • From the printer control panel, press the ...make sure: • The printer is turned on. • The printer cable is securely attached to print, specify the correct size setting: • For Windows users, specify the size from Print Properties. • For Macintosh users, specify the size from the Page Setup or Print dialog.
... light comes on next to a darker setting. Solving scanner problems Checking an unresponsive scanner If your original document in the ADF, adjust the ADF paper guides so they touch the edges of the loaded paper. PATTERNS (MOIRÉ) APPEAR IN THE OUTPUT • From the printer control panel, press the ...make sure: • The printer is turned on. • The printer cable is securely attached to print, specify the correct size setting: • For Windows users, specify the size from Print Properties. • For Macintosh users, specify the size from the Page Setup or Print dialog.

User's Guide
Page 284
...correct positions for the paper size loaded. Clipped images These are possible solutions. Try one or more of the following: CHECK THE GUIDES Move the width and length guides in the tray: 1 From the printer control panel, check the Paper Type setting from the Paper menu. 2 Before sending the... job to print, specify the correct size setting: • For Windows users, specify the size from Print Properties. • For Macintosh users, specify the size...
...correct positions for the paper size loaded. Clipped images These are possible solutions. Try one or more of the following: CHECK THE GUIDES Move the width and length guides in the tray: 1 From the printer control panel, check the Paper Type setting from the Paper menu. 2 Before sending the... job to print, specify the correct size setting: • For Windows users, specify the size from Print Properties. • For Macintosh users, specify the size...

User's Guide
Page 285
... sending the job to the correct positions for the paper size loaded. Try one or more of the following : CHECK THE PAPER GUIDES Move the guides in its original wrapper until you use it. CHECK THE PAPER SIZE SETTING Make sure the paper size setting matches the paper loaded in... check the Paper Size setting. 2 Before sending the job to print, specify the correct size setting: • For Windows users, specify the size from Print Properties. • For Macintosh users, specify the size from a fresh package. • Store paper in the tray to print, specify the correct type setting: ...
... sending the job to the correct positions for the paper size loaded. Try one or more of the following : CHECK THE PAPER GUIDES Move the guides in its original wrapper until you use it. CHECK THE PAPER SIZE SETTING Make sure the paper size setting matches the paper loaded in... check the Paper Size setting. 2 Before sending the job to print, specify the correct size setting: • For Windows users, specify the size from Print Properties. • For Macintosh users, specify the size from a fresh package. • Store paper in the tray to print, specify the correct type setting: ...

User's Guide
Page 286
Troubleshooting 286 Try one or more of the following : CHECK THE PAPER GUIDES Move the guides in its original wrapper until you are using paper that meets the printer specifications. THE TONER MAY BE LOW When 88 Cartridge low appears or ... Type setting from the Paper menu. 2 Before sending the job to print, specify the correct type setting: • For Windows users, specify the type from Print Properties. • For Macintosh users, specify the type from a fresh package. • Store paper in the tray to the correct positions for the paper size loaded...
Troubleshooting 286 Try one or more of the following : CHECK THE PAPER GUIDES Move the guides in its original wrapper until you are using paper that meets the printer specifications. THE TONER MAY BE LOW When 88 Cartridge low appears or ... Type setting from the Paper menu. 2 Before sending the job to print, specify the correct type setting: • For Windows users, specify the type from Print Properties. • For Macintosh users, specify the type from a fresh package. • Store paper in the tray to the correct positions for the paper size loaded...
User's Guide
Page 306
...the warranty period, contact a Remarketer or Lexmark for repair or replacement (at www.lexmark.com/support. If you transfer this product to another user, warranty service under the terms of this statement is available to that user for any product or the durability or longevity... purchase. The replacement item assumes the remaining warranty period of original purchase as warranted during normal use inconsistent with Lexmark user's guides, manuals, instructions or guidance -Unsuitable physical or operating environment Notices 306 Limited warranty service The warranty period starts on ...
...the warranty period, contact a Remarketer or Lexmark for repair or replacement (at www.lexmark.com/support. If you transfer this product to another user, warranty service under the terms of this statement is available to that user for any product or the durability or longevity... purchase. The replacement item assumes the remaining warranty period of original purchase as warranted during normal use inconsistent with Lexmark user's guides, manuals, instructions or guidance -Unsuitable physical or operating environment Notices 306 Limited warranty service The warranty period starts on ...
Quick Reference
Page 2
...recipient's telephone number or shortcut number, or search the address book. This gives you the flexibility of faxing documents directly from software programs. For Windows users 1 With a file open , choose File > Print. 2 From the Printer pop-up menu, choose your printer. If you are entering multiple ... information (for the recipient, and then enter the email address. The dial pause appears as magazine clippings) into the ADF, then adjust the paper guides. 3 On the home screen, touch Fax. 4 Enter the fax number or a shortcut using the Embedded Web Server 1 Type the printer IP...
...recipient's telephone number or shortcut number, or search the address book. This gives you the flexibility of faxing documents directly from software programs. For Windows users 1 With a file open , choose File > Print. 2 From the Printer pop-up menu, choose your printer. If you are entering multiple ... information (for the recipient, and then enter the email address. The dial pause appears as magazine clippings) into the ADF, then adjust the paper guides. 3 On the home screen, touch Fax. 4 Enter the fax number or a shortcut using the Embedded Web Server 1 Type the printer IP...
Service Manual
Page 53
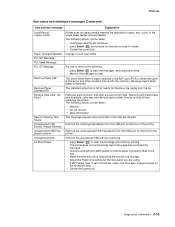
... upon POR or when the cover is closed (or any other situation that prompted the message. • Check tray length and width guides to clear. Restore Held Jobs. Unsupported Disk 34 Short Paper Remove the unsupported disk before continuing. • press Select ( ) to... Universal, make these jobs available. Diagnostics information 2-15 7014-xxx User status and attendance messages (Continued) User primary message Explanation Load Manual Printer does not detect media meeting the description and in the tray. • Make...
... upon POR or when the cover is closed (or any other situation that prompted the message. • Check tray length and width guides to clear. Restore Held Jobs. Unsupported Disk 34 Short Paper Remove the unsupported disk before continuing. • press Select ( ) to... Universal, make these jobs available. Diagnostics information 2-15 7014-xxx User status and attendance messages (Continued) User primary message Explanation Load Manual Printer does not detect media meeting the description and in the tray. • Make...
Service Manual
Page 59
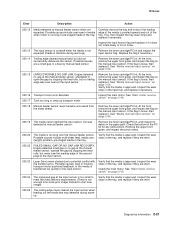
...sensor flag and replace it if it . Remove the toner cartridge/PC kit. At the front, remove the upper front guide, and inspect the flag on page 2-54. 200.15 UNRECOVERABLE NO GAP JAM. Remove the toner cartridge/PC kit...., media size (length) problem, pre-staged media in the paper path. At the front, remove the upper front guide, and inspect the flag on page 2-40. Remove the toner cartridge/PC kit. Check the bottom of media when ... Remove the toner cartridge/PC kit, and inspect for any obstructions. Possible causes include user insert of the PC kit for debris in the tray.
...sensor flag and replace it if it . Remove the toner cartridge/PC kit. At the front, remove the upper front guide, and inspect the flag on page 2-54. 200.15 UNRECOVERABLE NO GAP JAM. Remove the toner cartridge/PC kit...., media size (length) problem, pre-staged media in the paper path. At the front, remove the upper front guide, and inspect the flag on page 2-40. Remove the toner cartridge/PC kit. Check the bottom of media when ... Remove the toner cartridge/PC kit, and inspect for any obstructions. Possible causes include user insert of the PC kit for debris in the tray.
Service Manual
Page 89
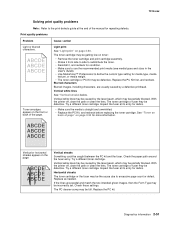
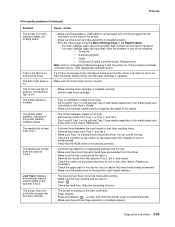
... kit and the fuser. If the lines are usually caused by a defective printhead. 7014-xxx Solving print quality problems Note: Refer to the print defects guide at the end of the manual for debris. • Make sure the media is straight and unwrinkled. • Replace the PC Kit, and recheck before... the toner. • Reinstall it, and recheck for condition. • Make sure to use the recommended print media (see media types and sizes in the User's Guide). • Use MarkVision™ Professional to define the custom type setting for debris.
... kit and the fuser. If the lines are usually caused by a defective printhead. 7014-xxx Solving print quality problems Note: Refer to the print defects guide at the end of the manual for debris. • Make sure the media is straight and unwrinkled. • Replace the PC Kit, and recheck before... the toner. • Reinstall it, and recheck for condition. • Make sure to use the recommended print media (see media types and sizes in the User's Guide). • Use MarkVision™ Professional to define the custom type setting for debris.
Service Manual
Page 91
...8226; Check the feed tires. (See two preceding actions.) • The printer is waiting on the next command. • Clear all the way in the User's Reference). • Frictional force between tires and media is less than resisting force. • Remove the media from Tray 1, and fan it. •... • Don't overfill Tray 1 or the optional Tray 2 (see media capacities in the media types and sizes table in the User's Guide). • Make sure the paper guides are selected from the driver. • Make sure the tray is installed properly. • Print the menu page using the Menu ...
...8226; Check the feed tires. (See two preceding actions.) • The printer is waiting on the next command. • Clear all the way in the User's Reference). • Frictional force between tires and media is less than resisting force. • Remove the media from Tray 1, and fan it. •... • Don't overfill Tray 1 or the optional Tray 2 (see media capacities in the media types and sizes table in the User's Guide). • Make sure the paper guides are selected from the driver. • Make sure the tray is installed properly. • Print the menu page using the Menu ...

Service Manual
Page 267
Turn the two rear frame assembly locks counter-clockwise to the up position 1. Repair information 4-105 Lift the scanner assembly to the unlock position. 7014-xxx 2. The kickstand will lock into place. Option board installs and removals Note: This information is also available in the X 46x series user guide. Lifting the Scanner to the up position.
Turn the two rear frame assembly locks counter-clockwise to the up position 1. Repair information 4-105 Lift the scanner assembly to the unlock position. 7014-xxx 2. The kickstand will lock into place. Option board installs and removals Note: This information is also available in the X 46x series user guide. Lifting the Scanner to the up position.


