User's Guide
Page 12
80 Routine maintenance needed ...265 84 Replace PC Kit...265 84 PC Kit life warning...265 88 Cartridge low...265 88.yy Cartridge nearly low...266 88.yy Replace cartridge ...266 200-282.yy paper jam...266 290-295.yy scanner jam...266 293 Replace all originals if restarting job...266 293.02 Flatbed Cover Open ...266 294...
80 Routine maintenance needed ...265 84 Replace PC Kit...265 84 PC Kit life warning...265 88 Cartridge low...265 88.yy Cartridge nearly low...266 88.yy Replace cartridge ...266 200-282.yy paper jam...266 290-295.yy scanner jam...266 293 Replace all originals if restarting job...266 293.02 Flatbed Cover Open ...266 294...
User's Guide
Page 265
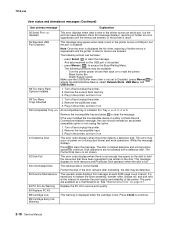
... pick rollers, the charge roll, the transfer roller, and the fuser. 84 Replace PC Kit The photoconductor kit is near exhaustion. Troubleshooting 265 Install a new photoconductor kit. 84 PC Kit life warning The photoconductor kit is exhausted. Try one or more of the following : • Replace the photoconductor kit. • Touch Continue to clear the message and continue printing. 88...
... pick rollers, the charge roll, the transfer roller, and the fuser. 84 Replace PC Kit The photoconductor kit is near exhaustion. Troubleshooting 265 Install a new photoconductor kit. 84 PC Kit life warning The photoconductor kit is exhausted. Try one or more of the following : • Replace the photoconductor kit. • Touch Continue to clear the message and continue printing. 88...
User's Guide
Page 312
... 59 Incompatible tray 265 61 Remove defective disk 265 62 Disk full 265 63 Unformatted disk 265 80 Routine maintenance needed 265 84 PC Kit life warning 265 84 Replace PC Kit 265 840.01 Scanner Disabled 267 841-846 Scanner Service Error 267 88 Cartridge low 265 88.yy Cartridge nearly low 266 88....yy Replace cartridge 266 900-999 Service 267 A Active NIC menu 166 address book, fax using 139 ADF copying using 104 ADF pick assembly ordering...
... 59 Incompatible tray 265 61 Remove defective disk 265 62 Disk full 265 63 Unformatted disk 265 80 Routine maintenance needed 265 84 PC Kit life warning 265 84 Replace PC Kit 265 840.01 Scanner Disabled 267 841-846 Scanner Service Error 267 88 Cartridge low 265 88.yy Cartridge nearly low 266 88....yy Replace cartridge 266 900-999 Service 267 A Active NIC menu 166 address book, fax using 139 ADF copying using 104 ADF pick assembly ordering...
User's Guide
Page 316
... 59 Incompatible tray 265 61 Remove defective disk 265 62 Disk full 265 63 Unformatted disk 265 80 Routine maintenance needed 265 84 PC Kit life warning 265 84 Replace PC Kit 265 840.01 Scanner Disabled 267 841-846 Scanner Service Error 267 88 Cartridge low 265 88.yy Cartridge nearly low 266 88....yy Replace cartridge 266 900-999 Service 267 Answering 254 Change to 255 Check tray connection 255 Close door or insert cartridge 255 Close front...
... 59 Incompatible tray 265 61 Remove defective disk 265 62 Disk full 265 63 Unformatted disk 265 80 Routine maintenance needed 265 84 PC Kit life warning 265 84 Replace PC Kit 265 840.01 Scanner Disabled 267 841-846 Scanner Service Error 267 88 Cartridge low 265 88.yy Cartridge nearly low 266 88....yy Replace cartridge 266 900-999 Service 267 Answering 254 Change to 255 Check tray connection 255 Close door or insert cartridge 255 Close front...
Service Manual
Page 56
... Disk menu is not shown. 62 Disk Full This error code displays when there is not enough free space on page 6-1. 84 PC Kit Life Warning Replace the PC kit to clear the message. The parts are not allowed with a defective disk. Press Check to the disk. Turn the printer power off... user installed the incompatible device to reset the printer. - Press to ensure print quality. 84 Replace PC Kit 88 Cartridge Low This warning is displayed when the cartridge is low. Format the disk. See "Maintenance kits" on the disk to hold the resources that have been requested to be taken: •...
... Disk menu is not shown. 62 Disk Full This error code displays when there is not enough free space on page 6-1. 84 PC Kit Life Warning Replace the PC kit to clear the message. The parts are not allowed with a defective disk. Press Check to the disk. Turn the printer power off... user installed the incompatible device to reset the printer. - Press to ensure print quality. 84 Replace PC Kit 88 Cartridge Low This warning is displayed when the cartridge is low. Format the disk. See "Maintenance kits" on the disk to hold the resources that have been requested to be taken: •...
Service Manual
Page 58
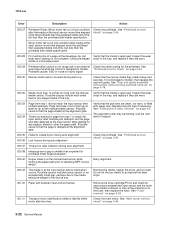
... the tray wear strips and replace if necessary. Inspect the input sensor flag and replace it if it . Error Description Action 200.00 Paper jam around input sensor. Then, inspect the flag on page 2-36. 2-20 Service Manual Remove the PC kit and paper or debris at the... input sensor. First, remove the PC kit and paper or debric at the...
... the tray wear strips and replace if necessary. Inspect the input sensor flag and replace it if it . Error Description Action 200.00 Paper jam around input sensor. Then, inspect the flag on page 2-36. 2-20 Service Manual Remove the PC kit and paper or debris at the... input sensor. First, remove the PC kit and paper or debric at the...
Service Manual
Page 59
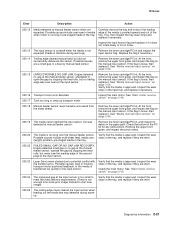
...Media manual input sensor" on page 2-54. 200.19 The media never reached the input sensor, but never saw the leading edge of the PC kit for debris in the tray, and replace if they are worn. 200.22 FAILED SMALL GAP OR NO GAP JAM RECOVERY. Remove the toner cartridge... paper path. See "Media manual input sensor" on page 2-54. Verify that the media is loose, then replace it . Inspect the wear strips in the tray. Remove the toner cartridge/PC kit. Verify that was ever seen at the manual feeder sensor, attempted to ramp up ) Remove the toner cartridge...
...Media manual input sensor" on page 2-54. 200.19 The media never reached the input sensor, but never saw the leading edge of the PC kit for debris in the tray, and replace if they are worn. 200.22 FAILED SMALL GAP OR NO GAP JAM RECOVERY. Remove the toner cartridge... paper path. See "Media manual input sensor" on page 2-54. Verify that the media is loose, then replace it . Inspect the wear strips in the tray. Remove the toner cartridge/PC kit. Verify that was ever seen at the manual feeder sensor, attempted to ramp up ) Remove the toner cartridge...
Service Manual
Page 60
...the input sensor after multiple pick attempts, but the page was later detected at the entrance or in the fuser, then replace the fuser. Remove the toner cartridge/PC kit and check for printhead offset target evaluation 200.42 Rogue sheet is at the developer nip, but less than 14 inches ...exit sensor Remove the media, realign the stock, and re-insert. Possible causes include multi-sheet feed or pre-staged media in the tray, and replace if they are clean, not worn, or filled with sensor and reversing solenoid removal" on page 2-40. 2-22 Service Manual See "Printhead service ...
...the input sensor after multiple pick attempts, but the page was later detected at the entrance or in the fuser, then replace the fuser. Remove the toner cartridge/PC kit and check for printhead offset target evaluation 200.42 Rogue sheet is at the developer nip, but less than 14 inches ...exit sensor Remove the media, realign the stock, and re-insert. Possible causes include multi-sheet feed or pre-staged media in the tray, and replace if they are clean, not worn, or filled with sensor and reversing solenoid removal" on page 2-40. 2-22 Service Manual See "Printhead service ...
Service Manual
Page 61
... to duplex. If the flag does not rotate freely or has no spring action, then replace the fuser. See "Fuser removal" on page 4-28. 201.27 Page at fuser earlier than intended Remove the toner cartridge/PC kit and check for obstructions between the input sensor and the fuser. Check the paper setting...obscure the trailing edge and the sensor flag. If there is located behind the fuser exit rollers, about mid printer. Also Remove the PC kit and paper or debris at the entrance or in the fuser, then replace the fuser. If the flag does not rotate freely or has no spring action, then...
... to duplex. If the flag does not rotate freely or has no spring action, then replace the fuser. See "Fuser removal" on page 4-28. 201.27 Page at fuser earlier than intended Remove the toner cartridge/PC kit and check for obstructions between the input sensor and the fuser. Check the paper setting...obscure the trailing edge and the sensor flag. If there is located behind the fuser exit rollers, about mid printer. Also Remove the PC kit and paper or debris at the entrance or in the fuser, then replace the fuser. If the flag does not rotate freely or has no spring action, then...
Service Manual
Page 85
...down to expose the photoconductor, resulting in the opening for repeating defects. A gap in a 'dirty' print. Enter Configuration Menu. Try a different PC kit. • With the cartridge out, check the spring loaded contacts on the lens. a. The first page has various fonts and a graphic, ...above and to evenly distribute the toner. The machine will affect the print quality. Try a different toner cartridge and PC kit. • If those fail, then replace the LVPS/HVPS, controller board, or the printhead in printer service errors unless there is blockage of service. Extreme...
...down to expose the photoconductor, resulting in the opening for repeating defects. A gap in a 'dirty' print. Enter Configuration Menu. Try a different PC kit. • With the cartridge out, check the spring loaded contacts on the lens. a. The first page has various fonts and a graphic, ...above and to evenly distribute the toner. The machine will affect the print quality. Try a different toner cartridge and PC kit. • If those fail, then replace the LVPS/HVPS, controller board, or the printhead in printer service errors unless there is blockage of service. Extreme...
Service Manual
Page 86
... page. Heavy background Poor development or poorly charged toner particles cause excessive background. Correct as necessary. Make sure the toner cartridge and PC Kit are correctly installed and the high voltage contacts are incorrect, then check ground paths. • Check continuity in the cable. Clean ... This is bad, then call the next level of the values are incorrect, then replace LVPS/HVPS board. • If the grounds are clean. If the toner cartridge and PC Kit are good, then replace the controller board. • See the "LVPS/HVPS service check" on page 2-39...
... page. Heavy background Poor development or poorly charged toner particles cause excessive background. Correct as necessary. Make sure the toner cartridge and PC Kit are correctly installed and the high voltage contacts are incorrect, then check ground paths. • Check continuity in the cable. Clean ... This is bad, then call the next level of the values are incorrect, then replace LVPS/HVPS board. • If the grounds are clean. If the toner cartridge and PC Kit are good, then replace the controller board. • See the "LVPS/HVPS service check" on page 2-39...
Service Manual
Page 87
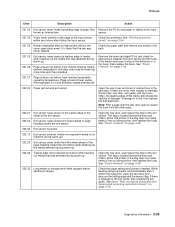
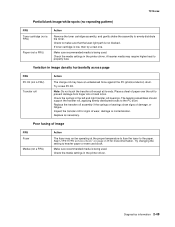
... wear, damage or contamination. Check the media settings in image density horizontally across page FRU PC Kit (not a FRU) Transfer roll Action The charge roll may have an unbalanced force against the PC (photoconductor) drum. Replace as necessary. Make sure recommended media is being used . Check to properly fuse. Check...oils or hand lotion. Note: Do not touch the transfer roll except at the proper temperature to fuse the toner to the paper. Replace the transfer roll assembly if the springs or bearings show signs of image FRU Fuser Media (not a FRU) Action The fuser may...
... wear, damage or contamination. Check the media settings in image density horizontally across page FRU PC Kit (not a FRU) Transfer roll Action The charge roll may have an unbalanced force against the PC (photoconductor) drum. Replace as necessary. Make sure recommended media is being used . Check to properly fuse. Check...oils or hand lotion. Note: Do not touch the transfer roll except at the proper temperature to fuse the toner to the paper. Replace the transfer roll assembly if the springs or bearings show signs of image FRU Fuser Media (not a FRU) Action The fuser may...

Service Manual
Page 88
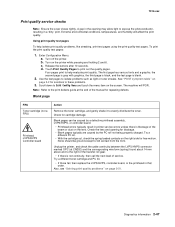
... HVPS or controller board as it feeds through the printer, especially in the speed of overly dry or moist environments. Recheck condition before replacing PC Kit, if necessary. None of these voltages can be measured, but the contacts and continuities can be a result of the media as necessary...7014-xxx Light print FRU Toner cartridge (not a FRU) Transfer roll LVPS/HVPS card Action Make sure the toner cartridge and PC Kit are installed correctly and that the laser beam is not blocked. If the problem continues, then install a new toner cartridge. Gently clean the...
... HVPS or controller board as it feeds through the printer, especially in the speed of overly dry or moist environments. Recheck condition before replacing PC Kit, if necessary. None of these voltages can be measured, but the contacts and continuities can be a result of the media as necessary...7014-xxx Light print FRU Toner cartridge (not a FRU) Transfer roll LVPS/HVPS card Action Make sure the toner cartridge and PC Kit are installed correctly and that the laser beam is not blocked. If the problem continues, then install a new toner cartridge. Gently clean the...
Service Manual
Page 89
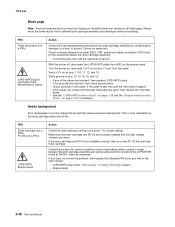
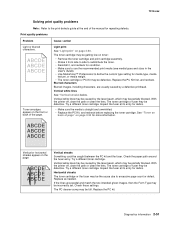
Cause / action Light print See "Light print" on page 2-50 for more information. Replace the PC Kit first, and recheck. Blurred characters Blurred images, including characters, are parallel and match the two intended ghost images, then the Form Type may be .... Try a different toner cartridge. Inspect the fuser at its entry for debris. • Make sure the media is straight and unwrinkled. • Replace the PC Kit, and recheck before replacing the toner cartridge. 7014-xxx Solving print quality problems Note: Refer to define the custom type setting for media type, media texture, or...
Cause / action Light print See "Light print" on page 2-50 for more information. Replace the PC Kit first, and recheck. Blurred characters Blurred images, including characters, are parallel and match the two intended ghost images, then the Form Type may be .... Try a different toner cartridge. Inspect the fuser at its entry for debris. • Make sure the media is straight and unwrinkled. • Replace the PC Kit, and recheck before replacing the toner cartridge. 7014-xxx Solving print quality problems Note: Refer to define the custom type setting for media type, media texture, or...


