Service Manual
Page 4
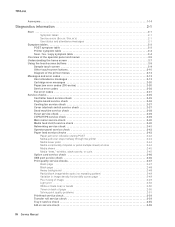
...the operator panel and menus 2-5 Understanding the home screen 2-7 Using the touch-screen buttons 2-9 Sample touch screen 2-9 Other touch-screen buttons 2-10 Diagram of the printer menus 2-12 Messages and error codes 2-13 User attendance messages 2-13 Cartridge error messages 2-20 Paper jam error codes (200-series 2-20... of image 2-49 Light print 2-50 White or black lines or bands 2-50 Toner on back of page 2-50 Solving print quality problems 2-51 Printhead service check 2-54 Transfer roll service check 2-54 Tray 2 service check 2-55 840.xx service check 2-55 iv Service Manual
...the operator panel and menus 2-5 Understanding the home screen 2-7 Using the touch-screen buttons 2-9 Sample touch screen 2-9 Other touch-screen buttons 2-10 Diagram of the printer menus 2-12 Messages and error codes 2-13 User attendance messages 2-13 Cartridge error messages 2-20 Paper jam error codes (200-series 2-20... of image 2-49 Light print 2-50 White or black lines or bands 2-50 Toner on back of page 2-50 Solving print quality problems 2-51 Printhead service check 2-54 Transfer roll service check 2-54 Tray 2 service check 2-55 840.xx service check 2-55 iv Service Manual
Service Manual
Page 6
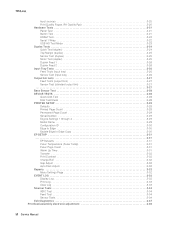
... (output bins 3-27 Sensor Test (standard output bin 3-27 3-27 Base Sensor Test 3-28 DEVICE TESTS 3-28 Quick Disk Test 3-28 Disk Test/Clean 3-28 PRINTER SETUP 3-29 Defaults 3-29 Printed Page Count 3-29 Permanent Page Count 3-29 Serial Number 3-29 Engine Settings 1 through 4 3-29 Model Name 3-29 Configuration ID 3-30... 3-33 Clear Log 3-33 Scanner Tests 3-34 ASIC Test 3-34 Feed Test 3-34 Sensor Tests 3-34 Exit Diagnostics 3-37 Printhead assembly electronic adjustment 3-38 vi Service Manual
... (output bins 3-27 Sensor Test (standard output bin 3-27 3-27 Base Sensor Test 3-28 DEVICE TESTS 3-28 Quick Disk Test 3-28 Disk Test/Clean 3-28 PRINTER SETUP 3-29 Defaults 3-29 Printed Page Count 3-29 Permanent Page Count 3-29 Serial Number 3-29 Engine Settings 1 through 4 3-29 Model Name 3-29 Configuration ID 3-30... 3-33 Clear Log 3-33 Scanner Tests 3-34 ASIC Test 3-34 Feed Test 3-34 Sensor Tests 3-34 Exit Diagnostics 3-37 Printhead assembly electronic adjustment 3-38 vi Service Manual
Service Manual
Page 8
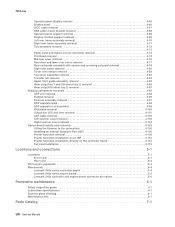
...the up position 4-105 Installing an Internal Solutions Port (ISP 4-106 Printer hard disk removal 4-109 Printer hard disk installation on an ISP 4-110 Printer hard disk installation directly on the controller board 4-112 Fax card ... engine paperpath 5-3 Main boards 5-4 Lexmark X46x series controller board 5-4 Lexmark X46x series engine board 5-5 Lexmark X46x controller and engine board connector pin values 5-6 Preventive maintenance 6-1 Safety inspection guide 6-1 Lubrication specifications 6-1 Scanner glass cleaning 6-1 Maintenance kits 6-1 Parts Catalog 7-1 viii Service Manual
...the up position 4-105 Installing an Internal Solutions Port (ISP 4-106 Printer hard disk removal 4-109 Printer hard disk installation on an ISP 4-110 Printer hard disk installation directly on the controller board 4-112 Fax card ... engine paperpath 5-3 Main boards 5-4 Lexmark X46x series controller board 5-4 Lexmark X46x series engine board 5-5 Lexmark X46x controller and engine board connector pin values 5-6 Preventive maintenance 6-1 Safety inspection guide 6-1 Lubrication specifications 6-1 Scanner glass cleaning 6-1 Maintenance kits 6-1 Parts Catalog 7-1 viii Service Manual
Service Manual
Page 20
... media feed clutch should only be loosened. Updated the description for service personnel. The connectors will not work if the insulation is divided into the following part numbers in step 8 of printer problems. 4. Revised the media feed clutch assembly removal procedure in ... "Scanner assembly removal" on page 4-91. -xx Service Manual Diagnostic aids contains tests and checks used to wiring diagram on page 6-1. 7014-xxx Preface This manual contains maintenance procedures for the "80 Routine Maintenance" on the printer. 6. Change history Revision date 2013/11/11 2013...
... media feed clutch should only be loosened. Updated the description for service personnel. The connectors will not work if the insulation is divided into the following part numbers in step 8 of printer problems. 4. Revised the media feed clutch assembly removal procedure in ... "Scanner assembly removal" on page 4-91. -xx Service Manual Diagnostic aids contains tests and checks used to wiring diagram on page 6-1. 7014-xxx Preface This manual contains maintenance procedures for the "80 Routine Maintenance" on the printer. 6. Change history Revision date 2013/11/11 2013...

Service Manual
Page 28
...high temperatures. Unacceptable paper The following paper characteristics affect print quality and reliability. Paper containing fibers such as the printer for use with the printer: • Preprinted papers with a high degree of the paper. 7014-xxx Media guidelines Paper characteristics The ... evaluating new paper stock. • Weight-The printer can automatically feed paper weights from 100% chemically treated pulped wood. For paper smaller than 60 g/m2 (16 lb) • Multiple-part forms or documents 1-6 Service Manual If paper is the tendency for paper to feed...
...high temperatures. Unacceptable paper The following paper characteristics affect print quality and reliability. Paper containing fibers such as the printer for use with the printer: • Preprinted papers with a high degree of the paper. 7014-xxx Media guidelines Paper characteristics The ... evaluating new paper stock. • Weight-The printer can automatically feed paper weights from 100% chemically treated pulped wood. For paper smaller than 60 g/m2 (16 lb) • Multiple-part forms or documents 1-6 Service Manual If paper is the tendency for paper to feed...

Service Manual
Page 30
7014-xxx Recycled paper, paper of lower weight (
7014-xxx Recycled paper, paper of lower weight (

Service Manual
Page 42
... 4. See Go to "ADF Duplex service check" on page 2-66. 2-4 Service Manual 7014-xxx Scan / fax / copy symptom table Symptom Action 840.xx scanner error ADF won't duplex (Duplex ADF only) ADF skew Multiple pages feed into ADF Documents wont feed into ADF Printer picks letter size paper on a legal... size scan Scanner makes buzzing noise on an incoming fax are stretched. Ask the fax recipient to "Fax reception service check" on page 2-62. Go to check their machine. 1. ...
... 4. See Go to "ADF Duplex service check" on page 2-66. 2-4 Service Manual 7014-xxx Scan / fax / copy symptom table Symptom Action 840.xx scanner error ADF won't duplex (Duplex ADF only) ADF skew Multiple pages feed into ADF Documents wont feed into ADF Printer picks letter size paper on a legal... size scan Scanner makes buzzing noise on an incoming fax are stretched. Ask the fax recipient to "Fax reception service check" on page 2-62. Go to check their machine. 1. ...
Service Manual
Page 44
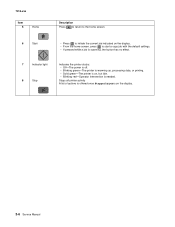
... 8 Stop Indicates the printer status: • Off-The power is off. • Blinking green-The printer is warming up, processing data, or printing. • Solid green-The printer is needed. Stops all printer activity A list of options is offered once Stopped appears on , but idle. • Blinking red-Operator intervention is on the display. 2-6 Service Manual
... 8 Stop Indicates the printer status: • Off-The power is off. • Blinking green-The printer is warming up, processing data, or printing. • Solid green-The printer is needed. Stops all printer activity A list of options is offered once Stopped appears on , but idle. • Blinking red-Operator intervention is on the display. 2-6 Service Manual

Service Manual
Page 46
...jobs exist in a column under it appears. Each job appears as a button which can touch to scroll through the jobs. 2-8 Service Manual Entering the correct PIN locks the printer control panel (touch screen and hard buttons). The following items are available under the Print, Fax, and Network headings: • ...Device Unlock Device Cancel Jobs Description Opens a screen containing all the held jobs This button appears on the screen when the printer is unlocked and Device Lockout Personal Identification Number (PIN) has been set. Touching this button opens a PIN entry screen.
...jobs exist in a column under it appears. Each job appears as a button which can touch to scroll through the jobs. 2-8 Service Manual Entering the correct PIN locks the printer control panel (touch screen and hard buttons). The following items are available under the Print, Fax, and Network headings: • ...Device Unlock Device Cancel Jobs Description Opens a screen containing all the held jobs This button appears on the screen when the printer is unlocked and Device Lockout Personal Identification Number (PIN) has been set. Touching this button opens a PIN entry screen.

Service Manual
Page 50
... FTP Flash Drive Print Security Edit Security Setup Misc Settings Confidential Print Disk Wiping Security Audit Log Set Date and Time 2-12 Service Manual 7014-xxx Diagram of the printer menus The diagram shows the menu index on the operator panel and the menus and items available under each menu. Not all menus...
... FTP Flash Drive Print Security Edit Security Setup Misc Settings Confidential Print Disk Wiping Security Audit Log Set Date and Time 2-12 Service Manual 7014-xxx Diagram of the printer menus The diagram shows the menu index on the operator panel and the menus and items available under each menu. Not all menus...

Service Manual
Page 52
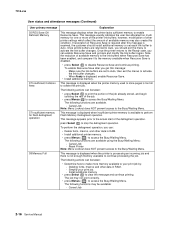
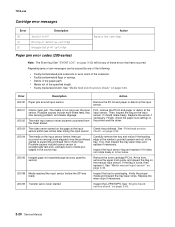
...press Select ( ), and choose an alternate source for media. • Cancel the current job. 2-14 Service Manual Load Load Load Load Load Manual Printer does not detect media meeting the description in , where is only posted once after the firmware has tried ...8226; Cancel the current job. IRHeldC occurs when the printer could not restore jobs from disk. Printer does not detect media meeting the description in the single sheet feeder (manual feeder). Load Manual Load Manual Printer does not detect media meeting the size requested in the...
...press Select ( ), and choose an alternate source for media. • Cancel the current job. 2-14 Service Manual Load Load Load Load Load Manual Printer does not detect media meeting the description in , where is only posted once after the firmware has tried ...8226; Cancel the current job. IRHeldC occurs when the printer could not restore jobs from disk. Printer does not detect media meeting the description in the single sheet feeder (manual feeder). Load Manual Load Manual Printer does not detect media meeting the size requested in the...
Service Manual
Page 54
.... The job may also create this message: - The following functions are available using the Busy/Waiting Menu: - If restoration of the printer link buffers; Note the reduction of the defragment operation. When Ready is displayed, enable Resource Save. • Install additional memory. 37...compare it to the memory available when Resource Save is too full to access the Busy/Waiting Menu. Cancel Job 2-16 Service Manual however, modification of other printer settings which affect the amount of the job. • press Menus ( ) to disable Resource Save and continue printing....
.... The job may also create this message: - The following functions are available using the Busy/Waiting Menu: - If restoration of the printer link buffers; Note the reduction of the defragment operation. When Ready is displayed, enable Resource Save. • Install additional memory. 37...compare it to the memory available when Resource Save is too full to access the Busy/Waiting Menu. Cancel Job 2-16 Service Manual however, modification of other printer settings which affect the amount of the job. • press Menus ( ) to disable Resource Save and continue printing....
Service Manual
Page 56
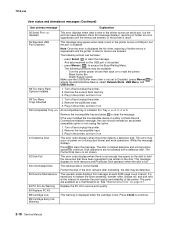
.... 88 Cartridge Early Life Warning 2-18 Service Manual Remove the incompatible trays. 3. While this interval to maintain the print quality and reliability of further errors is suppressed until the printer is reset or menus are entered, or the printer is reset. 56 Standard USB Port Disabled...to hold the resources that have been requested to be available: - Format the disk. Once this message displays, reporting of the printer. The following actions can be defective. 80 Routine Maintenance The operator panel displays this message at this message displays. 7014-xxx User...
.... 88 Cartridge Early Life Warning 2-18 Service Manual Remove the incompatible trays. 3. While this interval to maintain the print quality and reliability of further errors is suppressed until the printer is reset or menus are entered, or the printer is reset. 56 Standard USB Port Disabled...to hold the resources that have been requested to be available: - Format the disk. Once this message displays, reporting of the printer. The following actions can be defective. 80 Routine Maintenance The operator panel displays this message at this message displays. 7014-xxx User...
Service Manual
Page 58
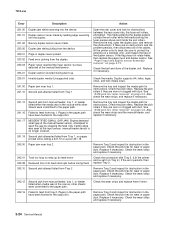
.... 200.08 Media reached the input sensor before interrupt occurred-not enough time elapsed since the printhead started to media prestaged in the printer and the driver. 200.03 The video never started Inspect the LVPS/HVPS. Possible causes include multi-sheet feed, tray size sensing... Description Action 200.00 Paper jam around input sensor. Replace the sensor if necessary. See "Media feed clutch service check" on page 2-36. 2-20 Service Manual See "Printhead service sensor within two inches after hitting the input sensor check" on the page at the input sensor before the ...
.... 200.08 Media reached the input sensor before interrupt occurred-not enough time elapsed since the printhead started to media prestaged in the printer and the driver. 200.03 The video never started Inspect the LVPS/HVPS. Possible causes include multi-sheet feed, tray size sensing... Description Action 200.00 Paper jam around input sensor. Replace the sensor if necessary. See "Media feed clutch service check" on page 2-36. 2-20 Service Manual See "Printhead service sensor within two inches after hitting the input sensor check" on the page at the input sensor before the ...
Service Manual
Page 62
... longer covered. 241.19 Second pick attempted failed from Tray 1, no obstructions and the problem persists, then disconnect all of the cables, tilt the printer onto its back (be sure to ramp up . Check the pick tires for wear or paper dust. Replace if necessary. If the flag does ... pick tires for obstruction in the paper path have been flushed to feed from tray 2. Check the wear strips and replace if necessary. 2-24 Service Manual Pages in the paper path. The media entering the duplex passes outside the exit roller while the media exiting the fuser passes above and inside...
... longer covered. 241.19 Second pick attempted failed from Tray 1, no obstructions and the problem persists, then disconnect all of the cables, tilt the printer onto its back (be sure to ramp up . Check the pick tires for wear or paper dust. Replace if necessary. If the flag does ... pick tires for obstruction in the paper path have been flushed to feed from tray 2. Check the wear strips and replace if necessary. 2-24 Service Manual Pages in the paper path. The media entering the duplex passes outside the exit roller while the media exiting the fuser passes above and inside...
Service Manual
Page 64
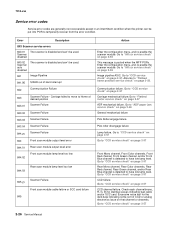
...generally non-recoverable except in an intermittent condition when the printer can be used . Error Description 8XX Scanner service errors 840.01 The scanner is detected to "CCD service check" on page 2-57. Go to "CCD service check" on page 2-57 Go to "CCD service check" on page 2-57 Rear Mono channel, Rear... used . 841 Image Pipeline 841.96 SIZAR out of band interrupt 842 Communication Failure 843 843.01 Scanner Failure - Go to "Flatbed motor service check" on page 2-57 2-26 Service Manual Go to "CCD service check" on page 2-57 Carriage mechanical failure.Go to "CCD...
...generally non-recoverable except in an intermittent condition when the printer can be used . Error Description 8XX Scanner service errors 840.01 The scanner is detected to "CCD service check" on page 2-57. Go to "CCD service check" on page 2-57 Go to "CCD service check" on page 2-57 Rear Mono channel, Rear... used . 841 Image Pipeline 841.96 SIZAR out of band interrupt 842 Communication Failure 843 843.01 Scanner Failure - Go to "Flatbed motor service check" on page 2-57 2-26 Service Manual Go to "CCD service check" on page 2-57 Carriage mechanical failure.Go to "CCD...
Service Manual
Page 66
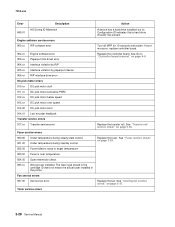
...stored in the cartridge ID does not match the actual fuser installed in the printer. Replace the fan. 7014-xxx Error Description Action 849.01 HD/Config ID Mismatch Engine software service errors 900.xx RIP software error 902.xx Engine software error 903.xx Paperport ... Under temperature during standby control. 922.00 Fuser failed to ramp to "Controller board removal" on page 2-37. 2-28 Service Manual Fan service errors 927.00 Service fan error Toner service errors A device has a hard drive installed, but its Configuration ID indicates that a hard drive shouldn't be present. If...
...stored in the cartridge ID does not match the actual fuser installed in the printer. Replace the fan. 7014-xxx Error Description Action 849.01 HD/Config ID Mismatch Engine software service errors 900.xx RIP software error 902.xx Engine software error 903.xx Paperport ... Under temperature during standby control. 922.00 Fuser failed to ramp to "Controller board removal" on page 2-37. 2-28 Service Manual Fan service errors 927.00 Service fan error Toner service errors A device has a hard drive installed, but its Configuration ID indicates that a hard drive shouldn't be present. If...

Service Manual
Page 68
.... If this does not resolve the problem, then replace the firmware card and download the emulation again. Network errors 2-30 Service Manual See "Controller board service check" on page 2-35. 959.22 Challenge secret failure 959.23 959.24 Self test failed during HW prog 959.26... space during initialization. Replace the controller board. See "Controller board service check" on page 2-35. 956.00 RIP card failure: processor failure 956.01 Processor overtemp 957.xx RIP card failure: ASIC failure 958.xx Printer has performed more than 100 "shift and reflash" operations as a...
.... If this does not resolve the problem, then replace the firmware card and download the emulation again. Network errors 2-30 Service Manual See "Controller board service check" on page 2-35. 959.22 Challenge secret failure 959.23 959.24 Self test failed during HW prog 959.26... space during initialization. Replace the controller board. See "Controller board service check" on page 2-35. 956.00 RIP card failure: processor failure 956.01 Processor overtemp 957.xx RIP card failure: ASIC failure 958.xx Printer has performed more than 100 "shift and reflash" operations as a...
Service Manual
Page 74
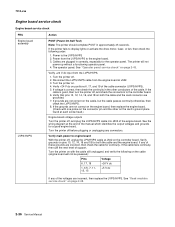
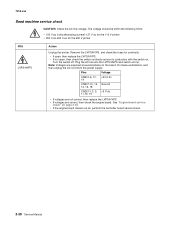
... to the LVPS/HVPS 2. If the cable fails continuity, then call the next level of the manual which identifies the output voltages and grounds for continuity. Turn the printer on with one probe on the connector pin and the other conductors of the cable connector (LVPS/...Dead machine service check" on page 2-43. See "Operator panel service check" on page 2-38. 2-36 Service Manual Verify +24 V dc on the controller board. 7014-xxx Engine board service check Engine board service check FRU Engine board assembly LVPS/HVPS Action POST (Power-On Self Test) Note: The printer should ...
... to the LVPS/HVPS 2. If the cable fails continuity, then call the next level of the manual which identifies the output voltages and grounds for continuity. Turn the printer on with one probe on the connector pin and the other conductors of the cable connector (LVPS/...Dead machine service check" on page 2-43. See "Operator panel service check" on page 2-38. 2-36 Service Manual Verify +24 V dc on the controller board. 7014-xxx Engine board service check Engine board service check FRU Engine board assembly LVPS/HVPS Action POST (Power-On Self Test) Note: The printer should ...
Service Manual
Page 76
... the fuses for the 220 V printer FRU LVPS/HVPS Action Unplug the printer. Plug the AC line into the LVPS/HVPS and switch unit on page 2-36. • If the engine board checks out ok, perform the controller board service check. 2-38 Service Manual Turn the switch off. Note: ...Voltages are correct, then check the engine board. The voltage should be within the following limits: • 100 V ac (volts alternating current)-127 V ac for the 110 V printer • 200 V ac-240 V ...
... the fuses for the 220 V printer FRU LVPS/HVPS Action Unplug the printer. Plug the AC line into the LVPS/HVPS and switch unit on page 2-36. • If the engine board checks out ok, perform the controller board service check. 2-38 Service Manual Turn the switch off. Note: ...Voltages are correct, then check the engine board. The voltage should be within the following limits: • 100 V ac (volts alternating current)-127 V ac for the 110 V printer • 200 V ac-240 V ...


