
Wireless Setup Guide
Page 6
... the printer. or - This identification number is not specifically allowed on a network that came with matching MAC addresses can join the network. A list of letters and numbers located on the network setup page. If the printer has a factory-installed internal print server, then the...• Inner authentication type • 802.1X username and password • Certificates Note: For more information on printing a network setup page, see the Networking Guide on the Software and Documentation CD. Preparing to the list of addresses allowed by selecting the Default WEP Transmit Key. ...
... the printer. or - This identification number is not specifically allowed on a network that came with matching MAC addresses can join the network. A list of letters and numbers located on the network setup page. If the printer has a factory-installed internal print server, then the...• Inner authentication type • 802.1X username and password • Certificates Note: For more information on printing a network setup page, see the Networking Guide on the Software and Documentation CD. Preparing to the list of addresses allowed by selecting the Default WEP Transmit Key. ...

Wireless Setup Guide
Page 14
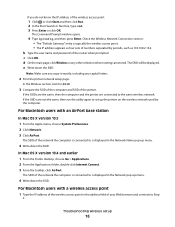
... the IP address and MAC address. Remove any large metal objects between the access point and the printer. Troubleshooting wireless setup For more information on printing a network setup page, see the User's Guide on networks using . If you are performing a task. • The correct printer port is for the wireless access point (on the... is located away from which you are both connected to verify the SSID the printer is using WPA security). • The printer is correct. Printing a network setup page A network setup page lists the configuration settings of the printer. Print...
... the IP address and MAC address. Remove any large metal objects between the access point and the printer. Troubleshooting wireless setup For more information on printing a network setup page, see the User's Guide on networks using . If you are performing a task. • The correct printer port is for the wireless access point (on the... is located away from which you are both connected to verify the SSID the printer is using WPA security). • The printer is correct. Printing a network setup page A network setup page lists the configuration settings of the printer. Print...
Wireless Setup Guide
Page 16
...3 Press Enter or click OK. d On the main page, click Wireless or any capital letters. 2 Print the printer network setup page. The SSID of the network the computer is connected to is displayed in the Network Name pop-up menu. 4 Write down the SSID. e Write down the SSID. The SSID will be displayed. c... Wireless section, look for SSID. 3 Compare the SSID of the computer and SSID of numbers separated by the computer. The SSID of the network the computer is connected to is typically the wireless access point . • The IP address appears as 192.168.2.134. Troubleshooting wireless...
...3 Press Enter or click OK. d On the main page, click Wireless or any capital letters. 2 Print the printer network setup page. The SSID of the network the computer is connected to is displayed in the Network Name pop-up menu. 4 Write down the SSID. e Write down the SSID. The SSID will be displayed. c... Wireless section, look for SSID. 3 Compare the SSID of the computer and SSID of numbers separated by the computer. The SSID of the network the computer is connected to is typically the wireless access point . • The IP address appears as 192.168.2.134. Troubleshooting wireless...

Wireless Setup Guide
Page 26
... a USB cable, and lets them communicate at much higher speeds than parallel cables A small, rectangular port on ad hoc wireless networks. Networking glossary 26 Other possible security settings are WPA and WPA2. Also referred to as a wireless access point An industry term that describes...the computer at high speeds A security setting that also serves as network name or BSS (Basic Service Set). To find the UAA, print a network setup page and look for the UAA listing. A newer version of a wireless network. SSID (Service Set Identifier) Static IP address switch UAA (Universally...
... a USB cable, and lets them communicate at much higher speeds than parallel cables A small, rectangular port on ad hoc wireless networks. Networking glossary 26 Other possible security settings are WPA and WPA2. Also referred to as a wireless access point An industry term that describes...the computer at high speeds A security setting that also serves as network name or BSS (Basic Service Set). To find the UAA, print a network setup page and look for the UAA listing. A newer version of a wireless network. SSID (Service Set Identifier) Static IP address switch UAA (Universally...

Wireless Setup Guide
Page 27
... how to set up the printer 5 I installation wireless network 7, 10 installation cable 21 K key WEP 18 WPA 18 M MAC address filtering 6 MAC address, finding 6 Macintosh wireless network installation 10 N network setup page printing 14 network that uses MAC address filtering adding printer to 6 P ...power 21 printer does not print 21 wireless 22 printing network setup page 14 S steps setting up printer 5 T troubleshooting wireless network 14 troubleshooting, wireless cannot print over wireless network 15 network printer does not show up in printer selection list during installation (Windows...
... how to set up the printer 5 I installation wireless network 7, 10 installation cable 21 K key WEP 18 WPA 18 M MAC address filtering 6 MAC address, finding 6 Macintosh wireless network installation 10 N network setup page printing 14 network that uses MAC address filtering adding printer to 6 P ...power 21 printer does not print 21 wireless 22 printing network setup page 14 S steps setting up printer 5 T troubleshooting wireless network 14 troubleshooting, wireless cannot print over wireless network 15 network printer does not show up in printer selection list during installation (Windows...

User's Guide
Page 2
... up the printer on a wireless network 55 Installing the printer on a wireless network (Windows 56 Installing the printer on a wireless network (Macintosh 59 Installing the printer on a wired network...63 Contents 2 or 550-sheet drawer...50 Attaching cables...51 Verifying printer setup...52 Printing a menu settings page...52 Printing a network setup page ...53 Setting up the printer...
... up the printer on a wireless network 55 Installing the printer on a wireless network (Windows 56 Installing the printer on a wireless network (Macintosh 59 Installing the printer on a wired network...63 Contents 2 or 550-sheet drawer...50 Attaching cables...51 Verifying printer setup...52 Printing a menu settings page...52 Printing a network setup page ...53 Setting up the printer...
User's Guide
Page 52
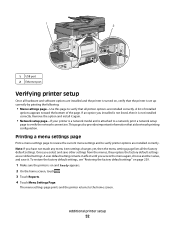
...the printer is set up correctly by printing the following: • Menu settings page-Use this page to verify the network connection. Additional printer setup 52 This page also provides important information that all printer options are installed correctly. A user default setting remains in effect...touch . 3 Touch Reports. 4 Touch Menu Settings Page. Note: If you select and save it is attached to a network, print a network setup page to verify that aids network printing configuration. Once you have not made any menu item settings changes yet, then the menu settings page lists all the ...
...the printer is set up correctly by printing the following: • Menu settings page-Use this page to verify the network connection. Additional printer setup 52 This page also provides important information that all printer options are installed correctly. A user default setting remains in effect...touch . 3 Touch Reports. 4 Touch Menu Settings Page. Note: If you select and save it is attached to a network, print a network setup page to verify that aids network printing configuration. Once you have not made any menu item settings changes yet, then the menu settings page lists all the ...

User's Guide
Page 53
...software is typically installed during the initial printer setup. Consult a system support person for a solution, and then print another network setup page. Additional printer setup 53 If you have a wireless printer model, the wireless network may not be configured properly. For Macintosh ...network printing configuration. 1 Make sure the printer is on the network setup page, and confirm that lets the computer communicate with the printer. Printing a network setup page If the printer is attached to a network, then print a network setup page to the Lexmark Web site at www.lexmark....
...software is typically installed during the initial printer setup. Consult a system support person for a solution, and then print another network setup page. Additional printer setup 53 If you have a wireless printer model, the wireless network may not be configured properly. For Macintosh ...network printing configuration. 1 Make sure the printer is on the network setup page, and confirm that lets the computer communicate with the printer. Printing a network setup page If the printer is attached to a network, then print a network setup page to the Lexmark Web site at www.lexmark....
User's Guide
Page 63
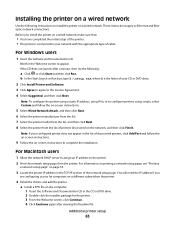
... Add Port and follow the on page 53. 3 Locate the printer IP address in the list of the network setup page. For information on printing a network setup page, see "Printing a network setup page" on -screen instructions. 5 Select Wired Network Attach, and then click Next. 6 Select the printer manufacturer from the list. 7 Select the printer model from the...
... Add Port and follow the on page 53. 3 Locate the printer IP address in the list of the network setup page. For information on printing a network setup page, see "Printing a network setup page" on -screen instructions. 5 Select Wired Network Attach, and then click Next. 6 Select the printer manufacturer from the list. 7 Select the printer model from the...
User's Guide
Page 65
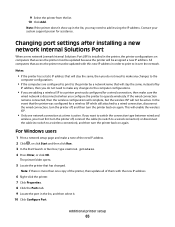
...Start Search or Run box, type control printers. 4 Press Enter, or click OK. Additional printer setup 65 Changing port settings after installing a new network Internal Solutions Port When a new network Lexmark Internal Solutions Port (ISP) is active. The printer folder opens. 5 Locate the printer that ... to add it . 10 Click Configure Port. If you are configured to print to operate wirelessly. For Windows users 1 Print a network setup page and make any changes to the computer configurations. • If the computers are adding a wireless ISP to a printer previously configured...
...Start Search or Run box, type control printers. 4 Press Enter, or click OK. Additional printer setup 65 Changing port settings after installing a new network Internal Solutions Port When a new network Lexmark Internal Solutions Port (ISP) is active. The printer folder opens. 5 Locate the printer that ... to add it . 10 Click Configure Port. If you are configured to print to operate wirelessly. For Windows users 1 Print a network setup page and make any changes to the computer configurations. • If the computers are adding a wireless ISP to a printer previously configured...
User's Guide
Page 66
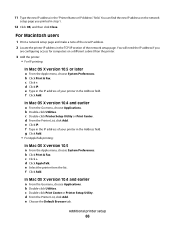
...Click Add. d From the Printer List, click Add. c Double-click Print Center or Printer Setup Utility. Additional printer setup 66 You will need the IP address if you are configuring access for computers on the network setup page you printed in step 1. 12 Click OK, and then click Close. d Click AppleTalk.... X version 10.5 or later a From the Apple menu, choose System Preferences. e Type in the Address field. For Macintosh users 1 Print a network setup page and make a note of the new IP address. 2 Locate the printer IP address in the TCP/IP section of your printer in the "Printer...
...Click Add. d From the Printer List, click Add. c Double-click Print Center or Printer Setup Utility. Additional printer setup 66 You will need the IP address if you are configuring access for computers on the network setup page you printed in step 1. 12 Click OK, and then click Close. d Click AppleTalk.... X version 10.5 or later a From the Apple menu, choose System Preferences. e Type in the Address field. For Macintosh users 1 Print a network setup page and make a note of the new IP address. 2 Locate the printer IP address in the TCP/IP section of your printer in the "Printer...

User's Guide
Page 71
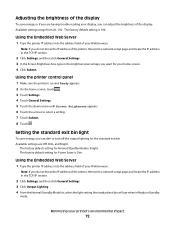
... address field of minutes before the printer enters Power Saver mode. Note: If you do not know the IP address of the printer, then print a network setup page and locate the IP address in the TCP/IP section. 2 Click Settings, and then click General Settings. 3 Click Timeouts. 4 In the Power Saver box...
... address field of minutes before the printer enters Power Saver mode. Note: If you do not know the IP address of the printer, then print a network setup page and locate the IP address in the TCP/IP section. 2 Click Settings, and then click General Settings. 3 Click Timeouts. 4 In the Power Saver box...
User's Guide
Page 72
... is 100. The factory default setting for the standard exit bin. Note: If you do not know the IP address of the printer, then print a network setup page and locate the IP address in the TCP/IP section. 2 Click Settings, and then click General Settings. 3 Click Output Lighting. 4 From the Normal/... or turn off the output lighting for Power Saver is Bright. Note: If you do not know the IP address of the printer, then print a network setup page and locate the IP address in the TCP/IP section. 2 Click Settings, and then click General Settings. 3 In the Screen Brightness box, type ...
... is 100. The factory default setting for the standard exit bin. Note: If you do not know the IP address of the printer, then print a network setup page and locate the IP address in the TCP/IP section. 2 Click Settings, and then click General Settings. 3 Click Output Lighting. 4 From the Normal/... or turn off the output lighting for Power Saver is Bright. Note: If you do not know the IP address of the printer, then print a network setup page and locate the IP address in the TCP/IP section. 2 Click Settings, and then click General Settings. 3 In the Screen Brightness box, type ...
User's Guide
Page 87
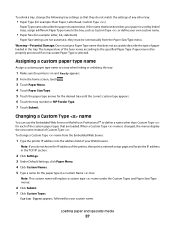
... paper is changed, the menus display the new name instead of Custom Type . they do not know the IP address of the printer, then print a network setup page and locate the IP address in a Custom Name box. Note: This custom name will replace a custom type name under the Custom Types and Paper...
... paper is changed, the menus display the new name instead of Custom Type . they do not know the IP address of the printer, then print a network setup page and locate the IP address in a Custom Name box. Note: This custom name will replace a custom type name under the Custom Types and Paper...
User's Guide
Page 116
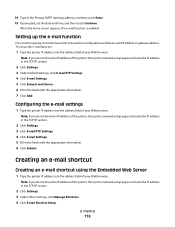
.... To set the date and time, and then touch Continue. Note: If you do not know the IP address of the printer, then print a network setup page and locate the IP address in the fields with the appropriate information. 6 Click Submit. Note: If you do not know the IP address of... the printer, then print a network setup page and locate the IP address in the TCP/IP section. 2 Click Settings. 3 Under Default Settings, click E-mail/FTP Settings. 4 Click E-mail Settings. 5...
.... To set the date and time, and then touch Continue. Note: If you do not know the IP address of the printer, then print a network setup page and locate the IP address in the fields with the appropriate information. 6 Click Submit. Note: If you do not know the IP address of... the printer, then print a network setup page and locate the IP address in the TCP/IP section. 2 Click Settings. 3 Under Default Settings, click E-mail/FTP Settings. 4 Click E-mail Settings. 5...

User's Guide
Page 134
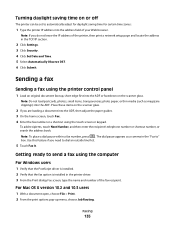
... Number box, and then enter the printer fax number. 7 Click Submit. Using the Embedded Web Server for fax setup 1 Type the printer IP address into the address field of the printer, then print a network setup page and locate the address in the TCP/IP section. 2 Click Settings. 3 Click Fax Settings. 4 Click Analog .... 14 Touch Enter. 15 If prompted, set the date and time: 1 Type the printer IP address into the address field of the printer, then print a network setup page and locate the address in the TCP/IP section. 2 Click Settings. 3 Click Security. 4 Click Set Date and Time. 5 In the...
... Number box, and then enter the printer fax number. 7 Click Submit. Using the Embedded Web Server for fax setup 1 Type the printer IP address into the address field of the printer, then print a network setup page and locate the address in the TCP/IP section. 2 Click Settings. 3 Click Fax Settings. 4 Click Analog .... 14 Touch Enter. 15 If prompted, set the date and time: 1 Type the printer IP address into the address field of the printer, then print a network setup page and locate the address in the TCP/IP section. 2 Click Settings. 3 Click Security. 4 Click Set Date and Time. 5 In the...
User's Guide
Page 135
... a fax Sending a fax using the touch screen or keypad. Use this feature if you do not know the IP address of the printer, then print a network setup page and locate the address in the printer driver. 3 From the Print dialog Fax screen, type the name and number of your Web browser. The...
... a fax Sending a fax using the touch screen or keypad. Use this feature if you do not know the IP address of the printer, then print a network setup page and locate the address in the printer driver. 3 From the Print dialog Fax screen, type the name and number of your Web browser. The...
User's Guide
Page 138
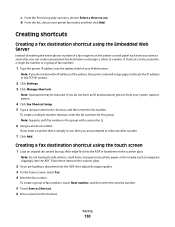
d From the list, choose your system support person. 4 Click Fax Shortcut Setup. 5 Type a unique name for the shortcut, and then enter the fax number. Note: Separate each time you can be required. Note: Do not load postcards, ..., short edge first into the ADF or facedown on the scanner glass. 2 If you do not know the IP address of the printer, then print a network setup page and locate the IP address in the TCP/IP section. 2 Click Settings. 3 Click Manage Shortcuts. Note: A password may be created to use , then you...
d From the list, choose your system support person. 4 Click Fax Shortcut Setup. 5 Type a unique name for the shortcut, and then enter the fax number. Note: Separate each time you can be required. Note: Do not load postcards, ..., short edge first into the ADF or facedown on the scanner glass. 2 If you do not know the IP address of the printer, then print a network setup page and locate the IP address in the TCP/IP section. 2 Click Settings. 3 Click Manage Shortcuts. Note: A password may be created to use , then you...
User's Guide
Page 141
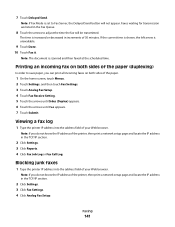
...faxes on both sides of 30 minutes. Blocking junk faxes 1 Type the printer IP address into the address field of the printer, then print a network setup page and locate the IP address in the Fax Queue. 8 Touch the arrows to Fax Server, the Delayed Send button will be transmitted. Note... and then faxed at the scheduled time. Viewing a fax log 1 Type the printer IP address into the address field of the printer, then print a network setup page and locate the IP address in increments of the paper. 1 On the home screen, touch Menus. 2 Touch Settings, and then touch Fax Settings....
...faxes on both sides of 30 minutes. Blocking junk faxes 1 Type the printer IP address into the address field of the printer, then print a network setup page and locate the IP address in the Fax Queue. 8 Touch the arrows to Fax Server, the Delayed Send button will be transmitted. Note... and then faxed at the scheduled time. Viewing a fax log 1 Type the printer IP address into the address field of the printer, then print a network setup page and locate the IP address in increments of the paper. 1 On the home screen, touch Menus. 2 Touch Settings, and then touch Fax Settings....
User's Guide
Page 144
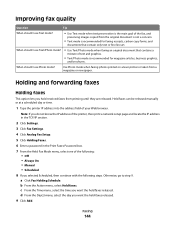
... Day(s) menu, select the day you want the held faxes released. Note: If you do not know the IP address of the printer, then print a network setup page and locate the IP address in the TCP/IP section. 2 Click Settings. 3 Click Fax Settings. 4 Click Analog Fax... Setup. 5 Click Holding Faxes. 6 Enter a password in the Print Faxes Password box. 7 From the Held Fax Mode menu, select one of the following: • Off • ...
... Day(s) menu, select the day you want the held faxes released. Note: If you do not know the IP address of the printer, then print a network setup page and locate the IP address in the TCP/IP section. 2 Click Settings. 3 Click Fax Settings. 4 Click Analog Fax... Setup. 5 Click Holding Faxes. 6 Enter a password in the Print Faxes Password box. 7 From the Held Fax Mode menu, select one of the following: • Off • ...


