User's Guide
Page 3
... Recycling Lexmark products...73 Recycling Lexmark packaging...73 Returning Lexmark cartridges for reuse or recycling...74 Reducing printer noise...74 Loading paper and specialty media 76 Setting the Paper Size and Paper Type...76 Configuring Universal paper settings...76 Avoiding jams...77 Loading trays...77 Using the multipurpose feeder...81 Linking and unlinking trays...86 Linking trays...86 Unlinking trays...86...
... Recycling Lexmark products...73 Recycling Lexmark packaging...73 Returning Lexmark cartridges for reuse or recycling...74 Reducing printer noise...74 Loading paper and specialty media 76 Setting the Paper Size and Paper Type...76 Configuring Universal paper settings...76 Avoiding jams...77 Loading trays...77 Using the multipurpose feeder...81 Linking and unlinking trays...86 Linking trays...86 Unlinking trays...86...
User's Guide
Page 4
... Printing 95 Printing a document...95 Printing on both sides of the paper (duplexing)...95 Printing on specialty media...96 Tips on using letterhead...96 Tips on using transparencies ...96 Tips on using envelopes...96 Tips on using... Making transparencies...105 Copying to letterhead...106 Customizing copy settings...106 Copying from one size to another...106 Making copies using paper from a selected tray ...106 Copying on both sides of the paper (duplexing) ...107 Reducing or enlarging copies ...107 Adjusting copy quality...107 Collating copies...108 Placing separator sheets between copies ......
... Printing 95 Printing a document...95 Printing on both sides of the paper (duplexing)...95 Printing on specialty media...96 Tips on using letterhead...96 Tips on using transparencies ...96 Tips on using envelopes...96 Tips on using... Making transparencies...105 Copying to letterhead...106 Customizing copy settings...106 Copying from one size to another...106 Making copies using paper from a selected tray ...106 Copying on both sides of the paper (duplexing) ...107 Reducing or enlarging copies ...107 Adjusting copy quality...107 Collating copies...108 Placing separator sheets between copies ......

User's Guide
Page 10
... set up properly ...254 Understanding printer messages...254 Answering ...254 Change to modem, fax is disabled 258 No answer...258 No dial tone...258 Paper Change: Load Tray ...258 Queued for error messages...254 Make sure the fax function is blank or displays only diamonds 254 Indicator light blinks red...254 Check...
... set up properly ...254 Understanding printer messages...254 Answering ...254 Change to modem, fax is disabled 258 No answer...258 No dial tone...258 Paper Change: Load Tray ...258 Queued for error messages...254 Make sure the fax function is blank or displays only diamonds 254 Indicator light blinks red...254 Check...

User's Guide
Page 11
Contact system administrator 259 Some held jobs were not restored 264 58 Too many trays attached ...264 58 Too many flash options installed ...264 59 Incompatible tray ...265 61 Remove defective disk...265 62 Disk full ...265 63 Unformatted disk...265 Contents 11 Replace if restarting job... 30 Invalid refill, change toner cartridge...260 31 Replace defective cartridge ...260 32 Cartridge part number unsupported by device ...260 34 Short paper ...260 35 Insufficient memory to support Resource Save feature 261 37 Insufficient memory to collate job ...261 37 Insufficient memory, some Held ...
Contact system administrator 259 Some held jobs were not restored 264 58 Too many trays attached ...264 58 Too many flash options installed ...264 59 Incompatible tray ...265 61 Remove defective disk...265 62 Disk full ...265 63 Unformatted disk...265 Contents 11 Replace if restarting job... 30 Invalid refill, change toner cartridge...260 31 Replace defective cartridge ...260 32 Cartridge part number unsupported by device ...260 34 Short paper ...260 35 Insufficient memory to support Resource Save feature 261 37 Insufficient memory to collate job ...261 37 Insufficient memory, some Held ...
User's Guide
Page 12
......265 84 PC Kit life warning...265 88 Cartridge low...265 88.yy Cartridge nearly low...266 88.yy Replace cartridge ...266 200-282.yy paper jam...266 290-295.yy scanner jam...266 293 Replace all originals if restarting job...266 293.02 Flatbed Cover Open ...266 294 ADF Jam... other held jobs do not print ...269 Job takes longer than expected to print ...269 Job prints from the wrong tray or on the wrong paper 270 Incorrect characters print...270 Tray linking does not work...270 Large jobs do not collate ...270 Unexpected page breaks occur...271 Solving copy problems...271 Copier...
......265 84 PC Kit life warning...265 88 Cartridge low...265 88.yy Cartridge nearly low...266 88.yy Replace cartridge ...266 200-282.yy paper jam...266 290-295.yy scanner jam...266 293 Replace all originals if restarting job...266 293.02 Flatbed Cover Open ...266 294 ADF Jam... other held jobs do not print ...269 Job takes longer than expected to print ...269 Job prints from the wrong tray or on the wrong paper 270 Incorrect characters print...270 Tray linking does not work...270 Large jobs do not collate ...270 Unexpected page breaks occur...271 Solving copy problems...271 Copier...

User's Guide
Page 13
...Drawers...280 Flash memory card...280 Hard disk with adapter...280 Internal Solutions Port ...280 Memory card ...280 Solving paper feed problems...281 Paper frequently jams ...281 Paper trays...281 Paper jam message remains after jam is cleared ...282 Page that jammed does not reprint after you clear the jam... Blank pages...283 Characters have jagged or uneven edges ...283 Clipped images...284 Ghost images...284 Gray background ...284 Incorrect margins...285 Paper curl...285 Print irregularities ...286 Skewed print...286 Solid black or white streaks...287 Print is too light ...287 Print is too ...
...Drawers...280 Flash memory card...280 Hard disk with adapter...280 Internal Solutions Port ...280 Memory card ...280 Solving paper feed problems...281 Paper frequently jams ...281 Paper trays...281 Paper jam message remains after jam is cleared ...282 Page that jammed does not reprint after you clear the jam... Blank pages...283 Characters have jagged or uneven edges ...283 Clipped images...284 Ghost images...284 Gray background ...284 Incorrect margins...285 Paper curl...285 Print irregularities ...286 Skewed print...286 Solid black or white streaks...287 Print is too light ...287 Print is too ...

User's Guide
Page 77
... and are set correctly in firmly after loading paper. 8 Touch Submit to load it. • Do not load too much paper. Avoiding jams The following hints can help you avoid jams: Paper tray recommendations • Make sure the paper lies flat in the paper tray. • Do not remove the paper tray while the printer is printing. • Do...
... and are set correctly in firmly after loading paper. 8 Touch Submit to load it. • Do not load too much paper. Avoiding jams The following hints can help you avoid jams: Paper tray recommendations • Make sure the paper lies flat in the paper tray. • Do not remove the paper tray while the printer is printing. • Do...
User's Guide
Page 238
..., see the Networking Guide on the Software and Documentation CD and the Embedded Web Server Administrator's Guide on the Lexmark Web site at www.lexmark.com. Administrative support Finding advanced networking and administrator information This chapter covers basic administrative support tasks. Using the Embedded ... alerts You can have the printer send you do not know the IP address of certain printer parts. For more information, see paper tray settings, the level of toner in the toner cartridge, the percentage of life remaining in the photoconductor kit, and capacity measurements of...
..., see the Networking Guide on the Software and Documentation CD and the Embedded Web Server Administrator's Guide on the Lexmark Web site at www.lexmark.com. Administrative support Finding advanced networking and administrator information This chapter covers basic administrative support tasks. Using the Embedded ... alerts You can have the printer send you do not know the IP address of certain printer parts. For more information, see paper tray settings, the level of toner in the toner cartridge, the percentage of life remaining in the photoconductor kit, and capacity measurements of...
User's Guide
Page 255
... when there is not continued. • Touch Cancel job to cancel the current job. Wait for the remainder of the following : • Select the paper tray with the correct paper size or type. • Touch Use current [src] to ignore the message and print from the wall outlet. 3 Remove the... or type. If the error occurs a second time: 1 Turn the printer off and then back on the paper loaded in the tray, the job is no paper in the selected tray. Change to is a tray or feeder, and is missing or not installed correctly. Close front door Close the front door of text or...
... when there is not continued. • Touch Cancel job to cancel the current job. Wait for the remainder of the following : • Select the paper tray with the correct paper size or type. • Touch Use current [src] to ignore the message and print from the wall outlet. 3 Remove the... or type. If the error occurs a second time: 1 Turn the printer off and then back on the paper loaded in the tray, the job is no paper in the selected tray. Change to is a tray or feeder, and is missing or not installed correctly. Close front door Close the front door of text or...

User's Guide
Page 260
... needed for the message to free system memory. The USB port is using a different paper tray. • Check tray length and width guides and make sure the paper is properly loaded in the proper tray. • Touch Continue to clear. Wait for the job are available. System busy,...restored. Remove the unsupported device, and then install a supported one or more of the following: • Load the appropriate paper or other specialty media in the tray. Remove the toner cartridge, and then install a new one. 31 Replace defective cartridge Remove the defective toner cartridge, and ...
... needed for the message to free system memory. The USB port is using a different paper tray. • Check tray length and width guides and make sure the paper is properly loaded in the proper tray. • Touch Continue to clear. Wait for the job are available. System busy,...restored. Remove the unsupported device, and then install a supported one or more of the following: • Load the appropriate paper or other specialty media in the tray. Remove the toner cartridge, and then install a new one. 31 Replace defective cartridge Remove the defective toner cartridge, and ...

User's Guide
Page 268
...and Documentation on the display before sending a job to print in the tray. For information regarding tested and approved USB flash memory devices, visit the Lexmark Web site at www.lexmark.com. MAKE SURE THE CORRECT PRINTER SOFTWARE IS INSTALLED • Verify... that the printer is connected to make sure you want to print. Troubleshooting 268 The Print dialog appears. 3 Click Advanced. 4 Select Print as image. 5 Click OK twice. CHECK TO SEE IF THE PAPER TRAY IS EMPTY Load paper...
...and Documentation on the display before sending a job to print in the tray. For information regarding tested and approved USB flash memory devices, visit the Lexmark Web site at www.lexmark.com. MAKE SURE THE CORRECT PRINTER SOFTWARE IS INSTALLED • Verify... that the printer is connected to make sure you want to print. Troubleshooting 268 The Print dialog appears. 3 Click Advanced. 4 Select Print as image. 5 Click OK twice. CHECK TO SEE IF THE PAPER TRAY IS EMPTY Load paper...

User's Guide
Page 273
... OR DISAPPEARING From the printer control panel, press the Content button until the light comes on the scanner glass in the tray: 1 From the printer control panel Paper menu, check the Paper Size setting. 2 Before sending the job to Text/Photo. • Rotate the original document on the scanner glass. • From the... printer control panel, press the Scale button and adjust the setting. Try one or more of the pages to be scanned. • Check the paper trays to the printer and the host computer, print server, option, or other network device. Troubleshooting 273 CHECK THE...
... OR DISAPPEARING From the printer control panel, press the Content button until the light comes on the scanner glass in the tray: 1 From the printer control panel Paper menu, check the Paper Size setting. 2 Before sending the job to Text/Photo. • Rotate the original document on the scanner glass. • From the... printer control panel, press the Scale button and adjust the setting. Try one or more of the pages to be scanned. • Check the paper trays to the printer and the host computer, print server, option, or other network device. Troubleshooting 273 CHECK THE...
User's Guide
Page 277
... DELAY SETTINGS The ring count delay sets the number of the printer, then print a network setup page and locate the IP address in the tray. Note: If you have extension phones on the same line as the printer, or subscribe to verify a dial tone. CHECK FOR JAMS Clear... solutions. Try one page at 4. 1 Type the printer IP address into the address field of the following: CHECK TO SEE IF THE PAPER TRAY IS EMPTY Load paper in the TCP/IP section. 2 Click Settings. TEMPORARILY DISCONNECT OTHER EQUIPMENT To ensure the printer is working correctly, connect it is working correctly...
... DELAY SETTINGS The ring count delay sets the number of the printer, then print a network setup page and locate the IP address in the tray. Note: If you have extension phones on the same line as the printer, or subscribe to verify a dial tone. CHECK FOR JAMS Clear... solutions. Try one page at 4. 1 Type the printer IP address into the address field of the following: CHECK TO SEE IF THE PAPER TRAY IS EMPTY Load paper in the TCP/IP section. 2 Click Settings. TEMPORARILY DISCONNECT OTHER EQUIPMENT To ensure the printer is working correctly, connect it is working correctly...

User's Guide
Page 281
... hardware setup documentation that came with the paper tray, or go to www.lexmark.com/publications to the correct positions for paper jams or misfeeds. 3 Make sure paper guides are aligned against the edges of the following : MAKE SURE THE PAPER IS LOADED CORRECTLY 1 Open the paper tray. 2 Check for the paper size loaded. Troubleshooting 281 Try one or...
... hardware setup documentation that came with the paper tray, or go to www.lexmark.com/publications to the correct positions for paper jams or misfeeds. 3 Make sure paper guides are aligned against the edges of the following : MAKE SURE THE PAPER IS LOADED CORRECTLY 1 Open the paper tray. 2 Check for the paper size loaded. Troubleshooting 281 Try one or...
User's Guide
Page 317
...Invalid PIN 257 Load with 257 Load manual feeder with adapter 280 Internal Solutions Port 280 memory card 280 option not working 279 paper trays 281 printer problems, solving basic 254 printing directory list 101 font sample list 101 from flash drive 100 from Macintosh 95 from ... registration 232 scanner glass 22 Scanner ADF Cover Open 259 scanner glass cleaning 230 scanner glass (flatbed) copying using 90 recycling 296 Lexmark packaging 73 Lexmark products 73 toner cartridges 74 WEEE statement 296 reducing a copy 107 Remove originals from the scanner ADF 258 Remove packaging material, check...
...Invalid PIN 257 Load with 257 Load manual feeder with adapter 280 Internal Solutions Port 280 memory card 280 option not working 279 paper trays 281 printer problems, solving basic 254 printing directory list 101 font sample list 101 from flash drive 100 from Macintosh 95 from ... registration 232 scanner glass 22 Scanner ADF Cover Open 259 scanner glass cleaning 230 scanner glass (flatbed) copying using 90 recycling 296 Lexmark packaging 73 Lexmark products 73 toner cartridges 74 WEEE statement 296 reducing a copy 107 Remove originals from the scanner ADF 258 Remove packaging material, check...
User's Guide
Page 319
..., printer options drawers 280 flash memory card 280 hard disk with adapter 280 Internal Solutions Port 280 memory card 280 option not working 279 paper trays 281 troubleshooting, scan cannot scan from a computer 275 partial document or photo scans 275 scan was not successful 274 scanner unit does not... close 271 scanning takes too long or freezes the computer 274 U Universal Paper Size setting 76 Universal Setup menu 164 unlinking trays 86 Unsupported disk 260 Unsupported USB device, please remove 260 Unsupported USB hub, please remove 260 USB port 51 ...
..., printer options drawers 280 flash memory card 280 hard disk with adapter 280 Internal Solutions Port 280 memory card 280 option not working 279 paper trays 281 troubleshooting, scan cannot scan from a computer 275 partial document or photo scans 275 scan was not successful 274 scanner unit does not... close 271 scanning takes too long or freezes the computer 274 U Universal Paper Size setting 76 Universal Setup menu 164 unlinking trays 86 Unsupported disk 260 Unsupported USB device, please remove 260 Unsupported USB hub, please remove 260 USB port 51 ...
Service Manual
Page 125
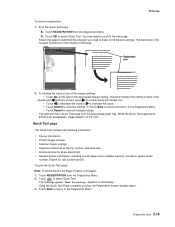
...the right of the page. 2. Diagnostic aids 3-19 Touch REGISTRATION from the Diagnostics Menu. 2. The device prints a Quick Test page from the appropriate paper tray. Quick Test page The Quick Test contains the following information: • Device information • Printer margin settings • Scanner margin settings • ...You may need to make to the next page. To print the Quick Test page: Note: Print the Quick Test Page on letter or A4 paper. 1. a. 7014-xxx To set print registration: 1. To change , or Touch Back to cancel and return to the Diagnostics Menu. • ...
...the right of the page. 2. Diagnostic aids 3-19 Touch REGISTRATION from the Diagnostics Menu. 2. The device prints a Quick Test page from the appropriate paper tray. Quick Test page The Quick Test contains the following information: • Device information • Printer margin settings • Scanner margin settings • ...You may need to make to the next page. To print the Quick Test page: Note: Print the Quick Test Page on letter or A4 paper. 1. a. 7014-xxx To set print registration: 1. To change , or Touch Back to cancel and return to the Diagnostics Menu. • ...
Service Manual
Page 164
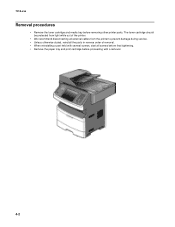
7014-xxx Removal procedures • Remove the toner cartridge and media tray before proceeding with a removal. 4-2 The toner cartridge should be protected from light while out of the printer. • We recommend disconnecting all external cables from the printer to prevent damage during service. • Unless otherwise stated, reinstall the parts in reverse order of removal. • When reinstalling a part held with several screws, start all screws before final tightening. • Remove the paper tray and print cartridge before removing other printer parts.
7014-xxx Removal procedures • Remove the toner cartridge and media tray before proceeding with a removal. 4-2 The toner cartridge should be protected from light while out of the printer. • We recommend disconnecting all external cables from the printer to prevent damage during service. • Unless otherwise stated, reinstall the parts in reverse order of removal. • When reinstalling a part held with several screws, start all screws before final tightening. • Remove the paper tray and print cartridge before removing other printer parts.

Service Manual
Page 165
Note: Be careful to remove the ACM pick tires. Repair information 4-3 7014-xxx ACM pick tire roller removal 1. After the ACM pick tires have been pulled out, close the duplex door. Warning: Open the duplex door only far enough to not mar the finish of the printer. 2. Open the duplex jam door just far enough to pull out the ACM pick tires. If the door is opened too far, then it can become disengaged and interfere with the paper tray. Place the printer on its side. The tray may go in but will not come out, and will render the printer non-serviceable. 3.
Note: Be careful to remove the ACM pick tires. Repair information 4-3 7014-xxx ACM pick tire roller removal 1. After the ACM pick tires have been pulled out, close the duplex door. Warning: Open the duplex door only far enough to not mar the finish of the printer. 2. Open the duplex jam door just far enough to pull out the ACM pick tires. If the door is opened too far, then it can become disengaged and interfere with the paper tray. Place the printer on its side. The tray may go in but will not come out, and will render the printer non-serviceable. 3.

Service Manual
Page 218
If it is not, then the paper tray will become lodged and the printer will need to make sure the duplex paper jam door is in its proper position. 7014-xxx Warning: Check to be replaced. 4-56
If it is not, then the paper tray will become lodged and the printer will need to make sure the duplex paper jam door is in its proper position. 7014-xxx Warning: Check to be replaced. 4-56


