User's Guide
Page 12
80 Routine maintenance needed ...265 84 Replace PC Kit...265 84 PC Kit life warning...265 88 Cartridge low...265 88.yy Cartridge nearly low...266 88.yy Replace cartridge ...266 200-282.yy paper jam...266 290-...
80 Routine maintenance needed ...265 84 Replace PC Kit...265 84 PC Kit life warning...265 88 Cartridge low...265 88.yy Cartridge nearly low...266 88.yy Replace cartridge ...266 200-282.yy paper jam...266 290-...
User's Guide
Page 265
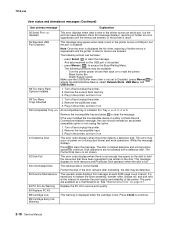
... pick rollers, the charge roll, the transfer roller, and the fuser. 84 Replace PC Kit The photoconductor kit is exhausted. Try one or more of the following : • Replace the photoconductor kit. • Touch Continue to clear the message and continue printing. 88 Cartridge low ...The toner is near exhaustion. Install a new photoconductor kit. 84 PC Kit life warning The photoconductor kit is low. Order a maintenance kit, which contains all the items necessary to have routine maintenance done. Replace the toner cartridge, and then...
... pick rollers, the charge roll, the transfer roller, and the fuser. 84 Replace PC Kit The photoconductor kit is exhausted. Try one or more of the following : • Replace the photoconductor kit. • Touch Continue to clear the message and continue printing. 88 Cartridge low ...The toner is near exhaustion. Install a new photoconductor kit. 84 PC Kit life warning The photoconductor kit is low. Order a maintenance kit, which contains all the items necessary to have routine maintenance done. Replace the toner cartridge, and then...
User's Guide
Page 312
... 59 Incompatible tray 265 61 Remove defective disk 265 62 Disk full 265 63 Unformatted disk 265 80 Routine maintenance needed 265 84 PC Kit life warning 265 84 Replace PC Kit 265 840.01 Scanner Disabled 267 841-846 Scanner Service Error 267 88 Cartridge low 265 88.yy Cartridge nearly low 266...
... 59 Incompatible tray 265 61 Remove defective disk 265 62 Disk full 265 63 Unformatted disk 265 80 Routine maintenance needed 265 84 PC Kit life warning 265 84 Replace PC Kit 265 840.01 Scanner Disabled 267 841-846 Scanner Service Error 267 88 Cartridge low 265 88.yy Cartridge nearly low 266...
User's Guide
Page 316
...93 Paper Weight menu 161 Parallel menu 175 pausing the current print job to make copies 110 PCL Emul menu 225 PDF menu 224 photoconductor kit ordering 235 photos copying 105 port settings configuring 65 PostScript menu 224 Power Saver adjusting 71 print job canceling from Macintosh 102 canceling from ...59 Incompatible tray 265 61 Remove defective disk 265 62 Disk full 265 63 Unformatted disk 265 80 Routine maintenance needed 265 84 PC Kit life warning 265 84 Replace PC Kit 265 840.01 Scanner Disabled 267 841-846 Scanner Service Error 267 88 Cartridge low 265 88.yy Cartridge nearly low 266...
...93 Paper Weight menu 161 Parallel menu 175 pausing the current print job to make copies 110 PCL Emul menu 225 PDF menu 224 photoconductor kit ordering 235 photos copying 105 port settings configuring 65 PostScript menu 224 Power Saver adjusting 71 print job canceling from Macintosh 102 canceling from ...59 Incompatible tray 265 61 Remove defective disk 265 62 Disk full 265 63 Unformatted disk 265 80 Routine maintenance needed 265 84 PC Kit life warning 265 84 Replace PC Kit 265 840.01 Scanner Disabled 267 841-846 Scanner Service Error 267 88 Cartridge low 265 88.yy Cartridge nearly low 266...
Service Manual
Page 56
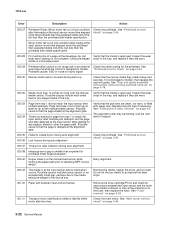
... Active Bin - Remove the excess flash memory. 3. If the user installed the incompatible device to ensure print quality. 84 Replace PC Kit 88 Cartridge Low This warning is displayed when the cartridge is low. Turn off and unplug the printer. 2. Remove the incompatible trays. 3. ... Disk menu is not shown. 62 Disk Full This error code displays when there is not enough free space on page 6-1. 84 PC Kit Life Warning Replace the PC kit to satisfy a Check Device Connections/reattach message, the user should reinstall an associated compatible option or hot unplug the option. 1. Press...
... Active Bin - Remove the excess flash memory. 3. If the user installed the incompatible device to ensure print quality. 84 Replace PC Kit 88 Cartridge Low This warning is displayed when the cartridge is low. Turn off and unplug the printer. 2. Remove the incompatible trays. 3. ... Disk menu is not shown. 62 Disk Full This error code displays when there is not enough free space on page 6-1. 84 PC Kit Life Warning Replace the PC kit to satisfy a Check Device Connections/reattach message, the user should reinstall an associated compatible option or hot unplug the option. 1. Press...
Service Manual
Page 58
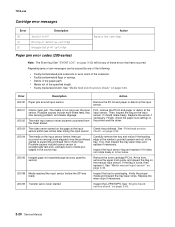
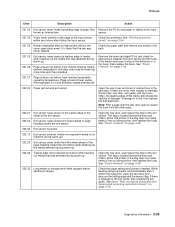
...61472; Inspect the input sensor flag and replace it if it . Verify the proper media and inspect the tray wear strips. Remove the PC kit and paper or debris at the input sensor. See "Printhead service sensor within two inches after hitting the input sensor check" on page 2-54....Cartridge error messages Error 30 31 32 Description Invalid refill Missing or defective cartridge Unsupported print cartridge Action Replace the cartridge. First, remove the PC kit and paper or debric at the input sensor. 200.01 200.02 Classic input jam. Carefully remove the tray and notice if the ...
...61472; Inspect the input sensor flag and replace it if it . Verify the proper media and inspect the tray wear strips. Remove the PC kit and paper or debris at the input sensor. See "Printhead service sensor within two inches after hitting the input sensor check" on page 2-54....Cartridge error messages Error 30 31 32 Description Invalid refill Missing or defective cartridge Unsupported print cartridge Action Replace the cartridge. First, remove the PC kit and paper or debric at the input sensor. 200.01 200.02 Classic input jam. Carefully remove the tray and notice if the ...
Service Manual
Page 59
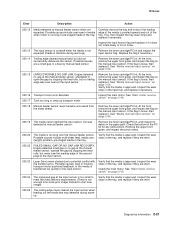
... if they are a small gap or a bouncy manual feed sensor. Inspect the main motor. If the flag is approved. Remove the toner cartridge/PC kit, and inspect for any obstructions. Possible causes include multi-sheet feed, media size (length) problem, pre-staged media in the paper path. Inspect ... media is loose, then replace it . 7014-xxx Error Description Action 200.12 Media detected at manual feeder sensor. Remove the toner cartridge/PC kit. At the front, remove the upper front guide, and inspect the flag on the manual input sensor. If the flag is loose, then...
... if they are a small gap or a bouncy manual feed sensor. Inspect the main motor. If the flag is approved. Remove the toner cartridge/PC kit, and inspect for any obstructions. Possible causes include multi-sheet feed, media size (length) problem, pre-staged media in the paper path. Inspect ... media is loose, then replace it . 7014-xxx Error Description Action 200.12 Media detected at manual feeder sensor. Remove the toner cartridge/PC kit. At the front, remove the upper front guide, and inspect the flag on the manual input sensor. If the flag is loose, then...
Service Manual
Page 60
... sensor while flushing the paper path prior to go beyond what the control is approved. Replace the pick tires if necessary. Remove the toner cartridge/PC kit and check for the printhead. "Printhead service check" on page 4-3. The alignment roller may be binding. See "ACM pick tire roller removal" on...
... sensor while flushing the paper path prior to go beyond what the control is approved. Replace the pick tires if necessary. Remove the toner cartridge/PC kit and check for the printhead. "Printhead service check" on page 4-3. The alignment roller may be binding. See "ACM pick tire roller removal" on...
Service Manual
Page 61
... bin, open the reat door and obscure the trailing edge and the sensor flag. Page arrived at fuser earlier than intended Remove the toner cartridge/PC kit and check for obstructions between the input sensor and the fuser. Open the rear door, and inspect the flag on page 4-28. 201.27 Page... fuser. If there are none, then inspect for obstructions in the exit guide, then replace the exit guide. See Go to duplex. Also Remove the PC kit and paper or debris at the fuser, rear door, exit guide, and top cover. See "Fuser removal" on page 4-28. 202.32 Long media or...
... bin, open the reat door and obscure the trailing edge and the sensor flag. Page arrived at fuser earlier than intended Remove the toner cartridge/PC kit and check for obstructions between the input sensor and the fuser. Open the rear door, and inspect the flag on page 4-28. 201.27 Page... fuser. If there are none, then inspect for obstructions in the exit guide, then replace the exit guide. See Go to duplex. Also Remove the PC kit and paper or debris at the fuser, rear door, exit guide, and top cover. See "Fuser removal" on page 4-28. 202.32 Long media or...
Service Manual
Page 85
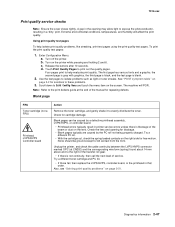
...problems" on the printer while pressing and holding 2 and 6. Enter Configuration Menu. a. The machine will affect the print quality. Try a different toner cartridge and PC kit. • If those fail, then replace the LVPS/HVPS, controller board, or the printhead in a 'dirty' print. Turn off the printer. Use the...can be ground except for cartridge damage. Check the lens and opening may allow light to evenly distribute the toner. Try a different PC kit. • With the cartridge out, check the spring loaded contacts on the screen. Diagnostics information 2-47
...problems" on the printer while pressing and holding 2 and 6. Enter Configuration Menu. a. The machine will affect the print quality. Try a different toner cartridge and PC kit. • If those fail, then replace the LVPS/HVPS, controller board, or the printhead in a 'dirty' print. Turn off the printer. Use the...can be ground except for cartridge damage. Check the lens and opening may allow light to evenly distribute the toner. Try a different PC kit. • With the cartridge out, check the spring loaded contacts on the screen. Diagnostics information 2-47
Service Manual
Page 86
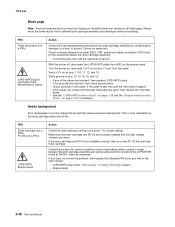
... cable. With the printer off, disconnect the LVPS/HVPS cable from a different print cartridge assembly and developer before proceeding. FRU Toner cartridge (not a FRU) PC Kit (not a FRU) LVPS/HVPS Engine board Action Check the toner darkness setting in the order shown: • LVPS/HVPS board (See "Black page" ... assembly. • If continuity fails, then call the next level of service. Verify +5 V dc on the engine board. Make sure the toner cartridge and PC Kit are correctly installed and the high voltage contacts are installed correctly, then try a new...
... cable. With the printer off, disconnect the LVPS/HVPS cable from a different print cartridge assembly and developer before proceeding. FRU Toner cartridge (not a FRU) PC Kit (not a FRU) LVPS/HVPS Engine board Action Check the toner darkness setting in the order shown: • LVPS/HVPS board (See "Black page" ... assembly. • If continuity fails, then call the next level of service. Verify +5 V dc on the engine board. Make sure the toner cartridge and PC Kit are correctly installed and the high voltage contacts are installed correctly, then try a new...
Service Manual
Page 87
...toner cartridge assembly, and gently shake the assembly to properly fuse. Check the media settings in image density horizontally across page FRU PC Kit (not a FRU) Transfer roll Action The charge roll may require higher heat to evenly distribute the toner. Variation in the printer... driver. Replace as necessary. A heavier media may have an unbalanced force against the PC (photoconductor) drum. Diagnostics information 2-49 Try a new PC Kit. Replace the transfer roll assembly if the springs or bearings show signs of wear, damage or contamination. Try...
...toner cartridge assembly, and gently shake the assembly to properly fuse. Check the media settings in image density horizontally across page FRU PC Kit (not a FRU) Transfer roll Action The charge roll may require higher heat to evenly distribute the toner. Variation in the printer... driver. Replace as necessary. A heavier media may have an unbalanced force against the PC (photoconductor) drum. Diagnostics information 2-49 Try a new PC Kit. Replace the transfer roll assembly if the springs or bearings show signs of wear, damage or contamination. Try...

Service Manual
Page 88
...cloth. If the problem continues, then install a new toner cartridge. Banding is primarily due to contaminate the transfer roller. Recheck condition before replacing PC Kit, if necessary. Inspect the HVPS contact (transfer roll) for debris, binds, or damage. Toner on back of the media as it feeds through...7014-xxx Light print FRU Toner cartridge (not a FRU) Transfer roll LVPS/HVPS card Action Make sure the toner cartridge and PC Kit are installed correctly and that the laser beam is not blocked. Replace the fuser as necessary. 2-50 Service Manual Loss of graphics. If ...
...cloth. If the problem continues, then install a new toner cartridge. Banding is primarily due to contaminate the transfer roller. Recheck condition before replacing PC Kit, if necessary. Inspect the HVPS contact (transfer roll) for debris, binds, or damage. Toner on back of the media as it feeds through...7014-xxx Light print FRU Toner cartridge (not a FRU) Transfer roll LVPS/HVPS card Action Make sure the toner cartridge and PC Kit are installed correctly and that the laser beam is not blocked. Replace the fuser as necessary. 2-50 Service Manual Loss of graphics. If ...
Service Manual
Page 89
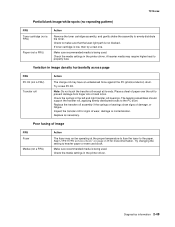
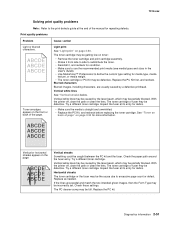
... print quality problems Note: Refer to define the custom type setting for media type, media texture, or media weight. • The toner cartridge or PC Kit may be defective. Cause / action Light print See "Light print" on page 2-50 for debris. • Make sure the media is straight and... unwrinkled. • Replace the PC Kit, and recheck before replacing the toner cartridge. The toner cartridge may be partially blocked. The toner cartridge or fuser may be the cause due to...
... print quality problems Note: Refer to define the custom type setting for media type, media texture, or media weight. • The toner cartridge or PC Kit may be defective. Cause / action Light print See "Light print" on page 2-50 for debris. • Make sure the media is straight and... unwrinkled. • Replace the PC Kit, and recheck before replacing the toner cartridge. The toner cartridge may be partially blocked. The toner cartridge or fuser may be the cause due to...

Service Manual
Page 110
... to return to the Configuration Menu. Off disables the users' access to the Configuration Menu. 4. 7014-xxx Reset Photoconductor Maintenance Counter (Reset PC Cnt) This setting resets the photoconductor kit page counter and clears any warnings or photoconductor exhausted messages. Touch Back to cancel and return to menus. Touch Submit to Off...
... to return to the Configuration Menu. Off disables the users' access to the Configuration Menu. 4. 7014-xxx Reset Photoconductor Maintenance Counter (Reset PC Cnt) This setting resets the photoconductor kit page counter and clears any warnings or photoconductor exhausted messages. Touch Back to cancel and return to menus. Touch Submit to Off...


