User's Guide
Page 9
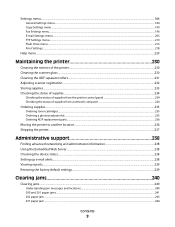
... of supplies from the printer control panel 234 Checking the status of supplies from a network computer 234 Ordering supplies...235 Ordering toner cartridges...235 Ordering a photoconductor kit ...235 Ordering ADF replacement parts...236 Moving the printer to another location...236 Shipping the printer...237 Administrative support 238 Finding advanced networking and administrator...
... of supplies from the printer control panel 234 Checking the status of supplies from a network computer 234 Ordering supplies...235 Ordering toner cartridges...235 Ordering a photoconductor kit ...235 Ordering ADF replacement parts...236 Moving the printer to another location...236 Shipping the printer...237 Administrative support 238 Finding advanced networking and administrator...
User's Guide
Page 235
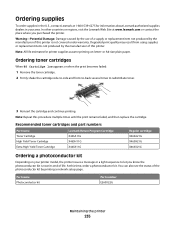
...of life. Note: All life estimates for information about Lexmark authorized supplies dealers in the U.S., contact Lexmark at www.lexmark.com or contact the place where you know the photoconductor kit is not covered under warranty. Recommended toner cartridges and part...Cartridge High Yield Toner Cartridge Extra High Yield Toner Cartridge Lexmark Return Program Cartridge X463A11G X463H11G X463X11G Regular cartridge X463A21G X463H21G X463X21G Ordering a photoconductor kit Depending on letter- Part name Photoconductor kit Part number E260X22G Maintaining the printer 235 In other ...
...of life. Note: All life estimates for information about Lexmark authorized supplies dealers in the U.S., contact Lexmark at www.lexmark.com or contact the place where you know the photoconductor kit is not covered under warranty. Recommended toner cartridges and part...Cartridge High Yield Toner Cartridge Extra High Yield Toner Cartridge Lexmark Return Program Cartridge X463A11G X463H11G X463X11G Regular cartridge X463A21G X463H21G X463X21G Ordering a photoconductor kit Depending on letter- Part name Photoconductor kit Part number E260X22G Maintaining the printer 235 In other ...
User's Guide
Page 238
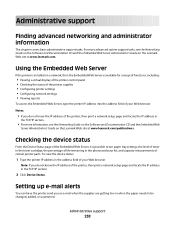
...see the Networking Guide on the Software and Documentation CD and the Embedded Web Server Administrator's Guide on the Lexmark Web site at www.lexmark.com/publications. Administrative support Finding advanced networking and administrator information This chapter covers basic administrative support tasks. Setting up... the TCP/IP section. 2 Click Device Status. To view the device status: 1 Type the printer IP address in the photoconductor kit, and capacity measurements of your Web browser. For more information, see the Networking Guide on the Software and Documentation CD and ...
...see the Networking Guide on the Software and Documentation CD and the Embedded Web Server Administrator's Guide on the Lexmark Web site at www.lexmark.com/publications. Administrative support Finding advanced networking and administrator information This chapter covers basic administrative support tasks. Setting up... the TCP/IP section. 2 Click Device Status. To view the device status: 1 Type the printer IP address in the photoconductor kit, and capacity measurements of your Web browser. For more information, see the Networking Guide on the Software and Documentation CD and ...
User's Guide
Page 240
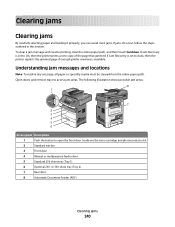
... locations Note: To resolve any message, all paper or specialty media must be cleared from the entire paper path. Inside are the toner cartridge and photoconductor kit. 2 Standard exit bin 3 Front door 4 Manual or multipurpose feeder door 5 Standard 250-sheet tray (Tray 1) 6 Optional 250- If Jam Recovery is available...
... locations Note: To resolve any message, all paper or specialty media must be cleared from the entire paper path. Inside are the toner cartridge and photoconductor kit. 2 Standard exit bin 3 Front door 4 Manual or multipurpose feeder door 5 Standard 250-sheet tray (Tray 1) 6 Optional 250- If Jam Recovery is available...
User's Guide
Page 241
... injury from the standard exit bin. To reduce the risk of the following : • Remove Tray 1. • Open the front door, and then remove the photoconductor kit. Open the front door, and then open the rear door. • Remove Tray 1, and then depress the lever. Try one or more of the following...
... injury from the standard exit bin. To reduce the risk of the following : • Remove Tray 1. • Open the front door, and then remove the photoconductor kit. Open the front door, and then open the rear door. • Remove Tray 1, and then depress the lever. Try one or more of the following...
User's Guide
Page 242
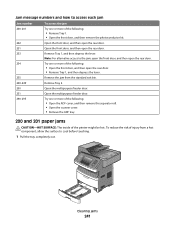
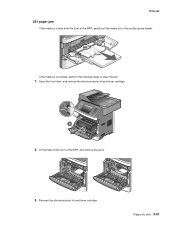
Clearing jams 242 2 Remove the jam if you see it here. 3 If you do not see the jam, open the front door, and then remove the photoconductor kit and toner cartridge. 4 Lift the flap at the front of the printer, and then remove any jammed sheets.
Clearing jams 242 2 Remove the jam if you see it here. 3 If you do not see the jam, open the front door, and then remove the photoconductor kit and toner cartridge. 4 Lift the flap at the front of the printer, and then remove any jammed sheets.
User's Guide
Page 243
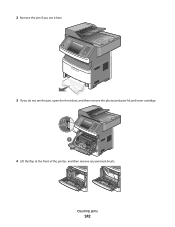
If the paper is exiting the printer, then pull the paper out, and then touch Continue. 5 If you do not see any jammed sheets, open the rear door. 6 Remove the jam. 7 Close the rear door. 8 Insert the photoconductor kit and toner cartridge. 9 Close the front door. 10 Touch Continue. 202 paper jam Touch Status/Supplies to identify the location of the jam. Clearing jams 243
If the paper is exiting the printer, then pull the paper out, and then touch Continue. 5 If you do not see any jammed sheets, open the rear door. 6 Remove the jam. 7 Close the rear door. 8 Insert the photoconductor kit and toner cartridge. 9 Close the front door. 10 Touch Continue. 202 paper jam Touch Status/Supplies to identify the location of the jam. Clearing jams 243
User's Guide
Page 249
If the sheet is visible, gently pull the jammed sheet out. If it is not visible, complete the following steps: 1 Open the front door, and then remove the photoconductor kit and toner cartridge. 2 Lift the flap at the front of paper failed to feed from the multipurpose feeder. Clearing jams 249 251 paper jam A sheet of the printer, and then remove any jams. 3 Reinsert the photoconductor kit and toner cartridge. 4 Close the front door. 5 Touch Continue.
If the sheet is visible, gently pull the jammed sheet out. If it is not visible, complete the following steps: 1 Open the front door, and then remove the photoconductor kit and toner cartridge. 2 Lift the flap at the front of paper failed to feed from the multipurpose feeder. Clearing jams 249 251 paper jam A sheet of the printer, and then remove any jams. 3 Reinsert the photoconductor kit and toner cartridge. 4 Close the front door. 5 Touch Continue.
User's Guide
Page 265
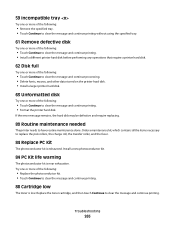
... rollers, the charge roll, the transfer roller, and the fuser. 84 Replace PC Kit The photoconductor kit is exhausted. Install a new photoconductor kit. 84 PC Kit life warning The photoconductor kit is low. Troubleshooting 265 Try one or more of the following : • Replace the photoconductor kit. • Touch Continue to clear the message and continue printing. 88 Cartridge low...
... rollers, the charge roll, the transfer roller, and the fuser. 84 Replace PC Kit The photoconductor kit is exhausted. Install a new photoconductor kit. 84 PC Kit life warning The photoconductor kit is low. Troubleshooting 265 Try one or more of the following : • Replace the photoconductor kit. • Touch Continue to clear the message and continue printing. 88 Cartridge low...
User's Guide
Page 316
... load 93 Paper Weight menu 161 Parallel menu 175 pausing the current print job to make copies 110 PCL Emul menu 225 PDF menu 224 photoconductor kit ordering 235 photos copying 105 port settings configuring 65 PostScript menu 224 Power Saver adjusting 71 print job canceling from Macintosh 102 canceling from Windows... tray 265 61 Remove defective disk 265 62 Disk full 265 63 Unformatted disk 265 80 Routine maintenance needed 265 84 PC Kit life warning 265 84 Replace PC Kit 265 840.01 Scanner Disabled 267 841-846 Scanner Service Error 267 88 Cartridge low 265 88.yy Cartridge nearly low 266...
... load 93 Paper Weight menu 161 Parallel menu 175 pausing the current print job to make copies 110 PCL Emul menu 225 PDF menu 224 photoconductor kit ordering 235 photos copying 105 port settings configuring 65 PostScript menu 224 Power Saver adjusting 71 print job canceling from Macintosh 102 canceling from Windows... tray 265 61 Remove defective disk 265 62 Disk full 265 63 Unformatted disk 265 80 Routine maintenance needed 265 84 PC Kit life warning 265 84 Replace PC Kit 265 840.01 Scanner Disabled 267 841-846 Scanner Service Error 267 88 Cartridge low 265 88.yy Cartridge nearly low 266...

User's Guide
Page 318
... menu 159 supplies conserving 69 status of 234 storing 233 using recycled paper 69 supplies, ordering 235 ADF pick assembly 236 ADF separator roll 236 photoconductor kit 235 system board accessing 30 System busy, preparing resources for job. 260 System busy, preparing resources for job. Deleting held jobs do not print 269...
... menu 159 supplies conserving 69 status of 234 storing 233 using recycled paper 69 supplies, ordering 235 ADF pick assembly 236 ADF separator roll 236 photoconductor kit 235 system board accessing 30 System busy, preparing resources for job. 260 System busy, preparing resources for job. Deleting held jobs do not print 269...
Service Manual
Page 26
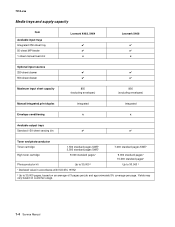
... 7014-xxx Media trays and supply capacity Item Available input trays Integrated 250-sheet tray 50-sheet MP feeder 1-sheet manual feed slot Lexmark X463, X464 ✔ ✔ x Lexmark X466 ✔ ✔ x Optional input sources 250-sheet drawer ✔ ✔ 550-sheet drawer ✔ ✔ Maximum ...¹ 7,000 standard pages SWE¹ High toner cartridge 9,000 standard pages¹ 9,000 standard pages¹ 15,000 standard pages¹ Photoconductor kit Up to 30,000 ² Up to 30,000 ² ¹ Declared value in accordance with ISO/IEC 19752 ² Up to...
... 7014-xxx Media trays and supply capacity Item Available input trays Integrated 250-sheet tray 50-sheet MP feeder 1-sheet manual feed slot Lexmark X463, X464 ✔ ✔ x Lexmark X466 ✔ ✔ x Optional input sources 250-sheet drawer ✔ ✔ 550-sheet drawer ✔ ✔ Maximum ...¹ 7,000 standard pages SWE¹ High toner cartridge 9,000 standard pages¹ 9,000 standard pages¹ 15,000 standard pages¹ Photoconductor kit Up to 30,000 ² Up to 30,000 ² ¹ Declared value in accordance with ISO/IEC 19752 ² Up to...
Service Manual
Page 85
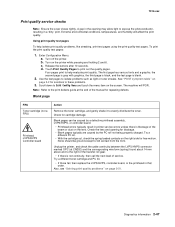
... there is blank. 2. Using print quality test pages To help evaluate print quality. c. Check the lens and opening may allow light to expose the photoconductor, resulting in that order. Diagnostics information 2-47 Extreme environmental conditions, temperatures, and humidity will POR. Scroll down to the right of the transfer roll ... LVPS/HVPS connector marked OPC (at the end of the beam or dust on the right side for free motion. Try a different PC kit. • With the cartridge out, check the spring loaded contacts on the lens. Try a different toner cartridge and PC...
... there is blank. 2. Using print quality test pages To help evaluate print quality. c. Check the lens and opening may allow light to expose the photoconductor, resulting in that order. Diagnostics information 2-47 Extreme environmental conditions, temperatures, and humidity will POR. Scroll down to the right of the transfer roll ... LVPS/HVPS connector marked OPC (at the end of the beam or dust on the right side for free motion. Try a different PC kit. • With the cartridge out, check the spring loaded contacts on the lens. Try a different toner cartridge and PC...
Service Manual
Page 86
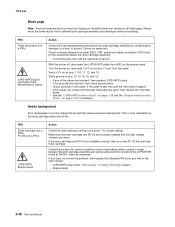
... ground paths. • Check continuity in the driver. Verify ground on pins 1, 3-5, 11, 13, and 15. If the toner cartridge and PC Kit are clean. FRU Toner electrodes (not a FRU) LVPS/HVPS board Controller board Miscellaneous cables Action Check the three rearward electrodes below the ...-xxx Black page Note: Incorrect laser exposure or incorrect charging of service. This is bad, then call the next level of the photoconductor causes an all black page. Correct as necessary. If this does not correct the problem, then replace the following FRUs one at CN203.
... ground paths. • Check continuity in the driver. Verify ground on pins 1, 3-5, 11, 13, and 15. If the toner cartridge and PC Kit are clean. FRU Toner electrodes (not a FRU) LVPS/HVPS board Controller board Miscellaneous cables Action Check the three rearward electrodes below the ...-xxx Black page Note: Incorrect laser exposure or incorrect charging of service. This is bad, then call the next level of the photoconductor causes an all black page. Correct as necessary. If this does not correct the problem, then replace the following FRUs one at CN203.
Service Manual
Page 87
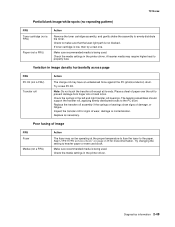
...should support the transfer roll, applying evenly distributed forces to the paper. Check the media settings in image density horizontally across page FRU PC Kit (not a FRU) Transfer roll Action The charge roll may require higher heat to properly fuse. Try changing the setting to prevent damage ... to make sure that the laser light path is not blocked. A heavier media may have an unbalanced force against the PC (photoconductor) drum. Inspect the transfer roll for more information. See"LVPS/HVPS service check" on page 2-39 for signs of damage, or fatigue.
...should support the transfer roll, applying evenly distributed forces to the paper. Check the media settings in image density horizontally across page FRU PC Kit (not a FRU) Transfer roll Action The charge roll may require higher heat to properly fuse. Try changing the setting to prevent damage ... to make sure that the laser light path is not blocked. A heavier media may have an unbalanced force against the PC (photoconductor) drum. Inspect the transfer roll for more information. See"LVPS/HVPS service check" on page 2-39 for signs of damage, or fatigue.

Service Manual
Page 88
...is plugged into the LVPS/HVPS. Replace the LVPS/ HVPS or controller board as necessary. Check the transfer roll for signs of page FRU Photoconductor kit (not a FRU) Fuser Transfer roll HVPS or engine board Action Print a menu page from the Menu Settings Page in the developer and ...beam is not low on back of spilled toner. If the problem continues, then install a new toner cartridge. Recheck condition before replacing PC Kit, if necessary. With the printer off, check to contaminate the transfer roller. Inspect the toner cartridge and paper feed components, especially the ...
...is plugged into the LVPS/HVPS. Replace the LVPS/ HVPS or controller board as necessary. Check the transfer roll for signs of page FRU Photoconductor kit (not a FRU) Fuser Transfer roll HVPS or engine board Action Print a menu page from the Menu Settings Page in the developer and ...beam is not low on back of spilled toner. If the problem continues, then install a new toner cartridge. Recheck condition before replacing PC Kit, if necessary. With the printer off, check to contaminate the transfer roller. Inspect the toner cartridge and paper feed components, especially the ...

Service Manual
Page 110
...menu. Touch Print Quality Pages from the Event Log menu. 2. The event log can only be performed only after a new photoconductor unit has been installed. Selecting On (the default) allows users to On, all PIN restrictions are restored. 3-4 Service Manual Off... Quality Pages: 1. Press to return to the Configuration menu. 7014-xxx Reset Photoconductor Maintenance Counter (Reset PC Cnt) This setting resets the photoconductor kit page counter and clears any warnings or photoconductor exhausted messages. This setting reports the values of a broad range of printer errors...
...menu. Touch Print Quality Pages from the Event Log menu. 2. The event log can only be performed only after a new photoconductor unit has been installed. Selecting On (the default) allows users to On, all PIN restrictions are restored. 3-4 Service Manual Off... Quality Pages: 1. Press to return to the Configuration menu. 7014-xxx Reset Photoconductor Maintenance Counter (Reset PC Cnt) This setting resets the photoconductor kit page counter and clears any warnings or photoconductor exhausted messages. This setting reports the values of a broad range of printer errors...

Service Manual
Page 151
Remove the jam. Diagnostic aids 3-45 If the paper is not visible, open the rear door. 6. If the paper is still not visible, open the front door and remove the photoconductor kit and toner cartridge. 4. Remove the jam. 5. 7014-xxx 3.
Remove the jam. Diagnostic aids 3-45 If the paper is not visible, open the rear door. 6. If the paper is still not visible, open the front door and remove the photoconductor kit and toner cartridge. 4. Remove the jam. 5. 7014-xxx 3.
Service Manual
Page 152
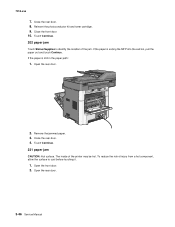
... risk of the printer may be hot. Close the rear door. 4. Touch Continue. 231 paper jam CAUTION: Hot surface. Open the front door. 2. Reinsert the photoconductor kit and toner cartridge. 9. If the paper is still in the paper path: 1. If the paper is exiting the MFP into the exit bin, pull the...
... risk of the printer may be hot. Close the rear door. 4. Touch Continue. 231 paper jam CAUTION: Hot surface. Open the front door. 2. Reinsert the photoconductor kit and toner cartridge. 9. If the paper is still in the paper path: 1. If the paper is exiting the MFP into the exit bin, pull the...
Service Manual
Page 157
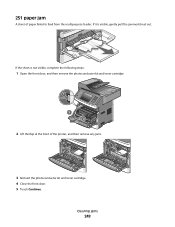
Open the front door, and remove the photoconductor kit and toner cartridge. 2. Lift the flap at the front of the multipurpose feeder. If the media is visible from the front of the MFP, gently pull the media out of the MFP, and remove any jams. 3. Diagnostic aids 3-51 Reinsert the photoconductor kit and toner cartridge. 7014-xxx 251 paper jam If the media is not visible, perform the following steps to clear the jam: 1.
Open the front door, and remove the photoconductor kit and toner cartridge. 2. Lift the flap at the front of the multipurpose feeder. If the media is visible from the front of the MFP, gently pull the media out of the MFP, and remove any jams. 3. Diagnostic aids 3-51 Reinsert the photoconductor kit and toner cartridge. 7014-xxx 251 paper jam If the media is not visible, perform the following steps to clear the jam: 1.


