
User Guide
Page 2
......26 Using recycled paper and other office papers ...26 Conserving supplies...26 Saving energy...27 Adjusting Power Saver...27 Recycling...27 Recycling Lexmark products...28 Recycling Lexmark packaging...28 Returning Lexmark cartridges for the printer...10 Printer configurations...11 Understanding the printer control panel...14 Additional printer setup 16 Installing internal options...16...
......26 Using recycled paper and other office papers ...26 Conserving supplies...26 Saving energy...27 Adjusting Power Saver...27 Recycling...27 Recycling Lexmark products...28 Recycling Lexmark packaging...28 Returning Lexmark cartridges for the printer...10 Printer configurations...11 Understanding the printer control panel...14 Additional printer setup 16 Installing internal options...16...
User Guide
Page 6
Large jobs do not collate ...111 Solving option problems...112 Option does not operate correctly or quits after it is installed 112 Drawers...112 Memory card ...113 Solving paper feed problems...113 Paper frequently jams ...113 Paper jam lights remain on after jam is cleared ...113 Page that jammed does ...
Large jobs do not collate ...111 Solving option problems...112 Option does not operate correctly or quits after it is installed 112 Drawers...112 Memory card ...113 Solving paper feed problems...113 Paper frequently jams ...113 Paper jam lights remain on after jam is cleared ...113 Page that jammed does ...

User Guide
Page 7
... battery is greater than those described in hazardous radiation exposure. CAUTION-SHOCK HAZARD: If you are accessing the system board or installing optional hardware or memory devices sometime after setting up the printer, then turn them off , and unplug the power cord from a hot component, allow the surface to move it...
... battery is greater than those described in hazardous radiation exposure. CAUTION-SHOCK HAZARD: If you are accessing the system board or installing optional hardware or memory devices sometime after setting up the printer, then turn them off , and unplug the power cord from a hot component, allow the surface to move it...

User Guide
Page 16
...are easily damaged by adding optional cards. Touch a metal surface on the right side. you can customize your printer connectivity and memory capacity by static electricity. Open the system board door. 2 Use the following illustration to install the available cards; The instructions... in this section explain how to locate the appropriate connector. Available internal options Memory cards • Printer memory • Flash memory • Fonts Accessing the system board to locate a card for removal. If you have any other devices...
...are easily damaged by adding optional cards. Touch a metal surface on the right side. you can customize your printer connectivity and memory capacity by static electricity. Open the system board door. 2 Use the following illustration to install the available cards; The instructions... in this section explain how to locate the appropriate connector. Available internal options Memory cards • Printer memory • Flash memory • Fonts Accessing the system board to locate a card for removal. If you have any other devices...
User Guide
Page 17
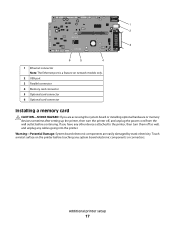
Touch a metal surface on network models only. 2 USB port 3 Parallel connector 4 Memory card connector 5 Optional card connector 6 Optional card connector Installing a memory card CAUTION-SHOCK HAZARD: If you have any other devices attached to the printer, then turn the printer off as... connectors. Additional printer setup 17 Warning-Potential Damage: System board electronic components are accessing the system board or installing optional hardware or memory devices sometime after setting up the printer, then turn them off , and unplug the power cord from the wall outlet before touching...
Touch a metal surface on network models only. 2 USB port 3 Parallel connector 4 Memory card connector 5 Optional card connector 6 Optional card connector Installing a memory card CAUTION-SHOCK HAZARD: If you have any other devices attached to the printer, then turn the printer off as... connectors. Additional printer setup 17 Warning-Potential Damage: System board electronic components are accessing the system board or installing optional hardware or memory devices sometime after setting up the printer, then turn them off , and unplug the power cord from the wall outlet before touching...
User Guide
Page 18
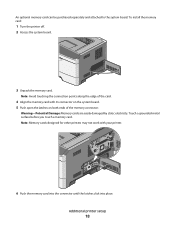
... along the edge of the card. 4 Align the memory card with your printer. 6 Push the memory card into the connector until the latches click into place. Warning-Potential Damage: Memory cards are easily damaged by static electricity. To install the memory card: 1 Turn the printer off. 2 Access the... system board. 3 Unpack the memory card. Note: Memory cards designed for other printers may not work with its ...
... along the edge of the card. 4 Align the memory card with your printer. 6 Push the memory card into the connector until the latches click into place. Warning-Potential Damage: Memory cards are easily damaged by static electricity. To install the memory card: 1 Turn the printer off. 2 Access the... system board. 3 Unpack the memory card. Note: Memory cards designed for other printers may not work with its ...
User Guide
Page 19
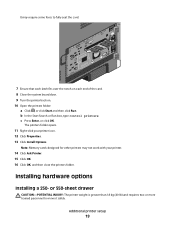
... card. 8 Close the system board door. 9 Turn the printer back on. 10 Open the printers folder: a Click , or click Start and then click Run. Note: Memory cards designed for other printers may require some force to move it safely. Installing hardware options Installing a 250- Additional printer setup 19 b In the Start...
... card. 8 Close the system board door. 9 Turn the printer back on. 10 Open the printers folder: a Click , or click Start and then click Run. Note: Memory cards designed for other printers may require some force to move it safely. Installing hardware options Installing a 250- Additional printer setup 19 b In the Start...

User Guide
Page 20
...; or 550-sheet drawer. A drawer consists of two parts: a tray and a support unit. If you are accessing the system board or installing optional hardware or memory devices sometime after setting up the printer, then turn them off , and unplug the power cord from inside the tray. 4 Insert the tray into the...
...; or 550-sheet drawer. A drawer consists of two parts: a tray and a support unit. If you are accessing the system board or installing optional hardware or memory devices sometime after setting up the printer, then turn them off , and unplug the power cord from inside the tray. 4 Insert the tray into the...

User Guide
Page 37
On - Insufficient memory to clear the light sequence. On - On • Install additional printer memory. • Press either or light sequence. On - Blinking - On - On Interpreting the printer control panel lights 37 On - Insufficient memory to print the remaining pages of the job. Light sequences What you can do Press either or to collate job - On Press to support Resource Save feature - Job will be printed without Resource Save. to clear the Complex page, some data may not have printed -
On - Insufficient memory to clear the light sequence. On - On • Install additional printer memory. • Press either or light sequence. On - Blinking - On - On Interpreting the printer control panel lights 37 On - Insufficient memory to print the remaining pages of the job. Light sequences What you can do Press either or to collate job - On Press to support Resource Save feature - Job will be printed without Resource Save. to clear the Complex page, some data may not have printed -
User Guide
Page 62
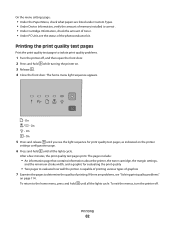
On - On - If there are listed under Custom Types. • Under Device Information, verify the amount of memory installed is capable of printing various types of the photoconductor kit . On 5 Press and release until you see "Solving print quality problems" on page 114. ...
On - On - If there are listed under Custom Types. • Under Device Information, verify the amount of memory installed is capable of printing various types of the photoconductor kit . On 5 Press and release until you see "Solving print quality problems" on page 114. ...

User Guide
Page 75
...Off prints a partial page when there is the factory default setting. Specifies whether the printer reprints jammed pages Notes: • Auto is not enough memory to print the whole page. • On sets the printer to hold the pages is needed for additional data before canceling a print job Notes:... entire page prints. This setting has no effect on PCL emulation print jobs. Understanding printer menus 75 The printer reprints jammed pages unless the memory required to process the whole page so that may not have printed otherwise Notes: • Off is a range of time in seconds. ...
...Off prints a partial page when there is the factory default setting. Specifies whether the printer reprints jammed pages Notes: • Auto is not enough memory to print the whole page. • On sets the printer to hold the pages is needed for additional data before canceling a print job Notes:... entire page prints. This setting has no effect on PCL emulation print jobs. Understanding printer menus 75 The printer reprints jammed pages unless the memory required to process the whole page so that may not have printed otherwise Notes: • Off is a range of time in seconds. ...

User Guide
Page 76
... use another printer language. Sets the storage location for processing print jobs. • The factory default printer language is temporary. All downloads stored in flash memory are deleted. Description Sets the default printer language Notes: • PostScript emulation uses a PS interpreter for processing print jobs. Menu item Factory Defaults Do Not...
... use another printer language. Sets the storage location for processing print jobs. • The factory default printer language is temporary. All downloads stored in flash memory are deleted. Description Sets the default printer language Notes: • PostScript emulation uses a PS interpreter for processing print jobs. Menu item Factory Defaults Do Not...
User Guide
Page 77
... portrait pages and the left edge of portrait pages and the top edge of landscape pages. • Short Edge specifies that requires more memory than is available Notes: • Off is the factory default setting. Menu item Resource Save Off On Print All Order Alphabetical Oldest First...; Note: Alphabetical is the factory default setting. Specifies a default number of the page is oriented in order to retain the downloads only until memory is the factory default setting. • To set 2-sided printing from the Print dialog and pop-up menus. Specifies whether blank pages are ...
... portrait pages and the left edge of portrait pages and the top edge of landscape pages. • Short Edge specifies that requires more memory than is available Notes: • Off is the factory default setting. Menu item Resource Save Off On Print All Order Alphabetical Oldest First...; Note: Alphabetical is the factory default setting. Specifies a default number of the page is oriented in order to retain the downloads only until memory is the factory default setting. • To set 2-sided printing from the Print dialog and pop-up menus. Specifies whether blank pages are ...

User Guide
Page 80
...: • Resident is R for Resident, M1 for Flash, and S for this menu item to be available. • The optional flash memory card cannot be Read/Write, Write, or password protected. • Job Buffer Size must be properly formatted and cannot be set of fonts downloaded...Notes: • Courier is the factory default setting. • The font source abbreviation is the factory default setting. • A formatted optional flash memory card must be installed in printed output Notes: • 0 is the factory default setting. • Higher settings show more difference between levels of...
...: • Resident is R for Resident, M1 for Flash, and S for this menu item to be available. • The optional flash memory card cannot be Read/Write, Write, or password protected. • Job Buffer Size must be properly formatted and cannot be set of fonts downloaded...Notes: • Courier is the factory default setting. • The font source abbreviation is the factory default setting. • A formatted optional flash memory card must be installed in printed output Notes: • 0 is the factory default setting. • Higher settings show more difference between levels of...
User Guide
Page 107
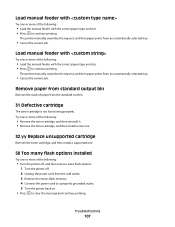
... the printer off, and then remove extra flash options: 1 Turn the printer off. 2 Unplug the power cord from the wall outlet. 3 Remove the excess flash memory. 4 Connect the power cord to a properly grounded outlet. 5 Turn the printer back on. • Press to clear the message and continue printing. Load manual feeder...
... the printer off, and then remove extra flash options: 1 Turn the printer off. 2 Unplug the power cord from the wall outlet. 3 Remove the excess flash memory. 4 Connect the power cord to a properly grounded outlet. 5 Turn the printer back on. • Press to clear the message and continue printing. Load manual feeder...

User Guide
Page 112
MAKE SURE THE PRINTER HAS ENOUGH MEMORY Add printer memory. CHECK TO SEE IF THE OPTION IS CONNECTED TO THE PRINTER 1 Turn the printer off , wait about 10 seconds, and then turn the printer on . ...
MAKE SURE THE PRINTER HAS ENOUGH MEMORY Add printer memory. CHECK TO SEE IF THE OPTION IS CONNECTED TO THE PRINTER 1 Turn the printer off , wait about 10 seconds, and then turn the printer on . ...
User Guide
Page 113
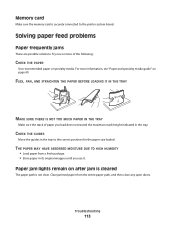
... specialty media guide" on after jam is cleared The paper path is securely connected to the correct positions for the paper size loaded. Memory card Make sure the memory card is not clear. THE PAPER MAY HAVE ABSORBED MOISTURE DUE TO HIGH HUMIDITY • Load paper from the entire paper path, and...
... specialty media guide" on after jam is cleared The paper path is securely connected to the correct positions for the paper size loaded. Memory card Make sure the memory card is not clear. THE PAPER MAY HAVE ABSORBED MOISTURE DUE TO HIGH HUMIDITY • Load paper from the entire paper path, and...
User Guide
Page 139
...tray 44 standard 250-sheet tray 40 Local Printer Settings Utility installing 65 using 66 M manual duplex printing 56 manual feeder loading 45 memory card installing 17 troubleshooting 113 menu settings page printing 61 menus Custom Types 72 Default Source 67 Finishing 77 General settings 74 in ...127, 128, 129, 130 N-up setting Finishing menu 67 O optional trays, loading 44 options 250-sheet drawer 19 550-sheet drawer 19 memory card 17 memory cards 16 ordering toner cartridges 84 P paper characteristics 49 letterhead 51 preprinted forms 51 recycled 26 selecting 51 setting size 40 setting type 40...
...tray 44 standard 250-sheet tray 40 Local Printer Settings Utility installing 65 using 66 M manual duplex printing 56 manual feeder loading 45 memory card installing 17 troubleshooting 113 menu settings page printing 61 menus Custom Types 72 Default Source 67 Finishing 77 General settings 74 in ...127, 128, 129, 130 N-up setting Finishing menu 67 O optional trays, loading 44 options 250-sheet drawer 19 550-sheet drawer 19 memory card 17 memory cards 16 ordering toner cartridges 84 P paper characteristics 49 letterhead 51 preprinted forms 51 recycled 26 selecting 51 setting size 40 setting type 40...
User Guide
Page 140
... Load manual feeder with 107 Load manual feeder with 106 Remove paper from standard output bin 107 printer options troubleshooting drawers 112 memory card 113 option not working 112 printer problems, solving basic 108 printer settings configuration sheet printing 22 printing booklet 61 duplex (2-...the paper 56 print quality test pages 62, 114 publications, finding 9 Q Quality menu 79 R recycled paper using 26 recycling Lexmark packaging 28 Lexmark products 28 toner cartridges 28 WEEE statement 126 Remove paper from standard output bin 107 replacing photoconductor kit 87 toner cartridge 85 ...
... Load manual feeder with 107 Load manual feeder with 106 Remove paper from standard output bin 107 printer options troubleshooting drawers 112 memory card 113 option not working 112 printer problems, solving basic 108 printer settings configuration sheet printing 22 printing booklet 61 duplex (2-...the paper 56 print quality test pages 62, 114 publications, finding 9 Q Quality menu 79 R recycled paper using 26 recycling Lexmark packaging 28 Lexmark products 28 toner cartridges 28 WEEE statement 126 Remove paper from standard output bin 107 replacing photoconductor kit 87 toner cartridge 85 ...

User Guide
Page 141
... horizontal lines 121 streaked vertical lines 121 toner fog or background shading 119 toner rubs off 119 toner specks 120 troubleshooting, printer options drawers 112 memory card 113 option not working 112 U Universal Paper Size 73 setting 40 Universal Setup menu 73 unlinking trays 47 USB port 22 W Web site finding...
... horizontal lines 121 streaked vertical lines 121 toner fog or background shading 119 toner rubs off 119 toner specks 120 troubleshooting, printer options drawers 112 memory card 113 option not working 112 U Universal Paper Size 73 setting 40 Universal Setup menu 73 unlinking trays 47 USB port 22 W Web site finding...


