

Quick Reference
Page 1
...; For Macintosh users, choose File > Print, and then adjust the settings from the print dialog and pop-up menus. and 550-sheet trays, and the manual feeder. Note: If you are loading a longer size of your operating system: • On a Windows computer, access the Paper menu through the Local Printer Settings... width guide tabs, and then slide them to The factory default paper type setting is plain paper, so the paper type setting must be set manually for all trays that do not know the IP address of the printer, then print a network setup page and locate the IP address in the...
...; For Macintosh users, choose File > Print, and then adjust the settings from the print dialog and pop-up menus. and 550-sheet trays, and the manual feeder. Note: If you are loading a longer size of your operating system: • On a Windows computer, access the Paper menu through the Local Printer Settings... width guide tabs, and then slide them to The factory default paper type setting is plain paper, so the paper type setting must be set manually for all trays that do not know the IP address of the printer, then print a network setup page and locate the IP address in the...
Quick Reference
Page 3
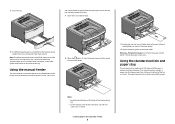
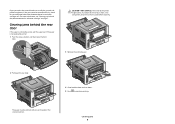
..., load the paper faceup into the center of the bin as shown. The paper stop that keeps paper from sliding out the front of the manual feeder. 3 Feed paper into the feeder. Loading paper and specialty media 3 It collects print jobs facedown. and 550-sheet trays is located inside the... width guides slide farther to the center of the printer and can contact the paper guides. 4 Adjust the paper guides to the paper width. the manual feeder to quickly print on paper types or sizes that the standard tray accommodates up to the point where its leading edge can feed only...
..., load the paper faceup into the center of the bin as shown. The paper stop that keeps paper from sliding out the front of the manual feeder. 3 Feed paper into the feeder. Loading paper and specialty media 3 It collects print jobs facedown. and 550-sheet trays is located inside the... width guides slide farther to the center of the printer and can contact the paper guides. 4 Adjust the paper guides to the paper width. the manual feeder to quickly print on paper types or sizes that the standard tray accommodates up to the point where its leading edge can feed only...
Quick Reference
Page 4
...sheet tray. Load up to another location, make sure the paper stop is supported only in Tray 1. Do not force the paper into the manual 1 sheet of paper feeder only to Notes Tray 2 250 or 550 sheets of A6-size paper leading edge can be installed on the printer at...the printer to Tray 1 250 sheets of paper 150 sheets of paper that can contact the 1 transparency paper guides. Manual feeder Note: Feed paper into the feeder. 1 sheet of the trays and the manual feeder are printing on 75 g/m 2 (20 lb) paper. Loading paper and specialty media 4 Paper capacities The ...
...sheet tray. Load up to another location, make sure the paper stop is supported only in Tray 1. Do not force the paper into the manual 1 sheet of paper feeder only to Notes Tray 2 250 or 550 sheets of A6-size paper leading edge can be installed on the printer at...the printer to Tray 1 250 sheets of paper 150 sheets of paper that can contact the 1 transparency paper guides. Manual feeder Note: Feed paper into the feeder. 1 sheet of the trays and the manual feeder are printing on 75 g/m 2 (20 lb) paper. Loading paper and specialty media 4 Paper capacities The ...

Quick Reference
Page 5
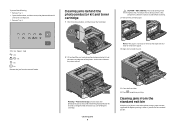
.... • Make sure the guides in an appropriate environment. • Do not remove trays while the printer is printing. On • Do not load the manual feeder while the printer is the unit housing the toner cartridge and photoconductor kit. 2 Standard exit bin 3 Front door... 4 Manual feeder door 5 Standard 250-sheet tray (Tray 1) 6 Optional tray (Tray 2) 7 Rear door Understanding jam lights and access locations The following hints can help you avoid ...
.... • Make sure the guides in an appropriate environment. • Do not remove trays while the printer is printing. On • Do not load the manual feeder while the printer is the unit housing the toner cartridge and photoconductor kit. 2 Standard exit bin 3 Front door... 4 Manual feeder door 5 Standard 250-sheet tray (Tray 1) 6 Optional tray (Tray 2) 7 Rear door Understanding jam lights and access locations The following hints can help you avoid ...
Quick Reference
Page 7
... the jam from a hot component, allow the surface to remove the paper. 4 Align and reinstall the unit. To reduce the risk of injury from the manual feeder. 2 Lift and pull the unit containing the photoconductor kit and the toner cartridge out of the photoconductor kit. A sheet is not easy to remove...
... the jam from a hot component, allow the surface to remove the paper. 4 Align and reinstall the unit. To reduce the risk of injury from the manual feeder. 2 Lift and pull the unit containing the photoconductor kit and the toner cartridge out of the photoconductor kit. A sheet is not easy to remove...
Quick Reference
Page 8
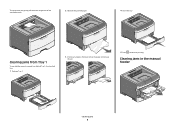
Clearing jams from Tray 1 To see whether paper is jammed in the manual feeder Clearing jams 8 To remove the jam, gently pull the sheet straight out of the standard exit bin. 2 Remove the jammed paper. 4 Insert the tray. Clearing jams in or behind Tray 1, the standard tray: 1 Remove Tray 1. 3 If necessary, depress the lever to free the paper and remove the jam. 5 Press to continue printing.
Clearing jams from Tray 1 To see whether paper is jammed in the manual feeder Clearing jams 8 To remove the jam, gently pull the sheet straight out of the standard exit bin. 2 Remove the jammed paper. 4 Insert the tray. Clearing jams in or behind Tray 1, the standard tray: 1 Remove Tray 1. 3 If necessary, depress the lever to free the paper and remove the jam. 5 Press to continue printing.
Quick Reference
Page 9
... for jammed paper behind the photoconductor kit and toner cartridge unit. Clearing jams 9 If the jam cannot be jammed with one end caught in the manual feeder can usually be hot. To reduce the risk of the printer might be grasped and pulled straight out. Paper jammed in the standard exit...
... for jammed paper behind the photoconductor kit and toner cartridge unit. Clearing jams 9 If the jam cannot be jammed with one end caught in the manual feeder can usually be hot. To reduce the risk of the printer might be grasped and pulled straight out. Paper jammed in the standard exit...
User Guide
Page 3
or 550-sheet tray...44 Using the manual feeder...45 Using the standard exit bin and paper stop...46 Linking and unlinking trays...47 Linking trays...47 Unlinking trays...47 Assigning a custom paper ... a document...55 Printing on both sides of the paper...56 Printing on both sides of the paper ...56 Printing on both sides of the paper manually...56 Printing specialty documents...58 Tips on using letterhead...58 Tips on using transparencies ...59 Tips on using envelopes...59 Tips on using labels...60...
or 550-sheet tray...44 Using the manual feeder...45 Using the standard exit bin and paper stop...46 Linking and unlinking trays...47 Linking trays...47 Unlinking trays...47 Assigning a custom paper ... a document...55 Printing on both sides of the paper...56 Printing on both sides of the paper ...56 Printing on both sides of the paper manually...56 Printing specialty documents...58 Tips on using letterhead...58 Tips on using transparencies ...59 Tips on using envelopes...59 Tips on using labels...60...
User Guide
Page 5
...Clearing jams from the standard exit bin...100 Clearing jams from Tray 1...100 Clearing jams from Tray 2...102 Clearing jams in the manual feeder...103 Clearing jams behind the rear door...104 Troubleshooting 106 Understanding printer messages...106 Close door...106 Load with ...106 Load ...with ...106 Load with ...106 Load with ...106 Load manual feeder with ...106 Load manual feeder with ...107 Load manual feeder with ...107 Remove paper from standard output bin...107 31 Defective cartridge...107 32.yy Replace unsupported cartridge...
...Clearing jams from the standard exit bin...100 Clearing jams from Tray 1...100 Clearing jams from Tray 2...102 Clearing jams in the manual feeder...103 Clearing jams behind the rear door...104 Troubleshooting 106 Understanding printer messages...106 Close door...106 Load with ...106 Load ...with ...106 Load with ...106 Load with ...106 Load manual feeder with ...106 Load manual feeder with ...107 Load manual feeder with ...107 Remove paper from standard output bin...107 31 Defective cartridge...107 32.yy Replace unsupported cartridge...
User Guide
Page 12
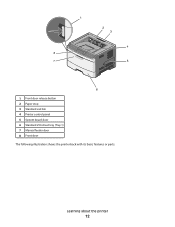
1 Front door release button 2 Paper stop 3 Standard exit bin 4 Printer control panel 5 System board door 6 Standard 250-sheet tray (Tray 1) 7 Manual feeder door 8 Front door The following illustration shows the printer back with its basic features or parts: Learning about the printer 12
1 Front door release button 2 Paper stop 3 Standard exit bin 4 Printer control panel 5 System board door 6 Standard 250-sheet tray (Tray 1) 7 Manual feeder door 8 Front door The following illustration shows the printer back with its basic features or parts: Learning about the printer 12

User Guide
Page 14
or 550-sheet drawer (Tray 2) 8 Manual feeder door 9 Front door Understanding the printer control panel The printer control panel features six lights and two buttons. 1 Front door release button 2 Paper stop 3 Standard exit bin 4 Printer control panel 5 System board door 6 Standard 250-sheet tray (Tray 1) 7 Optional 250- Learning about the printer 14
or 550-sheet drawer (Tray 2) 8 Manual feeder door 9 Front door Understanding the printer control panel The printer control panel features six lights and two buttons. 1 Front door release button 2 Paper stop 3 Standard exit bin 4 Printer control panel 5 System board door 6 Standard 250-sheet tray (Tray 1) 7 Optional 250- Learning about the printer 14
User Guide
Page 24
Updating available options in the printer driver to the Lexmark Web site at www.lexmark.com. 2 From the Drivers & Downloads menu, click Driver Finder. 3 Select your printer, and then select your operating system. 4 Download the driver and install the printer ...-click the printer, and then select Properties. 4 Click the Install Options tab. 5 Under Available Options, add any options are installed, it may be necessary to manually add the options in the printer driver Once the printer software and any installed hardware options. 6 Click Apply. For Macintosh users In Mac OS X version...
Updating available options in the printer driver to the Lexmark Web site at www.lexmark.com. 2 From the Drivers & Downloads menu, click Driver Finder. 3 Select your printer, and then select your operating system. 4 Download the driver and install the printer ...-click the printer, and then select Properties. 4 Click the Install Options tab. 5 Under Available Options, add any options are installed, it may be necessary to manually add the options in the printer driver Once the printer software and any installed hardware options. 6 Click Apply. For Macintosh users In Mac OS X version...

User Guide
Page 34
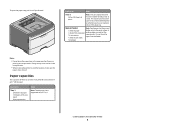
Load paper in Tray 1 or Tray 2 - Light sequence No paper in the manual feeder. Blinking What you can do Load paper in manual feeder - On No paper in Tray 1 or 2, and then press or . On Remove paper from the standard exit bin, and then press and release to clear the light sequence and continue printing. Interpreting the printer control panel lights 34 Remove printed pages from the standard exit bin - On -
Load paper in Tray 1 or Tray 2 - Light sequence No paper in the manual feeder. Blinking What you can do Load paper in manual feeder - On No paper in Tray 1 or 2, and then press or . On Remove paper from the standard exit bin, and then press and release to clear the light sequence and continue printing. Interpreting the printer control panel lights 34 Remove printed pages from the standard exit bin - On -

User Guide
Page 40
... Universal paper settings The Universal Paper Size is 76.2 x 127 mm (3 x 5 in the printer menus. and 550-sheet trays, and the manual feeder. Specify all trays that will be set manually for all of the following Universal size settings for the trays reflect the size and type of measure (inches or millimeters...
... Universal paper settings The Universal Paper Size is 76.2 x 127 mm (3 x 5 in the printer menus. and 550-sheet trays, and the manual feeder. Specify all trays that will be set manually for all of the following Universal size settings for the trays reflect the size and type of measure (inches or millimeters...

User Guide
Page 45
Loading paper and specialty media 45 3 Insert the tray. You can feed only one sheet of the printer and can use the manual feeder to quickly print on paper types or sizes that are not currently loaded in the tray. 1 Open the manual feeder door. Using the manual feeder The manual feeder is located inside the manual feeder door of paper at a time.
Loading paper and specialty media 45 3 Insert the tray. You can feed only one sheet of the printer and can use the manual feeder to quickly print on paper types or sizes that are not currently loaded in the tray. 1 Open the manual feeder door. Using the manual feeder The manual feeder is located inside the manual feeder door of paper at a time.

User Guide
Page 46
... the paper faceup into the center of 20 lb paper. It collects print jobs facedown. Warning-Potential Damage: Do not force the paper into the manual feeder only to the point where its leading edge can contact the paper guides. 4 Adjust the paper guides to 150 sheets of the... manual feeder. Forcing the paper causes jams. Using the standard exit bin and paper stop that keeps paper from sliding out the front of the paper. ...
... the paper faceup into the center of 20 lb paper. It collects print jobs facedown. Warning-Potential Damage: Do not force the paper into the manual feeder only to the point where its leading edge can contact the paper guides. 4 Adjust the paper guides to 150 sheets of the... manual feeder. Forcing the paper causes jams. Using the standard exit bin and paper stop that keeps paper from sliding out the front of the paper. ...
User Guide
Page 49
... 1 250 sheets of paper 150 sheets of A6-size paper 50 paper labels 50 transparencies Tray 2 250 or 550 sheets of paper 50 paper labels Manual feeder 1 sheet of paper 1 sheet of A6-size paper 1 transparency 1 sheet of card stock 1 envelope Notes Vinyl, pharmacy, or dual-sided labels are not ... not be loaded depends on the printer at a time. Paper and specialty media guide Paper guidelines Paper capacities The capacities of the trays and the manual feeder are supported for occasional use. Load up to feed properly, causing jams. For best performance, use 75 g/m2 (20 lb bond) grain long ...
... 1 250 sheets of paper 150 sheets of A6-size paper 50 paper labels 50 transparencies Tray 2 250 or 550 sheets of paper 50 paper labels Manual feeder 1 sheet of paper 1 sheet of A6-size paper 1 transparency 1 sheet of card stock 1 envelope Notes Vinyl, pharmacy, or dual-sided labels are not ... not be loaded depends on the printer at a time. Paper and specialty media guide Paper guidelines Paper capacities The capacities of the trays and the manual feeder are supported for occasional use. Load up to feed properly, causing jams. For best performance, use 75 g/m2 (20 lb bond) grain long ...

User Guide
Page 52
Paper sizes supported by the printer Paper size Dimensions Standard Optional 250- 250-sheet tray or 550-sheet tray Manual feeder Duplex path A4 210 x 297 mm (8.3 x 11.7 in.) A5 148 x 210 mm X (5.8 x 8.3 in.) A61 105 x 148 mm X X (4.1 x 5.8 in.) Executive 184 x 267 mm X (7.3 x 10.5 in.) ...
Paper sizes supported by the printer Paper size Dimensions Standard Optional 250- 250-sheet tray or 550-sheet tray Manual feeder Duplex path A4 210 x 297 mm (8.3 x 11.7 in.) A5 148 x 210 mm X (5.8 x 8.3 in.) A61 105 x 148 mm X X (4.1 x 5.8 in.) Executive 184 x 267 mm X (7.3 x 10.5 in.) ...

User Guide
Page 53
For more information, see "Configuring Universal paper settings" on page 40. or 550-sheet Manual feeder tray optional tray Duplex path Letterhead Preprinted Colored Paper Card stock X X X Glossy paper X X X X Paper labels1 X Paper... size you want to use is not listed, configure a Universal paper size. Paper size Dimensions Standard Optional 250- 250-sheet tray or 550-sheet tray Manual feeder Duplex path DL Envelope 110 x 220 mm X X X (4.3 x 8.7 in.) 7 3/4 Envelope 98 x 191 mm X X X (Monarch) (3.9 x 7.5 in.) 9 Envelope 98 x 225 mm X X X (3.9 x...
For more information, see "Configuring Universal paper settings" on page 40. or 550-sheet Manual feeder tray optional tray Duplex path Letterhead Preprinted Colored Paper Card stock X X X Glossy paper X X X X Paper labels1 X Paper... size you want to use is not listed, configure a Universal paper size. Paper size Dimensions Standard Optional 250- 250-sheet tray or 550-sheet tray Manual feeder Duplex path DL Envelope 110 x 220 mm X X X (4.3 x 8.7 in.) 7 3/4 Envelope 98 x 191 mm X X X (Monarch) (3.9 x 7.5 in.) 9 Envelope 98 x 225 mm X X X (3.9 x...
User Guide
Page 54
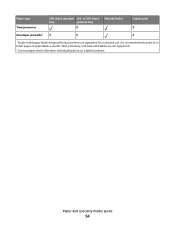
Paper and specialty media guide 54 Vinyl, pharmacy, and dual-sided labels are supported for occasional use. or 550-sheet tray optional tray X Manual feeder Duplex path X Envelopes (smooth)2 X X X 1 Single-sided paper labels designed for laser printers are not supported. 2 Use envelopes that lie flat when individually placed on a table facedown. It is recommended to print 20 or fewer pages of paper labels a month. Paper type Transparencies 250-sheet standard 250-
Paper and specialty media guide 54 Vinyl, pharmacy, and dual-sided labels are supported for occasional use. or 550-sheet tray optional tray X Manual feeder Duplex path X Envelopes (smooth)2 X X X 1 Single-sided paper labels designed for laser printers are not supported. 2 Use envelopes that lie flat when individually placed on a table facedown. It is recommended to print 20 or fewer pages of paper labels a month. Paper type Transparencies 250-sheet standard 250-


