
User Guide
Page 2
......29 Understanding the secondary error light sequences...36 Contents 2 or 550-sheet drawer...19 Printing the printer settings configuration sheet ...22 Attaching cables...22 Setting up the printer software...23 Installing printer software ...23 Updating available options ...Conserving supplies...26 Saving energy...27 Adjusting Power Saver...27 Recycling...27 Recycling Lexmark products...28 Recycling Lexmark packaging...28 Returning Lexmark cartridges for the printer...10 Printer configurations...11 Understanding the printer control panel...14 Additional printer setup 16 Installing internal...
......29 Understanding the secondary error light sequences...36 Contents 2 or 550-sheet drawer...19 Printing the printer settings configuration sheet ...22 Attaching cables...22 Setting up the printer software...23 Installing printer software ...23 Updating available options ...Conserving supplies...26 Saving energy...27 Adjusting Power Saver...27 Recycling...27 Recycling Lexmark products...28 Recycling Lexmark packaging...28 Returning Lexmark cartridges for the printer...10 Printer configurations...11 Understanding the printer control panel...14 Additional printer setup 16 Installing internal...
User Guide
Page 3
... network setup pages ...61 Printing the print quality test pages ...62 Contents 3 Loading paper and specialty media 40 Setting the paper size and type...40 Configuring Universal paper settings...40 Loading the standard 250-sheet tray...40 Loading the optional 250-
... network setup pages ...61 Printing the print quality test pages ...62 Contents 3 Loading paper and specialty media 40 Setting the paper size and type...40 Configuring Universal paper settings...40 Loading the standard 250-sheet tray...40 Loading the optional 250-

User Guide
Page 8
...copies, and faxes, you are using a high-capacity input tray, a duplex unit and an input option, or more information, see www.lexmark.com/multifunctionprinters. Safety information 8 Do not set up this product or make any electrical or cabling connections, such as the fax feature, power... cord, or telephone, during a lightning storm. CAUTION-TIPPING HAZARD: Floor-mounted configurations require additional furniture for additional safety information. You must use the fax feature during a lightning storm. For more than one input option....
...copies, and faxes, you are using a high-capacity input tray, a duplex unit and an input option, or more information, see www.lexmark.com/multifunctionprinters. Safety information 8 Do not set up this product or make any electrical or cabling connections, such as the fax feature, power... cord, or telephone, during a lightning storm. CAUTION-TIPPING HAZARD: Floor-mounted configurations require additional furniture for additional safety information. You must use the fax feature during a lightning storm. For more than one input option....

User Guide
Page 9
...printer, and then skim the User's Guide to learn how to perform basic tasks. For updates, check our Web site at http://support.lexmark.com. Learning about the printer Thank you looking for? Initial setup instructions: • Connecting the printer • Installing the printer software ...• Selecting and storing paper and specialty media • Loading paper • Performing printing depending on your printer model • Configuring printer settings • Viewing and printing documents and photos • Setting up and using printer software • Setting up and...
...printer, and then skim the User's Guide to learn how to perform basic tasks. For updates, check our Web site at http://support.lexmark.com. Learning about the printer Thank you looking for? Initial setup instructions: • Connecting the printer • Installing the printer software ...• Selecting and storing paper and specialty media • Loading paper • Performing printing depending on your printer model • Configuring printer settings • Viewing and printing documents and photos • Setting up and using printer software • Setting up and...

User Guide
Page 11
5 1 4 3 2 1 Rear 300 mm (12 in.) 2 Right side 200 mm (8 in.) 3 Front 300 mm (12 in.) 4 Left side 12.7 mm (0.5 in.) 5 Top 300 mm (12 in.) Printer configurations Basic model The following illustration shows the printer front with its basic features or parts: Learning about the printer 11
5 1 4 3 2 1 Rear 300 mm (12 in.) 2 Right side 200 mm (8 in.) 3 Front 300 mm (12 in.) 4 Left side 12.7 mm (0.5 in.) 5 Top 300 mm (12 in.) Printer configurations Basic model The following illustration shows the printer front with its basic features or parts: Learning about the printer 11

User Guide
Page 13
or 550-sheet drawer: Learning about the printer 13 1 Rear door 2 Ethernet port Note: The Ethernet port is a feature on network models only. 3 USB port 4 Parallel port 5 Printer power cord socket 6 Power switch 7 Security slot Configured models The following illustration shows the printer configured with an optional 250-
or 550-sheet drawer: Learning about the printer 13 1 Rear door 2 Ethernet port Note: The Ethernet port is a feature on network models only. 3 USB port 4 Parallel port 5 Printer power cord socket 6 Power switch 7 Security slot Configured models The following illustration shows the printer configured with an optional 250-
User Guide
Page 22
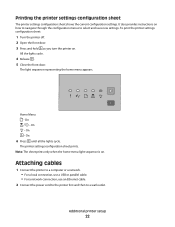
... On - Home Menu - On - Additional printer setup 22 All the lights cycle. 4 Release . 5 Close the front door. The printer settings configuration sheet prints. Note: The sheet prints only when the home menu light sequence is on . On - On 6 Press until all the lights cycle.... Printing the printer settings configuration sheet The printer settings configuration sheet shows the current configuration settings. To print the printer settings configuration sheet: 1 Turn the printer off. 2 Open the front door. 3 Press and hold as you...
... On - Home Menu - On - Additional printer setup 22 All the lights cycle. 4 Release . 5 Close the front door. The printer settings configuration sheet prints. Note: The sheet prints only when the home menu light sequence is on . On - On 6 Press until all the lights cycle.... Printing the printer settings configuration sheet The printer settings configuration sheet shows the current configuration settings. To print the printer settings configuration sheet: 1 Turn the printer off. 2 Open the front door. 3 Press and hold as you...

User Guide
Page 40
... to select from the print dialog and pop-up menus. Loading the standard 250-sheet tray The printer has two trays to load the 250- Configuring Universal paper settings The Universal Paper Size is plain paper, so the paper type setting must be saved until you reset factory default settings. If...
... to select from the print dialog and pop-up menus. Loading the standard 250-sheet tray The printer has two trays to load the 250- Configuring Universal paper settings The Universal Paper Size is plain paper, so the paper type setting must be saved until you reset factory default settings. If...

User Guide
Page 52
...356 mm (8.5 x 14 in.) unless the size is specified by the software application. 3If a paper size you want to use is not listed, configure a Universal paper size. For information on page 40. Paper and specialty media guide 52 Note: For an unlisted paper size, select the closest larger ...listed size. For more information, see "Configuring Universal paper settings" on card stock and labels, see the Card Stock & Label Guide. Supported paper sizes, types, and weights The following tables...
...356 mm (8.5 x 14 in.) unless the size is specified by the software application. 3If a paper size you want to use is not listed, configure a Universal paper size. For information on page 40. Paper and specialty media guide 52 Note: For an unlisted paper size, select the closest larger ...listed size. For more information, see "Configuring Universal paper settings" on card stock and labels, see the Card Stock & Label Guide. Supported paper sizes, types, and weights The following tables...

User Guide
Page 53
... is supported only for grain long papers. 2 This size setting formats the page for 216 x 356 mm (8.5 x 14 in.) unless the size is not listed, configure a Universal paper size. For more information, see "Configuring Universal paper settings" on page 40. The manual feeder supports 60-163 g/m2 (16-43 lb) paper weights.
... is supported only for grain long papers. 2 This size setting formats the page for 216 x 356 mm (8.5 x 14 in.) unless the size is not listed, configure a Universal paper size. For more information, see "Configuring Universal paper settings" on page 40. The manual feeder supports 60-163 g/m2 (16-43 lb) paper weights.
User Guide
Page 62
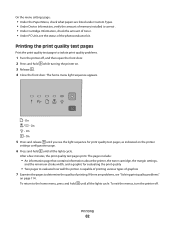
... printer, the toner cartridge, the margin settings, and the minimum stroke width, and a graphic for print quality test pages, as indicated on the printer settings configuration page. 6 Press and hold until all the lights cycle. If there are listed under Custom Types. • Under Device Information, verify the amount of memory...
... printer, the toner cartridge, the margin settings, and the minimum stroke width, and a graphic for print quality test pages, as indicated on the printer settings configuration page. 6 Press and hold until all the lights cycle. If there are listed under Custom Types. • Under Device Information, verify the amount of memory...
User Guide
Page 68
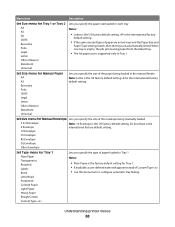
... is the factory default setting for Tray 1. • If available, a user-defined name will appear instead of Custom Type . • Use this menu item to configure automatic tray linking. Executive Folio JIS B5 Legal Letter Oficio (Mexico) Statement Universal Set Size menu for Manual Paper Lets you specify the size of...
... is the factory default setting for Tray 1. • If available, a user-defined name will appear instead of Custom Type . • Use this menu item to configure automatic tray linking. Executive Folio JIS B5 Legal Letter Oficio (Mexico) Statement Universal Set Size menu for Manual Paper Lets you specify the size of...
User Guide
Page 69
...; Custom Type is the factory default setting. • If available, a user-defined name will appear instead of Custom Type . • Use this menu item to configure automatic tray linking. Understanding printer menus 69 Lets you specify the type of paper being manually loaded Note: Envelope is the factory default setting. Lets...
...; Custom Type is the factory default setting. • If available, a user-defined name will appear instead of Custom Type . • Use this menu item to configure automatic tray linking. Understanding printer menus 69 Lets you specify the type of paper being manually loaded Note: Envelope is the factory default setting. Lets...

User Guide
Page 78
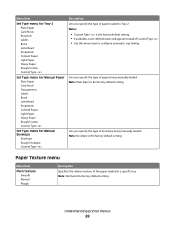
... tray) is the factory default setting. Specifies the orientation of a multiple-page sheet Note: Auto is the factory default setting. • From the Paper menu, Configure MP must be printed on the number of images and whether the images are inserted Notes: • None is the factory default setting. • Between...
... tray) is the factory default setting. Specifies the orientation of a multiple-page sheet Note: Auto is the factory default setting. • From the Paper menu, Configure MP must be printed on the number of images and whether the images are inserted Notes: • None is the factory default setting. • Between...

User Guide
Page 82
... Yes No Description Specifies whether the printer automatically performs a line feed (LF) after a carriage return (CR) control command Note: Off is not an available selection. Configures the printer to work with printer software or programs that use different source assignments for trays, drawers, and feeders Notes: • Off is the factory...
... Yes No Description Specifies whether the printer automatically performs a line feed (LF) after a carriage return (CR) control command Note: Off is not an available selection. Configures the printer to work with printer software or programs that use different source assignments for trays, drawers, and feeders Notes: • Off is the factory...

User Guide
Page 92
For instructions, print a printer settings configuration sheet. All downloads stored in RAM are deleted. Restoring the factory default settings If your printer is connected to the factory default settings except the ... advanced system support tasks, see the Networking Guide on the Software and Documentation CD and the Embedded Web Server Administrator's Guide on the Lexmark Web site at http://support.lexmark.com. Warning-Potential Damage: Restore Factory Defaults returns all printer settings to a computer by a USB or parallel cable, use the Local Printer...
For instructions, print a printer settings configuration sheet. All downloads stored in RAM are deleted. Restoring the factory default settings If your printer is connected to the factory default settings except the ... advanced system support tasks, see the Networking Guide on the Software and Documentation CD and the Embedded Web Server Administrator's Guide on the Lexmark Web site at http://support.lexmark.com. Warning-Potential Damage: Restore Factory Defaults returns all printer settings to a computer by a USB or parallel cable, use the Local Printer...
User Guide
Page 114
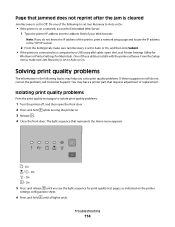
... off, and then open the Local Printer Settings Utility for Windows or Printer Settings for print quality test pages, as indicated on the printer settings configuration sheet. 6 Press and hold while turning the printer on a network, access the Embedded Web Server: 1 Type the printer IP address into the address field of...
... off, and then open the Local Printer Settings Utility for Windows or Printer Settings for print quality test pages, as indicated on the printer settings configuration sheet. 6 Press and hold while turning the printer on a network, access the Embedded Web Server: 1 Type the printer IP address into the address field of...

User Guide
Page 127
... the requirements of DHHS 21 CFR Subchapter J for Class I (1) laser products, and elsewhere is certified in the wavelength of 655-675 nanometers. ENERGY STAR Any Lexmark product bearing the ENERGY STAR emblem on the product or on a start-up screen is nominally a 7 milliwatt gallium arsenide laser operating in the U.S. The laser... there is never any human access to laser radiation above a Class I laser product conforming to comply with Environmental Protection Agency (EPA) ENERGY STAR requirements as configured when shipped by Lexmark.
... the requirements of DHHS 21 CFR Subchapter J for Class I (1) laser products, and elsewhere is certified in the wavelength of 655-675 nanometers. ENERGY STAR Any Lexmark product bearing the ENERGY STAR emblem on the product or on a start-up screen is nominally a 7 milliwatt gallium arsenide laser operating in the U.S. The laser... there is never any human access to laser radiation above a Class I laser product conforming to comply with Environmental Protection Agency (EPA) ENERGY STAR requirements as configured when shipped by Lexmark.

User Guide
Page 128
See www.lexmark.com for a print job. 12 W Power Saver The product is in order to completely stop product power consumption, disconnect the power supply cord from the ... is generating hard-copy output from electronic inputs. Power Saver This product is generating hard-copy output from hard-copy original documents. By using the configuration menus, the Power Saver Timeout can be substantially higher than the average. Setting the Power Saver Timeout to change. Mode Printing Copying Scanning Description The...
See www.lexmark.com for a print job. 12 W Power Saver The product is in order to completely stop product power consumption, disconnect the power supply cord from the ... is generating hard-copy output from electronic inputs. Power Saver This product is generating hard-copy output from hard-copy original documents. By using the configuration menus, the Power Saver Timeout can be substantially higher than the average. Setting the Power Saver Timeout to change. Mode Printing Copying Scanning Description The...

User Guide
Page 138
... 63 card stock tips 60 checking an unresponsive printer 108 cleaning exterior of the printer 83 Close front door 106 collate setting Finishing menu 67 configurations printer 11 conserving supplies 26 contacting Customer Support 123 control panel, printer 29, 36 buttons 14 lights 14 Custom Types menu 72 D Default Source menu...
... 63 card stock tips 60 checking an unresponsive printer 108 cleaning exterior of the printer 83 Close front door 106 collate setting Finishing menu 67 configurations printer 11 conserving supplies 26 contacting Customer Support 123 control panel, printer 29, 36 buttons 14 lights 14 Custom Types menu 72 D Default Source menu...


