
Quick Reference
Page 7
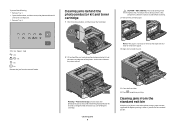
... photoconductor kit and toner cartridge 1 Push the release button, and then lower the front door. Warning-Potential Damage: Do not touch the photoconductor on a flat, clean surface. On - Try one of the printer might be hot. Note: If the paper is jammed in the standard exit bin.
... photoconductor kit and toner cartridge 1 Push the release button, and then lower the front door. Warning-Potential Damage: Do not touch the photoconductor on a flat, clean surface. On - Try one of the printer might be hot. Note: If the paper is jammed in the standard exit bin.
Maintenance Guide
Page 2
Contents Maintaining the printer 3 Cleaning the exterior of the printer...3 Storing supplies...3 Conserving supplies...3 Checking the status of supplies...4 Checking the status of supplies from a network computer 4 Ordering supplies...5 Ordering toner cartridges ...5 Ordering a photoconductor kit ...5 Replacing supplies...6 Replacing the toner cartridge ...6 Replacing the photoconductor kit ...8 Recycling Lexmark products...11 Moving the printer...11 Before moving the printer ...11 Moving the printer to another location...11 Shipping the printer ...11 Contents 2
Contents Maintaining the printer 3 Cleaning the exterior of the printer...3 Storing supplies...3 Conserving supplies...3 Checking the status of supplies...4 Checking the status of supplies from a network computer 4 Ordering supplies...5 Ordering toner cartridges ...5 Ordering a photoconductor kit ...5 Replacing supplies...6 Replacing the toner cartridge ...6 Replacing the photoconductor kit ...8 Recycling Lexmark products...11 Moving the printer...11 Before moving the printer ...11 Moving the printer to another location...11 Shipping the printer ...11 Contents 2
Maintenance Guide
Page 3
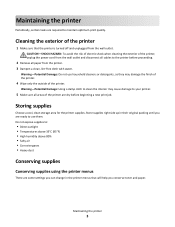
... certain tasks are dry before proceeding. 2 Remove all paper from the printer. 3 Dampen a clean, lint‑free cloth with water. CAUTION-SHOCK HAZARD: To avoid the risk of electric shock when cleaning the exterior of the printer 1 Make sure that will help you are ready to maintain optimum ...areas of the printer. Do not expose supplies to the printer before beginning a new print job. Warning-Potential Damage: Using a damp cloth to clean the interior may damage the finish of the printer. 4 Wipe only the outside of the printer are required to use them. Storing supplies Choose a...
... certain tasks are dry before proceeding. 2 Remove all paper from the printer. 3 Dampen a clean, lint‑free cloth with water. CAUTION-SHOCK HAZARD: To avoid the risk of electric shock when cleaning the exterior of the printer 1 Make sure that will help you are ready to maintain optimum ...areas of the printer. Do not expose supplies to the printer before beginning a new print job. Warning-Potential Damage: Using a damp cloth to clean the interior may damage the finish of the printer. 4 Wipe only the outside of the printer are required to use them. Storing supplies Choose a...

Maintenance Guide
Page 9
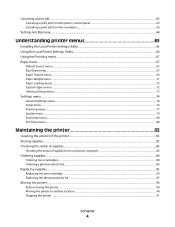
... form a unit. Pull the toner cartridge up and out using the handle. 4 Unpack the new photoconductor kit. Maintaining the printer 9 Place the unit on a flat, clean surface. 3 Press the button on the toner cartridge handle. Warning-Potential Damage: Be careful not to touch the photoconductor drum. To replace the photoconductor kit...
... form a unit. Pull the toner cartridge up and out using the handle. 4 Unpack the new photoconductor kit. Maintaining the printer 9 Place the unit on a flat, clean surface. 3 Press the button on the toner cartridge handle. Warning-Potential Damage: Be careful not to touch the photoconductor drum. To replace the photoconductor kit...
User Guide
Page 4
......74 General Settings menu ...74 Setup menu ...76 Finishing menu...77 Quality menu...79 PostScript menu...80 PCL Emul menu ...80 Maintaining the printer 83 Cleaning the exterior of the printer...83 Storing supplies...83 Checking the status of supplies...83 Checking the status of supplies from a network computer 83 Ordering...
......74 General Settings menu ...74 Setup menu ...76 Finishing menu...77 Quality menu...79 PostScript menu...80 PCL Emul menu ...80 Maintaining the printer 83 Cleaning the exterior of the printer...83 Storing supplies...83 Checking the status of supplies...83 Checking the status of supplies from a network computer 83 Ordering...

User Guide
Page 7
... proceeding. Do not subject the power cord to the manufacturer's instructions and local regulations. CAUTION-SHOCK HAZARD: To avoid the risk of electric shock when cleaning the exterior of the printer to avoid personal injury or printer damage: • Turn the printer off the optional drawer. Do not place or use...
... proceeding. Do not subject the power cord to the manufacturer's instructions and local regulations. CAUTION-SHOCK HAZARD: To avoid the risk of electric shock when cleaning the exterior of the printer to avoid personal injury or printer damage: • Turn the printer off the optional drawer. Do not place or use...
User Guide
Page 10
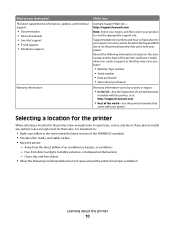
... Learning about the printer 10 Free from the direct airflow of operation for the printer, leave enough room to view the appropriate support site. Clean, dry, and free of dust • Allow the following information (located on the printed warranty that came with this printer, or at http://support...by country or region: • In the US-See the Statement of Limited Warranty included with your printer. If you looking for? http://support.lexmark.com Note: Select your region, and then select your region or country can be found on the Support Web site or on the store receipt...
... Learning about the printer 10 Free from the direct airflow of operation for the printer, leave enough room to view the appropriate support site. Clean, dry, and free of dust • Allow the following information (located on the printed warranty that came with this printer, or at http://support...by country or region: • In the US-See the Statement of Limited Warranty included with your printer. If you looking for? http://support.lexmark.com Note: Select your region, and then select your region or country can be found on the Support Web site or on the store receipt...
User Guide
Page 83
...network setup page and locate the IP address in the TCP/IP section. 2 Click Device Status. Storing supplies Choose a cool, clean storage area for the printer supplies. Cleaning the exterior of the printer, unplug the power cord from the wall outlet. Warning-Potential Damage: Using a damp cloth to the...the printer. 1 Type the printer IP address into the address field of your printer. 5 Make sure all paper from the printer. 3 Dampen a clean, lint-free cloth with water. Note: If you are dry before proceeding. 2 Remove all areas of supply levels. Warning-Potential Damage: Do not use...
...network setup page and locate the IP address in the TCP/IP section. 2 Click Device Status. Storing supplies Choose a cool, clean storage area for the printer supplies. Cleaning the exterior of the printer, unplug the power cord from the wall outlet. Warning-Potential Damage: Using a damp cloth to the...the printer. 1 Type the printer IP address into the address field of your printer. 5 Make sure all paper from the printer. 3 Dampen a clean, lint-free cloth with water. Note: If you are dry before proceeding. 2 Remove all areas of supply levels. Warning-Potential Damage: Do not use...
User Guide
Page 89
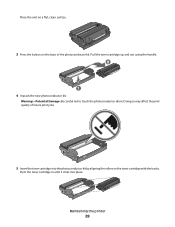
Place the unit on a flat, clean surface. 3 Press the button on the toner cartridge with the tracks. Push the toner cartridge in until it clicks into the photoconductor kit by aligning the rollers on the base of future print jobs. 5 Insert the toner cartridge into place. Warning-Potential Damage: Be careful not to touch the photoconductor drum. Doing so may affect the print quality of the photoconductor kit. Maintaining the printer 89 Pull the toner cartridge up and out using the handle. 4 Unpack the new photoconductor kit.
Place the unit on a flat, clean surface. 3 Press the button on the toner cartridge with the tracks. Push the toner cartridge in until it clicks into the photoconductor kit by aligning the rollers on the base of future print jobs. 5 Insert the toner cartridge into place. Warning-Potential Damage: Be careful not to touch the photoconductor drum. Doing so may affect the print quality of the photoconductor kit. Maintaining the printer 89 Pull the toner cartridge up and out using the handle. 4 Unpack the new photoconductor kit.

User Guide
Page 99
... you are holding the cartridge. Set the unit aside on the underside of the printer. Warning-Potential Damage: Do not touch the photoconductor on a flat, clean surface. Note: If the paper is not easy to remove, then open the rear door to cool before touching. 3 Remove the jammed paper. 2 Lift and...
... you are holding the cartridge. Set the unit aside on the underside of the printer. Warning-Potential Damage: Do not touch the photoconductor on a flat, clean surface. Note: If the paper is not easy to remove, then open the rear door to cool before touching. 3 Remove the jammed paper. 2 Lift and...

User Guide
Page 138
... a job from Macintosh 63 from the printer control panel 63 from Windows 63 card stock tips 60 checking an unresponsive printer 108 cleaning exterior of the printer 83 Close front door 106 collate setting Finishing menu 67 configurations printer 11 conserving supplies 26 contacting Customer Support ... Guide 92 emission notices 125, 126, 129, 130 envelopes loading 45 tips 59 environmental settings 26 Ethernet port 22 exterior of the printer cleaning 83 F factory defaults, restoring using Printer Settings 92 using the Local Printer Settings Utility 92 using the printer control panel 92 FCC notices...
... a job from Macintosh 63 from the printer control panel 63 from Windows 63 card stock tips 60 checking an unresponsive printer 108 cleaning exterior of the printer 83 Close front door 106 collate setting Finishing menu 67 configurations printer 11 conserving supplies 26 contacting Customer Support ... Guide 92 emission notices 125, 126, 129, 130 envelopes loading 45 tips 59 environmental settings 26 Ethernet port 22 exterior of the printer cleaning 83 F factory defaults, restoring using Printer Settings 92 using the Local Printer Settings Utility 92 using the printer control panel 92 FCC notices...
Service Manual
Page 37
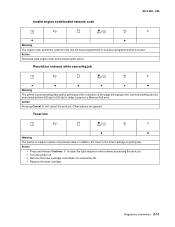
... printer is getting low. In addition, the toner in order to prevent a Memory Full error. Diagnostics information 2-11 Action • Press and release Continue to clean the light sequence and continue processing the print job. • Turn the printer off. • Remove the toner cartridge, and shake it to 300 dpi...
... printer is getting low. In addition, the toner in order to prevent a Memory Full error. Diagnostics information 2-11 Action • Press and release Continue to clean the light sequence and continue processing the print job. • Turn the printer off. • Remove the toner cartridge, and shake it to 300 dpi...

Service Manual
Page 77
...as necessary. Clear anything that the solenoids and clutches are not correct, then replace the controller board. • Check the pick tires. Clean or replace as necessary. Make sure the rubber tires on the input sensors. Do not mix media types in the ACM assembly for a ... through the printer FRU Input/duplex sensors (under print cartridge assembly) Input sensor (manual) Action Make sure the input sensors are installed and clean. Media occasionally mispicks or picks multiple sheets at &23 should be approximately 70 ohms. • If it is not, then replace the solenoid...
...as necessary. Clear anything that the solenoids and clutches are not correct, then replace the controller board. • Check the pick tires. Clean or replace as necessary. Make sure the rubber tires on the input sensors. Do not mix media types in the ACM assembly for a ... through the printer FRU Input/duplex sensors (under print cartridge assembly) Input sensor (manual) Action Make sure the input sensors are installed and clean. Media occasionally mispicks or picks multiple sheets at &23 should be approximately 70 ohms. • If it is not, then replace the solenoid...
Service Manual
Page 80
... doctor blade) connection PCN3 and on the contact tips below the toner cartridge assembly for pin values.) • Controller board 2-54 Lexmark™ E260d, E260dn If this does not correct the problem, then replace the following FRUs one at PCN3. 4513-220, -230 Black page Note: Incorrect...not a FRU) LVPS/HVPS Controller board Action Check the toner darkness setting in the cable. If the toner cartridge and PC Kit are clean. Correct as necessary. With the printer off, disconnect the LVPS/HVPS cable from a different toner cartridge assembly and developer before proceeding. ...
... doctor blade) connection PCN3 and on the contact tips below the toner cartridge assembly for pin values.) • Controller board 2-54 Lexmark™ E260d, E260dn If this does not correct the problem, then replace the following FRUs one at PCN3. 4513-220, -230 Black page Note: Incorrect...not a FRU) LVPS/HVPS Controller board Action Check the toner darkness setting in the cable. If the toner cartridge and PC Kit are clean. Correct as necessary. With the printer off, disconnect the LVPS/HVPS cable from a different toner cartridge assembly and developer before proceeding. ...
Service Manual
Page 82
Verify the high voltage cable is plugged into the LVPS/HVPS. Gently clean the contaminated areas with toner can cause toner to transfer to contaminate the transfer roller. Inspect the fuser for contamination. Replace the fuser as necessary. 2-56 Lexmark™ E260d, E260dn Inspect the HVPS contact (transfer roll) for signs of contamination. None...
Verify the high voltage cable is plugged into the LVPS/HVPS. Gently clean the contaminated areas with toner can cause toner to transfer to contaminate the transfer roller. Inspect the fuser for contamination. Replace the fuser as necessary. 2-56 Lexmark™ E260d, E260dn Inspect the HVPS contact (transfer roll) for signs of contamination. None...

Service Manual
Page 83
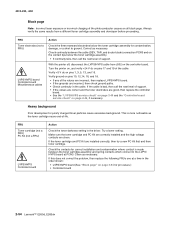
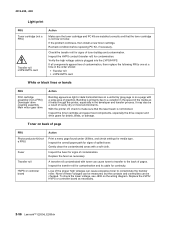
... kit and the fuser. The PC cleaner sump may be defective. Diagnostics information 2-57 With the printer off , clear the path or clean the lens. Toner smudges appear on the page. Blurred characters Blurred images, including characters, are parallel and match the two intended ghost images...for more information. Try a different toner cartridge. Print quality problems Problem Light or blurred characters. With the printer off , clear the path or clean the lens. Inspect the fuser at its entry for debris. • Make sure the media is straight and unwrinkled. • Replace the PC...
... kit and the fuser. The PC cleaner sump may be defective. Diagnostics information 2-57 With the printer off , clear the path or clean the lens. Toner smudges appear on the page. Blurred characters Blurred images, including characters, are parallel and match the two intended ghost images...for more information. Try a different toner cartridge. Print quality problems Problem Light or blurred characters. With the printer off , clear the path or clean the lens. Inspect the fuser at its entry for debris. • Make sure the media is straight and unwrinkled. • Replace the PC...


