

Quick Reference
Page 5
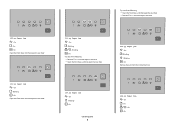
...cables are attached correctly. The light sequence for the light to come on the virtual display of the Embedded Web Server. 200.yy Paper jam Clearing jams 5 200.yy Paper jam - On • Do not load the manual feeder while the printer is printing. Wait for how to access each...front door, and then remove the photoconductor kit and toner cartridge unit. 201.yy Paper jam - On Try one of the following table lists the jam lights and messages and provides brief instructions for the light to access jam areas. Make sure the stack height does not exceed the indicated maximum height. ...
...cables are attached correctly. The light sequence for the light to come on the virtual display of the Embedded Web Server. 200.yy Paper jam Clearing jams 5 200.yy Paper jam - On • Do not load the manual feeder while the printer is printing. Wait for how to access each...front door, and then remove the photoconductor kit and toner cartridge unit. 201.yy Paper jam - On Try one of the following table lists the jam lights and messages and provides brief instructions for the light to access jam areas. Make sure the stack height does not exceed the indicated maximum height. ...
Quick Reference
Page 6
... and then open the rear door. • Remove Tray 1, and then depress the lever. 202.yy Paper jam - On - On - Blinking - Blinking - On Open the front door, and then open the rear door. 233.yy Paper jam - On - Blinking - Blinking - On - Blinking - On - On - On Open the front door..., and then open the rear door. 231.yy Paper jam - On Clearing jams 6 24x.yy Paper jam - On On - Blinking - Try one of the following : • Remove Tray 1, and then depress the lever. • Open the front...
... and then open the rear door. • Remove Tray 1, and then depress the lever. 202.yy Paper jam - On - On - Blinking - Blinking - On Open the front door, and then open the rear door. 233.yy Paper jam - On - Blinking - Blinking - On - Blinking - On - On - On Open the front door..., and then open the rear door. 231.yy Paper jam - On Clearing jams 6 24x.yy Paper jam - On On - Blinking - Try one of the following : • Remove Tray 1, and then depress the lever. • Open the front...
Quick Reference
Page 7
... unit aside on the underside of the printer. On - On Remove the jam from the standard exit bin A duplex print job was sent to cool before touching. 3 Remove the jammed paper. 251.yy Paper jam - Use the cartridge handle whenever you are holding the cartridge. On - ...On - Note: If the paper is jammed in the standard exit bin. Clearing jams behind the photoconductor kit and toner cartridge 1 Push the...
... unit aside on the underside of the printer. On - On Remove the jam from the standard exit bin A duplex print job was sent to cool before touching. 3 Remove the jammed paper. 251.yy Paper jam - Use the cartridge handle whenever you are holding the cartridge. On - ...On - Note: If the paper is jammed in the standard exit bin. Clearing jams behind the photoconductor kit and toner cartridge 1 Push the...
Quick Reference
Page 9
...manual feeder can usually be grasped and pulled straight out. For more information, see "Clearing jams behind the photoconductor kit and toner cartridge unit. Clearing jams behind the rear door If the paper is not exiting the printer: 1 Push the release button, and then lower the front ... injury from a hot component, allow the surface to cool before touching. 3 Remove the jammed paper. . 2 Pull open the rear door. 4 Close both the front and rear doors. 5 Press to continue printing. Paper jammed in the standard exit bin. To reduce the risk of the printer might be removed this...
...manual feeder can usually be grasped and pulled straight out. For more information, see "Clearing jams behind the photoconductor kit and toner cartridge unit. Clearing jams behind the rear door If the paper is not exiting the printer: 1 Push the release button, and then lower the front ... injury from a hot component, allow the surface to cool before touching. 3 Remove the jammed paper. . 2 Pull open the rear door. 4 Close both the front and rear doors. 5 Press to continue printing. Paper jammed in the standard exit bin. To reduce the risk of the printer might be removed this...
User Guide
Page 6
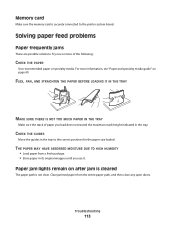
... operate correctly or quits after it is installed 112 Drawers...112 Memory card ...113 Solving paper feed problems...113 Paper frequently jams ...113 Paper jam lights remain on after jam is cleared ...113 Page that jammed does not reprint after the jam is cleared 114 Solving print quality problems...114 Isolating print quality problems...114 Blank pages...115...
... operate correctly or quits after it is installed 112 Drawers...112 Memory card ...113 Solving paper feed problems...113 Paper frequently jams ...113 Paper jam lights remain on after jam is cleared ...113 Page that jammed does not reprint after the jam is cleared 114 Solving print quality problems...114 Isolating print quality problems...114 Blank pages...115...
User Guide
Page 27
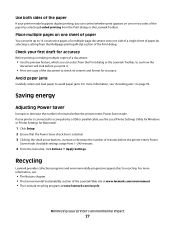
... 93. If your printer is connected to avoid paper jams. For more information, see: • The Notices chapter • The Environmental Sustainability section of the Lexmark Web site at www.lexmark.com/environment • The Lexmark recycling program at www.lexmark.com/recycle Minimizing your printer's environmental impact 27... model supports duplex printing, you can control whether print appears on one or two sides of the paper by selecting 2-sided printing from the Print dialog or the Lexmark Toolbar, to see how the document will look before you can print up to 16 consecutive pages...
... 93. If your printer is connected to avoid paper jams. For more information, see: • The Notices chapter • The Environmental Sustainability section of the Lexmark Web site at www.lexmark.com/environment • The Lexmark recycling program at www.lexmark.com/recycle Minimizing your printer's environmental impact 27... model supports duplex printing, you can control whether print appears on one or two sides of the paper by selecting 2-sided printing from the Print dialog or the Lexmark Toolbar, to see how the document will look before you can print up to 16 consecutive pages...
User Guide
Page 36
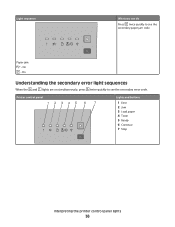
Paper jam - Printer control panel Lights and buttons 1 Error 2 Jam 3 Load paper 4 Toner 5 Ready 6 Continue 7 Stop Interpreting the printer control panel lights 36 On - On Understanding the secondary error light sequences When the and lights are on simultaneously, press twice quickly to see the secondary error code. Light sequence What you can do Press twice quickly to see the secondary paper jam code.
Paper jam - Printer control panel Lights and buttons 1 Error 2 Jam 3 Load paper 4 Toner 5 Ready 6 Continue 7 Stop Interpreting the printer control panel lights 36 On - On Understanding the secondary error light sequences When the and lights are on simultaneously, press twice quickly to see the secondary error code. Light sequence What you can do Press twice quickly to see the secondary paper jam code.
User Guide
Page 38
...your region. On - On - Cartridge region mismatch - Blinking - The printer discards any paper jam. • Press to clear the code. Blinking - On - On - Replace the toner cartridge with one that the paper you can do Press to clear the code and continue the print job. On - ...Host interface disabled - On Paper size is large enough. • Clear any print jobs previously sent. For more information...
...your region. On - On - Cartridge region mismatch - Blinking - The printer discards any paper jam. • Press to clear the code. Blinking - On - On - Replace the toner cartridge with one that the paper you can do Press to clear the code and continue the print job. On - ...Host interface disabled - On Paper size is large enough. • Clear any print jobs previously sent. For more information...
User Guide
Page 64
Setting Jam Recovery To ensure that Jam Recovery is connected to Auto or On. Printing 64 If the printer is set Jam Recovery to a computer by a USB or parallel cable, open the Local Printer Settings Utility for Windows or Printer Settings for Macintosh. 4 From the printer window, select the job to Auto or On. Under the Setup menu, ensure that a page will reprint after a paper jam, set to cancel. 5 From the icon bar at the top of the window, click the Delete icon.
Setting Jam Recovery To ensure that Jam Recovery is connected to Auto or On. Printing 64 If the printer is set Jam Recovery to a computer by a USB or parallel cable, open the Local Printer Settings Utility for Windows or Printer Settings for Macintosh. 4 From the printer window, select the job to Auto or On. Under the Setup menu, ensure that a page will reprint after a paper jam, set to cancel. 5 From the icon bar at the top of the window, click the Delete icon.
User Guide
Page 94
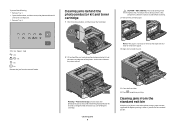
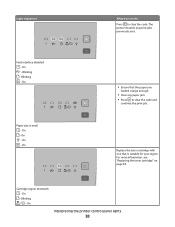
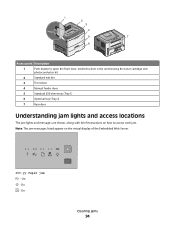
On - Access point Description 1 Push button to access each jam. On - Note: The jam messages listed appear on how to open the front door. On Clearing jams 94 Inside this door is the unit housing the toner cartridge and photoconductor kit. 2 Standard exit bin 3 Front door 4 Manual feeder door 5 Standard 250-sheet tray (Tray 1) 6 Optional tray (Tray 2) 7 Rear door Understanding jam lights and access locations The jam lights and messages are shown, along with brief instructions on the virtual display of the Embedded Web Server. 200.yy Paper jam -
On - Access point Description 1 Push button to access each jam. On - Note: The jam messages listed appear on how to open the front door. On Clearing jams 94 Inside this door is the unit housing the toner cartridge and photoconductor kit. 2 Standard exit bin 3 Front door 4 Manual feeder door 5 Standard 250-sheet tray (Tray 1) 6 Optional tray (Tray 2) 7 Rear door Understanding jam lights and access locations The jam lights and messages are shown, along with brief instructions on the virtual display of the Embedded Web Server. 200.yy Paper jam -
User Guide
Page 95
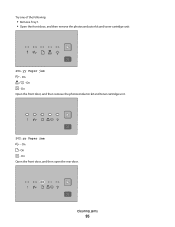
Try one of the following: • Remove Tray 1. • Open the front door, and then remove the photoconductor kit and toner cartridge unit. 201.yy Paper jam - On - On - On Open the front door, and then remove the photoconductor kit and toner cartridge unit. 202.yy Paper jam - On Open the front door, and then open the rear door. On - Clearing jams 95 On -
Try one of the following: • Remove Tray 1. • Open the front door, and then remove the photoconductor kit and toner cartridge unit. 201.yy Paper jam - On - On - On Open the front door, and then remove the photoconductor kit and toner cartridge unit. 202.yy Paper jam - On Open the front door, and then open the rear door. On - Clearing jams 95 On -

User Guide
Page 96
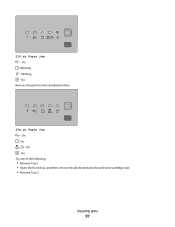
On - On - Clearing jams 96 On Open the front door, and then open the rear door. • Remove Tray 1, and then depress the lever. On Try one of the following : • Remove Tray 1, and then depress the lever. • Open the front door, and then open the rear door. 234.yy Paper jam - 231.yy Paper jam - Blinking - On Try one of the following : • Open the front door, and then open the rear door. 233.yy Paper jam - Blinking - Blinking - On - Blinking -
On - On - Clearing jams 96 On Open the front door, and then open the rear door. • Remove Tray 1, and then depress the lever. On Try one of the following : • Remove Tray 1, and then depress the lever. • Open the front door, and then open the rear door. 234.yy Paper jam - 231.yy Paper jam - Blinking - On Try one of the following : • Open the front door, and then open the rear door. 233.yy Paper jam - Blinking - Blinking - On - Blinking -
User Guide
Page 97
On Remove the jam from the standard exit bin. 24x.yy Paper jam - Clearing jams 97 Blinking - On Try one of the following: • Remove Tray 1. • Open the front door, and then remove the photoconductor kit and toner cartridge unit. • Remove Tray 2. On - Blinking - On - On - On - 235.yy Paper jam -
On Remove the jam from the standard exit bin. 24x.yy Paper jam - Clearing jams 97 Blinking - On Try one of the following: • Remove Tray 1. • Open the front door, and then remove the photoconductor kit and toner cartridge unit. • Remove Tray 2. On - Blinking - On - On - On - 235.yy Paper jam -

User Guide
Page 98
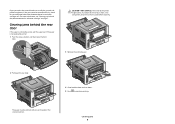
On Remove the jam from the manual feeder. Clearing jams behind the photoconductor kit and toner cartridge 1 Push the release button, and then lower the front door. On - On - On - Clearing jams 98 251.yy Paper jam -
On Remove the jam from the manual feeder. Clearing jams behind the photoconductor kit and toner cartridge 1 Push the release button, and then lower the front door. On - On - On - Clearing jams 98 251.yy Paper jam -
User Guide
Page 103
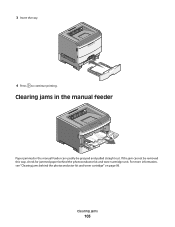
3 Insert the tray. 4 Press to continue printing. Clearing jams 103 For more information, see "Clearing jams behind the photoconductor kit and toner cartridge unit. If the jam cannot be grasped and pulled straight out. Clearing jams in the manual feeder Paper jammed in the manual feeder can usually be removed this way, check for jammed paper behind the photoconductor kit and toner cartridge" on page 98.
3 Insert the tray. 4 Press to continue printing. Clearing jams 103 For more information, see "Clearing jams behind the photoconductor kit and toner cartridge unit. If the jam cannot be grasped and pulled straight out. Clearing jams in the manual feeder Paper jammed in the manual feeder can usually be removed this way, check for jammed paper behind the photoconductor kit and toner cartridge" on page 98.

User Guide
Page 112
... or quits after it is not listed, reinstall it. Try one or more of the following : RESET THE PRINTER Turn the printer off, wait for paper jams or misfeeds. 3 Make sure the guides are possible solutions. RESET THE PRINTER Turn the printer off . 2 Unplug the printer from the wall outlet. 3 Check the... the program you are possible solutions. Mac OS 9 users should make sure the printer is listed in the Chooser. Try one or more of the paper. 4 Insert the tray. MAKE SURE THE OPTION IS INSTALLED Print a menu settings page and check to see if the option is set up in the...
... or quits after it is not listed, reinstall it. Try one or more of the following : RESET THE PRINTER Turn the printer off, wait for paper jams or misfeeds. 3 Make sure the guides are possible solutions. RESET THE PRINTER Turn the printer off . 2 Unplug the printer from the wall outlet. 3 Check the... the program you are possible solutions. Mac OS 9 users should make sure the printer is listed in the Chooser. Try one or more of the paper. 4 Insert the tray. MAKE SURE THE OPTION IS INSTALLED Print a menu settings page and check to see if the option is set up in the...
User Guide
Page 113
...is not clear. Clear jammed paper from a fresh package. • Store paper in the tray to the printer system board. For more of paper you use it. Paper jam lights remain on page 49. THE PAPER MAY HAVE ABSORBED MOISTURE DUE TO HIGH HUMIDITY • Load paper from the entire paper path, and then ...close any open doors. FLEX, FAN, AND STRAIGHTEN THE PAPER BEFORE LOADING IT IN THE TRAY...
...is not clear. Clear jammed paper from a fresh package. • Store paper in the tray to the printer system board. For more of paper you use it. Paper jam lights remain on page 49. THE PAPER MAY HAVE ABSORBED MOISTURE DUE TO HIGH HUMIDITY • Load paper from the entire paper path, and then ...close any open doors. FLEX, FAN, AND STRAIGHTEN THE PAPER BEFORE LOADING IT IN THE TRAY...

User Guide
Page 138
... 100 250-sheet drawer installing 19 251 paper jams, clearing from manual feeder 103 2-sided printing... 108 88 Replace toner 108 A attaching cables 22 B booklet printing 61 both sides of paper (duplexing) printing manually 56 C cables Ethernet 22 parallel 22 USB 22 calling Customer Support ...jam recovery setting 64 jams accessing jam areas 93 avoiding 93 jams, clearing 200 98, 100 201 98, 100 233 102 behind photoconductor kit and toner cartridge unit 98 behind the rear door 104 from manual feeder 103 from standard exit bin 100 from standard tray 100 from Tray 1 100 from Tray 2 102 L labels, paper...
... 100 250-sheet drawer installing 19 251 paper jams, clearing from manual feeder 103 2-sided printing... 108 88 Replace toner 108 A attaching cables 22 B booklet printing 61 both sides of paper (duplexing) printing manually 56 C cables Ethernet 22 parallel 22 USB 22 calling Customer Support ...jam recovery setting 64 jams accessing jam areas 93 avoiding 93 jams, clearing 200 98, 100 201 98, 100 233 102 behind photoconductor kit and toner cartridge unit 98 behind the rear door 104 from manual feeder 103 from standard exit bin 100 from standard tray 100 from Tray 1 100 from Tray 2 102 L labels, paper...
User Guide
Page 139
... storing 51 unacceptable 50 Universal Paper Size 73 Universal size setting 40 paper capacities manual feeder 49 trays 49 paper feed troubleshooting lights remain on after jam is cleared 113 page that jammed does not reprint 114 paper jam light sequences 94 messages 94 paper jams accessing jam areas 93 avoiding 93 locating 94 Index 139 paper jams, clearing 200 98, 100...
... storing 51 unacceptable 50 Universal Paper Size 73 Universal size setting 40 paper capacities manual feeder 49 trays 49 paper feed troubleshooting lights remain on after jam is cleared 113 page that jammed does not reprint 114 paper jam light sequences 94 messages 94 paper jams accessing jam areas 93 avoiding 93 locating 94 Index 139 paper jams, clearing 200 98, 100...
User Guide
Page 140
... quality test pages 62, 114 publications, finding 9 Q Quality menu 79 R recycled paper using 26 recycling Lexmark packaging 28 Lexmark products 28 toner cartridges 28 WEEE statement 126 Remove paper from standard output bin 107 replacing photoconductor kit 87 toner cartridge 85 reprint page after paper jam 64 S safety information 7, 8 separator sheet setting Finishing menu 67 setting...
... quality test pages 62, 114 publications, finding 9 Q Quality menu 79 R recycled paper using 26 recycling Lexmark packaging 28 Lexmark products 28 toner cartridges 28 WEEE statement 126 Remove paper from standard output bin 107 replacing photoconductor kit 87 toner cartridge 85 reprint page after paper jam 64 S safety information 7, 8 separator sheet setting Finishing menu 67 setting...


